42XR5/50XR6/60XR5 spec sheet
Page 1
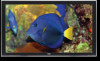
... control allowing flexibility with traditional filter technologies. ° Enhanced Motion Adaptive 3D Scan Conversion provides error free interpolation for moving video resulting in product reliability and service according to Pacific Media Associates 2005 Annual Resellers Survey. ° Low Power Consumption due to fit seamlessly into your image is setup properly for all viewing conditions. ° Color Tune Technology allows you to adjust individual colors without affecting white...
... control allowing flexibility with traditional filter technologies. ° Enhanced Motion Adaptive 3D Scan Conversion provides error free interpolation for moving video resulting in product reliability and service according to Pacific Media Associates 2005 Annual Resellers Survey. ° Low Power Consumption due to fit seamlessly into your image is setup properly for all viewing conditions. ° Color Tune Technology allows you to adjust individual colors without affecting white...
42XR5/50XR6/60XR5 spec sheet
Page 2
... Resolution 42XR5 XGA 1024 x 768 50XR6/ 60XR5 WXGA 1365 x 768 Pixel Pitch 42XR5 0.900/.671 mm 50XR6 0.81 mm square 60XR5 0.97 mm square Color Processing 1.07 billion colors, 1024 levels Viewing Angle 160° Filter Type Anti-reflective SIGNAL COMPATIBILITY/CONNNECTIVITY Scan Rate Supported Video Standards SD/HD Video Signal Compatibility PC Signal Compatibility Macintosh Compatibility Input/Output Terminals Audio External Control ELECTRICAL Horizontal 29.5 to 80.0 kHz auto, point scan Vertical...
... Resolution 42XR5 XGA 1024 x 768 50XR6/ 60XR5 WXGA 1365 x 768 Pixel Pitch 42XR5 0.900/.671 mm 50XR6 0.81 mm square 60XR5 0.97 mm square Color Processing 1.07 billion colors, 1024 levels Viewing Angle 160° Filter Type Anti-reflective SIGNAL COMPATIBILITY/CONNNECTIVITY Scan Rate Supported Video Standards SD/HD Video Signal Compatibility PC Signal Compatibility Macintosh Compatibility Input/Output Terminals Audio External Control ELECTRICAL Horizontal 29.5 to 80.0 kHz auto, point scan Vertical...
42XR5/50XR5/60XR5 speaker manual
Page 2
... is used properly and safely, a number of sound distortion occur, as doing so might result in fire or damage to the product. If this happens, place the speakers at a level exceeding maximum input. ÷ When connecting this could in turn might result in damage to the cords and this symbol indicate items containing instructions which must be sure the power...
... is used properly and safely, a number of sound distortion occur, as doing so might result in fire or damage to the product. If this happens, place the speakers at a level exceeding maximum input. ÷ When connecting this could in turn might result in damage to the cords and this symbol indicate items containing instructions which must be sure the power...
42XR5/50XR5/60XR5 speaker manual
Page 5
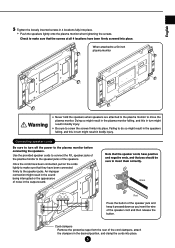
... Remove the protective tape from the rear of the speaker cord and then release the button. Doing so might result in the sound being interrupted or the appearance of the speakers. An improper connection might result in the plasma monitor falling, and this in turn off the power to the speaker jacks. English 5 Tighten the loosely inserted screws in 4 locations fully into place. Use the provided speaker cords...
... Remove the protective tape from the rear of the speaker cord and then release the button. Doing so might result in the sound being interrupted or the appearance of the speakers. An improper connection might result in the plasma monitor falling, and this in turn off the power to the speaker jacks. English 5 Tighten the loosely inserted screws in 4 locations fully into place. Use the provided speaker cords...
42XR5/50XR5/60XR5 speaker manual
Page 7
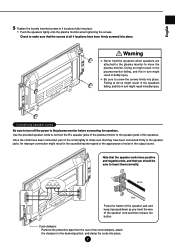
.... Black Red Press the button of the speaker cord and then release the button. Doing so might result in the plasma monitor falling, and this in turn might result in bodily injury. ¶ Be sure to the plasma monitor before connecting the speakers. Cord clampers Remove the protective tape from the rear of noise in turn off the power to screw the screws firmly into place. ∗ Push the speakers lightly onto...
.... Black Red Press the button of the speaker cord and then release the button. Doing so might result in the plasma monitor falling, and this in turn might result in bodily injury. ¶ Be sure to the plasma monitor before connecting the speakers. Cord clampers Remove the protective tape from the rear of noise in turn off the power to screw the screws firmly into place. ∗ Push the speakers lightly onto...
42XR5/50XR6/60XR5 UM
Page 4
... yourself, or children, by qualified service personnel when: A. Wall Mounting - The appliance should be sure the antenna system is grounded so as vases, shall be placed on or pinched particularly at plugs, convenience receptacles, and the point where they exit from power lines. 20. Power Lines - Outdoor Antenna Grounding - If an outside antenna is connected to the receiver, be taken so that no...
... yourself, or children, by qualified service personnel when: A. Wall Mounting - The appliance should be sure the antenna system is grounded so as vases, shall be placed on or pinched particularly at plugs, convenience receptacles, and the point where they exit from power lines. 20. Power Lines - Outdoor Antenna Grounding - If an outside antenna is connected to the receiver, be taken so that no...
42XR5/50XR6/60XR5 UM
Page 5
... received video signals. Do not attempt to a cooler location, and wait for service. 2. To avoid sulfurization it and do not produce light or remain lit. Certain operating conditions, such as possible without impairing image readability. * Display an image with a computer input source. * Display a moving vehicle, as alcohol or thinner to clean these pixels emit light according to the power cord, and do not place any part...
... received video signals. Do not attempt to a cooler location, and wait for service. 2. To avoid sulfurization it and do not produce light or remain lit. Certain operating conditions, such as possible without impairing image readability. * Display an image with a computer input source. * Display a moving vehicle, as alcohol or thinner to clean these pixels emit light according to the power cord, and do not place any part...
42XR5/50XR6/60XR5 UM
Page 6
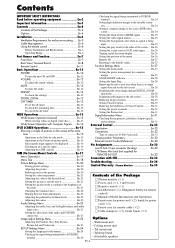
...-4 Installation En-5 Ventilation Requirements for remote control) Ⅺ Manuals (Model Information and Operation) Adjusting the colors En-22 Audio Settings Menu En-23 Adjusting the treble, bass and left/right balance and audio input select En-23 Setting the allocation of the screen ... En-26 Setting the screen size for REMOTE IN/OUT En-32 Connection with Computer Signals ..... En-5 Cable Management En-6 Using the remote control En-6 Battery Installation and Replacement En-6 Operating Range En-6 Part Names...
...-4 Installation En-5 Ventilation Requirements for remote control) Ⅺ Manuals (Model Information and Operation) Adjusting the colors En-22 Audio Settings Menu En-23 Adjusting the treble, bass and left/right balance and audio input select En-23 Setting the allocation of the screen ... En-26 Setting the screen size for REMOTE IN/OUT En-32 Connection with Computer Signals ..... En-5 Cable Management En-6 Using the remote control En-6 Battery Installation and Replacement En-6 Operating Range En-6 Part Names...
42XR5/50XR6/60XR5 UM
Page 10
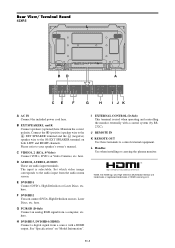
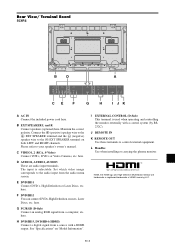
... to control external equipment. F DVD/HD2 You can connect DVDs, High Definition sources, Laser Discs, etc. L Handles Use when installing or carrying the plasma monitor. En-8 here. HDMI, the HDMI logo and High-Definition Multimedia Interface are audio input terminals. Set which video image corresponds to the EXT SPEAKER terminal on "Model Information". See "Specifications" on both LEFT and RIGHT channels. G PC/RGB (D-Sub) Connect an analog RGB signal from the audio menu screen. J REMOTE IN K REMOTE OUT Use...
... to control external equipment. F DVD/HD2 You can connect DVDs, High Definition sources, Laser Discs, etc. L Handles Use when installing or carrying the plasma monitor. En-8 here. HDMI, the HDMI logo and High-Definition Multimedia Interface are audio input terminals. Set which video image corresponds to the EXT SPEAKER terminal on "Model Information". See "Specifications" on both LEFT and RIGHT channels. G PC/RGB (D-Sub) Connect an analog RGB signal from the audio menu screen. J REMOTE IN K REMOTE OUT Use...
42XR5/50XR6/60XR5 UM
Page 11
... signal from the audio menu screen. H DVD/HD3, DVD/HD4 (HDMI) Connect a digital signal from a source with a control system (by RS232C). L Handles Use when installing or carrying the plasma monitor. Connect the (positive) speaker wire to the EXT SPEAKER terminal and the (negative) speaker wire to control external equipment. Rear View/ Terminal Board 50XR6 L VIDEO AUDIO1 L/R DVD/HD1 AUDIO2 Y Cb/Pb Cr/Pr L/R DVD/HD2 Y Cb/Pb Cr/Pr PC/RGB AUDIO 3 L/R DVD/HD3 DVD/HD4 EXTERNAL CONTROL REMOTE IN OUT B D A VIDEO 1 AUDIO1 R DVD/HD1 AUDIO2 R DVD...
... signal from the audio menu screen. H DVD/HD3, DVD/HD4 (HDMI) Connect a digital signal from a source with a control system (by RS232C). L Handles Use when installing or carrying the plasma monitor. Connect the (positive) speaker wire to the EXT SPEAKER terminal and the (negative) speaker wire to control external equipment. Rear View/ Terminal Board 50XR6 L VIDEO AUDIO1 L/R DVD/HD1 AUDIO2 Y Cb/Pb Cr/Pr L/R DVD/HD2 Y Cb/Pb Cr/Pr PC/RGB AUDIO 3 L/R DVD/HD3 DVD/HD4 EXTERNAL CONTROL REMOTE IN OUT B D A VIDEO 1 AUDIO1 R DVD/HD1 AUDIO2 R DVD...

42XR5/50XR6/60XR5 UM
Page 12
.... J REMOTE IN K REMOTE OUT Use these terminals to your speaker's owner's manual. here. The input is used when operating and controlling the monitor externally with a HDMI output. G PC/RGB (D-Sub) Connect an analog RGB signal from the audio menu screen. See "Specifications" on both LEFT and RIGHT channels. F DVD/HD2 You can connect DVDs, High Definition sources, Laser Discs, etc. I JK A AC IN Connect the included power cord here. Set which video image corresponds to the EXT SPEAKER terminal on "Model Information...
.... J REMOTE IN K REMOTE OUT Use these terminals to your speaker's owner's manual. here. The input is used when operating and controlling the monitor externally with a HDMI output. G PC/RGB (D-Sub) Connect an analog RGB signal from the audio menu screen. See "Specifications" on both LEFT and RIGHT channels. F DVD/HD2 You can connect DVDs, High Definition sources, Laser Discs, etc. I JK A AC IN Connect the included power cord here. Set which video image corresponds to the EXT SPEAKER terminal on "Model Information...
42XR5/50XR6/60XR5 UM
Page 22
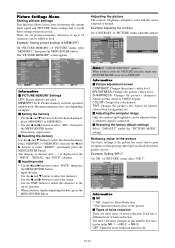
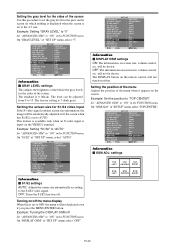
..., and "-" is not set to each. Use the ᮤ and ᮣ buttons to 6: Picture memory with the specified number used . Example: Adjusting the contrast On "CONTRAST" of VIDEO display. Information Ⅵ Picture adjustment screen CONTRAST: Changes the picture's white level. Adjusts picture detail of "PICTURE" menu, adjust the contrast. PICTURE PICTURE MEMORY : OFF CONTRAST : 52 BRIGHTNESS : 32 SHARPNESS : 16 COLOR : 32 TINT R G : 32 NR : OFF COLOR TEMP. : MIDDLE NR CINEMA MODE : ON PICTURE MODE : NORMAL GAMMA : 2.2 LOW...
..., and "-" is not set to each. Use the ᮤ and ᮣ buttons to 6: Picture memory with the specified number used . Example: Adjusting the contrast On "CONTRAST" of VIDEO display. Information Ⅵ Picture adjustment screen CONTRAST: Changes the picture's white level. Adjusts picture detail of "PICTURE" menu, adjust the contrast. PICTURE PICTURE MEMORY : OFF CONTRAST : 52 BRIGHTNESS : 32 SHARPNESS : 16 COLOR : 32 TINT R G : 32 NR : OFF COLOR TEMP. : MIDDLE NR CINEMA MODE : ON PICTURE MODE : NORMAL GAMMA : 2.2 LOW...

42XR5/50XR6/60XR5 UM
Page 23
... "PICTURE" menu, select "HIGH", then press the MENU/ENTER button. HIGH GAIN RED GAIN GREEN GAIN BLUE BIAS RED BIAS GREEN BIAS BLUE RESET : OFF SEL. For a darker image, select THEATER2. This mode provides dynamic pictures with distinct differences between light and dark sections. DEFAULT: Use this procedure to adjust the white balance for black level RESET: Resets settings to select "ON", then press the MENU/ENTER button. Ⅵ Restoring the factory default settings Select "RESET" under the WHITE BALANCE menu...
... "PICTURE" menu, select "HIGH", then press the MENU/ENTER button. HIGH GAIN RED GAIN GREEN GAIN BLUE BIAS RED BIAS GREEN BIAS BLUE RESET : OFF SEL. For a darker image, select THEATER2. This mode provides dynamic pictures with distinct differences between light and dark sections. DEFAULT: Use this procedure to adjust the white balance for black level RESET: Resets settings to select "ON", then press the MENU/ENTER button. Ⅵ Restoring the factory default settings Select "RESET" under the WHITE BALANCE menu...
42XR5/50XR6/60XR5 UM
Page 25
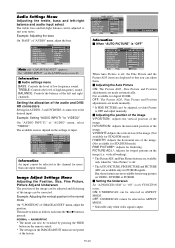
... Ⅵ Audio settings menu BASS: Controls the level of "AUDIO" menu, select "VIDEO2". Example: Setting "AUDIO INPUT1" to OFF and adjust manually. Ⅵ Adjusting the position of the image V-POSITION: Adjusts the vertical position of input. The mode switches as the channel for striped patterns on the IMAGE ADJUST menu are available only when the "Auto Picture" is "OFF" IMAGE ADJUST ASPECT MODE : ANAMORPHIC V- P O S I T I G H T : 0 H-WIDTH : 0 AUTO PICTURE : OFF FINE PICTURE : 0 PICTURE ADJ. : 0 UNDERSCAN : OFF SEL. VIDEO1 DVD/HD1 PC/RGB HDMI HDMI EXIT RETURN...
... Ⅵ Audio settings menu BASS: Controls the level of "AUDIO" menu, select "VIDEO2". Example: Setting "AUDIO INPUT1" to OFF and adjust manually. Ⅵ Adjusting the position of the image V-POSITION: Adjusts the vertical position of input. The mode switches as the channel for striped patterns on the IMAGE ADJUST menu are available only when the "Auto Picture" is "OFF" IMAGE ADJUST ASPECT MODE : ANAMORPHIC V- P O S I T I G H T : 0 H-WIDTH : 0 AUTO PICTURE : OFF FINE PICTURE : 0 PICTURE ADJ. : 0 UNDERSCAN : OFF SEL. VIDEO1 DVD/HD1 PC/RGB HDMI HDMI EXIT RETURN...
42XR5/50XR6/60XR5 UM
Page 28
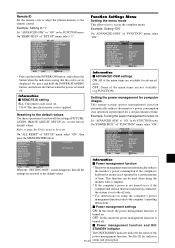
... SELECT : AUTO HDMI SET UP : HIGH COLOR SYSTEM : AUTO BACK GROUND : GRAY GRAY LEVEL : 3 S1/S2 : AUTO DISPLAY OSM : ON OSM ADJ. : TOP LEFT REMOTE ID : ALL ALL RESET : OFF SEL. will not displayed even if you press the MENU/ENTER button. Setting the position of the menu Adjusts the position of the menu when it appears on screen size, volume control, etc. SET UP LANGUAGE : ENGLISH DVD/HD1 INPUT : COMPONENT D-SUB INPUT : RGB...
... SELECT : AUTO HDMI SET UP : HIGH COLOR SYSTEM : AUTO BACK GROUND : GRAY GRAY LEVEL : 3 S1/S2 : AUTO DISPLAY OSM : ON OSM ADJ. : TOP LEFT REMOTE ID : ALL ALL RESET : OFF SEL. will not displayed even if you press the MENU/ENTER button. Setting the position of the menu Adjusts the position of the menu when it appears on screen size, volume control, etc. SET UP LANGUAGE : ENGLISH DVD/HD1 INPUT : COMPONENT D-SUB INPUT : RGB...
42XR5/50XR6/60XR5 UM
Page 29
... a certain amount of time. SET UP LANGUAGE : ENGLISH DVD/HD1 INPUT : COMPONENT D-SUB INPUT : RGB HD SELECT : 1080I RGB SELECT : AUTO HDMI SET UP : HIGH COLOR SYSTEM : AUTO BACK GROUND : GRAY GRAY LEVEL : 3 S1/S2 : OFF DISPLAY OSM : ON OSM ADJ. : TOP LEFT REMOTE ID : ALL ALL RESET : ON SEL. EXIT RETURN ALL RESET SETTING NOW When the "SETTING NOW" screen disappears, then all the settings (PICTURE, AUDIO, IMAGE ADJUST, SET UP, etc...
... a certain amount of time. SET UP LANGUAGE : ENGLISH DVD/HD1 INPUT : COMPONENT D-SUB INPUT : RGB HD SELECT : 1080I RGB SELECT : AUTO HDMI SET UP : HIGH COLOR SYSTEM : AUTO BACK GROUND : GRAY GRAY LEVEL : 3 S1/S2 : OFF DISPLAY OSM : ON OSM ADJ. : TOP LEFT REMOTE ID : ALL ALL RESET : ON SEL. EXIT RETURN ALL RESET SETTING NOW When the "SETTING NOW" screen disappears, then all the settings (PICTURE, AUDIO, IMAGE ADJUST, SET UP, etc...
42XR5/50XR6/60XR5 UM
Page 30
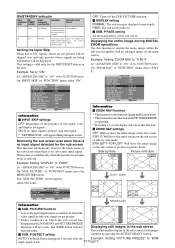
... a 2-screen display will not work. Example: Set to "ON" Set "ADVANCED OSM" to display the entire image within the sub screen together with an enlarged image on the main screen. PICTURE function. Ⅵ DISPLAY setting NORMAL: The sub screen is lost. On "ZOOM NAV" of "FUNCTION" menu, select "ON". PICTURE ZOOM NAV : S BY S PICTURE FREEZE : S BY S1 PDP SAVER : MANUAL CLOSED CAPTION : OFF CAPTION CONT : LOW PWR. Horizontal and vertical Picture already on On Green...
... a 2-screen display will not work. Example: Set to "ON" Set "ADVANCED OSM" to display the entire image within the sub screen together with an enlarged image on the main screen. PICTURE function. Ⅵ DISPLAY setting NORMAL: The sub screen is lost. On "ZOOM NAV" of "FUNCTION" menu, select "ON". PICTURE ZOOM NAV : S BY S PICTURE FREEZE : S BY S1 PDP SAVER : MANUAL CLOSED CAPTION : OFF CAPTION CONT : LOW PWR. Horizontal and vertical Picture already on On Green...

42XR5/50XR6/60XR5 UM
Page 33
..., the text screen will appear on mode This function sets the input mode and the sound volume at the time the power is weak. 3. A closed caption signal may not be displayed. Reducing the brightness of Closed Caption Use this setting when connecting a device which uses special protocol for details of input signals, and resolution Use this function to "MULTI ", then press the MENU/ENTER button. PICTURE IN PICTURE PWR. EXIT RETURN Ⅵ VOLUME settings LAST: Last mode (the volume that was...
..., the text screen will appear on mode This function sets the input mode and the sound volume at the time the power is weak. 3. A closed caption signal may not be displayed. Reducing the brightness of Closed Caption Use this setting when connecting a device which uses special protocol for details of input signals, and resolution Use this function to "MULTI ", then press the MENU/ENTER button. PICTURE IN PICTURE PWR. EXIT RETURN Ⅵ VOLUME settings LAST: Last mode (the volume that was...
42XR5/50XR6/60XR5 UM
Page 36
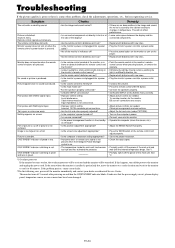
... the standby or off ? • Are the remote control's batteries worn out? • Replace both batteries with new ones. • Plug the monitor's power cord into a power outlet. • Increase the volume. • Press the remote control's MUTE button. • Connect the speakers properly. • Set AUDIO INPUT on the AUDIO menu correctly. • Adjust picture control as needed . Picture is blinking in green and red, or green. • Is the remote control pointed at the monitor's remote control sensor when pressing buttons, or remove the...
... the standby or off ? • Are the remote control's batteries worn out? • Replace both batteries with new ones. • Plug the monitor's power cord into a power outlet. • Increase the volume. • Press the remote control's MUTE button. • Connect the speakers properly. • Set AUDIO INPUT on the AUDIO menu correctly. • Adjust picture control as needed . Picture is blinking in green and red, or green. • Is the remote control pointed at the monitor's remote control sensor when pressing buttons, or remove the...
42XR5/50XR6/60XR5 UM
Page 37
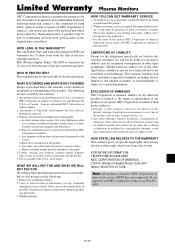
... purchase. EXCLUSION OF DAMAGES NEC Corporation of user controls. Any other warranties expressed or implied, including, but we will not pay for (1) one year from whom the product was purchased. 3. Burns or residual images upon inconvenience, loss of use of the product, loss of initial technical adjustments (set forth in connection with the product. Costs of time, commercial loss; or 2. FOR...
... purchase. EXCLUSION OF DAMAGES NEC Corporation of user controls. Any other warranties expressed or implied, including, but we will not pay for (1) one year from whom the product was purchased. 3. Burns or residual images upon inconvenience, loss of use of the product, loss of initial technical adjustments (set forth in connection with the product. Costs of time, commercial loss; or 2. FOR...


