
42XM2/50XM3/61XM2
Page 6
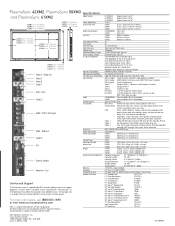
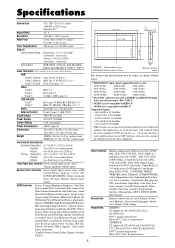
..., display, off , BNC Input, D-sub Input, RGB select, HD select, Input Skip, All Reset Option 2 Pwr. Contrast, brightness, sharpness, color, tint, color temperature, white balance, picture mode, noise reduction, gamma, low tone and color tune Audio - bass, treble, balance and audio input Image Adjust - Plug & Play Power Requirements Power Consumption Standby Power Dimensions (WxHxD) without base Weight Environmental Considerations Warranty Regulatory Included Accessories Optional Accessories PX-61XM2A Diagonal Screen Size 61" PX-50XM3A Diagonal Screen Size 50" PX-42XM2A...
..., display, off , BNC Input, D-sub Input, RGB select, HD select, Input Skip, All Reset Option 2 Pwr. Contrast, brightness, sharpness, color, tint, color temperature, white balance, picture mode, noise reduction, gamma, low tone and color tune Audio - bass, treble, balance and audio input Image Adjust - Plug & Play Power Requirements Power Consumption Standby Power Dimensions (WxHxD) without base Weight Environmental Considerations Warranty Regulatory Included Accessories Optional Accessories PX-61XM2A Diagonal Screen Size 61" PX-50XM3A Diagonal Screen Size 50" PX-42XM2A...
42VP4/42XM2/50XM3/61XM2
Page 2
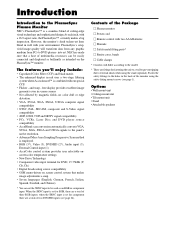
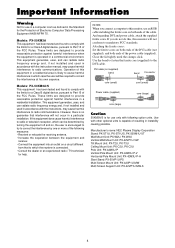
... two DVD/HD inputs (see page 1). Options • Wall mount unit • Ceiling mount unit • Tilt mount unit • Stand • Attachable speakers into art. NEC has made sure that makes image adjustments a snap • Seven languages (English, German, French, Italian, Spanish, Swedish, and Chinese) * You can be used as intended on screen control system that a host of the Package Ⅺ Plasma monitor Ⅺ Power cord Ⅺ Remote control...
... two DVD/HD inputs (see page 1). Options • Wall mount unit • Ceiling mount unit • Tilt mount unit • Stand • Attachable speakers into art. NEC has made sure that makes image adjustments a snap • Seven languages (English, German, French, Italian, Spanish, Swedish, and Chinese) * You can be used as intended on screen control system that a host of the Package Ⅺ Plasma monitor Ⅺ Power cord Ⅺ Remote control...
42VP4/42XM2/50XM3/61XM2
Page 3
... REMOVE COVER. NO USER-SERVICEABLE PARTS INSIDE. Please see the section "Plasma monitor cleaning procedure" on the next page. The plasma display panel consists of electric shock. 7. If you install the unit in a closed cabinet or shelves. If the monitor becomes too hot, the overheat protector will be activated and the monitor will be turned off the power to cool the monitor. Refer all service to service or repair...
... REMOVE COVER. NO USER-SERVICEABLE PARTS INSIDE. Please see the section "Plasma monitor cleaning procedure" on the next page. The plasma display panel consists of electric shock. 7. If you install the unit in a closed cabinet or shelves. If the monitor becomes too hot, the overheat protector will be activated and the monitor will be turned off the power to cool the monitor. Refer all service to service or repair...
42VP4/42XM2/50XM3/61XM2
Page 7
... signal ........ 31 Option3 Settings Menu 32 Using the timer 32 Setting the power on mode 33 Enabling/disabling the front panel controls 34 Enabling/disabling remote control wireless transmission 34 Loop Out setting 35 ID number setting 35 Video Wall setting 36 Advanced OSM Settings Menu 39 Setting the menu mode 39 Language Settings Menu 40 Setting the language for the menus 40 Color System Settings Menu 40 Setting the video signal format 40 Source Information Menu 40 Checking the frequencies, polarities of input signals, and resolution 40 External Control 41 Troubleshooting...
... signal ........ 31 Option3 Settings Menu 32 Using the timer 32 Setting the power on mode 33 Enabling/disabling the front panel controls 34 Enabling/disabling remote control wireless transmission 34 Loop Out setting 35 ID number setting 35 Video Wall setting 36 Advanced OSM Settings Menu 39 Setting the menu mode 39 Language Settings Menu 40 Setting the language for the menus 40 Color System Settings Menu 40 Setting the video signal format 40 Source Information Menu 40 Checking the frequencies, polarities of input signals, and resolution 40 External Control 41 Troubleshooting...
42VP4/42XM2/50XM3/61XM2
Page 10
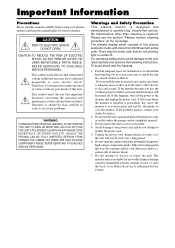
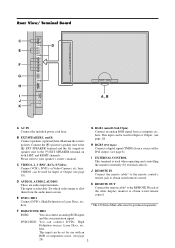
.../Pr VD Cb/Pb HD Y Cr/Pr R Y VIDEO 1 ( I N / OUT) AUDIO 3 R B/ G/ R/ R RGB 3 RGB2 / DVD2 / HD2 AUDIO 2 DVD1 / HD1 AUDIO 1 VIDEO VIDEO 2 Rear View/ Terminal Board C D E F G H I EXTERNAL CONTROL This terminal is selectable. This input can be purchased separately. K REMOTE OUT Connect the remote cable* to the REMOTE IN jack of the other display monitor to obtain wired remote control. * The 1/8 Stereo Mini cable must be set for Input or Output (see page 24) 3 B EXT SPEAKER L and R Connect speakers (optional) here.
.../Pr VD Cb/Pb HD Y Cr/Pr R Y VIDEO 1 ( I N / OUT) AUDIO 3 R B/ G/ R/ R RGB 3 RGB2 / DVD2 / HD2 AUDIO 2 DVD1 / HD1 AUDIO 1 VIDEO VIDEO 2 Rear View/ Terminal Board C D E F G H I EXTERNAL CONTROL This terminal is selectable. This input can be purchased separately. K REMOTE OUT Connect the remote cable* to the REMOTE IN jack of the other display monitor to obtain wired remote control. * The 1/8 Stereo Mini cable must be set for Input or Output (see page 24) 3 B EXT SPEAKER L and R Connect speakers (optional) here.
42VP4/42XM2/50XM3/61XM2
Page 12
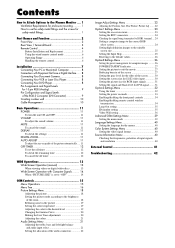
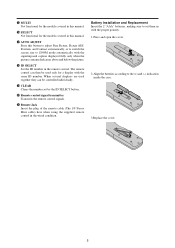
... the models covered in this manual. !7 AUTO ADJUST Press this button to adjust Fine Picture, Picture ADJ, Position, and Contrast automatically, or to switch the screen size to ZOOM mode automatically with the same ID number. Battery Installation and Replacement Insert the 2 "AAA" batteries, making sure to set by the ID SELECT button. @0 Remote control signal transmitter Transmits the remote control signals. @1 Remote Jack Insert the plug of the remote cable (The 1/8 Stereo Mini cable) here when using the supplied remote control...
... the models covered in this manual. !7 AUTO ADJUST Press this button to adjust Fine Picture, Picture ADJ, Position, and Contrast automatically, or to switch the screen size to ZOOM mode automatically with the same ID number. Battery Installation and Replacement Insert the 2 "AAA" batteries, making sure to set by the ID SELECT button. @0 Remote control signal transmitter Transmits the remote control signals. @1 Remote Jack Insert the plug of the remote cable (The 1/8 Stereo Mini cable) here when using the supplied remote control...
42VP4/42XM2/50XM3/61XM2
Page 15
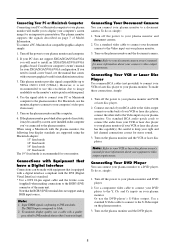
... graphics board for your equipment's video output requirements. Input TMDS signals conforming to VESA 1600ן1200 (UXGA). Use standard RCA audio patch cords to connect the audio from your VCR or laser disc player to your computer's video port, if necessary. 5. To make these connections, simply: 1. Turn off the power to your plasma monitor (if your plasma monitor and DVD player. 2. Or use a cable with a quality prescribed by a screen saver installed on the plasma monitor and...
... graphics board for your equipment's video output requirements. Input TMDS signals conforming to VESA 1600ן1200 (UXGA). Use standard RCA audio patch cords to connect the audio from your VCR or laser disc player to your computer's video port, if necessary. 5. To make these connections, simply: 1. Turn off the power to your plasma monitor (if your plasma monitor and DVD player. 2. Or use a cable with a quality prescribed by a screen saver installed on the plasma monitor and...

42VP4/42XM2/50XM3/61XM2
Page 18
... monitor's POWER/STANDBY indicator turns red and the standby mode is set . 3. The screen changes each time the DISPLAY button is set (only when turning off the unit with the vwᮤ ᮣ buttons. 2. To change the picture position: Select the position with the remote control). AUTO ADJUST To adjust the size or quality of the picture: Press the ZOOM+ button and enlarge the picture. The screen size switches to restore. Plug the power cord into an active AC power outlet. 2. Press the POWER ON button...
... monitor's POWER/STANDBY indicator turns red and the standby mode is set . 3. The screen changes each time the DISPLAY button is set (only when turning off the unit with the vwᮤ ᮣ buttons. 2. To change the picture position: Select the position with the remote control). AUTO ADJUST To adjust the size or quality of the picture: Press the ZOOM+ button and enlarge the picture. The screen size switches to restore. Plug the power cord into an active AC power outlet. 2. Press the POWER ON button...
42VP4/42XM2/50XM3/61XM2
Page 21
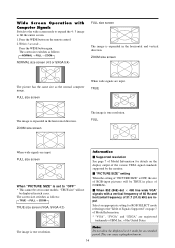
... "PICTURE SIZE" is true resolution. Within 3 seconds ... Note: Do not allow the displayed in . 14 Press the WIDE button on the remote control. 2. The screen size switches as the normal computer image. Wide Screen Operation with a vertical frequency of 60 Hz and horizontal frequency of 31.7 (31.0) kHz are input Select an appropriate setting for details on the display output of the various VESA signal standards supported by the monitor. Ⅵ "PICTURE SIZE" setting...
... "PICTURE SIZE" is true resolution. Within 3 seconds ... Note: Do not allow the displayed in . 14 Press the WIDE button on the remote control. 2. The screen size switches as the normal computer image. Wide Screen Operation with a vertical frequency of 60 Hz and horizontal frequency of 31.7 (31.0) kHz are input Select an appropriate setting for details on the display output of the various VESA signal standards supported by the monitor. Ⅵ "PICTURE SIZE" setting...
42VP4/42XM2/50XM3/61XM2
Page 24
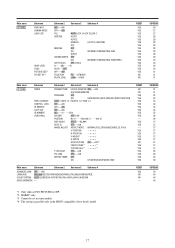
... LEVEL S1/S2 PICTURE SIZE*3 DVI SET UP*4 Sub menu 2 Sub menu 3 Sub menu 4 OFF←→ON OFF←→ON PLE AUTO/LOCK 1/LOCK 2/LOCK 3 ORBITER AUTO 1 AUTO 2 MANUAL H-DOT/V-LINE/TIME OFF INVERSE OFF ON WORKING TIME/WAITING TIME WHITE SCREEN WIPER OFF ON WORKING TIME/WAITING TIME/SPEED SOFT FOCUS OFF/1/2/3/4 0←...→3←...→15 AUTO←→OFF OFF←→ON PLUG/PLAY PC←→STB/DVD BLACK LEVEL LOW←...
... LEVEL S1/S2 PICTURE SIZE*3 DVI SET UP*4 Sub menu 2 Sub menu 3 Sub menu 4 OFF←→ON OFF←→ON PLE AUTO/LOCK 1/LOCK 2/LOCK 3 ORBITER AUTO 1 AUTO 2 MANUAL H-DOT/V-LINE/TIME OFF INVERSE OFF ON WORKING TIME/WAITING TIME WHITE SCREEN WIPER OFF ON WORKING TIME/WAITING TIME/SPEED SOFT FOCUS OFF/1/2/3/4 0←...→3←...→15 AUTO←→OFF OFF←→ON PLUG/PLAY PC←→STB/DVD BLACK LEVEL LOW←...

42VP4/42XM2/50XM3/61XM2
Page 32
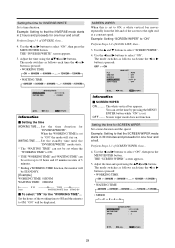
... display VESA standard signals. (Use this mode for the details of the above settings. Ⅵ Restoring the factory default settings Select "ALL RESET" under the OPTION1 menu. Setting high definition images to the factory defaults. See page 7 of Model Information for a still image from a scan converter) will be displayed. Note that this also restores other settings to the suitable screen size Use this mode when watching digital broadcasting (480P). AUTO Select the suitable mode for the INPUT SELECT button...
... display VESA standard signals. (Use this mode for the details of the above settings. Ⅵ Restoring the factory default settings Select "ALL RESET" under the OPTION1 menu. Setting high definition images to the factory defaults. See page 7 of Model Information for a still image from a scan converter) will be displayed. Note that this also restores other settings to the suitable screen size Use this mode when watching digital broadcasting (480P). AUTO Select the suitable mode for the INPUT SELECT button...
42VP4/42XM2/50XM3/61XM2
Page 36
...← INVERSE/WHITE WORKING TIME : 01H30M WAITING TIME : 02H00M SEL. EXIT RETURN Information Ⅵ Setting the time WORKING TIME ..... Set the standby time until the "INVERSE/WHITE" mode starts. * The "WAITING TIME" can not be set when the "WORKING TIME" is ON. * THE "WORKING TIME" and "WAITING TIME" can set the time by pressing the MENU/ ENTER button while "ON" is set to "ON" the mode will be displayed. Example: Setting "SCREEN WIPER" to that the SCREEN WIPER mode starts in...
...← INVERSE/WHITE WORKING TIME : 01H30M WAITING TIME : 02H00M SEL. EXIT RETURN Information Ⅵ Setting the time WORKING TIME ..... Set the standby time until the "INVERSE/WHITE" mode starts. * The "WAITING TIME" can not be set when the "WORKING TIME" is ON. * THE "WORKING TIME" and "WAITING TIME" can set the time by pressing the MENU/ ENTER button while "ON" is set to "ON" the mode will be displayed. Example: Setting "SCREEN WIPER" to that the SCREEN WIPER mode starts in...

42VP4/42XM2/50XM3/61XM2
Page 37
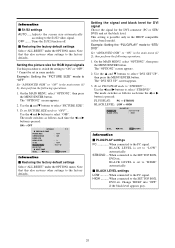
... operations. 1. Use the ᮤ and ᮣ buttons to select "S1/S2". 3. SPEED Set the moving speed for "SCREEN WIPER". ADJ. Activates the SOFT FOCUS setting. The factory setting is set for S1/S2 video input If the S-video signal contains screen size information, the image will stay on the "PICTURE" menu. Set the standby time until the "SCREEN WIPER" mode starts. When the WORKING TIME is 3 (dark gray). Ⅵ Restoring the factory default settings Select "ALL RESET" under...
... operations. 1. Use the ᮤ and ᮣ buttons to select "S1/S2". 3. SPEED Set the moving speed for "SCREEN WIPER". ADJ. Activates the SOFT FOCUS setting. The factory setting is set for S1/S2 video input If the S-video signal contains screen size information, the image will stay on the "PICTURE" menu. Set the standby time until the "SCREEN WIPER" mode starts. When the WORKING TIME is 3 (dark gray). Ⅵ Restoring the factory default settings Select "ALL RESET" under...
42VP4/42XM2/50XM3/61XM2
Page 38
... settings AUTO .....Adjusts the screen size automatically according to the PC signal. OFF ....... EXIT RETURN Information Ⅵ Restoring the factory default settings Select "ALL RESET" under the OPTION1 menu. The mode switches as follows each time the ᮤ or ᮣ button is pressed: PLUG/PLAY: PC ↔ STB/DVD BLACK LEVEL: LOW ↔ HIGH PLUG/PLAY BLACK LEVEL DVI SET UP : : STB/DVD HIGH SEL. EXIT RETURN Information Ⅵ PLUG/PLAY settings PC When connected to the S1/S2 video signal...
... settings AUTO .....Adjusts the screen size automatically according to the PC signal. OFF ....... EXIT RETURN Information Ⅵ Restoring the factory default settings Select "ALL RESET" under the OPTION1 menu. The mode switches as follows each time the ᮤ or ᮣ button is pressed: PLUG/PLAY: PC ↔ STB/DVD BLACK LEVEL: LOW ↔ HIGH PLUG/PLAY BLACK LEVEL DVI SET UP : : STB/DVD HIGH SEL. EXIT RETURN Information Ⅵ PLUG/PLAY settings PC When connected to the S1/S2 video signal...

42VP4/42XM2/50XM3/61XM2
Page 45
.... P. MODE : SPLIT AUTO ID : OFF IMAGE ADJUST P. Turns on the main power of the position numbers for the No.1 monitor. Turns on the main power of each time the ᮤ or ᮣ button is set to "ON", POWER ON/ OFF button on the remote control does not function except for the 2×2 video wall. OFF .... Sets the individual screen brightness for each screen in a video wall. * When this function to set "ON", connect your plasma displays with 2×2 video wall...
.... P. MODE : SPLIT AUTO ID : OFF IMAGE ADJUST P. Turns on the main power of the position numbers for the No.1 monitor. Turns on the main power of each time the ᮤ or ᮣ button is set to "ON", POWER ON/ OFF button on the remote control does not function except for the 2×2 video wall. OFF .... Sets the individual screen brightness for each screen in a video wall. * When this function to set "ON", connect your plasma displays with 2×2 video wall...
42VP4/42XM2/50XM3/61XM2
Page 49
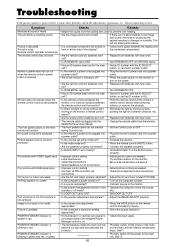
... lighted in • Leave some other problem, check the adjustments, operations, etc., before requesting service. Picture is disturbed. • Is a connected component set the ID number to the monitor. • Is the power management function in green and red, or green. ------ • Prompty switch off the power of the main unit. button, or set directly in red. • Horizontal and / or vertical sync signal is noisy. Monitor's power does not turn on when the remote control's power button...
... lighted in • Leave some other problem, check the adjustments, operations, etc., before requesting service. Picture is disturbed. • Is a connected component set the ID number to the monitor. • Is the power management function in green and red, or green. ------ • Prompty switch off the power of the main unit. button, or set directly in red. • Horizontal and / or vertical sync signal is noisy. Monitor's power does not turn on when the remote control's power button...
42VP4/42XM2/50XM3/61XM2
Page 51
... user controls. Cartons, carrying cases, batteries, external cabinets, magnetic tapes, or any other property caused by NEC Plasma Display Corporation NEC and the NEC logo are not covered by NEC Solutions or which is not purchased in the U.S.A. Shipping charges. for : 1. This warranty may be enforced only by NEC Solutions. Removal or installation charges. 2. Costs of initial technical adjustments (set-up), including adjustment of the product. Replacement parts...
... user controls. Cartons, carrying cases, batteries, external cabinets, magnetic tapes, or any other property caused by NEC Plasma Display Corporation NEC and the NEC logo are not covered by NEC Solutions or which is not purchased in the U.S.A. Shipping charges. for : 1. This warranty may be enforced only by NEC Solutions. Removal or installation charges. 2. Costs of initial technical adjustments (set-up), including adjustment of the product. Replacement parts...
50XM3
Page 4
... Screen Mount Unit: PX-42VP1U-MW Multi Screen Support Unit: PX-42VP1U-MW-S 4 Models: PX-50XM3A/S This equipment has been tested and found to comply with the limits for a Class A digital device, pursuant to radio communications. And regarding DVI and power cable, attach the supplied ferrite cores. This equipment generates, uses, and can radiate radio frequency energy and, if not installed and used in accordance with the instruction manual...
... Screen Mount Unit: PX-42VP1U-MW Multi Screen Support Unit: PX-42VP1U-MW-S 4 Models: PX-50XM3A/S This equipment has been tested and found to comply with the limits for a Class A digital device, pursuant to radio communications. And regarding DVI and power cable, attach the supplied ferrite cores. This equipment generates, uses, and can radiate radio frequency energy and, if not installed and used in accordance with the instruction manual...
50XM3
Page 6
... Select/Input Skip/All Reset), Option2 (Power management/Cinema mode/Long life [PLE, Orbiter, Inverse, White, Screen wiper, Soft focus]/Gray level/ S1/S2/Picture size/DVI Set up / down, Off timer, Wireless/ Wired remote control OSM Functions Picture (Contrast/Brightness/Sharpness/ Color/Tint/ Picture mode/Noise reduction/Color temperature/ White balance/Gamma/Low tone/Color tune), Audio (Bass/Treble/Balance/Audio input), Image Adjust (Aspect mode/V-Position /H-Position/V-Height /H- Specifications Screen Size 43.5"(H)ן24.5"(V) inches 1106(H)...
... Select/Input Skip/All Reset), Option2 (Power management/Cinema mode/Long life [PLE, Orbiter, Inverse, White, Screen wiper, Soft focus]/Gray level/ S1/S2/Picture size/DVI Set up / down, Off timer, Wireless/ Wired remote control OSM Functions Picture (Contrast/Brightness/Sharpness/ Color/Tint/ Picture mode/Noise reduction/Color temperature/ White balance/Gamma/Low tone/Color tune), Audio (Bass/Treble/Balance/Audio input), Image Adjust (Aspect mode/V-Position /H-Position/V-Height /H- Specifications Screen Size 43.5"(H)ן24.5"(V) inches 1106(H)...
50XM3
Page 8
... NEC Plasma Display Corporation NEC and the NEC logo are available as specified in the original resolution. *4 The aspect ratio is 5:4. This signal is converted to a 960 dotsן768 lines signal. *5 Normally the RGB select mode suite for the input signals listed in synchronization of your computer's video port. *7 Other screen modes (ZOOM and STADIUM) are registered trademarks of video data sent over a Digital Visual Interface (DVI...
... NEC Plasma Display Corporation NEC and the NEC logo are available as specified in the original resolution. *4 The aspect ratio is 5:4. This signal is converted to a 960 dotsן768 lines signal. *5 Normally the RGB select mode suite for the input signals listed in synchronization of your computer's video port. *7 Other screen modes (ZOOM and STADIUM) are registered trademarks of video data sent over a Digital Visual Interface (DVI...


