
42VP4/42VP4D (update)
Page 5
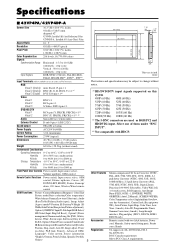
... Front Panel User Controls Power on/off, Input source select, Volume up/down, OSM control Other Features Motion compensated 3D Scan Converter (NTSC, Remote Control Functions Power on/off, Input source select, OSM control,Volume up/down, Cursor (UP, DOWN,LEFT, RIGHT), Pointer, Zoom up/ down..., Off timer, Wireless/Wired remote control PAL, 480I, 576I, 525I, 625I, 1035I, 1080I), 2-3 pull down Converter (NTSC, 480I, 525I, 1035I, 1080I (60Hz)), 2-2 pull down Converter (...
... Front Panel User Controls Power on/off, Input source select, Volume up/down, OSM control Other Features Motion compensated 3D Scan Converter (NTSC, Remote Control Functions Power on/off, Input source select, OSM control,Volume up/down, Cursor (UP, DOWN,LEFT, RIGHT), Pointer, Zoom up/ down..., Off timer, Wireless/Wired remote control PAL, 480I, 576I, 525I, 625I, 1035I, 1080I), 2-3 pull down Converter (NTSC, 480I, 525I, 1035I, 1080I (60Hz)), 2-2 pull down Converter (...
42VP4
Page 3
... RGB, All-White, Pixel Refresh and Brightness Limiter. Advanced AccuBlend scan conversion provides high quality scaling for the purest reds possible. NEC 's patented Capsulated Color Filter ensures realistic color and it's further enhanced by setting power on your needs, you view it The 42... a 2x2 (84") or 3x3 (126") matrix without the use of source equipment location. In addition, operating problems can be operated remotely via RS232 or front bezel LED lights through its progressive scan driving method offers stable, flicker-free images. And sophisticated video signal processing,...
... RGB, All-White, Pixel Refresh and Brightness Limiter. Advanced AccuBlend scan conversion provides high quality scaling for the purest reds possible. NEC 's patented Capsulated Color Filter ensures realistic color and it's further enhanced by setting power on your needs, you view it The 42... a 2x2 (84") or 3x3 (126") matrix without the use of source equipment location. In addition, operating problems can be operated remotely via RS232 or front bezel LED lights through its progressive scan driving method offers stable, flicker-free images. And sophisticated video signal processing,...
42VP4
Page 4
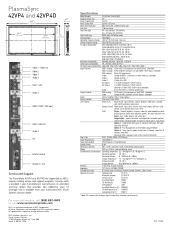
...noise reduction, gamma, low tone and color tune Audio - Pwr. Management, Cinema Mode, Long Life Mode Option 3 - NEC Solutions (America), Inc. NEC 120204 All specifications subject to 9 Active Screen Area 921mm x 518 mm Native Pixel Resolution 853 vertical dots x 480 horizontal ..., volume up/down, OSM access, (Control Lock Switch located on input panel) Remote Control Power on /off -timer, OSM control, cursor, pointer, zoom, auto, select OSM Picture - Anti-reflective (PX-42VP4A) AG - For more than 4 monitors simultaneously. aspect ratio mode, vertical position...
...noise reduction, gamma, low tone and color tune Audio - Pwr. Management, Cinema Mode, Long Life Mode Option 3 - NEC Solutions (America), Inc. NEC 120204 All specifications subject to 9 Active Screen Area 921mm x 518 mm Native Pixel Resolution 853 vertical dots x 480 horizontal ..., volume up/down, OSM access, (Control Lock Switch located on input panel) Remote Control Power on /off -timer, OSM control, cursor, pointer, zoom, auto, select OSM Picture - Anti-reflective (PX-42VP4A) AG - For more than 4 monitors simultaneously. aspect ratio mode, vertical position...
42VP4/42VP4D
Page 2
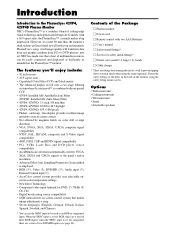
...is a seamless blend of cutting-edge visual technology and sophisticated design. Contents of the Package Ⅺ Plasma monitor Ⅺ Power cord Ⅺ Remote control with our special CCF. • 42VP4: Installed AR (Anti-Reflection) Filter 42VP4D: Installed AG (Anti-Glare) Filter • 42VP4, ...• 42VP4, 42VP4D: 853ן480 pixels • Flicker - Introduction Introduction to the PlasmaSync 42VP4, 42VP4D Plasma Monitor NEC's PlasmaSync™ is set the 5BNC input to DVD players- PlasmaSync's crisp, vivid image quality will transform data from any graphic medium...
...is a seamless blend of cutting-edge visual technology and sophisticated design. Contents of the Package Ⅺ Plasma monitor Ⅺ Power cord Ⅺ Remote control with our special CCF. • 42VP4: Installed AR (Anti-Reflection) Filter 42VP4D: Installed AG (Anti-Glare) Filter • 42VP4, ...• 42VP4, 42VP4D: 853ן480 pixels • Flicker - Introduction Introduction to the PlasmaSync 42VP4, 42VP4D Plasma Monitor NEC's PlasmaSync™ is set the 5BNC input to DVD players- PlasmaSync's crisp, vivid image quality will transform data from any graphic medium...
42VP4/42VP4D
Page 7
... Plasma Monitor .... 1 Part Names and Function 2 Front View 2 Rear View / Terminal Board 3 Remote Control 4 Battery Installation and Replacement 5 Using the wired remote control mode 6 Operating Range 6 Handling the remote control 6 Installation 7 Connecting Your PC or Macintosh Computer 8 Connections with Equipment that have a Digital ...31 Using the timer 31 Setting the power on mode 32 Enabling/disabling the front panel controls 33 Enabling/disabling remote control wireless transmission 33 Loop Out setting 34 ID number setting 34 Video Wall setting 35 Advanced OSM Settings ...
... Plasma Monitor .... 1 Part Names and Function 2 Front View 2 Rear View / Terminal Board 3 Remote Control 4 Battery Installation and Replacement 5 Using the wired remote control mode 6 Operating Range 6 Handling the remote control 6 Installation 7 Connecting Your PC or Macintosh Computer 8 Connections with Equipment that have a Digital ...31 Using the timer 31 Setting the power on mode 32 Enabling/disabling the front panel controls 33 Enabling/disabling remote control wireless transmission 33 Loop Out setting 34 ID number setting 34 Video Wall setting 35 Advanced OSM Settings ...

42VP4/42VP4D
Page 9
... POWER/STANDBY 7 6 5 4 1 32 q Power Turns the monitor's power on the setting of "BNC INPUT". and RIGHT/+ Enlarges or reduces the image. w Remote sensor window Receives the signals from the remote control. e POWER/STANDBY indicator When the power is in the On-Screen Menu (OSM) mode. Part Names and Function Front View MENU...
... POWER/STANDBY 7 6 5 4 1 32 q Power Turns the monitor's power on the setting of "BNC INPUT". and RIGHT/+ Enlarges or reduces the image. w Remote sensor window Receives the signals from the remote control. e POWER/STANDBY indicator When the power is in the On-Screen Menu (OSM) mode. Part Names and Function Front View MENU...
42VP4/42VP4D
Page 10
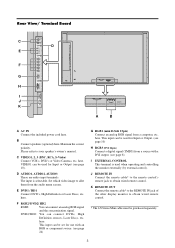
...) Connect an analog RGB signal from the audio menu screen. This input can connect DVDs, High Definition sources, Laser Discs, etc. J REMOTE IN Connect the remote cable* to the remote control's remote jack to allot them from a computer, etc. Rear View/ Terminal Board VIDEO VIDEO 2 VIDEO 1 ( I N / OUT) L ...You can be purchased separately. 3 VIDEO1 can connect an analog RGB signal and the syncronization signal. here. K REMOTE OUT Connect the remote cable* to the REMOTE IN jack of the other display monitor to your speaker's owner's manual. Maintain the correct polarity. The input is...
...) Connect an analog RGB signal from the audio menu screen. This input can connect DVDs, High Definition sources, Laser Discs, etc. J REMOTE IN Connect the remote cable* to the remote control's remote jack to allot them from a computer, etc. Rear View/ Terminal Board VIDEO VIDEO 2 VIDEO 1 ( I N / OUT) L ...You can be purchased separately. 3 VIDEO1 can connect an analog RGB signal and the syncronization signal. here. K REMOTE OUT Connect the remote cable* to the REMOTE IN jack of the other display monitor to your speaker's owner's manual. Maintain the correct polarity. The input is...
42VP4/42VP4D
Page 11
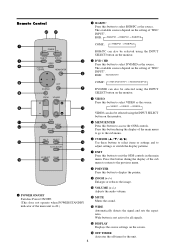
Remote Control w RGB/PC Press this button to select RGB/PC as the source. The available sources depend on the screen. !4 OFF TIMER Activates the off .) !0 ...
Remote Control w RGB/PC Press this button to select RGB/PC as the source. The available sources depend on the screen. !4 OFF TIMER Activates the off .) !0 ...
42VP4/42VP4D
Page 12
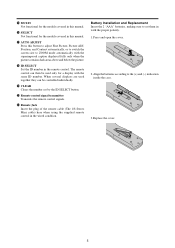
...the batteries according to set by the ID SELECT button. @0 Remote control signal transmitter Transmits the remote control signals. @1 Remote Jack Insert the plug of the remote cable (The 1/8 Stereo Mini cable) here when using the supplied remote control in the wired condition. !5 MULTI Not functional for the ...displayed fully only when the picture contains dark areas above and below the picture. !8 ID SELECT Set the ID number in the remote control. Battery Installation and Replacement Insert the 2 "AAA" batteries, making sure to the (+) and (-) indication inside the case. 3.Replace the...
...the batteries according to set by the ID SELECT button. @0 Remote control signal transmitter Transmits the remote control signals. @1 Remote Jack Insert the plug of the remote cable (The 1/8 Stereo Mini cable) here when using the supplied remote control in the wired condition. !5 MULTI Not functional for the ...displayed fully only when the picture contains dark areas above and below the picture. !8 ID SELECT Set the ID number in the remote control. Battery Installation and Replacement Insert the 2 "AAA" batteries, making sure to the (+) and (-) indication inside the case. 3.Replace the...

42VP4/42VP4D
Page 13
... is an obstacle between the sensor and the remote control. Operating Range * Use the remote control within a distance of up to approximately 30°. * The remote control operation may not function if the monitor's remote control sensor is exposed to direct sunlight or ...operated even if no batteries are loaded. Handling the remote control • Do not drop or mishandle the remote control. • Do not get the remote control wet. Using the wired remote control mode Connect the remote cable* to the remote control's remote jack and the "REMOTE IN" terminal on the monitor. 6 AUDIO 2 ...
... is an obstacle between the sensor and the remote control. Operating Range * Use the remote control within a distance of up to approximately 30°. * The remote control operation may not function if the monitor's remote control sensor is exposed to direct sunlight or ...operated even if no batteries are loaded. Handling the remote control • Do not drop or mishandle the remote control. • Do not get the remote control wet. Using the wired remote control mode Connect the remote cable* to the remote control's remote jack and the "REMOTE IN" terminal on the monitor. 6 AUDIO 2 ...

42VP4/42VP4D
Page 17
... ( I N / OUT) VIDEO 2 BNC connector OUT VIDEO Signal RGB signal/ IN DVD/HD signal AUDIO 1 R L (MONO) Y DVD1 Remote IN control REMOTE OUT IN OUT Remote control Remote IN control REMOTE OUT IN RGB 1 (IN / OUT) VD Cb/Pb HD Y Cr/Pr B/ G/ R/ RGB2 / DVD2 / HD2 OUT RGB signal/ DVD... unit To attach 1. 2. The VIDEO1 and RGB1 terminals can create a 2×2 or 3×3 video wall. • Connect signal cables and remote cables as a video wall function, maximaly 4-screen is particularly recommended when using a 9-screen video wall. • From the second monitor onward,...
... ( I N / OUT) VIDEO 2 BNC connector OUT VIDEO Signal RGB signal/ IN DVD/HD signal AUDIO 1 R L (MONO) Y DVD1 Remote IN control REMOTE OUT IN OUT Remote control Remote IN control REMOTE OUT IN RGB 1 (IN / OUT) VD Cb/Pb HD Y Cr/Pr B/ G/ R/ RGB2 / DVD2 / HD2 OUT RGB signal/ DVD... unit To attach 1. 2. The VIDEO1 and RGB1 terminals can create a 2×2 or 3×3 video wall. • Connect signal cables and remote cables as a video wall function, maximaly 4-screen is particularly recommended when using a 9-screen video wall. • From the second monitor onward,...

42VP4/42VP4D
Page 18
...only when the picture contains dark areas above and below the picture. 11 To change the picture position: Select the position with the remote control). The monitor's POWER/STANDBY indicator turns red and the standby mode is not pressed for approximately three seconds, the menu turns ...2. press again to delete the pointer. Press the POINTER button to restore. Press the POWER OFF button (on the remote control or control panel) to turn on the remote control or the unit) to increase to cancel the sound; The monitor's POWER/STANDBY indicator will be adjusted automatically....
...only when the picture contains dark areas above and below the picture. 11 To change the picture position: Select the position with the remote control). The monitor's POWER/STANDBY indicator turns red and the standby mode is not pressed for approximately three seconds, the menu turns ...2. press again to delete the pointer. Press the POINTER button to restore. Press the POWER OFF button (on the remote control or control panel) to turn on the remote control or the unit) to increase to cancel the sound; The monitor's POWER/STANDBY indicator will be adjusted automatically....

42VP4/42VP4D
Page 20
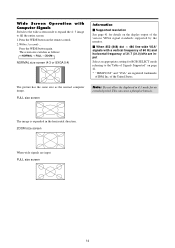
... image is expanded in the horizontal direction. * Images compressed in the horizontal direction ("squeezed images") are expanded in the horizontal direction and displayed on the remote control. Press the WIDE button on the entire screen with a wide screen. 14:9 size screen The picture is displayed. * The picture has the same size... video, component or RGB (525P or 625P signal from a scan converter). This can select one of five screen sizes. Press the WIDE button on the remote control. 2.
... image is expanded in the horizontal direction. * Images compressed in the horizontal direction ("squeezed images") are expanded in the horizontal direction and displayed on the remote control. Press the WIDE button on the entire screen with a wide screen. 14:9 size screen The picture is displayed. * The picture has the same size... video, component or RGB (525P or 625P signal from a scan converter). This can select one of five screen sizes. Press the WIDE button on the remote control. 2.
42VP4/42VP4D
Page 21
... size screen (4:3 or SXGA 5:4) Information Ⅵ Supported resolution See page 41 for an extended period. The image is expanded in 4:3 mode for details on the remote control. 2. The screen size switches as the normal computer image. FULL size screen 14 of IBM, Inc. Press the WIDE button on the display output...
... size screen (4:3 or SXGA 5:4) Information Ⅵ Supported resolution See page 41 for an extended period. The image is expanded in 4:3 mode for details on the remote control. 2. The screen size switches as the normal computer image. FULL size screen 14 of IBM, Inc. Press the WIDE button on the display output...

42VP4/42VP4D
Page 22
... or the settings that are stored in the main menu (1/2), full menu items will be displayed differently. Press the cursor buttons v w on the remote control to highlight the menu you change it again. 6. PICTURE 1 / 2 CONTRAST BRIGHTNESS SHARPNESS COLOR TINT PICTURE MODE : NORMAL NR : OFF NEXT...of the selected item by pressing the EXIT button. Note: The main menu disappears by using the cursor buttons ᮤ ᮣ on the remote control to use the menus and the selected items. 1. MAIN MENU 1 / 2 PICTURE AUDIO IMAGE ADJUST OPTION1 ADVANCED OSM NEXT PAGE SEL...
... or the settings that are stored in the main menu (1/2), full menu items will be displayed differently. Press the cursor buttons v w on the remote control to highlight the menu you change it again. 6. PICTURE 1 / 2 CONTRAST BRIGHTNESS SHARPNESS COLOR TINT PICTURE MODE : NORMAL NR : OFF NEXT...of the selected item by pressing the EXIT button. Note: The main menu disappears by using the cursor buttons ᮤ ᮣ on the remote control to use the menus and the selected items. 1. MAIN MENU 1 / 2 PICTURE AUDIO IMAGE ADJUST OPTION1 ADVANCED OSM NEXT PAGE SEL...

42VP4/42VP4D
Page 24
... both sides. SPLIT OFF - Yes Yes Yes Reset Yes No No - * Menu items in of the display. In case of 4 : 3, sets the luminance of the remote control. MODE AUTO ID IMAGE ADJUST P. Sets the input mode at the time the power is set to ON, the received signal will be looped.../OFF time for each display turns on the power and the input mode. OFF LAST OFF ON OFF ALL OFF - ON MODE CONTROL LOCK IR REMOTE LOOP OUT ID NUMBER VIDEO WALL DIVIDER POSITION DISP. OFF OFF OFF Main menu Sub menu ADVANCED OSM LANGUAGE COLOR SYSTEM SOURCE INFORMATION Functions Turn...
... both sides. SPLIT OFF - Yes Yes Yes Reset Yes No No - * Menu items in of the display. In case of 4 : 3, sets the luminance of the remote control. MODE AUTO ID IMAGE ADJUST P. Sets the input mode at the time the power is set to ON, the received signal will be looped.../OFF time for each display turns on the power and the input mode. OFF LAST OFF ON OFF ALL OFF - ON MODE CONTROL LOCK IR REMOTE LOOP OUT ID NUMBER VIDEO WALL DIVIDER POSITION DISP. OFF OFF OFF Main menu Sub menu ADVANCED OSM LANGUAGE COLOR SYSTEM SOURCE INFORMATION Functions Turn...

42VP4/42VP4D
Page 25
... press the MENU/ENTER button. Changes the picture's sharpness. TINT Changes the picture's tint. Example: Adjusting the contrast Press the MENU/ENTER button on the remote control to display the MAIN MENU on the screen, then... 1. EXIT RETURN 3. Information Ⅵ Types of VIDEO display. To delete the main menu, press ... MODE : NORMAL NR : OFF NEXT PAGE SEL. Changes the picture's white level. Example: Setting the "THEAT. 1" mode Press the MENU/ENTER button on the remote control to display the MAIN MENU on the screen, then... 1. The "PICTURE" screen appears. 2.
... press the MENU/ENTER button. Changes the picture's sharpness. TINT Changes the picture's tint. Example: Adjusting the contrast Press the MENU/ENTER button on the remote control to display the MAIN MENU on the screen, then... 1. EXIT RETURN 3. Information Ⅵ Types of VIDEO display. To delete the main menu, press ... MODE : NORMAL NR : OFF NEXT PAGE SEL. Changes the picture's white level. Example: Setting the "THEAT. 1" mode Press the MENU/ENTER button on the remote control to display the MAIN MENU on the screen, then... 1. The "PICTURE" screen appears. 2.

42VP4/42VP4D
Page 26
... of COLOR TEMP., then... 4. Adjusting the color to the desired level Use this also restores other settings to display the MAIN MENU on the remote control to the factory defaults. Perform Steps 1-3 of noise reduction. Example: Setting "NR-3" Press the MENU/ENTER button on the screen, then......press the EXIT button once more . The "WHITE BALANCE" screen appears. 19 Use the v and w buttons to display the MAIN MENU on the remote control to achieve the desired color quality. The "PICTURE" screen appears. 2. Example: Setting "HIGH" Press the MENU/ENTER button on which the picture...
... of COLOR TEMP., then... 4. Adjusting the color to the desired level Use this also restores other settings to display the MAIN MENU on the remote control to the factory defaults. Perform Steps 1-3 of noise reduction. Example: Setting "NR-3" Press the MENU/ENTER button on the screen, then......press the EXIT button once more . The "WHITE BALANCE" screen appears. 19 Use the v and w buttons to display the MAIN MENU on the remote control to achieve the desired color quality. The "PICTURE" screen appears. 2. Example: Setting "HIGH" Press the MENU/ENTER button on which the picture...

42VP4/42VP4D
Page 27
... brightness of 1, 2, 3, 4). Ⅵ Restoring the factory default settings Select "ALL RESET" under the OPTION1 menu. Press the MENU/ENTER button on the remote control to the factory default values. Use the v and w buttons to select "GAMMA". 3. The "PICTURE" screen appears. 2. Use the v and w...... Example: Setting "2" Set "ADVANCED OSM" to display the MAIN MENU on the screen, then... 1. Press the MENU/ENTER button on the remote control to "ON" in the sequence of the midtone areas while keeping shadows and highlights unchanged. The "PICTURE" screen appears. 2. Use the ...
... brightness of 1, 2, 3, 4). Ⅵ Restoring the factory default settings Select "ALL RESET" under the OPTION1 menu. Press the MENU/ENTER button on the remote control to the factory default values. Use the v and w buttons to select "GAMMA". 3. The "PICTURE" screen appears. 2. Use the v and w...... Example: Setting "2" Set "ADVANCED OSM" to display the MAIN MENU on the screen, then... 1. Press the MENU/ENTER button on the remote control to "ON" in the sequence of the midtone areas while keeping shadows and highlights unchanged. The "PICTURE" screen appears. 2. Use the ...

42VP4/42VP4D
Page 28
... the factory defaults. 21 To adjust the bass ... Adjust the bass using the ᮤ and ᮣ buttons. Press the MENU/ENTER button on the remote control to suit your tastes. The "PICTURE" screen appears. 2. BASS TREBLE BALANCE AUDIO INPUT1 AUDIO INPUT2 AUDIO INPUT3 AUDIO : VIDEO1 : HD/DVD1 : RGB1... making other colors. Use ᮤ and ᮣ buttons to the main menu. You can be adjusted to display the MAIN MENU on the remote control to select "COLOR TUNE", then press the MENU/ENTER button. Press the EXIT button to return to select "ON", then press the MENU...
... the factory defaults. 21 To adjust the bass ... Adjust the bass using the ᮤ and ᮣ buttons. Press the MENU/ENTER button on the remote control to suit your tastes. The "PICTURE" screen appears. 2. BASS TREBLE BALANCE AUDIO INPUT1 AUDIO INPUT2 AUDIO INPUT3 AUDIO : VIDEO1 : HD/DVD1 : RGB1... making other colors. Use ᮤ and ᮣ buttons to the main menu. You can be adjusted to display the MAIN MENU on the remote control to select "COLOR TUNE", then press the MENU/ENTER button. Press the EXIT button to return to select "ON", then press the MENU...


