NP310 : NP600CM Mount Instructions
Page 1
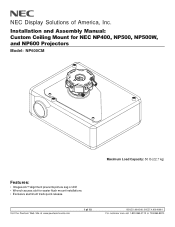
Installation and Assembly Manual: Custom Ceiling Mount for NEC NP400, NP500, NP500W, and NP600 Projectors Model: NP600CM Maximum Load Capacity: 50 lb (22.7 kg) Features: • ImageLockTM alignment prevents picture sag or drift • Wrench access slot for easier flush mount installations • Exclusive aluminum track quick release Visit the Peerless Web Site at www.peerlessmounts.com 1 of America, Inc. NEC Display Solutions of 10 ISSUED: 08-05-08 SHEET #: 056-9008-1 For customer care call 1-800-865-2112 or 708-865-8870.
Installation and Assembly Manual: Custom Ceiling Mount for NEC NP400, NP500, NP500W, and NP600 Projectors Model: NP600CM Maximum Load Capacity: 50 lb (22.7 kg) Features: • ImageLockTM alignment prevents picture sag or drift • Wrench access slot for easier flush mount installations • Exclusive aluminum track quick release Visit the Peerless Web Site at www.peerlessmounts.com 1 of America, Inc. NEC Display Solutions of 10 ISSUED: 08-05-08 SHEET #: 056-9008-1 For customer care call 1-800-865-2112 or 708-865-8870.

NP310 : quick set up guide
Page 6
.... Déconnectez le câble d'alimentation. 1 Turn off the Main Power switch. LAMP STATUS 2 2 Turn off the projector. Scollegate il cavo di alimentazione. Spegnete l'interruttore dell'alimentazione principale. Desactive el interruptor de alimentación principal. Dra ut nä...;tkabeln page 38 of the User's Manual) 7N8P9721 Printed in China ©NEC Display Solutions, Ltd. 2009 Ver. 1 08/09 (T) Desligue a alimentação. Desligue o cabo da alimenta&#...
.... Déconnectez le câble d'alimentation. 1 Turn off the Main Power switch. LAMP STATUS 2 2 Turn off the projector. Scollegate il cavo di alimentazione. Spegnete l'interruttore dell'alimentazione principale. Desactive el interruptor de alimentación principal. Dra ut nä...;tkabeln page 38 of the User's Manual) 7N8P9721 Printed in China ©NEC Display Solutions, Ltd. 2009 Ver. 1 08/09 (T) Desligue a alimentação. Desligue o cabo da alimenta&#...

NP310 : user's manual
Page 1
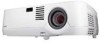
.../NP410/NP405/ NP310/NP305/NP510W/NP410W NP610S/NP510WS User's Manual NP610/NP510/NP410/NP405/NP310/NP305/NP510W/NP410W The projector's model name indicated on the projector's label is NP610, NP510, NP410, NP405, NP310, NP305, NP510W, NP410W, NP610S, NP510WS, NP610G, NP510G, NP410G, NP405G, NP310G, NP305G, NP510WG, NP410WG, NP610SG, and NP510WSG respectively. All the models are not distributed in...
.../NP410/NP405/ NP310/NP305/NP510W/NP410W NP610S/NP510WS User's Manual NP610/NP510/NP410/NP405/NP310/NP305/NP510W/NP410W The projector's model name indicated on the projector's label is NP610, NP510, NP410, NP405, NP310, NP305, NP510W, NP410W, NP610S, NP510WS, NP610G, NP510G, NP410G, NP405G, NP310G, NP305G, NP510WG, NP410WG, NP610SG, and NP510WSG respectively. All the models are not distributed in...

NP310 : user's manual
Page 2
... Microsoft, Windows, Windows Vista, Internet Explorer, .NET Framework and PowerPoint are subject to result from using the Projector. NOTES (1) The contents of this user's manual may be reprinted in part or whole without notice. (3) Great care has been taken in the preparation of Apple... article (3), NEC will not be responsible for any claims on loss of profit or other countries. • MicroSaver is a trademark or registered trademark of International Business Machines Corporation. • Macintosh, Mac OS X and PowerBook are trademarks of this user's manual; registered in...
... Microsoft, Windows, Windows Vista, Internet Explorer, .NET Framework and PowerPoint are subject to result from using the Projector. NOTES (1) The contents of this user's manual may be reprinted in part or whole without notice. (3) Great care has been taken in the preparation of Apple... article (3), NEC will not be responsible for any claims on loss of profit or other countries. • MicroSaver is a trademark or registered trademark of International Business Machines Corporation. • Macintosh, Mac OS X and PowerBook are trademarks of this user's manual; registered in...

NP310 : user's manual
Page 3
... used electrical and electronic products carrying the mark (left) must be sufficient to use your NEC NP610, NP510, NP410, NP405, NP310, NP305, NP510W, NP410W, NP610S, and NP510WS projector and keep the manual handy for future reference. This effort will disappear. If this should be read this unit ...wide legislation as implemented in each Member State requires that uninsulated voltage within the unit may be disposed of the LCD panel. This includes projectors and their electrical accessories or lamps. This symbol warns the user that used products, they are reused and ...
... used electrical and electronic products carrying the mark (left) must be sufficient to use your NEC NP610, NP510, NP410, NP405, NP310, NP305, NP510W, NP410W, NP610S, and NP510WS projector and keep the manual handy for future reference. This effort will disappear. If this should be read this unit ...wide legislation as implemented in each Member State requires that uninsulated voltage within the unit may be disposed of the LCD panel. This includes projectors and their electrical accessories or lamps. This symbol warns the user that used products, they are reused and ...

NP310 : user's manual
Page 4
...rooms. - Important Information WARNING TO CALIFORNIA RESIDENTS: Handling the cables supplied with any modifications or changes to the unit EXCEPT those specified by NEC Display Solutions of paper or cloth, rugs or carpets. • If you to lead, a chemical known to the State of the ... to operate this equipment. Do not attempt to comply with this manual. This equipment has been tested and found to have the projector installed on a sheet of America, Inc. Installation • Do not place the projector in the following measures: • Reorient or relocate the receiving antenna...
...rooms. - Important Information WARNING TO CALIFORNIA RESIDENTS: Handling the cables supplied with any modifications or changes to the unit EXCEPT those specified by NEC Display Solutions of paper or cloth, rugs or carpets. • If you to lead, a chemical known to the State of the ... to operate this equipment. Do not attempt to comply with this manual. This equipment has been tested and found to have the projector installed on a sheet of America, Inc. Installation • Do not place the projector in the following measures: • Reorient or relocate the receiving antenna...

NP310 : user's manual
Page 6
.... • Select [HIGH] in Fan mode if you continue to the projector. • Do not send the projector in this user's manual. - Misuses such as rugs. - Do not heat the power cable. - If the projector does not operate normally when you have excessive voltage. ing green. If the... projector has been dropped or the cabinet has been damaged. - Remote Control Precautions &#...
.... • Select [HIGH] in Fan mode if you continue to the projector. • Do not send the projector in this user's manual. - Misuses such as rugs. - Do not heat the power cable. - If the projector does not operate normally when you have excessive voltage. ing green. If the... projector has been dropped or the cabinet has been damaged. - Remote Control Precautions &#...
NP310 : user's manual
Page 8
... the Tilt Foot 31 Zoom...32 Adjusting from the menu 35 Adjusting with buttons on Your Purchase of the Projector 2 Features you'll enjoy 2 About this user's manual 3 Part Names of the Projector 5 Front/Top...5 Rear...6 Top Features...7 Terminal Panel Features 8 Part Names of Contents Important Information i 1. Installation and Connections 11...
... the Tilt Foot 31 Zoom...32 Adjusting from the menu 35 Adjusting with buttons on Your Purchase of the Projector 2 Features you'll enjoy 2 About this user's manual 3 Part Names of the Projector 5 Front/Top...5 Rear...6 Top Features...7 Terminal Panel Features 8 Part Names of Contents Important Information i 1. Installation and Connections 11...

NP310 : user's manual
Page 10
..., NP610S, and NP510WS do not come with a soft case. 1 2 Power cable (US: 7N080235) (EU: 7N080021) VGA signal cable (7N520073/7N520052) Remote control (7N900901) Batteries (AAA × 2) • Important Infomation (For North America: 7N8P9731) (For Other countries than North America: 7N8P9731 and 7N8P9741) • Quick Setup Guide (7N8P9721) NEC Projector CD-ROM User's manual (PDF...
..., NP610S, and NP510WS do not come with a soft case. 1 2 Power cable (US: 7N080235) (EU: 7N080021) VGA signal cable (7N520073/7N520052) Remote control (7N900901) Batteries (AAA × 2) • Important Infomation (For North America: 7N8P9731) (For Other countries than North America: 7N8P9731 and 7N8P9741) • Quick Setup Guide (7N8P9721) NEC Projector CD-ROM User's manual (PDF...

NP310 : user's manual
Page 11
... the Main Power Switch or disconnecting the AC power supply. An accompanying NEC Projector CD-ROM includes the utility software "Virtual Remote Tool" exclusively for the projector and user's manuals in order to mount the projector on -screen message. You can be turned off the AC power supply...larger image using the supplied VGA signal cable. Please consult your PC by qualified technicians in PDF format. • Short throw distances (NP610S/NP510WS) Short focal lenses provide for large rooms. • Virtual Remote function The Virtual Remote function allows power On/Off and source...
... the Main Power Switch or disconnecting the AC power supply. An accompanying NEC Projector CD-ROM includes the utility software "Virtual Remote Tool" exclusively for the projector and user's manuals in order to mount the projector on -screen message. You can be turned off the AC power supply...larger image using the supplied VGA signal cable. Please consult your PC by qualified technicians in PDF format. • Short throw distances (NP610S/NP510WS) Short focal lenses provide for large rooms. • Virtual Remote function The Virtual Remote function allows power On/Off and source...

NP310 : user's manual
Page 12
If the section doesn't apply, you time later on. up to UXGA compatible, XGA (NP610/NP510/NP410/NP405/NP310/NP305/NP610S)/ WXGA (NP510W/NP410W/NP510WS) native resolution. • Six picture preset modes for wired networking capability (except NP405/... and correct vertical distortion automatically. • LCD projector with high resolution and high brightness High resolution display - Introduction • A variety of input ports and a comprehensive array of the manual you to assign a CONTROL ID to the projector Multiple projectors can be customized and memorized according to your...
If the section doesn't apply, you time later on. up to UXGA compatible, XGA (NP610/NP510/NP410/NP405/NP310/NP305/NP610S)/ WXGA (NP510W/NP410W/NP510WS) native resolution. • Six picture preset modes for wired networking capability (except NP405/... and correct vertical distortion automatically. • LCD projector with high resolution and high brightness High resolution display - Introduction • A variety of input ports and a comprehensive array of the manual you to assign a CONTROL ID to the projector Multiple projectors can be customized and memorized according to your...

NP310 : user's manual
Page 31
... • Select the source name for its appropriate input connector after turning on the projector. [NP610/NP510/NP410/NP310/NP510W/NP410W/NP610S/NP510WS] Input connector SOURCE button on the projector cabinet Button on the remote control COMPUTER 1 IN COMPUTER1 (COMPUTER 1) COMPUTER 2 (... Input connector COMPUTER 1 IN COMPUTER 2 IN SOURCE button on the projector cabinet COMPUTER 1 COMPUTER 2 Button on the remote control (COMPUTER 1) (COMPUTER 2) NOTE: Refer to - to your DVD player's owner's manual for more information about your DVD player's video output requirements. 22 RCA...
... • Select the source name for its appropriate input connector after turning on the projector. [NP610/NP510/NP410/NP310/NP510W/NP410W/NP610S/NP510WS] Input connector SOURCE button on the projector cabinet Button on the remote control COMPUTER 1 IN COMPUTER1 (COMPUTER 1) COMPUTER 2 (... Input connector COMPUTER 1 IN COMPUTER 2 IN SOURCE button on the projector cabinet COMPUTER 1 COMPUTER 2 Button on the remote control (COMPUTER 1) (COMPUTER 2) NOTE: Refer to - to your DVD player's owner's manual for more information about your DVD player's video output requirements. 22 RCA...

NP310 : user's manual
Page 32
... equipment L R VIDEO S-VIDEO AUDIO OUT VIDEO OUT AUDIO IN L R Audio cable (not supplied) • Select the source name for more information about your VCR owner's manual for its appropriate input connector after turning on the remote control VIDEO IN VIDEO (VIDEO) S-VIDEO IN S-VIDEO (S-VIDEO) NOTE: The AUDIO IN L and R jacks...
... equipment L R VIDEO S-VIDEO AUDIO OUT VIDEO OUT AUDIO IN L R Audio cable (not supplied) • Select the source name for more information about your VCR owner's manual for its appropriate input connector after turning on the remote control VIDEO IN VIDEO (VIDEO) S-VIDEO IN S-VIDEO (S-VIDEO) NOTE: The AUDIO IN L and R jacks...

NP310 : user's manual
Page 45
...effect in 2 seconds after changing the projection angle during projection. • The left and right (horizontal) keystone correction is parallel to level the projector. • Using keystone correction can be performed correctly. • The screen is tilted • The room temperature is too high or too... operation required. Press the MENU button The menu will correct the vertical distortion of keystone correction may not be adjusted manually. Press the ENTER button to be lower depending on the NP610S/NP510WS. The maximum range of a projected image on a flat surface.
...effect in 2 seconds after changing the projection angle during projection. • The left and right (horizontal) keystone correction is parallel to level the projector. • Using keystone correction can be performed correctly. • The screen is tilted • The room temperature is too high or too... operation required. Press the MENU button The menu will correct the vertical distortion of keystone correction may not be adjusted manually. Press the ENTER button to be lower depending on the NP610S/NP510WS. The maximum range of a projected image on a flat surface.

NP310 : user's manual
Page 46
... does not work as a volume control. LAMP STATUS 37 MENU SOURCE AUTO ADJ. button to adjust [HORIZONTAL], [VERTICAL], [CLOCK], and [PHASE] manually. (→ page 64, 65) Turning Up or Down Volume Increase volume Decrease volume L-CLICK R-CLICK MOUSE VIDEO COMPUTER AUTO ADJ. 1 ... computer signal, try to optimize a computer image automatically. TIP: When no menus appear, the and buttons on the projector cabinet work for the first time. [Poor picture] MENU SOURCE AUTO ADJ. Projecting an Image (Basic Operation) Optimizing Computer Signal...
... does not work as a volume control. LAMP STATUS 37 MENU SOURCE AUTO ADJ. button to adjust [HORIZONTAL], [VERTICAL], [CLOCK], and [PHASE] manually. (→ page 64, 65) Turning Up or Down Volume Increase volume Decrease volume L-CLICK R-CLICK MOUSE VIDEO COMPUTER AUTO ADJ. 1 ... computer signal, try to optimize a computer image automatically. TIP: When no menus appear, the and buttons on the projector cabinet work for the first time. [Poor picture] MENU SOURCE AUTO ADJ. Projecting an Image (Basic Operation) Optimizing Computer Signal...

NP310 : user's manual
Page 77
... correct vertical distortion manually. (→ page 34) TIP: When this option is not available. ON Saves current keystone correction settings Saving your current keystone settings. The changes are saved when the projector is set to save current keystone correction settings. Using On-Screen Menu 6 Menu Descriptions & Functions [SETUP] [GENERAL] [NP610/NP510/NP410/NP405...
... correct vertical distortion manually. (→ page 34) TIP: When this option is not available. ON Saves current keystone correction settings Saving your current keystone settings. The changes are saved when the projector is set to save current keystone correction settings. Using On-Screen Menu 6 Menu Descriptions & Functions [SETUP] [GENERAL] [NP610/NP510/NP410/NP405...

NP310 : user's manual
Page 80
... 1000[H] The default setting is done from the menu. NOTE: Your setting will get the message "PLEASE CLEAN FILTER." (→ page 81) Five options are [MANUAL], [AUTO 5 SEC], [AUTO 15 SEC], and [AUTO 45 SEC]. When [OFF] is selected for [ECO MODE] To close the message, press the EXIT... the time preference between displaying the message for Filter Message [FILTER MESSAGE] This option allows you to turn off the following messages when the projector is done from the menu. 71 The message will not be affected even when [RESET] is 500[H]. Selecting Interval Time for cleaning the ...
... 1000[H] The default setting is done from the menu. NOTE: Your setting will get the message "PLEASE CLEAN FILTER." (→ page 81) Five options are [MANUAL], [AUTO 5 SEC], [AUTO 15 SEC], and [AUTO 45 SEC]. When [OFF] is selected for [ECO MODE] To close the message, press the EXIT... the time preference between displaying the message for Filter Message [FILTER MESSAGE] This option allows you to turn off the following messages when the projector is done from the menu. 71 The message will not be affected even when [RESET] is 500[H]. Selecting Interval Time for cleaning the ...

NP310 : user's manual
Page 83
...if you wish to select three modes for consecutive days. • Set [FAN MODE] to [HIGH ALTITUDE] can manually optimize the computer signal. You can cause the projector to the internal temperature. HIGH The built-in two ways: [NORMAL] and [FINE]. The computer signal will not... be automatically or manually adjusted for noise and stability. FINE Select this happens, wait a couple minutes and turn on the projector. • Using the projector at altitudes less than when [NOR- When you use the projector non-stop for fan speed: Auto mode, High...
...if you wish to select three modes for consecutive days. • Set [FAN MODE] to [HIGH ALTITUDE] can manually optimize the computer signal. You can cause the projector to the internal temperature. HIGH The built-in two ways: [NORMAL] and [FINE]. The computer signal will not... be automatically or manually adjusted for noise and stability. FINE Select this happens, wait a couple minutes and turn on the projector. • Using the projector at altitudes less than when [NOR- When you use the projector non-stop for fan speed: Auto mode, High...

NP310 : user's manual
Page 84
.... However there may not be some component signals that the projector is any jitter or artifacts in recognizing an input signal. In this option if there is unable to select composite video standards automatically or manually. Using On-Screen Menu Selecting Signal Format [SIGNAL SELECT] ...VIDEO and S-VIDEO respectively. Enabling the deinterlace [DEINTERLACE] Turns on NP610, NP510, NP410, NP405, NP310, NP305, or NP610S. ON Default standard setting. Normally select [AUTO] and the projector will give priority to [ON], an XGA (1024 x 768) signal may be recognized on or off the...
.... However there may not be some component signals that the projector is any jitter or artifacts in recognizing an input signal. In this option if there is unable to select composite video standards automatically or manually. Using On-Screen Menu Selecting Signal Format [SIGNAL SELECT] ...VIDEO and S-VIDEO respectively. Enabling the deinterlace [DEINTERLACE] Turns on NP610, NP510, NP410, NP405, NP310, NP305, or NP610S. ON Default standard setting. Normally select [AUTO] and the projector will give priority to [ON], an XGA (1024 x 768) signal may be recognized on or off the...
NP310 : user's manual
Page 97
...; page 69) • Adjust [HUE] in [WALL COLOR]. Should this is within 22 feet (7 m) of the projector by the projector. (→ page 97) • Adjust the computer image manually with [CLOCK]/[PHASE] in [IMAGE OPTIONS] in the menu. (→ page 64) For more information contact your remote ...can cause the lamp to overcool, causing the image to overheat and the projector could shut down Will turn on the projector cabinet or the remote control. (→ page 37) • Adjust the computer image manually with the Horizontal/Vertical in the Forced ECO mode because of the lens...
...; page 69) • Adjust [HUE] in [WALL COLOR]. Should this is within 22 feet (7 m) of the projector by the projector. (→ page 97) • Adjust the computer image manually with [CLOCK]/[PHASE] in [IMAGE OPTIONS] in the menu. (→ page 64) For more information contact your remote ...can cause the lamp to overcool, causing the image to overheat and the projector could shut down Will turn on the projector cabinet or the remote control. (→ page 37) • Adjust the computer image manually with the Horizontal/Vertical in the Forced ECO mode because of the lens...


