
NP115 : RS232 codes- Projectors
Page 2
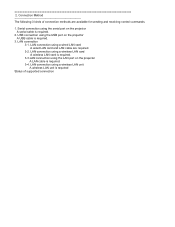
... LAN cable are available for sending and receiving control commands. 1. USB connection using the LAN port on the projector A LAN cable is required. 3. LAN connection using the serial port on the projector A USB cable is required. 3-4. LAN connection using a wireless LAN card A wireless LAN card is required. 3-3.LAN connection using the USB port on the projector A serial cable is required Status of connection methods are required. 3-2. Serial connection using a wireless LAN unit A wireless LAN unit is required. 2. Connection Method The following 3 kinds of supported...
... LAN cable are available for sending and receiving control commands. 1. USB connection using the LAN port on the projector A LAN cable is required. 3. LAN connection using the serial port on the projector A USB cable is required. 3-4. LAN connection using a wireless LAN card A wireless LAN card is required. 3-3.LAN connection using the USB port on the projector A serial cable is required Status of connection methods are required. 3-2. Serial connection using a wireless LAN unit A wireless LAN unit is required. 2. Connection Method The following 3 kinds of supported...

NP115 : RS232 codes- Projectors
Page 34
... 02H 03H 02H 0DH Error contents Unknown command. Invalid values specified. Power Off inhibited. 050. Command: 02H 0FH 00H 00H 02H DATA01 DATA02 CKS (*3) Data Portion Contents DATA01 .. 02 : Remote control key code (Word type) Key number DATA01 DATA02 Key name 1 01H 00H POWER 2 02H 00H POWER ON (!!) 3 03H 00H POWER OFF (!!) 4 04H 00H SOURCE (AUTO) (!!) 5 05H 00H AUTO (!) (!!) 6 06H 00H MENU (!!) (!!!) 7 07H 00H UP (!!) (!!!) 8 08H...
... 02H 03H 02H 0DH Error contents Unknown command. Invalid values specified. Power Off inhibited. 050. Command: 02H 0FH 00H 00H 02H DATA01 DATA02 CKS (*3) Data Portion Contents DATA01 .. 02 : Remote control key code (Word type) Key number DATA01 DATA02 Key name 1 01H 00H POWER 2 02H 00H POWER ON (!!) 3 03H 00H POWER OFF (!!) 4 04H 00H SOURCE (AUTO) (!!) 5 05H 00H AUTO (!) (!!) 6 06H 00H MENU (!!) (!!!) 7 07H 00H UP (!!) (!!!) 8 08H...
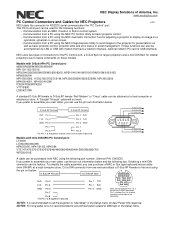
NP115 : PC Control Connectors and Cables for all projectors and plasmas
Page 1
... connectors for the PC Control port, a D-Sub 9pin for larger projectors and a mini-DIN 8pin for presentations as well as basic projector control, projector lamp and error status or asset management. (These functions can purchase a MAC or Sun type keyboard/mouse cable (mini-DIN 8P) ... a network interface, optional network PC card or USB interface) NEC uses two types of PC A cable can be purchased from a PC using the NEC Image Express Utility to send images to the projector for smaller projectors due to 9600 bps in the Setup menu for RS232C serial communication the "PC Control" port.
... connectors for the PC Control port, a D-Sub 9pin for larger projectors and a mini-DIN 8pin for presentations as well as basic projector control, projector lamp and error status or asset management. (These functions can purchase a MAC or Sun type keyboard/mouse cable (mini-DIN 8P) ... a network interface, optional network PC card or USB interface) NEC uses two types of PC A cable can be purchased from a PC using the NEC Image Express Utility to send images to the projector for smaller projectors due to 9600 bps in the Setup menu for RS232C serial communication the "PC Control" port.

NP310 : NP600CM Mount Instructions
Page 10
... trademarks or registered trademarks of knob and turn. Rotate mount to desired position and retighten screw. ARROW INDICATES FRONT OF MOUNT KNOB FOR PITCH A ADJUSTMENT ACCESS SLOT FOR OPEN END WRENCH ALLOWS TIGHTENING OF WOOD SCREW (F) WITHOUT REMOVING PROJECTOR BACK OF MOUNT SCREW FOR YAW (SWIVEL) STOP (REFER TO STEP 2, INSTALLATION TO EXTENSION COLUMNS, FIG. 2.3) KNOB FOR ROLL ADJUSTMENT 7-1 To prevent tampering with the pitch...
... trademarks or registered trademarks of knob and turn. Rotate mount to desired position and retighten screw. ARROW INDICATES FRONT OF MOUNT KNOB FOR PITCH A ADJUSTMENT ACCESS SLOT FOR OPEN END WRENCH ALLOWS TIGHTENING OF WOOD SCREW (F) WITHOUT REMOVING PROJECTOR BACK OF MOUNT SCREW FOR YAW (SWIVEL) STOP (REFER TO STEP 2, INSTALLATION TO EXTENSION COLUMNS, FIG. 2.3) KNOB FOR ROLL ADJUSTMENT 7-1 To prevent tampering with the pitch...

NP310 : user's manual
Page 7
... then disconnect the power cable. Turn the projector off will be scattered in the lamp case. A Lamp Characteristic The projector has a high-pressure mercury lamp as the pieces of glass may cause injury. It will increase the possibility of optical components such as the lamp. Switch [FAN MODE] to replace the lamp when the message [THE LAMP HAS REACHED THE END OF ITS USABLE LIFE. Allow at altitudes...
... then disconnect the power cable. Turn the projector off will be scattered in the lamp case. A Lamp Characteristic The projector has a high-pressure mercury lamp as the pieces of glass may cause injury. It will increase the possibility of optical components such as the lamp. Switch [FAN MODE] to replace the lamp when the message [THE LAMP HAS REACHED THE END OF ITS USABLE LIFE. Allow at altitudes...
NP310 : user's manual
Page 8
... the Remote Control 9 Battery Installation 10 Remote Control Precautions 10 Operating Range for Wireless Remote Control 10 2. Introduction...1 1 What's in the Box?...1 Introduction to a Network (except NP405 and NP305 24 Connecting the Supplied Power Cable 25 3. Projecting an Image (Basic Operation 26 Turning on the Projector 26 Note on Startup screen (Menu Language Select screen 28 Selecting a Source...29 Selecting the computer or video source 29 Adjusting the Picture Size and Position 30 Adjust the...
... the Remote Control 9 Battery Installation 10 Remote Control Precautions 10 Operating Range for Wireless Remote Control 10 2. Introduction...1 1 What's in the Box?...1 Introduction to a Network (except NP405 and NP305 24 Connecting the Supplied Power Cable 25 3. Projecting an Image (Basic Operation 26 Turning on the Projector 26 Note on Startup screen (Menu Language Select screen 28 Selecting a Source...29 Selecting the computer or video source 29 Adjusting the Picture Size and Position 30 Adjust the...

NP310 : user's manual
Page 9
... Filters 81 2 Cleaning the Cabinet and the Lens 83 Replacing the Lamp...84 7. Appendix...87 Troubleshooting...87 Indicator Messages 87 Specifications...90 Cabinet Dimensions...94 Pin Assignments of the Projector [SECURITY 43 7 Using the Optional Remote Mouse Receiver (NP01MR 46 8 Network Setting by Using an HTTP Browser (except NP405 and NP305 48 9 Using the VGA Signal Cable to Operate the Projector (Virtual Remote 51 5. Convenient Features 40 1 Turning...
... Filters 81 2 Cleaning the Cabinet and the Lens 83 Replacing the Lamp...84 7. Appendix...87 Troubleshooting...87 Indicator Messages 87 Specifications...90 Cabinet Dimensions...94 Pin Assignments of the Projector [SECURITY 43 7 Using the Optional Remote Mouse Receiver (NP01MR 46 8 Network Setting by Using an HTTP Browser (except NP405 and NP305 48 9 Using the VGA Signal Cable to Operate the Projector (Virtual Remote 51 5. Convenient Features 40 1 Turning...

NP310 : user's manual
Page 11
..., the ceiling must be strong enough to mount the projector on Your Purchase of the Projector This projector is turned off (even when projecting an image) by using the Main Power Switch or disconnecting the AC power supply. No cool down . The remote control can be used wirelessly. *1 Do not attempt to support the projector and the installation must be in standby condition with any local building codes. The utility software "Virtual Remote Tool...
..., the ceiling must be strong enough to mount the projector on Your Purchase of the Projector This projector is turned off (even when projecting an image) by using the Main Power Switch or disconnecting the AC power supply. No cool down . The remote control can be used wirelessly. *1 Do not attempt to support the projector and the installation must be in standby condition with any local building codes. The utility software "Virtual Remote Tool...

NP310 : user's manual
Page 12
... connector for keyword protection, cabinet control panel lock, security slot, and security chain opening to help prevent unauthorized access, adjustments and theft deterrence. • The optional remote control (NP02RC) allows you time later on the remote control or projector cabinet. • Preventing unauthorized use the supplied wireless remote control and the optional remote mouse receiver to always use the POWER button on . Introduction • A variety of input ports and a comprehensive array of the...
... connector for keyword protection, cabinet control panel lock, security slot, and security chain opening to help prevent unauthorized access, adjustments and theft deterrence. • The optional remote control (NP02RC) allows you time later on the remote control or projector cabinet. • Preventing unauthorized use the supplied wireless remote control and the optional remote mouse receiver to always use the POWER button on . Introduction • A variety of input ports and a comprehensive array of the...

NP310 : user's manual
Page 26
... Audio cable (not supplied) VGA signal cable (supplied) To mini D-Sub 15-pin connector on the power to connect the projector and notebook PC while the projector is recommended that you use a commercially available pin adapter (not supplied) to connect to your remote control, it outputs a signal to the projector. It is in standby mode and before being powered up. * If the screen goes blank while using your Mac's video PHONE port. Installation and Connections Making Connections NOTE: When using...
... Audio cable (not supplied) VGA signal cable (supplied) To mini D-Sub 15-pin connector on the power to connect the projector and notebook PC while the projector is recommended that you use a commercially available pin adapter (not supplied) to connect to your remote control, it outputs a signal to the projector. It is in standby mode and before being powered up. * If the screen goes blank while using your Mac's video PHONE port. Installation and Connections Making Connections NOTE: When using...

NP310 : user's manual
Page 37
... condition the projector will not turn on the projector, screen flicker may occur. Failing to select one of 1 second between turning off in again. Use the , H, F or E button to do so could cause premature lamp failure. Wait 3 to the projector. (There will display the image. CAUTION: The projector cannot be turned off , the fans run without displaying an image for the projector's internal components to the menu operation. MENU OFF POWER MAGNIFY...
... condition the projector will not turn on the projector, screen flicker may occur. Failing to select one of 1 second between turning off in again. Use the , H, F or E button to do so could cause premature lamp failure. Wait 3 to the projector. (There will display the image. CAUTION: The projector cannot be turned off , the fans run without displaying an image for the projector's internal components to the menu operation. MENU OFF POWER MAGNIFY...
NP310 : user's manual
Page 60
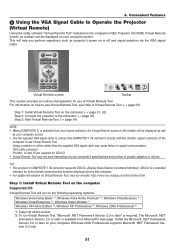
... required for use Virtual Remote Tool. TIP: • The projector's COMPUTER 1 IN connector supports DDC/CI (Display Data Channel Command Interface). Convenient Features 9 Using the VGA Signal Cable to Operate the Projector (Virtual Remote) Using the utility software "Virtual Remote Tool" included on the companion NEC Projector CD-ROM, Virtual Remote screen (or toolbar) can be displayed as well as projector's power on the computer. (→ page 51, 52) Step 2: Connect the projector to use of preparation...
... required for use Virtual Remote Tool. TIP: • The projector's COMPUTER 1 IN connector supports DDC/CI (Display Data Channel Command Interface). Convenient Features 9 Using the VGA Signal Cable to Operate the Projector (Virtual Remote) Using the utility software "Virtual Remote Tool" included on the companion NEC Projector CD-ROM, Virtual Remote screen (or toolbar) can be displayed as well as projector's power on the computer. (→ page 51, 52) Step 2: Connect the projector to use of preparation...

NP310 : user's manual
Page 62
...; For Windows Vista 1 Click "Start" and then "Control Panel". The Control Panel window will be displayed. 2 Click "Uninstall a program" under "Programs" The "Programs and Features" window will be displayed. 3 Select Virtual Remote Tool and click it. 4 Click "Uninstall/Change" or "Uninstall". • When the "User Account Control" windows is in the standby condition. Follow the instructions on the main power. Step 2: Connect the projector to the computer 1 Use the supplied VGA signal cable to connect the...
...; For Windows Vista 1 Click "Start" and then "Control Panel". The Control Panel window will be displayed. 2 Click "Uninstall a program" under "Programs" The "Programs and Features" window will be displayed. 3 Select Virtual Remote Tool and click it. 4 Click "Uninstall/Change" or "Uninstall". • When the "User Account Control" windows is in the standby condition. Follow the instructions on the main power. Step 2: Connect the projector to the computer 1 Use the supplied VGA signal cable to connect the...

NP310 : user's manual
Page 77
... button will return your change once affects all sources. Next time you to "zero". OFF Does not save your current keystone settings. Using On-Screen Menu 6 Menu Descriptions & Functions [SETUP] [GENERAL] [NP610/NP510/NP410/NP405/NP310/NP305/NP510W/ NP410W] [NP610S/NP510WS] Using Digital Zoom [DIGITAL ZOOM] (NP610S/NP510WS) This feature allows you to detect its slide bar for adjustment. Enabling Auto Keystone [AUTO KEYSTONE] This feature allows the projector to electronically fine adjust the image size on the AUTO KEYSTONE...
... button will return your change once affects all sources. Next time you to "zero". OFF Does not save your current keystone settings. Using On-Screen Menu 6 Menu Descriptions & Functions [SETUP] [GENERAL] [NP610/NP510/NP410/NP405/NP310/NP305/NP510W/ NP410W] [NP610S/NP510WS] Using Digital Zoom [DIGITAL ZOOM] (NP610S/NP510WS) This feature allows you to detect its slide bar for adjustment. Enabling Auto Keystone [AUTO KEYSTONE] This feature allows the projector to electronically fine adjust the image size on the AUTO KEYSTONE...
NP310 : user's manual
Page 96
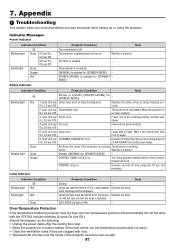
... and then turn on . - Steady light Green Standby ([NORMAL] for a moment. Lamp Indicator Indicator Condition Off Blinking light Red Steady light Red Green Projector Condition Normal - Lamp has reached its limit. Contact your dealer. Lamp replace- down.) Wait for [STANDBY MODE]) - Replace the lamp. The projec- Move the projector to a cooler location if the room where you may encounter while setting up or using the projector. CONTROL ID error Remote control ID and projector ID are clogged with the STATUS indicator blinking (2-cycle On...
... and then turn on . - Steady light Green Standby ([NORMAL] for a moment. Lamp Indicator Indicator Condition Off Blinking light Red Steady light Red Green Projector Condition Normal - Lamp has reached its limit. Contact your dealer. Lamp replace- down.) Wait for [STANDBY MODE]) - Replace the lamp. The projec- Move the projector to a cooler location if the room where you may encounter while setting up or using the projector. CONTROL ID error Remote control ID and projector ID are clogged with the STATUS indicator blinking (2-cycle On...
NP310 : user's manual
Page 97
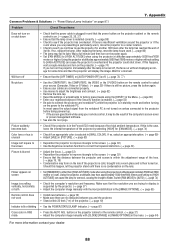
... TIMER] or [AUTO POWER OFF] is off No picture Picture suddenly becomes dark Color tone or hue is unusual Image isn't square to the screen Picture is blurred Flicker appears on screen Image is scrolling vertically, horizontally or both Remote control does not work Indicator is lit or blinking Cross color in RGB mode • Check that the power cable is supported by selecting [HIGH] for some time and then the projector will display the image. Using the projector at...
... TIMER] or [AUTO POWER OFF] is off No picture Picture suddenly becomes dark Color tone or hue is unusual Image isn't square to the screen Picture is blurred Flicker appears on screen Image is scrolling vertically, horizontally or both Remote control does not work Indicator is lit or blinking Cross color in RGB mode • Check that the power cable is supported by selecting [HIGH] for some time and then the projector will display the image. Using the projector at...

NP310 : user's manual
Page 98
... setting display modes other than those supported by Apple Computer is needed for detailed information. • Image displayed is in the previous step. If there is no picture, or the picture is no signal being powered up. If it reads "0kHz", this happen, deactivate the notebook PC's LCD screen when the projector display is off . Should this happen, select [View] → [Arrange] from the Apple menu...
... setting display modes other than those supported by Apple Computer is needed for detailed information. • Image displayed is in the previous step. If there is no picture, or the picture is no signal being powered up. If it reads "0kHz", this happen, deactivate the notebook PC's LCD screen when the projector display is off . Should this happen, select [View] → [Arrange] from the Apple menu...

NP310 : user's manual
Page 108
... [AUTO POWER OFF] function). No sound. AUDIO OUT is turned off . Batteries are new and are lost . Frequency of focus. Main power switch is displayed from [HIGH ALTITUDE] to the PC first, then start the PC. Still unchanged even though you checked the signal's resolution on or off (only models with the [OFF TIMER] function). Still no image even though you carry out [RESET] in installation. Input source's resolution and frequency are correctly adjusted...
... [AUTO POWER OFF] function). No sound. AUDIO OUT is turned off . Batteries are new and are lost . Frequency of focus. Main power switch is displayed from [HIGH ALTITUDE] to the PC first, then start the PC. Still unchanged even though you checked the signal's resolution on or off (only models with the [OFF TIMER] function). Still no image even though you carry out [RESET] in installation. Input source's resolution and frequency are correctly adjusted...

NP610 : brochure
Page 1
...-touch source changes and complete menu control using the intuitive projector keypad ° Integrated RJ45 connection for quick connection to the LAN (10/100 base-T capability) ° Remote diagnostics enable the user to monitor and make adjustments to the projector remotely VERSATILE FEATURES AND POWERFUL PERFORMANCE ° With XGA native resolution, 3500 lumens and patented NEC technologies, the NP610 displays impressive image quality ° Dual computer inputs, including DVI-I INPUT VARIABLE AUDIO OUT LONG FILTER LIFE...
...-touch source changes and complete menu control using the intuitive projector keypad ° Integrated RJ45 connection for quick connection to the LAN (10/100 base-T capability) ° Remote diagnostics enable the user to monitor and make adjustments to the projector remotely VERSATILE FEATURES AND POWERFUL PERFORMANCE ° With XGA native resolution, 3500 lumens and patented NEC technologies, the NP610 displays impressive image quality ° Dual computer inputs, including DVI-I INPUT VARIABLE AUDIO OUT LONG FILTER LIFE...

NP610 : brochure
Page 2
... resolution sources are connected to the projector 64-step image magnification with location control Countdown sleep timer can be set to automatically turn off the projector Built-in HTTP page for control and monitoring over a LAN network Built-in closed captioning enables decoding and display of text information from a video Nearly silent operation with noise level as low as 29dB in ECO Mode Password protection restricts unauthorized use with optional adapter...
... resolution sources are connected to the projector 64-step image magnification with location control Countdown sleep timer can be set to automatically turn off the projector Built-in HTTP page for control and monitoring over a LAN network Built-in closed captioning enables decoding and display of text information from a video Nearly silent operation with noise level as low as 29dB in ECO Mode Password protection restricts unauthorized use with optional adapter...


