
User Manual
Page 4
... malfunctions. • Do not bump the projector. • Avoid bumping the projector when moving or handling. Doing so may break the glass, resulting in injury. • Do not touch the air vents or lamp cover • The air vents, lamp cover, and peripheral surfaces may increase, resulting in unstable places....the lens. • Do not look through the lens into eyes, immediately wash them with your hand during operation. Doing so could cause the projector to prevent paper or cloth from a nearby appliance - Soot or steam - Doing so could cause fire or electric shock. • Do ...
... malfunctions. • Do not bump the projector. • Avoid bumping the projector when moving or handling. Doing so may break the glass, resulting in injury. • Do not touch the air vents or lamp cover • The air vents, lamp cover, and peripheral surfaces may increase, resulting in unstable places....the lens. • Do not look through the lens into eyes, immediately wash them with your hand during operation. Doing so could cause the projector to prevent paper or cloth from a nearby appliance - Soot or steam - Doing so could cause fire or electric shock. • Do ...

User Manual
Page 5
...• To clean the cabinet, operation panel, and glass surface, wipe gently with hard or pointed objects. The lamp is also designed to forcibly turn off the dirt, then use the projector for a long time, disconnect the power cord for a long period: • If you require new packaging. ...• Lamp implosion • An AC type New Super High pressure lamp is used beyond the lamp usage of the projector gets dusty and is used in rupture or leakage, and could cause fire and injury. • Servicing...
...• To clean the cabinet, operation panel, and glass surface, wipe gently with hard or pointed objects. The lamp is also designed to forcibly turn off the dirt, then use the projector for a long time, disconnect the power cord for a long period: • If you require new packaging. ...• Lamp implosion • An AC type New Super High pressure lamp is used beyond the lamp usage of the projector gets dusty and is used in rupture or leakage, and could cause fire and injury. • Servicing...

User Manual
Page 6
... minute after the power is turned off may get loose and fall off too frequently could cause injury. • Replacing the lamp • Be sure to keep the projector horizontal. Removing the air filter while the cooling fan is turned on /off /on page E-54 for the procedure. •...smoke. Refer to disconnect the power cord when the cooling fan stops before replacing the lamp. Using the projector in a tilted status may cause the projector to move or turn over, resulting in malfunctions of the projector. • Do not project an image with casters. Doing so could cause the ...
... minute after the power is turned off may get loose and fall off too frequently could cause injury. • Replacing the lamp • Be sure to keep the projector horizontal. Removing the air filter while the cooling fan is turned on /off /on page E-54 for the procedure. •...smoke. Refer to disconnect the power cord when the cooling fan stops before replacing the lamp. Using the projector in a tilted status may cause the projector to move or turn over, resulting in malfunctions of the projector. • Do not project an image with casters. Doing so could cause the ...
User Manual
Page 7
...Please save the original box and packing materials if you do not plan to use the projector for a long time, disconnect the power cord for Europe (1) E-7 For Europe Two-... any pieces are damaged. • If you ever need to ship your DT20 Projector. Moving the projector with wet hands. DT20 Projector (1) Remote control(1) Power codes (2) For North America Three-pin type for ... Box? If any cable connections between units and release the anti-theft lock before moving the projector. PC Signal cable (1) Lens cap(1) Batteries(2) (AA×2) Documents: User's manual (1) ...
...Please save the original box and packing materials if you do not plan to use the projector for a long time, disconnect the power cord for Europe (1) E-7 For Europe Two-... any pieces are damaged. • If you ever need to ship your DT20 Projector. Moving the projector with wet hands. DT20 Projector (1) Remote control(1) Power codes (2) For North America Three-pin type for ... Box? If any cable connections between units and release the anti-theft lock before moving the projector. PC Signal cable (1) Lens cap(1) Batteries(2) (AA×2) Documents: User's manual (1) ...

User Manual
Page 8
...11 Buttons and Indicator Lights E-12 Remote Controller E-15 Remote Control Operations E-17 Battery Replacement E-17 How to Install the Projector E-18 Installation Sequence E-18 Adjusting the Tilt E-18 Projection Distance and Projected Image Size E-19 Typical Installation E-20 Compensating ... of Menu Items E-43 Basic Operation E-47 Quick Menu ...E-51 Description of Menu Items E-51 Maintenance E-52 Fault Protection E-52 Lamp Unit Replacement E-54 Cleaning the Air Filter E-56 Troubleshooting E-57 Specifications E-58 * Company names and product names herein are trademarks ...
...11 Buttons and Indicator Lights E-12 Remote Controller E-15 Remote Control Operations E-17 Battery Replacement E-17 How to Install the Projector E-18 Installation Sequence E-18 Adjusting the Tilt E-18 Projection Distance and Projected Image Size E-19 Typical Installation E-20 Compensating ... of Menu Items E-43 Basic Operation E-47 Quick Menu ...E-51 Description of Menu Items E-51 Maintenance E-52 Fault Protection E-52 Lamp Unit Replacement E-54 Cleaning the Air Filter E-56 Troubleshooting E-57 Specifications E-58 * Company names and product names herein are trademarks ...

User Manual
Page 10
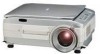
See page E-31 Sensor Adjustable Feet Air Vent B Air is discharged from the inside this cover. Adjustable Feet I/O Terminal Panel Connection terminals for a PC or video source are located here. Scanner Place documents or printed matter here to project images when OHP is housed inside to the outside through this vent. Speakers Power (Cord connecter) Connect the power cord into this terminal. Lamp Unit Cover (bottom of main unit) The scanner lamp unit is selected. See page E-20. See page E-54. E-10 See page E-11.
See page E-31 Sensor Adjustable Feet Air Vent B Air is discharged from the inside this cover. Adjustable Feet I/O Terminal Panel Connection terminals for a PC or video source are located here. Scanner Place documents or printed matter here to project images when OHP is housed inside to the outside through this vent. Speakers Power (Cord connecter) Connect the power cord into this terminal. Lamp Unit Cover (bottom of main unit) The scanner lamp unit is selected. See page E-20. See page E-54. E-10 See page E-11.

User Manual
Page 12
... off. • Only this button can be used when the lamp is off. • This LED blinks for ten seconds and lights when the temperature inside the projector has built up. • This LED lights while the lamp is on. • When the lamp is turned on, it blinks for about six seconds then... remains on. • When the lamp is off, it blinks for about 60 seconds then remains...
... off. • Only this button can be used when the lamp is off. • This LED blinks for ten seconds and lights when the temperature inside the projector has built up. • This LED lights while the lamp is on. • When the lamp is turned on, it blinks for about six seconds then... remains on. • When the lamp is off, it blinks for about 60 seconds then remains...
User Manual
Page 15
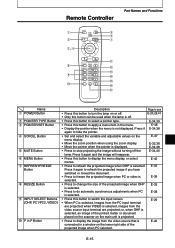
...the E-40 projected image when PC selected. Press it again and the image will reappear. • Press this button can be used when the lamp is selected, images from the video source input terminal are projected; E-48 E-34,38 • Set and select the variable and adjustable values ... select menus. E-15 E-34,39 • Press this button to apply a menu item in P Button Description • Press this button to turn the lamp on the menu display. • Move the zoom position when using the zoom display. • Move the pointer when the pointer is selected. E-42 &#...
...the E-40 projected image when PC selected. Press it again and the image will reappear. • Press this button can be used when the lamp is selected, images from the video source input terminal are projected; E-48 E-34,38 • Set and select the variable and adjustable values ... select menus. E-15 E-34,39 • Press this button to apply a menu item in P Button Description • Press this button to turn the lamp on the menu display. • Move the zoom position when using the zoom display. • Move the pointer when the pointer is selected. E-42 &#...

User Manual
Page 29
ON/ STANDBY LAMP/ COVER TEMP The projector is displayed. Remote Control Operation OHP PC1/PC2 VIDEO The selected input display is in the standby mode.... OHP PC/video See page E-30. Basic Operation ■ Preparation Basic Operation 2 1 1 1 Connect the power cord. If the LAMP/COVER LED lights red after turning on the power. 2 Main Unit Operation OHP PC1/PC2 VIDEO Select the external input device. NOTE When ... lens cap has been removed before turning on the POWER button, then there is displayed. The LAMP/COVER LED lights (green). Press the POWER button.
ON/ STANDBY LAMP/ COVER TEMP The projector is displayed. Remote Control Operation OHP PC1/PC2 VIDEO The selected input display is in the standby mode.... OHP PC/video See page E-30. Basic Operation ■ Preparation Basic Operation 2 1 1 1 Connect the power cord. If the LAMP/COVER LED lights red after turning on the power. 2 Main Unit Operation OHP PC1/PC2 VIDEO Select the external input device. NOTE When ... lens cap has been removed before turning on the POWER button, then there is displayed. The LAMP/COVER LED lights (green). Press the POWER button.

User Manual
Page 34
... images. w Project an arbitrary image while the projected image is muted. E-34 Press the SCROLL button to stop projecting the image without turning off the lamp. You can switch the type of pointer with the POINTER TYPE button on the "Setting 2" menu. q Project a completely black image while the projected image is...
... images. w Project an arbitrary image while the projected image is muted. E-34 Press the SCROLL button to stop projecting the image without turning off the lamp. You can switch the type of pointer with the POINTER TYPE button on the "Setting 2" menu. q Project a completely black image while the projected image is...

User Manual
Page 40
... both connected, you can not use the picture in Picture" to "ON" on the quick menu to stop projecting the image without turning off the lamp. See page E-51 for a certain amount of time (about 15 minutes) it when video is selected. • You can select the image projected while the...
... both connected, you can not use the picture in Picture" to "ON" on the quick menu to stop projecting the image without turning off the lamp. See page E-51 for a certain amount of time (about 15 minutes) it when video is selected. • You can select the image projected while the...

User Manual
Page 41
... Control Operation "Press POWER button again to Quit Basic Operation 1 2 1 Main Unit Operation POWER Turn the lamp off or the LAMP/COVER LED lights. POWER Press the POWER button again. The LAMP/COVER LED blinks green, and then goes out after the ON/STANDBY LED lights red. 2 Disconnect the power... goes out. ■ How to turn the lamp on again, press the POWER button again after about 10 seconds) before the lamp goes off . E-41 ON/ STANDBY LAMP/ COVER The ON/STANDBY LED on even if you are not going to use the projector for at least one minute. is blinking green...
... Control Operation "Press POWER button again to Quit Basic Operation 1 2 1 Main Unit Operation POWER Turn the lamp off or the LAMP/COVER LED lights. POWER Press the POWER button again. The LAMP/COVER LED blinks green, and then goes out after the ON/STANDBY LED lights red. 2 Disconnect the power... goes out. ■ How to turn the lamp on again, press the POWER button again after about 10 seconds) before the lamp goes off . E-41 ON/ STANDBY LAMP/ COVER The ON/STANDBY LED on even if you are not going to use the projector for at least one minute. is blinking green...

User Manual
Page 42
... PHOTO / TEXT MENU Image adjustment Setting 1 Setting 2 Language selection Projection mode Video select Quit Standard Clock Phase Horizontal Vertical Sync adjustment 0 0 0 0 Return Standard Return Setting 1 Lamp usage time Input signal 24H 1024 x 768 / 48.6KHz 60Hz Auto power off ON / OFF Start-up display Economy mode ON / OFF ON / OFF Standard...
... PHOTO / TEXT MENU Image adjustment Setting 1 Setting 2 Language selection Projection mode Video select Quit Standard Clock Phase Horizontal Vertical Sync adjustment 0 0 0 0 Return Standard Return Setting 1 Lamp usage time Input signal 24H 1024 x 768 / 48.6KHz 60Hz Auto power off ON / OFF Start-up display Economy mode ON / OFF ON / OFF Standard...

User Manual
Page 45
...Item Pointer type RGB-OUT select Mute mode Setting Item Description / / Selects a type of time (about 15 minutes). Black/Logo Sets the image to (XGA 60Hz) on page E-24. When black is a straight through output. PC·OHP/ When PC·OHP is selected: OHP If the input selection...pointer from among the three types. NOTE In the "Setting 1" menu, the currently set to ON, the projector automatically goes to display the Logo while the lamp is on. E-45 ◆ Setting 1 Setting 1 Lamp usage time Input signal 24H 1024 x 768 / 48.6KHz 60Hz Auto power off ON / OFF Start-up...
...Item Pointer type RGB-OUT select Mute mode Setting Item Description / / Selects a type of time (about 15 minutes). Black/Logo Sets the image to (XGA 60Hz) on page E-24. When black is a straight through output. PC·OHP/ When PC·OHP is selected: OHP If the input selection...pointer from among the three types. NOTE In the "Setting 1" menu, the currently set to ON, the projector automatically goes to display the Logo while the lamp is on. E-45 ◆ Setting 1 Setting 1 Lamp usage time Input signal 24H 1024 x 768 / 48.6KHz 60Hz Auto power off ON / OFF Start-up...

User Manual
Page 48
...To return to set . POWER MENU MUTE POINTER TYPE REFRESH Menu items that require selection of these menu items, see page E-45. Setting 1 Lamp usage time 24H Input signal 1024 x 768 / 48.6KHz 60Hz Auto power off ", "Start up display ON / OFF VIDEO OHP STORED IMAGE... OFF P in the "Image adjustment", "Sync adjustment", "Setting" or "Video adjustment" menus. The menu for the item you bought the SET projector, select "Standard" and press the button (or POINTER/ SET POINTER button) in P LIVE IMAGE KEYSTONE Standard Return E-48 Main Unit Operation SCROLL RESIZE...
...To return to set . POWER MENU MUTE POINTER TYPE REFRESH Menu items that require selection of these menu items, see page E-45. Setting 1 Lamp usage time 24H Input signal 1024 x 768 / 48.6KHz 60Hz Auto power off ", "Start up display ON / OFF VIDEO OHP STORED IMAGE... OFF P in the "Image adjustment", "Sync adjustment", "Setting" or "Video adjustment" menus. The menu for the item you bought the SET projector, select "Standard" and press the button (or POINTER/ SET POINTER button) in P LIVE IMAGE KEYSTONE Standard Return E-48 Main Unit Operation SCROLL RESIZE...

User Manual
Page 49
... FREEZE ZOOM 4-2 POSITION RESIZE ROTATION V H OHP BRIGHTNESS 4-1 4-1 Press the buttons to select the item you want to select "ON" or SCROLL RESIZE MENU SET Setting 1 Lamp usage time 24H Input signal 1024 x 768 / 48.6KHz 60Hz Auto power off ON / OFF Start-up display Economy mode ON / OFF ON / OFF POINTER...
... FREEZE ZOOM 4-2 POSITION RESIZE ROTATION V H OHP BRIGHTNESS 4-1 4-1 Press the buttons to select the item you want to select "ON" or SCROLL RESIZE MENU SET Setting 1 Lamp usage time 24H Input signal 1024 x 768 / 48.6KHz 60Hz Auto power off ON / OFF Start-up display Economy mode ON / OFF ON / OFF POINTER...

User Manual
Page 51
...the - Description of the projected image. * Does not display without input from the internal memory. *If the ambient temperature is low when the scanner lamp is 1 frame per second. The document scanning speed is turned ON, the OHP images will appear a little red. ◆ When the OHP stored.... When "Window" is on the lower right side of Menu Items ◆ When OHP Is Selected QUICK MENU Movie mode Full / Window Scanner lamp ON / OFF Stored images clear all - E-51 Stored images clear all Quit Menu Item Setting Item Description Movie mode Full/Window When "Full"...
...the - Description of the projected image. * Does not display without input from the internal memory. *If the ambient temperature is low when the scanner lamp is 1 frame per second. The document scanning speed is turned ON, the OHP images will appear a little red. ◆ When the OHP stored.... When "Window" is on the lower right side of Menu Items ◆ When OHP Is Selected QUICK MENU Movie mode Full / Window Scanner lamp ON / OFF Stored images clear all - E-51 Stored images clear all Quit Menu Item Setting Item Description Movie mode Full/Window When "Full"...

User Manual
Page 52
...stays on page E-4. E-52 Maintenance ■ Fault Protection Your projector is provided with internal protection circuits for repair. * When the TEMP LED is OFF, your projector is working properly. * Replace the lamp at the same time when the LAMP/COVER LED is on. Disconnect the power cord from the ...power outlet. 2. Is the air filter clogged? Ask your projector away from walls and other objects. If the ...
...stays on page E-4. E-52 Maintenance ■ Fault Protection Your projector is provided with internal protection circuits for repair. * When the TEMP LED is OFF, your projector is working properly. * Replace the lamp at the same time when the LAMP/COVER LED is on. Disconnect the power cord from the ...power outlet. 2. Is the air filter clogged? Ask your projector away from walls and other objects. If the ...
User Manual
Page 54
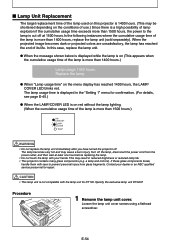
...dealer or an NEC qualified service presonnel for repair. Turn off the lamp, disconnect the power cord from glass fragments. Specify the exclusive lamp unit DT02LP. E-54 ■ Lamp Unit Replacement The target replacement time of the lamp used on this case, replace the lamp unit. ●...the menu display has reached 1400 hours, the LAMP/ COVER LED blinks red. This may cause a burn injury. The lamp usage time is displayed in reduced brightness or reduced lamp life. • This projector contains many glass components (e.g. a lamp and mirrors). Contact your hands. If these ...
...dealer or an NEC qualified service presonnel for repair. Turn off the lamp, disconnect the power cord from glass fragments. Specify the exclusive lamp unit DT02LP. E-54 ■ Lamp Unit Replacement The target replacement time of the lamp used on this case, replace the lamp unit. ●...the menu display has reached 1400 hours, the LAMP/ COVER LED blinks red. This may cause a burn injury. The lamp usage time is displayed in reduced brightness or reduced lamp life. • This projector contains many glass components (e.g. a lamp and mirrors). Contact your hands. If these ...

User Manual
Page 55
...slots on unless the lamp unit cover is not reset, reset it by the local government. NOTE • As a safety precaution, the lamp does not turn on the projector to the lamp is "0H" as well. (See page E-56.) • The lamp can be known. The LAMP/COVER LED then blinks ...green. The probability of a lamp explosion increases if the cumulative usage time of the...
...slots on unless the lamp unit cover is not reset, reset it by the local government. NOTE • As a safety precaution, the lamp does not turn on the projector to the lamp is "0H" as well. (See page E-56.) • The lamp can be known. The LAMP/COVER LED then blinks ...green. The probability of a lamp explosion increases if the cumulative usage time of the...

