
User Manual
Page 2
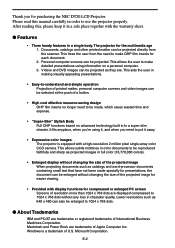
... document can be projected. Windows is equipped with display functions for compressed or enlarged PC screen Screens of resolution more than 1024 x 768 dots are displayed compressed to 1024 x 768 dots without any loss in to be reproduced faithfully and sharp as projected images in full color (16,770,000 colors). • Enlarged display without changing the size of the projected image for purchasing the NEC DT20 LCD Projector. Thank you need...
... document can be projected. Windows is equipped with display functions for compressed or enlarged PC screen Screens of resolution more than 1024 x 768 dots are displayed compressed to 1024 x 768 dots without any loss in to be reproduced faithfully and sharp as projected images in full color (16,770,000 colors). • Enlarged display without changing the size of the projected image for purchasing the NEC DT20 LCD Projector. Thank you need...

User Manual
Page 5
... blower or lens cleaning paper. E-5 There is a risk of fire or faulty operation if the inside of the projector gets dusty and is used beyond the lamp usage of 1500 hours (Refer to explode during use the projector for a long time, disconnect the power cord for a long time. Solvents can cause rupture or leakage, and could cause fire and injury. • Servicing and cleaning •...
... blower or lens cleaning paper. E-5 There is a risk of fire or faulty operation if the inside of the projector gets dusty and is used beyond the lamp usage of 1500 hours (Refer to explode during use the projector for a long time, disconnect the power cord for a long time. Solvents can cause rupture or leakage, and could cause fire and injury. • Servicing and cleaning •...

User Manual
Page 6
... disconnect the power cord when the fan stops, and wait an hour or more before removing the air filter. Return the product to deteriorate or break, resulting in malfunctions of the projector. • Do not project an image with the lens cap attached. • Moving the projector • Be sure careful of the lamp can escape and looks like white smoke. The lamp pieces could...
... disconnect the power cord when the fan stops, and wait an hour or more before removing the air filter. Return the product to deteriorate or break, resulting in malfunctions of the projector. • Do not project an image with the lens cap attached. • Moving the projector • Be sure careful of the lamp can escape and looks like white smoke. The lamp pieces could...

User Manual
Page 8
... Panel E-11 Buttons and Indicator Lights E-12 Remote Controller E-15 Remote Control Operations E-17 Battery Replacement E-17 How to Install the Projector E-18 Installation Sequence E-18 Adjusting the Tilt E-18 Projection Distance and Projected Image Size E-19 Typical Installation E-20 Compensating Keystone E-21 Connecting to a Personal Computer E-22 Connecting to a Personal Computer E-22 About RGB Video Output E-23 When Images on the Personal Computer Screen are not Projected E-24 Input Signal Compatibility Table (PC video input terminal E-25 Connecting to a Video Source...
... Panel E-11 Buttons and Indicator Lights E-12 Remote Controller E-15 Remote Control Operations E-17 Battery Replacement E-17 How to Install the Projector E-18 Installation Sequence E-18 Adjusting the Tilt E-18 Projection Distance and Projected Image Size E-19 Typical Installation E-20 Compensating Keystone E-21 Connecting to a Personal Computer E-22 Connecting to a Personal Computer E-22 About RGB Video Output E-23 When Images on the Personal Computer Screen are not Projected E-24 Input Signal Compatibility Table (PC video input terminal E-25 Connecting to a Video Source...

User Manual
Page 12
... BRIGHTNESS button lightens the projected image. ■ Buttons and Indicator Lights qw e r t POWER ON/ STANDBY LAMP/ COVER TEMP KEYSTONE MUTE OHP BRIGHTNESS PC1/PC2 VIDEO ZOOM MENU SCROLL yu i o !0 !1 Name q POWER Button w TEMP LED e LAMP/COVER LED r ON/STANDBY LED t INPUT SELECT Buttons (OHP, PC1/PC2, VIDEO) y KEYSTONE Button u MUTE Button i BRIGHTNESS Buttons Description • Press this button to turn the lamp on or off. • Only this button can be used when the lamp is off. • This LED blinks for ten seconds and lights when the temperature inside the projector...
... BRIGHTNESS button lightens the projected image. ■ Buttons and Indicator Lights qw e r t POWER ON/ STANDBY LAMP/ COVER TEMP KEYSTONE MUTE OHP BRIGHTNESS PC1/PC2 VIDEO ZOOM MENU SCROLL yu i o !0 !1 Name q POWER Button w TEMP LED e LAMP/COVER LED r ON/STANDBY LED t INPUT SELECT Buttons (OHP, PC1/PC2, VIDEO) y KEYSTONE Button u MUTE Button i BRIGHTNESS Buttons Description • Press this button to turn the lamp on or off. • Only this button can be used when the lamp is off. • This LED blinks for ten seconds and lights when the temperature inside the projector...
User Manual
Page 15
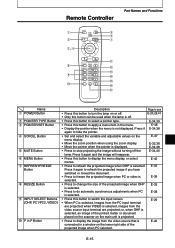
Remote Controller Part Names and Functions q w e,r POWER MENU MUTE POINTER TYPE REFRESH POINTER/ SET FREEZE t y u i o !0 ZOOM POSITION RESIZE ROTATION V H OHP BRIGHTNESS PC1/PC2 VOLUME VIDEO OHP STORED IMAGE P in P LIVE IMAGE KEYSTONE !1 !2 !3 !4 !5 !6 !7 Name q POWER Button w POINTER TYPE Button e POINTER/SET Button r SCROLL Button t MUTE Button y MENU Button u REFRESH/FREEZE Button i RESIZE Button o INPUT SELECT Buttons (OHP, PC1/PC2, VIDEO) !0 P in the menu. • Display the pointer when the menu is not displayed. Page to see E-20,29,41 • Press this...
Remote Controller Part Names and Functions q w e,r POWER MENU MUTE POINTER TYPE REFRESH POINTER/ SET FREEZE t y u i o !0 ZOOM POSITION RESIZE ROTATION V H OHP BRIGHTNESS PC1/PC2 VOLUME VIDEO OHP STORED IMAGE P in P LIVE IMAGE KEYSTONE !1 !2 !3 !4 !5 !6 !7 Name q POWER Button w POINTER TYPE Button e POINTER/SET Button r SCROLL Button t MUTE Button y MENU Button u REFRESH/FREEZE Button i RESIZE Button o INPUT SELECT Buttons (OHP, PC1/PC2, VIDEO) !0 P in the menu. • Display the pointer when the menu is not displayed. Page to see E-20,29,41 • Press this...

User Manual
Page 25
Connecting to a Personal Computer ■ Input Signal Compatibility Table (PC video input terminal) The DT20 supports the signals marked by ● in the Sync Adjustment menu. When it does not distort the image. If this happens, adjust the projected image in the following table. E-25 Note that it is higher, compress the display. • Signals marked with an * may become fuzzy if too much vertical keystone...; When the input signal resolution is applied. When using one of these signals, set the keystone compensation so that on some PC models, flickering and blurring occur in the...
Connecting to a Personal Computer ■ Input Signal Compatibility Table (PC video input terminal) The DT20 supports the signals marked by ● in the Sync Adjustment menu. When it does not distort the image. If this happens, adjust the projected image in the following table. E-25 Note that it is higher, compress the display. • Signals marked with an * may become fuzzy if too much vertical keystone...; When the input signal resolution is applied. When using one of these signals, set the keystone compensation so that on some PC models, flickering and blurring occur in the...

User Manual
Page 29
... the standby mode, and the power indicator LED lights (red). Basic Operation ■ Preparation Basic Operation 2 1 1 1 Connect the power cord. Press the POWER button. The LAMP/COVER LED lights (green). ON/ STANDBY LAMP/ COVER TEMP The projector is something wrong. (See page E52 for details.) NOTE Make sure that the lens cap has been removed before turning on , "No input" is displayed. The fan spins, the LED lights, and the ON/STANDBY LED lights (green). OHP PC/video See page E-30. See page E-37. E-29 Select the video source...
... the standby mode, and the power indicator LED lights (red). Basic Operation ■ Preparation Basic Operation 2 1 1 1 Connect the power cord. Press the POWER button. The LAMP/COVER LED lights (green). ON/ STANDBY LAMP/ COVER TEMP The projector is something wrong. (See page E52 for details.) NOTE Make sure that the lens cap has been removed before turning on , "No input" is displayed. The fan spins, the LED lights, and the ON/STANDBY LED lights (green). OHP PC/video See page E-30. See page E-37. E-29 Select the video source...

User Manual
Page 33
... while checking the projected image. 12 Main Unit Operation RESIZE Remote Control Operation RESIZE Basic Operation Project a full-screen image. There are stored on the bottom right of the OHP images are the two following the currently displayed image from the quick menu (page E-51) when viewing the OHP stored image. • Pressing the POWER button and going into standby erases the OHP stored images. • The brightness can switch the stored images...
... while checking the projected image. 12 Main Unit Operation RESIZE Remote Control Operation RESIZE Basic Operation Project a full-screen image. There are stored on the bottom right of the OHP images are the two following the currently displayed image from the quick menu (page E-51) when viewing the OHP stored image. • Pressing the POWER button and going into standby erases the OHP stored images. • The brightness can switch the stored images...

User Manual
Page 34
... projecting the image without turning off the lamp. While the image is muted, the projecting image icon is displayed on the top right side of pointer with the POINTER TYPE button on the top right side of the screen. Press it automatically goes into standby. E-34 NOTE Adjusting the zoom or the brightness while the pointer is muted from "Pointer type" on the "Setting 2" menu...
... projecting the image without turning off the lamp. While the image is muted, the projecting image icon is displayed on the top right side of pointer with the POINTER TYPE button on the top right side of the screen. Press it automatically goes into standby. E-34 NOTE Adjusting the zoom or the brightness while the pointer is muted from "Pointer type" on the "Setting 2" menu...

User Manual
Page 40
... muted, the projecting image icon is not being input. 13 Main Unit Operation MUTE Remote Control Operation MUTE NOTE Mute the image. If you select personal computer input while a video source and a personal computer are both connected, you can display video images in the window at the same time. Set "Picture in "Mute mode" on the quick menu to stop projecting the image without turning off the lamp. You can not use the picture in picture function if...
... muted, the projecting image icon is not being input. 13 Main Unit Operation MUTE Remote Control Operation MUTE NOTE Mute the image. If you select personal computer input while a video source and a personal computer are both connected, you can display video images in the window at the same time. Set "Picture in "Mute mode" on the quick menu to stop projecting the image without turning off the lamp. You can not use the picture in picture function if...

User Manual
Page 41
... LAMP/COVER LED is displayed on the projected image. ON/ STANDBY LAMP/ COVER The ON/STANDBY LED on even if you are not going to use the projector for at least one minute. The LAMP/COVER LED blinks green, and then goes out after the ON/STANDBY LED lights red. 2 Disconnect the power cord. Doing so may shorten the life of time (about one second.) Remote Control Operation "Press POWER button again to Quit Basic Operation 1 2 1 Main Unit Operation POWER Turn the lamp off or the LAMP/COVER LED lights...
... LAMP/COVER LED is displayed on the projected image. ON/ STANDBY LAMP/ COVER The ON/STANDBY LED on even if you are not going to use the projector for at least one minute. The LAMP/COVER LED blinks green, and then goes out after the ON/STANDBY LED lights red. 2 Disconnect the power cord. Doing so may shorten the life of time (about one second.) Remote Control Operation "Press POWER button again to Quit Basic Operation 1 2 1 Main Unit Operation POWER Turn the lamp off or the LAMP/COVER LED lights...

User Manual
Page 45
... images are input for a fixed period of pointer from among the three types. Black/Logo Sets the image to be displayed for which the timing is changed to (XGA 60Hz) on page E-23. Economy mode ON/OFF Sets the lamp in Economy mode. Start-up display Economy mode ON / OFF ON / OFF Standard Return Basic Operation Menu Item Setting Item Description Auto power off ON/OFF Sets the auto power off is set input signals and lamp usage time...
... images are input for a fixed period of pointer from among the three types. Black/Logo Sets the image to be displayed for which the timing is changed to (XGA 60Hz) on page E-23. Economy mode ON/OFF Sets the lamp in Economy mode. Start-up display Economy mode ON / OFF ON / OFF Standard Return Basic Operation Menu Item Setting Item Description Auto power off ON/OFF Sets the auto power off is set input signals and lamp usage time...

User Manual
Page 46
...;ais Italiano Return Menu Item Language selection Setting Item Description English Sets the language used in display. E-46 Deutsch Français Italiano Española Svenska ◆ Projection Mode Projection mode Front Rear Return Menu Item Projection mode Setting Item Front Rear Description Adjusts the projection mode according to the installation method (front (standard) projection or rear projection). ◆ Video Select (only when video source input is selected) Video select Auto NTSC 4.43 PAL...
...;ais Italiano Return Menu Item Language selection Setting Item Description English Sets the language used in display. E-46 Deutsch Français Italiano Española Svenska ◆ Projection Mode Projection mode Front Rear Return Menu Item Projection mode Setting Item Front Rear Description Adjusts the projection mode according to the installation method (front (standard) projection or rear projection). ◆ Video Select (only when video source input is selected) Video select Auto NTSC 4.43 PAL...

User Manual
Page 52
... actions. Place your projector away from the power outlet. 2. Disconnect the power cord from the power outlet. 2. Use your projector within 10 seconds after the LED starts blinking, the warning will stop. (When the TEMP LED goes out, normal operation continues.) If the TEMP LED blinks for more than 10 seconds and the operating status does not change, the LED stops blinking and stays on and the lamp turns off. Clean the air filter. Ask your dealer...
... actions. Place your projector away from the power outlet. 2. Disconnect the power cord from the power outlet. 2. Use your projector within 10 seconds after the LED starts blinking, the warning will stop. (When the TEMP LED goes out, normal operation continues.) If the TEMP LED blinks for more than 10 seconds and the operating status does not change, the LED stops blinking and stays on and the lamp turns off. Clean the air filter. Ask your dealer...
User Manual
Page 54
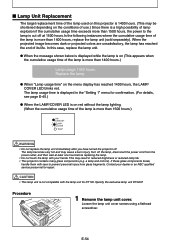
... time" on the menu display has reached 1400 hours, the LAMP/ COVER LED blinks red. Specify the exclusive lamp unit DT02LP. Turn off the lamp, disconnect the power cord from glass fragments. Contact your hands. This may cause a burn injury. When the projected image becomes dark or projected colors are unsatisfactory, the lamp has reached the end of its life. The lamp usage time is displayed in reduced brightness or reduced lamp life. • This projector...
... time" on the menu display has reached 1400 hours, the LAMP/ COVER LED blinks red. Specify the exclusive lamp unit DT02LP. Turn off the lamp, disconnect the power cord from glass fragments. Contact your hands. This may cause a burn injury. When the projected image becomes dark or projected colors are unsatisfactory, the lamp has reached the end of its life. The lamp usage time is displayed in reduced brightness or reduced lamp life. • This projector...

User Manual
Page 55
... on unless the lamp unit cover is forcibly turned off ON / OFF Start-up display Economy mode ON / OFF ON / OFF Standard Return 4 Install a new lamp unit. When replacing the lamp unit, be known. OHP PC1/PC2 VIDEO MENU q w e Setting 1 Lamp usage time Input signal 0H 1024 x 768 / 48.6KHz 60H Auto power off regardless of the lamp kit. CAUTION Do not reset the lamp usage time without replacing the lamp. Loosen the lamp unit screws. (2 pieces) 3 Draw...
... on unless the lamp unit cover is forcibly turned off ON / OFF Start-up display Economy mode ON / OFF ON / OFF Standard Return 4 Install a new lamp unit. When replacing the lamp unit, be known. OHP PC1/PC2 VIDEO MENU q w e Setting 1 Lamp usage time Input signal 0H 1024 x 768 / 48.6KHz 60H Auto power off regardless of the lamp kit. CAUTION Do not reset the lamp usage time without replacing the lamp. Loosen the lamp unit screws. (2 pieces) 3 Draw...
User Manual
Page 56
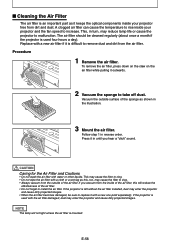
A clogged air filter can cause the temperature to rise inside of the sponge as this will not light unless the air filter is mounted. If you hear a "click" sound. The air filter should be sure to install the air filter. Press it in turn, may reduce lamp life or cause the projector to malfunction. ■ Cleaning the Air Filter The air filter is an important part as it keeps the optical components inside your projector free from...
A clogged air filter can cause the temperature to rise inside of the sponge as this will not light unless the air filter is mounted. If you hear a "click" sound. The air filter should be sure to install the air filter. Press it in turn, may reduce lamp life or cause the projector to malfunction. ■ Cleaning the Air Filter The air filter is an important part as it keeps the optical components inside your projector free from...

User Manual
Page 57
... PC is within the focusing distance. • Keystone compensation may not be applied. The image is blurred. • Check the focus. • Make sure that the projection distance is correctly set to minimum. The lamp does not light due to the changes in the Image Adjustment menu is not blown or worn. The color is in the Sync Adjustment menu. The LAMP/COVER LED lights red. • Make sure that the air filter is not disconnected...
... PC is within the focusing distance. • Keystone compensation may not be applied. The image is blurred. • Check the focus. • Make sure that the projection distance is correctly set to minimum. The lamp does not light due to the changes in the Image Adjustment menu is not blown or worn. The color is in the Sync Adjustment menu. The LAMP/COVER LED lights red. • Make sure that the air filter is not disconnected...
User Manual
Page 58
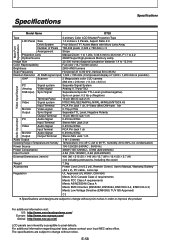
E-58 Specifications Specifications Model Name DT20 Type 3 primary Color LCD Shutter Projection Type LCD Panel Size 1.0 inches x 3 Panels, Aspect Ratio 4:3 Main Part Specification Drive System Poly Silicon TFT Active Matrix with Micro Lens Array Number of Pixels 786,432 pixels (1,024 x 768 dots)ן3 Arrangement Stripe Projection Lens Manual Zoom: 1 to 1.25x, f=36.5 mm to 45.6 mm, F1.7 to 2.2 Optical Source 260W Super High-pressure Mercury Lamp Image Size 32-300 inches diagonal (projection distance 1.4 to...
E-58 Specifications Specifications Model Name DT20 Type 3 primary Color LCD Shutter Projection Type LCD Panel Size 1.0 inches x 3 Panels, Aspect Ratio 4:3 Main Part Specification Drive System Poly Silicon TFT Active Matrix with Micro Lens Array Number of Pixels 786,432 pixels (1,024 x 768 dots)ן3 Arrangement Stripe Projection Lens Manual Zoom: 1 to 1.25x, f=36.5 mm to 45.6 mm, F1.7 to 2.2 Optical Source 260W Super High-pressure Mercury Lamp Image Size 32-300 inches diagonal (projection distance 1.4 to...

