User Guide
Page 4
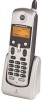
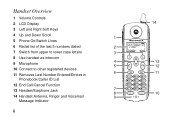
Handset Overview 1 Volume Controls 2 LCD Display 3 Left and Right Soft Keys 4 Up and Down Scroll 1 5 Phone On/Switch Lines 6 Redial list of the last 5 numbers dialed 2 7 Switch from upper to lower case letters 3 8 Use handset as intercom 9 Microphone 4 5 10 Connect to other registered devices 11 Removes Last Number Entered/Entries in 6 Phonebook/Caller ID List 12 End Call/Cancel Function 13 Headset/Earphone Jack 7 8 14 Handset Antenna, Ringer and Voicemail 9 Message Indicator ii 14 13 12 11 10
Handset Overview 1 Volume Controls 2 LCD Display 3 Left and Right Soft Keys 4 Up and Down Scroll 1 5 Phone On/Switch Lines 6 Redial list of the last 5 numbers dialed 2 7 Switch from upper to lower case letters 3 8 Use handset as intercom 9 Microphone 4 5 10 Connect to other registered devices 11 Removes Last Number Entered/Entries in 6 Phonebook/Caller ID List 12 End Call/Cancel Function 13 Headset/Earphone Jack 7 8 14 Handset Antenna, Ringer and Voicemail 9 Message Indicator ii 14 13 12 11 10
User Guide
Page 15
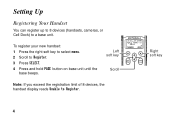
Left soft key Scroll Note: If you exceed the registration limit of 8 devices, the handset display reads Unable to a base unit. Setting Up Registering Your Handset You can register up to 8 devices (handsets, cameras, or Cell Dock) to Register. 4 Right soft key To register your new handset: 1 Press the right soft key to select menu. 2 Scroll to Register. 3 Press SELECT. 4 Press and hold PAGE button on base unit until the base beeps.
Left soft key Scroll Note: If you exceed the registration limit of 8 devices, the handset display reads Unable to a base unit. Setting Up Registering Your Handset You can register up to 8 devices (handsets, cameras, or Cell Dock) to Register. 4 Right soft key To register your new handset: 1 Press the right soft key to select menu. 2 Scroll to Register. 3 Press SELECT. 4 Press and hold PAGE button on base unit until the base beeps.
User Guide
Page 16
...5 "Please register handset" displays. 6 Press OK to begin the registration process or press EXIT. ** NOTE ** All accessories use the same process to register and deregister to flash quickly, then release PAGE. 5 Quickly and fully press and release PAGE again. Deregistering a Handset Caution: You will deregister all handsets from the base unit... to all voice mail messages, if necessary, to clear the IN USE/Voice Mail indicator. 2 Press OFF on the base unit and all handsets. 3 Press and hold down PAGE on the base unit until the IN USE indicator begins to flash slowly, then release. 4 Press and ...
...5 "Please register handset" displays. 6 Press OK to begin the registration process or press EXIT. ** NOTE ** All accessories use the same process to register and deregister to flash quickly, then release PAGE. 5 Quickly and fully press and release PAGE again. Deregistering a Handset Caution: You will deregister all handsets from the base unit... to all voice mail messages, if necessary, to clear the IN USE/Voice Mail indicator. 2 Press OFF on the base unit and all handsets. 3 Press and hold down PAGE on the base unit until the IN USE indicator begins to flash slowly, then release. 4 Press and ...
User Guide
Page 25
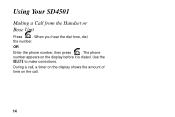
Use the DELETE to make corrections. Using Your SD4501 Making a Call from the Handset or Base Unit Press . The phone number appears on the call , a timer on the display shows the amount of time on the display before it is dialed. During a call . 14 When you hear the dial tone, dial the number. OR Enter the phone number, then press .
Use the DELETE to make corrections. Using Your SD4501 Making a Call from the Handset or Base Unit Press . The phone number appears on the call , a timer on the display shows the amount of time on the display before it is dialed. During a call . 14 When you hear the dial tone, dial the number. OR Enter the phone number, then press .

User Guide
Page 32
The phone number displays in the Number field. 5 Press DONE. 6 Press EXIT once to return to the redial list, or press EXIT twice to return to the left of the blinking cursor. 4 Scroll down. Press DELETE to backspace and erase characters to the standby menu. 21 Enter the name up to the Phonebook from Redial Press REDIAL. Using Your SD4501 Adding Numbers to 11 characters. The display shows the last numbers you dialed, with the most recent number at the top. 1 Scroll to the number you want to save. 2 Press STORE. 3 Select the PRIVATE or SHARD phonebook.
The phone number displays in the Number field. 5 Press DONE. 6 Press EXIT once to return to the redial list, or press EXIT twice to return to the left of the blinking cursor. 4 Scroll down. Press DELETE to backspace and erase characters to the standby menu. 21 Enter the name up to the Phonebook from Redial Press REDIAL. Using Your SD4501 Adding Numbers to 11 characters. The display shows the last numbers you dialed, with the most recent number at the top. 1 Scroll to the number you want to save. 2 Press STORE. 3 Select the PRIVATE or SHARD phonebook.
User Guide
Page 33
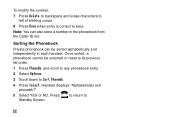
Handset displays "Alphabetically sort phonebk?" 5 Select YES or NO. Note: You can be unsorted or reset to its previous list order. 1 Press Phonebk, and scroll to any phonebook entry. 2 Select Options. 3 Scroll down to Sort Phonebk. 4 Press Select. Sorting the Phonebook Private phonebook can also store a number in each handset. to return to save...
Handset displays "Alphabetically sort phonebk?" 5 Select YES or NO. Note: You can be unsorted or reset to its previous list order. 1 Press Phonebk, and scroll to any phonebook entry. 2 Select Options. 3 Scroll down to Sort Phonebk. 4 Press Select. Sorting the Phonebook Private phonebook can also store a number in each handset. to return to save...
User Guide
Page 36
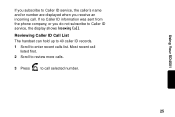
Most recent call listed first. 2 Scroll to review more calls. 3 Press to call . Reviewing Caller ID Call List The handset can hold up to 40 caller ID records. 1 Scroll to Caller ID service, the display shows Incoming Call. Using Your SD4501 If you subscribe to Caller ID service, the caller's name and/or number are displayed when you do not subscribe to enter recent calls list. If no Caller ID information was sent from the phone company, or you receive an incoming call selected number. 25
Most recent call listed first. 2 Scroll to review more calls. 3 Press to call . Reviewing Caller ID Call List The handset can hold up to 40 caller ID records. 1 Scroll to Caller ID service, the display shows Incoming Call. Using Your SD4501 If you subscribe to Caller ID service, the caller's name and/or number are displayed when you do not subscribe to enter recent calls list. If no Caller ID information was sent from the phone company, or you receive an incoming call selected number. 25

User Guide
Page 39
Conference Calling If one handset is added to a call: 1 Press or DELETE on the second handset. 2 To join a conference call , the display on other handsets registered to the same base unit shows Line in use. from the 3 To disconnect from the conference call , the display on all handsets shows On conference. To connect a second handset to the call , press base unit. Once a second handset is already on a call , press on either or both handsets. 28
Conference Calling If one handset is added to a call: 1 Press or DELETE on the second handset. 2 To join a conference call , the display on other handsets registered to the same base unit shows Line in use. from the 3 To disconnect from the conference call , the display on all handsets shows On conference. To connect a second handset to the call , press base unit. Once a second handset is already on a call , press on either or both handsets. 28

User Guide
Page 45
..., the monitoring feature is turned off. 34 The display lists the handsets registered to the base unit. The display shows Ready to monitor room. 8 On the handset you want to listen from , press Handsfree. The display lists the handsets registered to the base unit. 3 If you have only 1 handset, pressing the Handsfree button automatically pages the other...
..., the monitoring feature is turned off. 34 The display lists the handsets registered to the base unit. The display shows Ready to monitor room. 8 On the handset you want to listen from , press Handsfree. The display lists the handsets registered to the base unit. 3 If you have only 1 handset, pressing the Handsfree button automatically pages the other...


