User Guide
Page 4
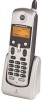
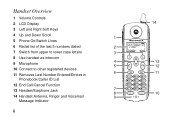
Handset Overview 1 Volume Controls 2 LCD Display 3 Left and Right Soft Keys 4 Up and Down Scroll 1 5 Phone On/Switch Lines 6 Redial list of the last 5 numbers dialed 2 7 Switch from upper to lower case letters 3 8 Use handset as intercom 9 Microphone 4 5 10 Connect to other registered devices 11 Removes Last Number Entered/Entries in 6 Phonebook/Caller ID List 12 End Call/Cancel Function 13 Headset/Earphone Jack 7 8 14 Handset Antenna, Ringer and Voicemail 9 Message Indicator ii 14 13 12 11 10
Handset Overview 1 Volume Controls 2 LCD Display 3 Left and Right Soft Keys 4 Up and Down Scroll 1 5 Phone On/Switch Lines 6 Redial list of the last 5 numbers dialed 2 7 Switch from upper to lower case letters 3 8 Use handset as intercom 9 Microphone 4 5 10 Connect to other registered devices 11 Removes Last Number Entered/Entries in 6 Phonebook/Caller ID List 12 End Call/Cancel Function 13 Headset/Earphone Jack 7 8 14 Handset Antenna, Ringer and Voicemail 9 Message Indicator ii 14 13 12 11 10
User Guide
Page 10
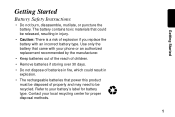
... chemicals or cleaning agents to normal operation. 7 Clean this product with your home, consult with a soft, damp cloth. Unplug this cordless phone immediately from the wall. Do not retrieve the handset or base until after you are covered by unplugged cords. • The product has been dropped or the cabinet has been...
... chemicals or cleaning agents to normal operation. 7 Clean this product with your home, consult with a soft, damp cloth. Unplug this cordless phone immediately from the wall. Do not retrieve the handset or base until after you are covered by unplugged cords. • The product has been dropped or the cabinet has been...
User Guide
Page 11
... will not be walked on. • Never insert objects of any kind into the product slits as that proper ventilation is required, contact the Motorola address found in the back of this product. If service or repair work is provided at the installation site. • Do not use while.... Important Safety Instructions Follow these safety precautions when using during an electrical storm. Ensure that may result in fire or shock. • Unplug this cordless phone to report a gas leak, especially if you are in water. • Do not use this product near a bath tub, kitchen sink, or swimming ...
... will not be walked on. • Never insert objects of any kind into the product slits as that proper ventilation is required, contact the Motorola address found in the back of this product. If service or repair work is provided at the installation site. • Do not use while.... Important Safety Instructions Follow these safety precautions when using during an electrical storm. Ensure that may result in fire or shock. • Unplug this cordless phone to report a gas leak, especially if you are in water. • Do not use this product near a bath tub, kitchen sink, or swimming ...
User Guide
Page 12
Refer to be disposed of explosion if you replace the battery with your local recycling center for battery type. Contact your phone or an authorized replacement recommended by the manufacturer. • Keep batteries out of the reach of children. • Remove batteries if storing over 30 days. &#...
Refer to be disposed of explosion if you replace the battery with your local recycling center for battery type. Contact your phone or an authorized replacement recommended by the manufacturer. • Keep batteries out of the reach of children. • Remove batteries if storing over 30 days. &#...
User Guide
Page 14
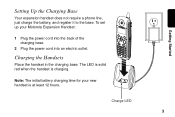
Getting Started Setting Up the Charging Base Your expansion handset does not require a phone line, just charge the battery, and register it to the base. To set up your new handset is charging. Note: The initial battery charging time for your Motorola Expansion Handset: 1 Plug the power cord into the back of the charging base. 2 Plug the power cord into an electric outlet. The LED is solid red when the handset is at least 12 hours. Charge LED 3 Charging the Handsets Place the handset in the charging base.
Getting Started Setting Up the Charging Base Your expansion handset does not require a phone line, just charge the battery, and register it to the base. To set up your new handset is charging. Note: The initial battery charging time for your Motorola Expansion Handset: 1 Plug the power cord into the back of the charging base. 2 Plug the power cord into an electric outlet. The LED is solid red when the handset is at least 12 hours. Charge LED 3 Charging the Handsets Place the handset in the charging base.

User Guide
Page 24
Do not change the setting unless touch tone service is set for touch tone dialing. Setting Touch Tone or Pulse Dialing Your phone is not available in your area. 1 Press Menu. 2 Scroll to Tone/Pulse. 3 Press Select. 4 Press Change to switch between Tone and Pulse. 5 Press Done. 6 Press Exit to return to the Standby Screen. 13 Setting Up
Do not change the setting unless touch tone service is set for touch tone dialing. Setting Touch Tone or Pulse Dialing Your phone is not available in your area. 1 Press Menu. 2 Scroll to Tone/Pulse. 3 Press Select. 4 Press Change to switch between Tone and Pulse. 5 Press Done. 6 Press Exit to return to the Standby Screen. 13 Setting Up
User Guide
Page 25
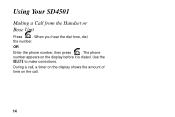
Use the DELETE to make corrections. When you hear the dial tone, dial the number. During a call, a timer on the display shows the amount of time on the display before it is dialed. The phone number appears on the call. 14 OR Enter the phone number, then press . Using Your SD4501 Making a Call from the Handset or Base Unit Press .
Use the DELETE to make corrections. When you hear the dial tone, dial the number. During a call, a timer on the display shows the amount of time on the display before it is dialed. The phone number appears on the call. 14 OR Enter the phone number, then press . Using Your SD4501 Making a Call from the Handset or Base Unit Press .

User Guide
Page 32
The display shows the last numbers you dialed, with the most recent number at the top. 1 Scroll to the number you want to the standby menu. 21 The phone number displays in the Number field. 5 Press DONE. 6 Press EXIT once to return to the redial list, or press EXIT twice to return to save. 2 Press STORE. 3 Select the PRIVATE or SHARD phonebook. Using Your SD4501 Adding Numbers to the left of the blinking cursor. 4 Scroll down. Press DELETE to backspace and erase characters to the Phonebook from Redial Press REDIAL. Enter the name up to 11 characters.
The display shows the last numbers you dialed, with the most recent number at the top. 1 Scroll to the number you want to the standby menu. 21 The phone number displays in the Number field. 5 Press DONE. 6 Press EXIT once to return to the redial list, or press EXIT twice to return to save. 2 Press STORE. 3 Select the PRIVATE or SHARD phonebook. Using Your SD4501 Adding Numbers to the left of the blinking cursor. 4 Scroll down. Press DELETE to backspace and erase characters to the Phonebook from Redial Press REDIAL. Enter the name up to 11 characters.

User Guide
Page 34
Editing a Phonebook Entry 1 Press Phonebk. 2 Scroll to entry you want to edit. 3 Press Options. 4 Scroll to Edit. 5 Press Select. Use Delete to backspace and erase characters to the left of the blinking cursor. 6 Scroll down to move to phone number field. 7 Modify number. 8 Press Done. 23 Using Your SD4501 Calling a Number from the Phonebook 1 Press Phonebk. 2 Scroll to entry you want to call. 3 Press or Handsfree.
Editing a Phonebook Entry 1 Press Phonebk. 2 Scroll to entry you want to edit. 3 Press Options. 4 Scroll to Edit. 5 Press Select. Use Delete to backspace and erase characters to the left of the blinking cursor. 6 Scroll down to move to phone number field. 7 Modify number. 8 Press Done. 23 Using Your SD4501 Calling a Number from the Phonebook 1 Press Phonebk. 2 Scroll to entry you want to call. 3 Press or Handsfree.

User Guide
Page 35
...voicemail system. When you have to dial 9 to get a dial tone or for example, when you call a number with a pause, the phone waits 3 seconds before transmitting the next digits in a Number At the position where you want to delete. 3 Press Options. 4 Scroll to Delete. 5 Press Select. Using Caller ID... Note: You must subscribe to caller ID service from your local telephone company to use the caller ID features of your phone. 24 Inserting...
...voicemail system. When you have to dial 9 to get a dial tone or for example, when you call a number with a pause, the phone waits 3 seconds before transmitting the next digits in a Number At the position where you want to delete. 3 Press Options. 4 Scroll to Delete. 5 Press Select. Using Caller ID... Note: You must subscribe to caller ID service from your local telephone company to use the caller ID features of your phone. 24 Inserting...
User Guide
Page 36
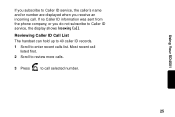
Using Your SD4501 If you subscribe to call selected number. 25 Most recent call . If no Caller ID information was sent from the phone company, or you receive an incoming call listed first. 2 Scroll to review more calls. 3 Press to Caller ID service, the caller's name and/or number are displayed when you do not subscribe to enter recent calls list. Reviewing Caller ID Call List The handset can hold up to 40 caller ID records. 1 Scroll to Caller ID service, the display shows Incoming Call.
Using Your SD4501 If you subscribe to call selected number. 25 Most recent call . If no Caller ID information was sent from the phone company, or you receive an incoming call listed first. 2 Scroll to review more calls. 3 Press to Caller ID service, the caller's name and/or number are displayed when you do not subscribe to enter recent calls list. Reviewing Caller ID Call List The handset can hold up to 40 caller ID records. 1 Scroll to Caller ID service, the display shows Incoming Call.

User Guide
Page 37
Using Automated Dialing You can retrieve previously entered information from the phone book (such as necessary to re-enter additional numbers. 1 While on a call, scroll the entry that you can enter your most frequently used prompt, for ...example, balance inquiry. 26 Then, you want to recall. 2 Press DIAL. 3 Repeat steps 1 and 2 as many times as a PIN or credit card number) during a phone call without have to complete your account number (using automated dialing), and PIN (using automated dialing). Note: This function is useful when using automated response...
Using Automated Dialing You can retrieve previously entered information from the phone book (such as necessary to re-enter additional numbers. 1 While on a call, scroll the entry that you can enter your most frequently used prompt, for ...example, balance inquiry. 26 Then, you want to recall. 2 Press DIAL. 3 Repeat steps 1 and 2 as many times as a PIN or credit card number) during a phone call without have to complete your account number (using automated dialing), and PIN (using automated dialing). Note: This function is useful when using automated response...
User Guide
Page 38
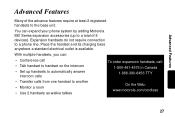
... base anywhere a standard electrical outlet is available. With multiple handsets, you can expand your phone system by adding Motorola MD Series expansion accessories (up handsets to automatically answer intercom calls • Transfer calls from one handset to another • Monitor a room • Use 2 handsets as walkie talkies To order expansion handsets, call: 1-800-461-4575 in Canada 1-888-390...
... base anywhere a standard electrical outlet is available. With multiple handsets, you can expand your phone system by adding Motorola MD Series expansion accessories (up handsets to automatically answer intercom calls • Transfer calls from one handset to another • Monitor a room • Use 2 handsets as walkie talkies To order expansion handsets, call: 1-800-461-4575 in Canada 1-888-390...

User Guide
Page 44
Advanced Features Using the Handset as a Walkie Talkie The walkie talkie feature lets you cannot make or receive phone calls. When a handset is named Kitchen(2), press 2 on the handset keypad that corresponds to the handset you want to use walkie talkie with. (For example, if the handset you want to talk... to is in walkie talkie mode, you talk handset to end the walkie ...
Advanced Features Using the Handset as a Walkie Talkie The walkie talkie feature lets you cannot make or receive phone calls. When a handset is named Kitchen(2), press 2 on the handset keypad that corresponds to the handset you want to use walkie talkie with. (For example, if the handset you want to talk... to is in walkie talkie mode, you talk handset to end the walkie ...

User Guide
Page 48
... or corporation commission for information. • If your home has specially wired alarm equipment connected to correct the situation 37 In case of this cordless phone does not disable your alarm equipment. Note: • This equipment may temporarily disconnect service immediately.
... or corporation commission for information. • If your home has specially wired alarm equipment connected to correct the situation 37 In case of this cordless phone does not disable your alarm equipment. Note: • This equipment may temporarily disconnect service immediately.

User Guide
Page 51
... not exceed 5. The equipment must comply with this equipment to the facilities of the local telecommunications company. The Ringer Equivalency Number (REN) for this cordless phone, you may connect to be extended by the certification/registration number found on the label on the telephone base unit. Before installing this equipment is...
... not exceed 5. The equipment must comply with this equipment to the facilities of the local telecommunications company. The Ringer Equivalency Number (REN) for this cordless phone, you may connect to be extended by the certification/registration number found on the label on the telephone base unit. Before installing this equipment is...
User Guide
Page 52
...Hearing Aid Compatibility This telephone system meets Industry Canada standards for hearing aid compatibility. 41 Privacy Privacy of this cordless phone or cause noise during operation. If you disconnect the equipment, and may interfere with the operation of communications may ...cordless telephones, may void the limited warranty. Any repairs or alterations made by an authorized Canadian maintenance facility designated by Motorola. Contact the appropriate electrical inspection authority or an electrician, as appropriate.If your telephone company or a qualified installer. This...
...Hearing Aid Compatibility This telephone system meets Industry Canada standards for hearing aid compatibility. 41 Privacy Privacy of this cordless phone or cause noise during operation. If you disconnect the equipment, and may interfere with the operation of communications may ...cordless telephones, may void the limited warranty. Any repairs or alterations made by an authorized Canadian maintenance facility designated by Motorola. Contact the appropriate electrical inspection authority or an electrician, as appropriate.If your telephone company or a qualified installer. This...


