
User Guide
Page 2
... other product or service names are registered in this manual at www.motorola.com/cordless Copyright © 2005 Motorola, Inc. For a large-print version of this guide, or for a particular purpose. All rights reserved. Motorola may be reproduced in content from Motorola, Inc. MOTOROLA, and the Stylized M Logo, are the property of any means or used to make improvements or changes in the...
... other product or service names are registered in this manual at www.motorola.com/cordless Copyright © 2005 Motorola, Inc. For a large-print version of this guide, or for a particular purpose. All rights reserved. Motorola may be reproduced in content from Motorola, Inc. MOTOROLA, and the Stylized M Logo, are the property of any means or used to make improvements or changes in the...

User Guide
Page 3
... status. Registering helps us facilitate warranty service, and permits us to ensure that your Motorola product require an update or other service. Registration is an important step toward enjoying your purchase of a Motorola SD4501 series telephone. For warranty service of your Motorola Product, you should your purchase includes each of your records. To register your product online, visit: www.motorola.com/warranty/cordless Please retain your original dated sales...
... status. Registering helps us facilitate warranty service, and permits us to ensure that your Motorola product require an update or other service. Registration is an important step toward enjoying your purchase of a Motorola SD4501 series telephone. For warranty service of your Motorola Product, you should your purchase includes each of your records. To register your product online, visit: www.motorola.com/warranty/cordless Please retain your original dated sales...
User Guide
Page 4
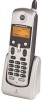
Handset Overview 1 Volume Controls 2 LCD Display 3 Left and Right Soft Keys 4 Up and Down Scroll 1 5 Phone On/Switch Lines 6 Redial list of the last 5 numbers dialed 2 7 Switch from upper to lower case letters 3 8 Use handset as intercom 9 Microphone 4 5 10 Connect to other registered devices 11 Removes Last Number Entered/Entries in 6 Phonebook/Caller ID List 12 End Call/Cancel Function 13 Headset/Earphone Jack 7 8 14 Handset Antenna, Ringer and Voicemail 9 Message Indicator ii 14 13 12 11 10
Handset Overview 1 Volume Controls 2 LCD Display 3 Left and Right Soft Keys 4 Up and Down Scroll 1 5 Phone On/Switch Lines 6 Redial list of the last 5 numbers dialed 2 7 Switch from upper to lower case letters 3 8 Use handset as intercom 9 Microphone 4 5 10 Connect to other registered devices 11 Removes Last Number Entered/Entries in 6 Phonebook/Caller ID List 12 End Call/Cancel Function 13 Headset/Earphone Jack 7 8 14 Handset Antenna, Ringer and Voicemail 9 Message Indicator ii 14 13 12 11 10
User Guide
Page 6
Table of Contents Welcome i Handset Overview ii Handset Charger Overview iii Important Safety Instructions iv Getting Started 1 Battery Safety Instructions 1 Charging the Handsets 3 Setting Up 4 Registering Your Handset 4 Ringer Options 6 Setting the Ring Tone and Ring Volume 7 Setting Key Beeps On or Off 8 Naming a Handset or Base Station 9 Setting Touch Tone or Pulse Dialing 13 iv
Table of Contents Welcome i Handset Overview ii Handset Charger Overview iii Important Safety Instructions iv Getting Started 1 Battery Safety Instructions 1 Charging the Handsets 3 Setting Up 4 Registering Your Handset 4 Ringer Options 6 Setting the Ring Tone and Ring Volume 7 Setting Key Beeps On or Off 8 Naming a Handset or Base Station 9 Setting Touch Tone or Pulse Dialing 13 iv
User Guide
Page 10
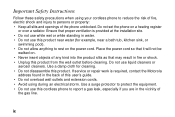
... table. Do not retrieve the handset or base until after you are covered by unplugged cords. • The product has been dropped or the cabinet has been damaged. • The product exhibits a distinct change in damage and will often require extensive work to restore the product to rain or water. Then retrieve the unit by the operating instructions. viii Unplug this phone.
... table. Do not retrieve the handset or base until after you are covered by unplugged cords. • The product has been dropped or the cabinet has been damaged. • The product exhibits a distinct change in damage and will often require extensive work to restore the product to rain or water. Then retrieve the unit by the operating instructions. viii Unplug this phone.
User Guide
Page 11
... the vicinity of the phone unblocked. Important Safety Instructions Follow these safety precautions when using during an electrical storm. Do not set the phone on the power cord. Do not use this cordless phone to report a gas leak, especially if you are in fire or shock. • Unplug this user's guide. • Do not overload wall outlets and extension cords. • Avoid using your cordless phone to reduce the...
... the vicinity of the phone unblocked. Important Safety Instructions Follow these safety precautions when using during an electrical storm. Do not set the phone on the power cord. Do not use this cordless phone to report a gas leak, especially if you are in fire or shock. • Unplug this user's guide. • Do not overload wall outlets and extension cords. • Avoid using your cordless phone to reduce the...
User Guide
Page 14
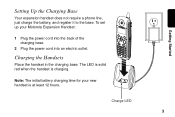
To set up your new handset is charging. Getting Started Setting Up the Charging Base Your expansion handset does not require a phone line, just charge the battery, and register it to the base. The LED is solid red when the handset is at least 12 hours. Charging the Handsets Place the handset in the charging base. Note: The initial battery charging time for your Motorola Expansion Handset: 1 Plug the power cord into the back of the charging base. 2 Plug the power cord into an electric outlet. Charge LED 3
To set up your new handset is charging. Getting Started Setting Up the Charging Base Your expansion handset does not require a phone line, just charge the battery, and register it to the base. The LED is solid red when the handset is at least 12 hours. Charging the Handsets Place the handset in the charging base. Note: The initial battery charging time for your Motorola Expansion Handset: 1 Plug the power cord into the back of the charging base. 2 Plug the power cord into an electric outlet. Charge LED 3
User Guide
Page 15
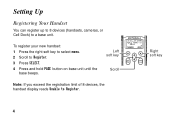
Setting Up Registering Your Handset You can register up to 8 devices (handsets, cameras, or Cell Dock) to Register. 3 Press SELECT. 4 Press and hold PAGE button on base unit until the base beeps. To register your new handset: 1 Press the right soft key to select menu. 2 Scroll to a base unit. Left soft key Scroll Note: If you exceed the registration limit of 8 devices, the handset display reads Unable to Register. 4 Right soft key
Setting Up Registering Your Handset You can register up to 8 devices (handsets, cameras, or Cell Dock) to Register. 3 Press SELECT. 4 Press and hold PAGE button on base unit until the base beeps. To register your new handset: 1 Press the right soft key to select menu. 2 Scroll to a base unit. Left soft key Scroll Note: If you exceed the registration limit of 8 devices, the handset display reads Unable to Register. 4 Right soft key
User Guide
Page 16
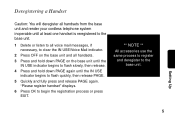
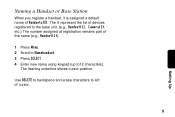
... voice mail messages, if necessary, to clear the IN USE/Voice Mail indicator. 2 Press OFF on the base unit and all handsets. 3 Press and hold down PAGE on the base unit until the IN USE indicator begins to flash slowly, then release. 4 Press and hold down PAGE again until the IN USE indicator begins to the base unit. "Please register handset" displays. 6 Press OK to begin the registration process or press EXIT. ** NOTE ** All accessories use...
... voice mail messages, if necessary, to clear the IN USE/Voice Mail indicator. 2 Press OFF on the base unit and all handsets. 3 Press and hold down PAGE on the base unit until the IN USE indicator begins to flash slowly, then release. 4 Press and hold down PAGE again until the IN USE indicator begins to the base unit. "Please register handset" displays. 6 Press OK to begin the registration process or press EXIT. ** NOTE ** All accessories use...
User Guide
Page 17
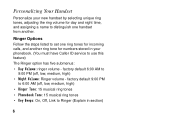
... ring tones • Key Beeps: On, Off, Link to Ringer (Explain in your phonebook. (You must have Caller ID service to use this feature) The Ringer option has five submenus: • Day Volume: ringer volume - Ringer Options Follow the steps listed to set one handset from another ring tone for numbers stored in section) 6 factory default 9:00 PM to 6:00 AM (off , low, medium, high) • Night Volume: Ringer volume - Personalizing Your Handset Personalize your new handset...
... ring tones • Key Beeps: On, Off, Link to Ringer (Explain in your phonebook. (You must have Caller ID service to use this feature) The Ringer option has five submenus: • Day Volume: ringer volume - Ringer Options Follow the steps listed to set one handset from another ring tone for numbers stored in section) 6 factory default 9:00 PM to 6:00 AM (off , low, medium, high) • Night Volume: Ringer volume - Personalizing Your Handset Personalize your new handset...

User Guide
Page 18
... Screen or press scroll keys to Ringer. 3 Press Select. 4 Scroll through list of options. (Day Volume, Night Volume, Ringer Tone, etc.) 5 Select desired option. 6 Press Change. RING ER SUBM ENU OPTIONS Day Volume: Ringer volume from 6:00 AM to 9:00 PM (off, low, m edium , high) Night Volume: Ringer volum e from 9:00 PM to 6:00 AM (off, low, m edium , high) Ringer Tone: 24 ring tones Phonebook Tone: 24 ring tones Key Beeps: O n, O ff, Link to R inger Setting...
... Screen or press scroll keys to Ringer. 3 Press Select. 4 Scroll through list of options. (Day Volume, Night Volume, Ringer Tone, etc.) 5 Select desired option. 6 Press Change. RING ER SUBM ENU OPTIONS Day Volume: Ringer volume from 6:00 AM to 9:00 PM (off, low, m edium , high) Night Volume: Ringer volum e from 9:00 PM to 6:00 AM (off, low, m edium , high) Ringer Tone: 24 ring tones Phonebook Tone: 24 ring tones Key Beeps: O n, O ff, Link to R inger Setting...
User Guide
Page 20
The flashing underline shows cursor position. Use DELETE to backspace and erase characters to Namehandset. 3 Press SELECT. 4 Enter new name using keypad (up to12 characters). Naming a Handset or Base Station When you register a handset, it is assigned a default name of cursor. 9 Setting Up The X represent the list of devices registered to the base unit. (e.g., Handset(1), Camera(2), etc.) The number assigned at registration remains part of the name (e.g., Handset(1)). 1 Press Menu. 2 Scroll to left of Handsets(X).
The flashing underline shows cursor position. Use DELETE to backspace and erase characters to Namehandset. 3 Press SELECT. 4 Enter new name using keypad (up to12 characters). Naming a Handset or Base Station When you register a handset, it is assigned a default name of cursor. 9 Setting Up The X represent the list of devices registered to the base unit. (e.g., Handset(1), Camera(2), etc.) The number assigned at registration remains part of the name (e.g., Handset(1)). 1 Press Menu. 2 Scroll to left of Handsets(X).

User Guide
Page 23
Setting the Language Option 1 Press Menu. 2 Scroll to Language. 3 Press Select. 4 Press Change until desired language is listed. 5 Press Done. 6 Press Exit to return to Standby Screen. 8 Scroll to next field. 9 Press Change to select date format (MM/DD, DD/MM) 10 Scroll to next field. 11 Enter the current date. 12 Press Done. 13 Press Exit to return to the Standby Screen. 12
Setting the Language Option 1 Press Menu. 2 Scroll to Language. 3 Press Select. 4 Press Change until desired language is listed. 5 Press Done. 6 Press Exit to return to Standby Screen. 8 Scroll to next field. 9 Press Change to select date format (MM/DD, DD/MM) 10 Scroll to next field. 11 Enter the current date. 12 Press Done. 13 Press Exit to return to the Standby Screen. 12
User Guide
Page 25
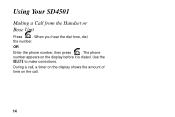
Use the DELETE to make corrections. During a call, a timer on the display shows the amount of time on the display before it is dialed. Using Your SD4501 Making a Call from the Handset or Base Unit Press . OR Enter the phone number, then press . The phone number appears on the call. 14 When you hear the dial tone, dial the number.
Use the DELETE to make corrections. During a call, a timer on the display shows the amount of time on the display before it is dialed. Using Your SD4501 Making a Call from the Handset or Base Unit Press . OR Enter the phone number, then press . The phone number appears on the call. 14 When you hear the dial tone, dial the number.
User Guide
Page 26
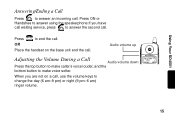
Using Your SD4501 Answering/Ending a Call Press to end the call. Press to answer an incoming call. Press ON or Handsfree to answer using the speakerphone.If you are not on the base unit end the call . When you have call , use the volume keys to change the day (6 am-9 pm) or night (9 pm-6 am) ringer volume. 15 OR Place the handset on a call waiting service, press to make voice softer. Audio volume up Adjusting the Volume During a Call Audio volume down Press the top button to make caller's voice louder, and the bottom button to answer the second call .
Using Your SD4501 Answering/Ending a Call Press to end the call. Press to answer an incoming call. Press ON or Handsfree to answer using the speakerphone.If you are not on the base unit end the call . When you have call , use the volume keys to change the day (6 am-9 pm) or night (9 pm-6 am) ringer volume. 15 OR Place the handset on a call waiting service, press to make voice softer. Audio volume up Adjusting the Volume During a Call Audio volume down Press the top button to make caller's voice louder, and the bottom button to answer the second call .
User Guide
Page 38
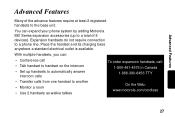
... handsets, you can expand your phone system by adding Motorola MD Series expansion accessories (up handsets to automatically answer intercom calls • Transfer calls from one handset to another • Monitor a room • Use 2 handsets as walkie talkies To order expansion handsets, call: 1-800-461-4575 in Canada 1-888-390-6456 TTY (Text Telephone) On the Web: www.motorola.com/cordless 27 You can : • Conference call • Talk handset to handset on the intercom • Set...
... handsets, you can expand your phone system by adding Motorola MD Series expansion accessories (up handsets to automatically answer intercom calls • Transfer calls from one handset to another • Monitor a room • Use 2 handsets as walkie talkies To order expansion handsets, call: 1-800-461-4575 in Canada 1-888-390-6456 TTY (Text Telephone) On the Web: www.motorola.com/cordless 27 You can : • Conference call • Talk handset to handset on the intercom • Set...

User Guide
Page 39
Conference Calling If one handset is added to the same base unit shows Line in use. To connect a second handset to a call: 1 Press or DELETE on the second handset. 2 To join a conference call , the display on other handsets registered to the call , press on all handsets shows On conference. from the 3 To disconnect from the conference call , the display on either or both handsets. 28 Once a second handset is already on a call , press base unit.
Conference Calling If one handset is added to the same base unit shows Line in use. To connect a second handset to a call: 1 Press or DELETE on the second handset. 2 To join a conference call , the display on other handsets registered to the call , press on all handsets shows On conference. from the 3 To disconnect from the conference call , the display on either or both handsets. 28 Once a second handset is already on a call , press base unit.

User Guide
Page 40
... the factory. Advanced Features Using the Intercom Intercom Setup Set up a handset or base unit to the desired answering option. 5 Press SELECT. the handset 2 Scroll to Intercom Setup. 3 Press SELECT. 4 Scroll to automatically answers an intercom page after 1 or 3 rings. does not automatically answer an intercom page. Change the factory setting using the steps below. After 1 Ring or After 3 Rings the handset automatically answers and turns on the 6 Press to return to the standby screen, or to scroll speakerphone...
... the factory. Advanced Features Using the Intercom Intercom Setup Set up a handset or base unit to the desired answering option. 5 Press SELECT. the handset 2 Scroll to Intercom Setup. 3 Press SELECT. 4 Scroll to automatically answers an intercom page after 1 or 3 rings. does not automatically answer an intercom page. Change the factory setting using the steps below. After 1 Ring or After 3 Rings the handset automatically answers and turns on the 6 Press to return to the standby screen, or to scroll speakerphone...

User Guide
Page 46
... can also use the base unit for monitoring automatically answers the page. To turn off . You can download additional ring tones and purchase services with openLCR. 1 Go to the openLCR website at www.openLCR.com. 2 Click on Ringtone. 3 Click on either handset. Advanced Features The handset that handset is turned on, and the speaker is turned off monitoring, press CANCEL or OFF on Search& Listen. 4 Select...
... can also use the base unit for monitoring automatically answers the page. To turn off . You can download additional ring tones and purchase services with openLCR. 1 Go to the openLCR website at www.openLCR.com. 2 Click on Ringtone. 3 Click on either handset. Advanced Features The handset that handset is turned on, and the speaker is turned off monitoring, press CANCEL or OFF on Search& Listen. 4 Select...
User Guide
Page 49
... communications. This equipment generates, uses, and can radiate radio frequency energy and, if not installed and used in accordance with the instructions, may cause undesired operation. Operation is no guarantee that could affect the operation of the equipment. These limits...make necessary modifications to maintain uninterrupted service. The telephone company may not cause harmful interference. • Inform you to make changes in its facilities, equipment, operations, or procedures that interference will provide advance notice in order for a Class B digital device, pursuant to Part...
... communications. This equipment generates, uses, and can radiate radio frequency energy and, if not installed and used in accordance with the instructions, may cause undesired operation. Operation is no guarantee that could affect the operation of the equipment. These limits...make necessary modifications to maintain uninterrupted service. The telephone company may not cause harmful interference. • Inform you to make changes in its facilities, equipment, operations, or procedures that interference will provide advance notice in order for a Class B digital device, pursuant to Part...


