User Guide
Page 4
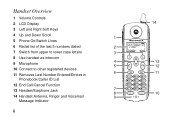
Handset Overview 1 Volume Controls 2 LCD Display 3 Left and Right Soft Keys 4 Up and Down Scroll 1 5 Phone On/Switch Lines 6 Redial list of the last 5 numbers dialed 2 7 Switch from upper to lower case letters 3 8 Use handset as intercom 9 Microphone 4 5 10 Connect to other registered devices 11 Removes Last Number Entered/Entries in 6 Phonebook/Caller ID List 12 End Call/Cancel Function 13 Headset/Earphone Jack 7 8 14 Handset Antenna, Ringer and Voicemail 9 Message Indicator ii 14 13 12 11 10
Handset Overview 1 Volume Controls 2 LCD Display 3 Left and Right Soft Keys 4 Up and Down Scroll 1 5 Phone On/Switch Lines 6 Redial list of the last 5 numbers dialed 2 7 Switch from upper to lower case letters 3 8 Use handset as intercom 9 Microphone 4 5 10 Connect to other registered devices 11 Removes Last Number Entered/Entries in 6 Phonebook/Caller ID List 12 End Call/Cancel Function 13 Headset/Earphone Jack 7 8 14 Handset Antenna, Ringer and Voicemail 9 Message Indicator ii 14 13 12 11 10
User Guide
Page 10
... marking label. viii Do not use chemicals or cleaning agents to your home, consult with your dealer or local power company. 5 Do not place this phone using only the power source that is damaged or frayed. • Liquid has been spilled into the product. • The product has been exposed to... an outlet if: • The power cord or plug is indicated on an unstable cart, stand or table. Do not retrieve the handset or base until after you are covered by unplugged cords. • The product has been dropped or the cabinet has been damaged. • The product ...
... marking label. viii Do not use chemicals or cleaning agents to your home, consult with your dealer or local power company. 5 Do not place this phone using only the power source that is damaged or frayed. • Liquid has been spilled into the product. • The product has been exposed to... an outlet if: • The power cord or plug is indicated on an unstable cart, stand or table. Do not retrieve the handset or base until after you are covered by unplugged cords. • The product has been dropped or the cabinet has been damaged. • The product ...
User Guide
Page 14
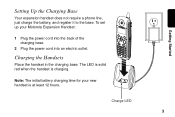
Charge LED 3 To set up your new handset is charging. The LED is solid red when the handset is at least 12 hours. Note: The initial battery charging time for your Motorola Expansion Handset: 1 Plug the power cord into the back of the charging base. 2 Plug the power cord into an electric outlet. Getting Started Setting Up the Charging Base Your expansion handset does not require a phone line, just charge the battery, and register it to the base. Charging the Handsets Place the handset in the charging base.
Charge LED 3 To set up your new handset is charging. The LED is solid red when the handset is at least 12 hours. Note: The initial battery charging time for your Motorola Expansion Handset: 1 Plug the power cord into the back of the charging base. 2 Plug the power cord into an electric outlet. Getting Started Setting Up the Charging Base Your expansion handset does not require a phone line, just charge the battery, and register it to the base. Charging the Handsets Place the handset in the charging base.
User Guide
Page 25
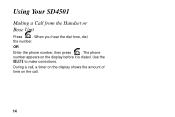
When you hear the dial tone, dial the number. Use the DELETE to make corrections. OR Enter the phone number, then press . The phone number appears on the call , a timer on the display shows the amount of time on the display before it is dialed. Using Your SD4501 Making a Call from the Handset or Base Unit Press . During a call . 14
When you hear the dial tone, dial the number. Use the DELETE to make corrections. OR Enter the phone number, then press . The phone number appears on the call , a timer on the display shows the amount of time on the display before it is dialed. Using Your SD4501 Making a Call from the Handset or Base Unit Press . During a call . 14
User Guide
Page 36
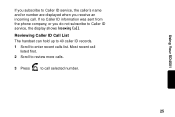
Most recent call listed first. 2 Scroll to review more calls. 3 Press to call . Using Your SD4501 If you subscribe to Caller ID service, the caller's name and/or number are displayed when you do not subscribe to Caller ID service, the display shows Incoming Call. Reviewing Caller ID Call List The handset can hold up to 40 caller ID records. 1 Scroll to enter recent calls list. If no Caller ID information was sent from the phone company, or you receive an incoming call selected number. 25
Most recent call listed first. 2 Scroll to review more calls. 3 Press to call . Using Your SD4501 If you subscribe to Caller ID service, the caller's name and/or number are displayed when you do not subscribe to Caller ID service, the display shows Incoming Call. Reviewing Caller ID Call List The handset can hold up to 40 caller ID records. 1 Scroll to enter recent calls list. If no Caller ID information was sent from the phone company, or you receive an incoming call selected number. 25
User Guide
Page 38
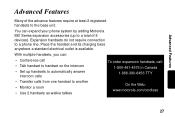
... phone system by adding Motorola MD Series expansion accessories (up handsets to automatically answer intercom calls • Transfer calls from one handset to another • Monitor a room • Use 2 handsets as walkie talkies To order expansion handsets, call: 1-800-461-4575 in Canada 1-888-390-6456 TTY (Text Telephone) On the Web: www.motorola.com/cordless 27 Place the handset...
... phone system by adding Motorola MD Series expansion accessories (up handsets to automatically answer intercom calls • Transfer calls from one handset to another • Monitor a room • Use 2 handsets as walkie talkies To order expansion handsets, call: 1-800-461-4575 in Canada 1-888-390-6456 TTY (Text Telephone) On the Web: www.motorola.com/cordless 27 Place the handset...

User Guide
Page 44
... example, if the handset you cannot make or receive phone calls. When a handset is in walkie talkie mode, you want to use walkie-talkie mode 1 Press MENU. 2 Scroll to Walkie Talkie. 3 Press SELECT. 4 Press Handsfree on one of the handsets. 5 Press the number on the handset keypad that corresponds to the handset you want to talk...
... example, if the handset you cannot make or receive phone calls. When a handset is in walkie talkie mode, you want to use walkie-talkie mode 1 Press MENU. 2 Scroll to Walkie Talkie. 3 Press SELECT. 4 Press Handsfree on one of the handsets. 5 Press the number on the handset keypad that corresponds to the handset you want to talk...


