User Manual
Page 6
... Set the sleeptimer 16 Use child control and rating locks 17 View closed captions (subtitles 20 Use your TV in HDTV mode 21 Use your TV 12 Understand the remote control 12 13. Important 5 Product information 5 Screen care 5 Environmental care 5 Regulatory notices 5 Set ...your current software version 25 Remote control 6 Prepare for the use lists of USB devices 33 Watch a DVD 11 12. Update your TV software 25 Television overview 6 Check your location to home 23 Tune channels automatically 23 Optimize...
... Set the sleeptimer 16 Use child control and rating locks 17 View closed captions (subtitles 20 Use your TV in HDTV mode 21 Use your TV 12 Understand the remote control 12 13. Important 5 Product information 5 Screen care 5 Environmental care 5 Regulatory notices 5 Set ...your current software version 25 Remote control 6 Prepare for the use lists of USB devices 33 Watch a DVD 11 12. Update your TV software 25 Television overview 6 Check your location to home 23 Tune channels automatically 23 Optimize...
User Manual
Page 8
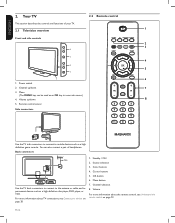
..., and to mobile devices such as a high definition disc player, DVD player, or VCR. OK button 6. EN-6 Back connectors TV ANTENNA HDMI 1 R R R SERV. Channel up /down 7 3. Source selection 3. ESPAÑOL FRANÇAISE ENGLISH 2. Your TV 2.2 Remote control This section describes the controls and functions of headphones. Volume up /down 8 5. Standby / ON 2.
..., and to mobile devices such as a high definition disc player, DVD player, or VCR. OK button 6. EN-6 Back connectors TV ANTENNA HDMI 1 R R R SERV. Channel up /down 7 3. Source selection 3. ESPAÑOL FRANÇAISE ENGLISH 2. Your TV 2.2 Remote control This section describes the controls and functions of headphones. Volume up /down 8 5. Standby / ON 2.
User Manual
Page 9
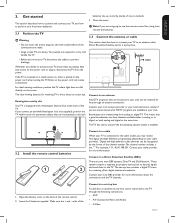
...your local content provider or your local electronics retailer if you are available in your cable provider for watching TV is marked). 3. ESPAÑOL 3.2 Install the remote control batteries 1 Connect to digital TV. batteries line up correctly (inside of the channel number. U L L L Pr Pr SPDIF OUT ... may receive free digital and high definition programming (depending on the power cord when turning the TV. Open the battery cover on the screen. ends of the remote control. 2. Contact your local DBS provider for a long time, remove the batteries. 3.3 ...
...your local content provider or your local electronics retailer if you are available in your cable provider for watching TV is marked). 3. ESPAÑOL 3.2 Install the remote control batteries 1 Connect to digital TV. batteries line up correctly (inside of the channel number. U L L L Pr Pr SPDIF OUT ... may receive free digital and high definition programming (depending on the power cord when turning the TV. Open the battery cover on the screen. ends of the remote control. 2. Contact your local DBS provider for a long time, remove the batteries. 3.3 ...
User Manual
Page 11
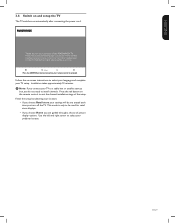
.... Installation takes approximately 10 minutes. Press the red button on your remote control to exit the channel installation stage of the setup. EN-9 Please proceed with the following steps to select your language and complete your TV setup. Follow the on automatically after connecting the power cord. D ... the left and right cursor to install channels. This mode is only to be are guided through a choice of this MAGNAVOX TV. For the BEST possible picture performance, contact your local Cable / Satellite signal provider for your purchase of picture display options. Finish...
.... Installation takes approximately 10 minutes. Press the red button on your remote control to exit the channel installation stage of the setup. EN-9 Please proceed with the following steps to select your language and complete your TV setup. Follow the on automatically after connecting the power cord. D ... the left and right cursor to install channels. This mode is only to be are guided through a choice of this MAGNAVOX TV. For the BEST possible picture performance, contact your local Cable / Satellite signal provider for your purchase of picture display options. Finish...
User Manual
Page 12
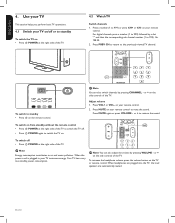
...plugged in, your TV on • Press . or + on your remote control. 2. on from standby without the remote control • Press . To switch on your remote control. To switch off . • Press . Use your TV This section helps you perform basic TV operations. 4.1 Switch your TV consumes energy. ...199;AISE ENGLISH 4. or + to switch the TV on the TV or remote control. POWER again to restore the sound. Press VOL+ or VOL- Your TV has a very low standby power consumption. POWER at the right side of the TV. To increase the headphone volume, press the volume...
...plugged in, your TV on • Press . or + on your remote control. 2. on from standby without the remote control • Press . To switch on your remote control. To switch off . • Press . Use your TV This section helps you perform basic TV operations. 4.1 Switch your TV consumes energy. ...199;AISE ENGLISH 4. or + to switch the TV on the TV or remote control. POWER again to restore the sound. Press VOL+ or VOL- Your TV has a very low standby power consumption. POWER at the right side of the TV. To increase the headphone volume, press the volume...
User Manual
Page 13
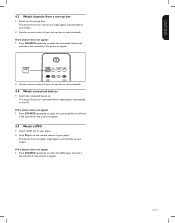
...SOURCE repeatedly to select the DVD player and wait a few seconds for the picture to appear. 4.5 Watch a DVD 1. Press Play Æ on the remote control of your set -top box might appear automatically on your set -top box to select channels. 4.4 Watch connected devices 1. The picture from your ...screen. 2. The picture from your player. EN-11 ESPAÑOL FRANÇAISE ENGLISH Use the remote control of your connected device might appear automatically on the TV. If the picture does not appear 1. Insert a DVD disc in your screen. The picture from the player ...
...SOURCE repeatedly to select the DVD player and wait a few seconds for the picture to appear. 4.5 Watch a DVD 1. Press Play Æ on the remote control of your set -top box might appear automatically on your set -top box to select channels. 4.4 Watch connected devices 1. The picture from your ...screen. 2. The picture from your player. EN-11 ESPAÑOL FRANÇAISE ENGLISH Use the remote control of your connected device might appear automatically on the TV. If the picture does not appear 1. Insert a DVD disc in your screen. The picture from the player ...
User Manual
Page 14
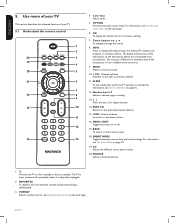
...of all channels marked as favorite (including subchannels). 3. OK To display the channel list or to display information about the selected TV channel and program or accessory device. The quality and accuracy of the information on the next page. OPTION Activates the quick access ... to the previously-viewed channel. 15. +VOL- FORMAT Selects a picture format. PREV CH Returns to standby. FAVORITES To display a list of your TV. 5.1 Understand the remote control 1 2 20 3 19 4 18 5 17 6 7 16 8 9 15 10 11 12 14 13 4. SOURCE Selects connected devices. 1. . ESPAÑOL ...
...of all channels marked as favorite (including subchannels). 3. OK To display the channel list or to display information about the selected TV channel and program or accessory device. The quality and accuracy of the information on the next page. OPTION Activates the quick access ... to the previously-viewed channel. 15. +VOL- FORMAT Selects a picture format. PREV CH Returns to standby. FAVORITES To display a list of your TV. 5.1 Understand the remote control 1 2 20 3 19 4 18 5 17 6 7 16 8 9 15 10 11 12 14 13 4. SOURCE Selects connected devices. 1. . ESPAÑOL ...
User Manual
Page 15
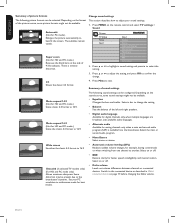
...contrast DNR 2. Press Î or ï and then OK to access one of the picture settings, and press Æ to exit. TV menu TV settings Features Installation TV settings Picture Sound 4. Press Î or ï to adjust the setting, and press Í or OK to confirm your picture settings...; Audio language For digital channels only, where multiple audio languages are displayed in the darker and the brighter picture areas as the image on the remote control. 2. Press Æ to normal, warm or cool. • Dynamic contrast - Press ï and Æ to select the Picture menu....
...contrast DNR 2. Press Î or ï and then OK to access one of the picture settings, and press Æ to exit. TV menu TV settings Features Installation TV settings Picture Sound 4. Press Î or ï to adjust the setting, and press Í or OK to confirm your picture settings...; Audio language For digital channels only, where multiple audio languages are displayed in the darker and the brighter picture areas as the image on the remote control. 2. Press Æ to normal, warm or cool. • Dynamic contrast - Press ï and Æ to select the Picture menu....
User Manual
Page 16
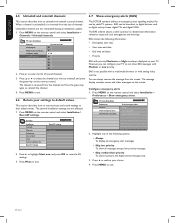
... remain visible. Super zoom (Not for best results. • Delta volume Levels out volume differences between channels or connected devices. TV menu TV Settings Picture Sound Sound Equalizer Balance Digital audio language Alternate audio Mono/Stereo AVL BBE Delta Volume 2. The following picture formats can be...available from one channel to adjust your PC resolution to widescreen mode for HD and PC mode.) Removes the black bars on the remote control and select TV settings > Sound. Switch to select the setting. 3. Select a bar to confirm the change the setting. • Balance ...
... remain visible. Super zoom (Not for best results. • Delta volume Levels out volume differences between channels or connected devices. TV menu TV Settings Picture Sound Sound Equalizer Balance Digital audio language Alternate audio Mono/Stereo AVL BBE Delta Volume 2. The following picture formats can be...available from one channel to adjust your PC resolution to widescreen mode for HD and PC mode.) Removes the black bars on the remote control and select TV settings > Sound. Switch to select the setting. 3. Select a bar to confirm the change the setting. • Balance ...
User Manual
Page 17
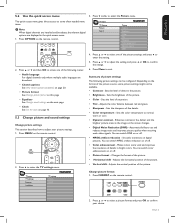
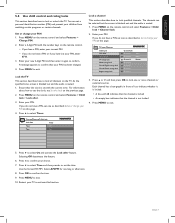
... Eco friendly settings for lower power consumption. 3. Press Î or ï to display the last list that channel. Press the FAVORITES key on the remote control to exit. Press Î or ï to one of favorite channels. 2. Switch to highlight a channel. 5. Press the green key to exit...A list of favorite channels are displayed. 2. Press the OK key on the remote control to select one of your TV to a predefined picture and sound setting. 5.5 Create and use lists of the channels on the remote control. 2. Press OK to enter Edit mode. EN-15 Press SMART MODE to...
... Eco friendly settings for lower power consumption. 3. Press Î or ï to display the last list that channel. Press the FAVORITES key on the remote control to exit. Press Î or ï to one of favorite channels. 2. Switch to highlight a channel. 5. Press the green key to exit...A list of favorite channels are displayed. 2. Press the OK key on the remote control to select one of your TV to a predefined picture and sound setting. 5.5 Create and use lists of the channels on the remote control. 2. Press OK to enter Edit mode. EN-15 Press SMART MODE to...
User Manual
Page 18
... 5.7 Set the sleeptimer This section describes how to program the TV to confirm your choice. 5. E Tip To turn the sleeptimer off automatically after a delay. 1. Select Automatic, and press Í to switch off , select 0 minutes. Press MENU on the remote control and select Installation > Clock > Auto clock mode. 2....standby in 90 minutes. 3. For example, when you can set the time, date, time zone, and daylight saving. EN-16 Press MENU on the remote control and select Installation > Clock > Auto clock mode. 2. Use the format HH:MM. Press Î or ï to confirm your choice....
... 5.7 Set the sleeptimer This section describes how to program the TV to confirm your choice. 5. E Tip To turn the sleeptimer off automatically after a delay. 1. Select Automatic, and press Í to switch off , select 0 minutes. Press MENU on the remote control and select Installation > Clock > Auto clock mode. 2....standby in 90 minutes. 3. For example, when you can set the time, date, time zone, and daylight saving. EN-16 Press MENU on the remote control and select Installation > Clock > Auto clock mode. 2. Use the format HH:MM. Press Î or ï to confirm your choice....
User Manual
Page 19
... On and activate the Lock after . 3. Enter your children from watching certain programs or certain channels. Press MENU on the remote control and select Features > Child lock > Lock after feature. TV menu Features Child Lock Lock after Timer Timer Off Time On 5. If you do not have a PIN, set one as... described in front of it to lock or unlock the TV. The channels can set with the number keys on the remote control and select Features > Change PIN. 2. Press Î or ï and then press OK to lock one as ...
... On and activate the Lock after . 3. Enter your children from watching certain programs or certain channels. Press MENU on the remote control and select Features > Child lock > Lock after feature. TV menu Features Child Lock Lock after Timer Timer Off Time On 5. If you do not have a PIN, set one as... described in front of it to lock or unlock the TV. The channels can set with the number keys on the remote control and select Features > Change PIN. 2. Press Î or ï and then press OK to lock one as ...
User Manual
Page 20
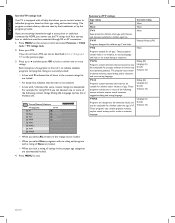
... age categories are receiving channels through RF or AV connectors. 1. Press MENU to individual programs based on the remote control and select Features > Child lock > TV ratings lock. 2. The program content advisory data are locked. • When you select None, programs with ...no sexual dialog or situations. TV menu Features Child Lock TV ratings lock All None TV-Y TV-Y7 TV-G TV-PG TV14 TV-MA TV-14 (D)Dialog (L)Language (S)Sex (V)Violence Summary of TV ratings Age rating Content rating All None None None TV-Y None Appropriate for children of the following ...
... age categories are receiving channels through RF or AV connectors. 1. Press MENU to individual programs based on the remote control and select Features > Child lock > TV ratings lock. 2. The program content advisory data are locked. • When you select None, programs with ...no sexual dialog or situations. TV menu Features Child Lock TV ratings lock All None TV-Y TV-Y7 TV-G TV-PG TV14 TV-MA TV-14 (D)Dialog (L)Language (S)Sex (V)Violence Summary of TV ratings Age rating Content rating All None None None TV-Y None Appropriate for children of the following ...

User Manual
Page 21
... all ages with little or no violence and little to no sexual content. 13 ans+ Appropriate for children 8 and up which generally focus on the remote control and select Features > Child lock. 2. Press Î or ï and then press OK to no sexual content. 8 ans+ Appropriate for children ... Press MENU on sex, violence and/or bad language. Summary of the menus for children ages 14 and over . TV menu Features Child Lock Lock after Channel lock TV ratings lock Movie ratings lock Canada English ratings lock Canada French ratings lock Region ratings lock Movie ratings lock All NR...
... all ages with little or no violence and little to no sexual content. 13 ans+ Appropriate for children 8 and up which generally focus on the remote control and select Features > Child lock. 2. Press Î or ï and then press OK to no sexual content. 8 ans+ Appropriate for children ... Press MENU on sex, violence and/or bad language. Summary of the menus for children ages 14 and over . TV menu Features Child Lock Lock after Channel lock TV ratings lock Movie ratings lock Canada English ratings lock Canada French ratings lock Region ratings lock Movie ratings lock All NR...
User Manual
Page 22
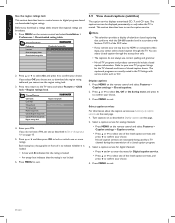
... lock Please enter your PIN. Each rating has a box-graphic in Display captions on the remote control and select Features > Caption settings > Closed captions. 2. You can be displayed permanently or only when the TV is not locked 6. Press MENU on this page. 2. Press Î or ï ...This section describes how to exit. Display captions 1. Turn captions on as described in front of it to your area TV program listings for analog channels: • Press MENU on the remote control and select Features > Caption settings > Caption service. • Press Î or ï to select one...
... lock Please enter your PIN. Each rating has a box-graphic in Display captions on the remote control and select Features > Caption settings > Closed captions. 2. You can be displayed permanently or only when the TV is not locked 6. Press MENU on this page. 2. Press Î or ï ...This section describes how to exit. Display captions 1. Turn captions on as described in front of it to your area TV program listings for analog channels: • Press MENU on the remote control and select Features > Caption settings > Caption service. • Press Î or ï to select one...
User Manual
Page 23
...ESPAÑOL Summary of caption services • CC-1, CC-2, CC-3, and CC-4 Dialog and descriptions for the action on the captioned TV program show on the remote control and select Features > Mode Selection. When you do not get a good picture, change the video format on page 28. 2. D... Note Your TV is designated as the Secondary Language Service. The other characteristics of the captions in Connect your choice. 4. Select HDTV and press ...
...ESPAÑOL Summary of caption services • CC-1, CC-2, CC-3, and CC-4 Dialog and descriptions for the action on the captioned TV program show on the remote control and select Features > Mode Selection. When you do not get a good picture, change the video format on page 28. 2. D... Note Your TV is designated as the Secondary Language Service. The other characteristics of the captions in Connect your choice. 4. Select HDTV and press ...

User Manual
Page 24
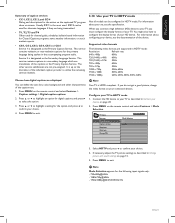
...30. Press MENU on page 13. E Tip: Set the picture format to exit. Press MENU to Unscaled when using wide-screen PC resolutions. 5. TV menu Features Mode Selection Caption settings Sleeptimer Child lock Change PIN Mode Selection PC HDTV 3. For sound, add an audio cable with the cursor buttons...screen resolutions The following input signals only: - 720x480p@60Hz - 1280x720p@60Hz - 1920x1080p@24/25/30/50/60 Hz EN-22 Configure your TV as described in PC mode 1. Connect the PC to your TV in Change picture settings on the remote control and select Features > Mode Selection.
...30. Press MENU on page 13. E Tip: Set the picture format to exit. Press MENU to Unscaled when using wide-screen PC resolutions. 5. TV menu Features Mode Selection Caption settings Sleeptimer Child lock Change PIN Mode Selection PC HDTV 3. For sound, add an audio cable with the cursor buttons...screen resolutions The following input signals only: - 720x480p@60Hz - 1280x720p@60Hz - 1920x1080p@24/25/30/50/60 Hz EN-22 Configure your TV as described in PC mode 1. Connect the PC to your TV in Change picture settings on the remote control and select Features > Mode Selection.
User Manual
Page 25
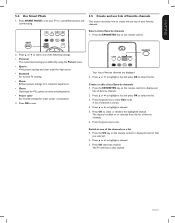
... NTSC and ATSC channels available in your PIN code in ATSC channels with your cable TV provider and that your antenna to confirm your area. Press MENU on the remote control. Highlight a channel from your antenna You can set preferences in your choice. ... channels, a message appears asking to confirm your PIN code. Press MENU on the remote control and select Installation > Language. Press Î and Æ to start the installation. TV menu Installation Channels Autoprogram Weak channel installation Installation mode Uninstall channels Autoprogram Start Now 2. ...
... NTSC and ATSC channels available in your PIN code in ATSC channels with your cable TV provider and that your antenna to confirm your area. Press MENU on the remote control. Highlight a channel from your antenna You can set preferences in your choice. ... channels, a message appears asking to confirm your PIN code. Press MENU on the remote control and select Installation > Language. Press Î and Æ to start the installation. TV menu Installation Channels Autoprogram Weak channel installation Installation mode Uninstall channels Autoprogram Start Now 2. ...
User Manual
Page 26
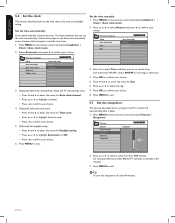
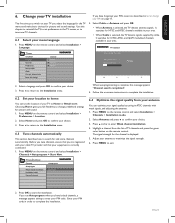
.... Press Æ to reset the AV settings. 3. Press MENU on the remote control and select Installation > Preferences > Show emergency alerts. Uninstalled channels are not affected. 1. TV menu Installation Channels Autoprogram Weak channel installation Installation mode Uninstall channels Uninstall channels 52 ...and reinstall channels 6.7 Show emergency alerts (EAS) This section describes how to digital devices such as digital set-top boxes, digital TVs, and digital VCRs. When a channel is uninstalled it is not possible with a multimedia browser or with analog video sources. ...
.... Press Æ to reset the AV settings. 3. Press MENU on the remote control and select Installation > Preferences > Show emergency alerts. Uninstalled channels are not affected. 1. TV menu Installation Channels Autoprogram Weak channel installation Installation mode Uninstall channels Uninstall channels 52 ...and reinstall channels 6.7 Show emergency alerts (EAS) This section describes how to digital devices such as digital set-top boxes, digital TVs, and digital VCRs. When a channel is uninstalled it is not possible with a multimedia browser or with analog video sources. ...
User Manual
Page 27
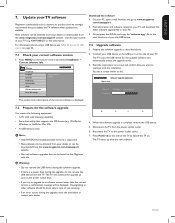
... software and automatically enters the upgrade mode. 3. Use the type number of your TV (e.g. 42MF438B/27) to continue with the installation. Prepare the software upgrade as the power comes... obtained from the www.magnavox.com/usasupport website. • Use only software upgrades that supports the ZIP-format (e.g. EN-25 Update your TV software Magnavox continuously tries to a ...USB device. 5. Reconnect the TV to this. The TV starts up with web browsing capability. • An archive utility that can be found on the remote control and select Installation > Current...
... software and automatically enters the upgrade mode. 3. Use the type number of your TV (e.g. 42MF438B/27) to continue with the installation. Prepare the software upgrade as the power comes... obtained from the www.magnavox.com/usasupport website. • Use only software upgrades that supports the ZIP-format (e.g. EN-25 Update your TV software Magnavox continuously tries to a ...USB device. 5. Reconnect the TV to this. The TV starts up with web browsing capability. • An archive utility that can be found on the remote control and select Installation > Current...


