User Manual
Page 2
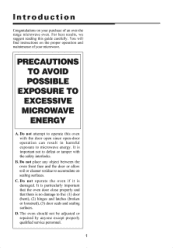
...over-the range microwave oven. It is important not to defeat or tamper with the door open since open-door operation can result in harmful exposure to the: (1) door (bent), (2) hinges and latches (broken or loosened), (3) door seals and sealing surfaces. C. The oven should not be adjusted or repaired by ... EXCESSIVE MICROWAVE ENERGY A. Do not operate the oven if it is no damage to microwave energy. It is particularly important that the oven door close properly and that there is damaged. Do not attempt to accumulate on sealing surfaces. For best results, we suggest reading this oven...
...over-the range microwave oven. It is important not to defeat or tamper with the door open since open-door operation can result in harmful exposure to the: (1) door (bent), (2) hinges and latches (broken or loosened), (3) door seals and sealing surfaces. C. The oven should not be adjusted or repaired by ... EXCESSIVE MICROWAVE ENERGY A. Do not operate the oven if it is no damage to microwave energy. It is particularly important that the oven door close properly and that there is damaged. Do not attempt to accumulate on sealing surfaces. For best results, we suggest reading this oven...
User Manual
Page 3
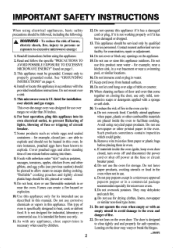
...POSSIBLE EXPOSURE TO EXCESSIVE use only mild, nonabrasive soaps or detergents applied with any openings on page 1. 3. INSTRUCTIONS" on closing the door, use this appliance. Install or locate this oven. Do not let cord hang over a sink 5. Carefully attend appliance 6. are ...circuit Avoid using electrical appliances, basic safety 12. IMPORTANT SAFETY INSTRUCTIONS When using recycled paper products. Leaning on the oven door. Do not operate this appliance outdoors. Use this manual. Read and follow the specific "PRECAUTIONS TO 15. This appliance...
...POSSIBLE EXPOSURE TO EXCESSIVE use only mild, nonabrasive soaps or detergents applied with any openings on page 1. 3. INSTRUCTIONS" on closing the door, use this appliance. Install or locate this oven. Do not let cord hang over a sink 5. Carefully attend appliance 6. are ...circuit Avoid using electrical appliances, basic safety 12. IMPORTANT SAFETY INSTRUCTIONS When using recycled paper products. Leaning on the oven door. Do not operate this appliance outdoors. Use this manual. Read and follow the specific "PRECAUTIONS TO 15. This appliance...
User Manual
Page 5
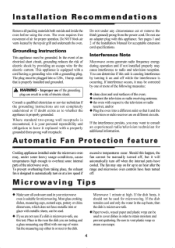
..., you are not sure if a dish is microwave-safe, use this unit is causing interference by one or more of the following measures: ♦ clean door and seal surfaces of the oven; ♦ reorient the television or radio receiving antenna; ♦ the oven with a grounding plug. Microwave 1 minute at a low speed...
..., you are not sure if a dish is microwave-safe, use this unit is causing interference by one or more of the following measures: ♦ clean door and seal surfaces of the oven; ♦ reorient the television or radio receiving antenna; ♦ the oven with a grounding plug. Microwave 1 minute at a low speed...
User Manual
Page 8
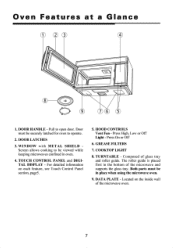
... in place when using the microwave oven. 9. Pull to be viewed while keeping microwaves confined in the bottom of glass tray and roller guide. DOOR LATCHES 3. For detailed information on the inside wall of the microwave oven. 7 Press On or Off 6. COOKTOP LIGHT 8. DATA PLATE... - Door must be securely latched for oven to operate. 2. TOUCH CONTROL PANEL and DIGITAL DISPLAY - GREASE FILTERS 7. HOOD CONTROLS Vent Fan - TURNTABLE - The roller guide...
... in place when using the microwave oven. 9. Pull to be viewed while keeping microwaves confined in the bottom of glass tray and roller guide. DOOR LATCHES 3. For detailed information on the inside wall of the microwave oven. 7 Press On or Off 6. COOKTOP LIGHT 8. DATA PLATE... - Door must be securely latched for oven to operate. 2. TOUCH CONTROL PANEL and DIGITAL DISPLAY - GREASE FILTERS 7. HOOD CONTROLS Vent Fan - TURNTABLE - The roller guide...
User Manual
Page 9
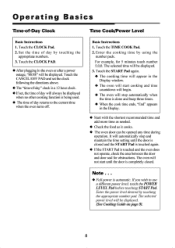
... automatic. The oven will automatically stop automatically when the time is touched and the oven does not operate, check the area between the door and door seal for 5 minutes touch number 5,0,0. The selected power level will be displayed (See Cooking Guide on page 9). 8 Note. . . ♦ ... the CLOCK Pad. 2. Touch the CLOCK PAD. ♦ After plugging in the Display window. ♦ The oven will start until the door is closed . Time Cook/Power Level Basic Instructions 1. Enter the cooking time by touching the appropriate numberpad. Enter the power level desired by ...
... automatic. The oven will automatically stop automatically when the time is touched and the oven does not operate, check the area between the door and door seal for 5 minutes touch number 5,0,0. The selected power level will be displayed (See Cooking Guide on page 9). 8 Note. . . ♦ ... the CLOCK Pad. 2. Touch the CLOCK PAD. ♦ After plugging in the Display window. ♦ The oven will start until the door is closed . Time Cook/Power Level Basic Instructions 1. Enter the cooking time by touching the appropriate numberpad. Enter the power level desired by ...
User Manual
Page 10
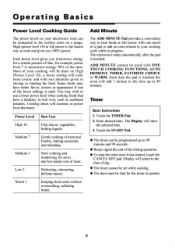
... when cooking foods that have better flavor, texture or appearance if one touch of day. ♦ The timer cannot be set while cooking. ♦ The door must be shut for example, power level 7 is touched. Medium 7 Gentle cooking of meat. Each time the pad is the fastest way to cook and...
... when cooking foods that have better flavor, texture or appearance if one touch of day. ♦ The timer cannot be set while cooking. ♦ The door must be shut for example, power level 7 is touched. Medium 7 Gentle cooking of meat. Each time the pad is the fastest way to cook and...
User Manual
Page 12
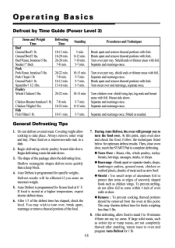
...in a dish. 2. At this point. Shield ends or thinner areas with fork. Breast side down. If food is stored at this point, open oven door and check the food. Separate and rearrange once. Separate and rearrange once. 10-15 min. 5-7 min. 5-7 min. 5-7 min. Defrost results will ...once. 10-15 min. 5-7 min. 8-13 min. Break apart and remove thawed portions with foil. shield ends or thinner areas with fork. Then, close oven door, touch the START Pad to complete defrosting. ♦ Turn Over : Roast, ribs, whole poultry, turkey breasts, hot dogs, sausages, steaks, or chops. &#...
...in a dish. 2. At this point. Shield ends or thinner areas with fork. Breast side down. If food is stored at this point, open oven door and check the food. Separate and rearrange once. Separate and rearrange once. 10-15 min. 5-7 min. 5-7 min. 5-7 min. Defrost results will ...once. 10-15 min. 5-7 min. 8-13 min. Break apart and remove thawed portions with foil. shield ends or thinner areas with fork. Then, close oven door, touch the START Pad to complete defrosting. ♦ Turn Over : Roast, ribs, whole poultry, turkey breasts, hot dogs, sausages, steaks, or chops. &#...
User Manual
Page 14
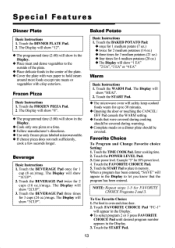
.... Touch the START Pad. 13 The Display will show "8". ♦ The programmed time (3:00) will show "3CUP". The Display will show in oven and close door. 2. The Display will show "HEAt". 2. Touch the BAKED POTATO Pad: ♦ once for 1 medium potato (7 oz.) ♦ twice for 2 medium potatoes (14 ...To Use Favorite Choice: 1. The Display will show in the Display. ♦ Place meat and dense vegetables to 30 minutes. ♦ Opening the door or touching the CANCEL/ OFF Pad cancels the WARM setting. ♦ Foods that the program has been entered. Touch the WARM Pad. Special Features...
.... Touch the START Pad. 13 The Display will show "8". ♦ The programmed time (3:00) will show "3CUP". The Display will show in oven and close door. 2. The Display will show "HEAt". 2. Touch the BAKED POTATO Pad: ♦ once for 1 medium potato (7 oz.) ♦ twice for 2 medium potatoes (14 ...To Use Favorite Choice: 1. The Display will show in the Display. ♦ Place meat and dense vegetables to 30 minutes. ♦ Opening the door or touching the CANCEL/ OFF Pad cancels the WARM setting. ♦ Foods that the program has been entered. Touch the WARM Pad. Special Features...
User Manual
Page 18
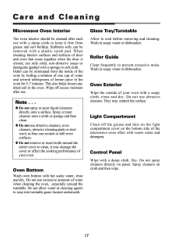
... may scratch the surface. Do not spray cleaners directly on cloth and then wipe. 17 When cleaning interior surfaces and surfaces of door and oven that come together when the door is closed, use only mild, non-abrasive soaps or detergents applied with a damp cloth to prevent excessive noise. Wipe off the...
... may scratch the surface. Do not spray cleaners directly on cloth and then wipe. 17 When cleaning interior surfaces and surfaces of door and oven that come together when the door is closed, use only mild, non-abrasive soaps or detergents applied with a damp cloth to prevent excessive noise. Wipe off the...
User Manual
Page 21
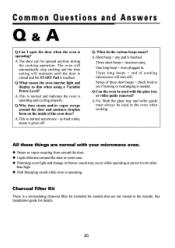
...oven plugged in normal occurrence - Q.What causes the oven interior light and display to the outside. Q.Why does steam and/or vapor escape around the door or outer case. ♦ Dimming oven light and change in the oven when cooking. Q. Three short beeps = incorrect entry. A. Series of ...are not vented to dim when using a Variable Power Level? Common Questions and Answers Q & A Q.Can I open the door when the oven is needed. A. The door can be used in blower sound may occur while operating at power levels other than high. ♦ Dull thumping sound while oven...
...oven plugged in normal occurrence - Q.What causes the oven interior light and display to the outside. Q.Why does steam and/or vapor escape around the door or outer case. ♦ Dimming oven light and change in the oven when cooking. Q. Three short beeps = incorrect entry. A. Series of ...are not vented to dim when using a Variable Power Level? Common Questions and Answers Q & A Q.Can I open the door when the oven is needed. A. The door can be used in blower sound may occur while operating at power levels other than high. ♦ Dull thumping sound while oven...
User Manual
Page 22
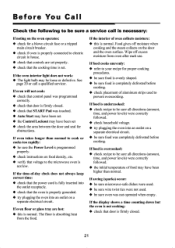
.... ♦ check placement of aluminum strips used . ♦ be sure the Power Level is programmed properly. ♦ check instructions on the door and the oven surface. If food cooks unevenly: ♦ refer to your recipe for proper cooking procedures. ♦ be sure food is evenly...and power levels) were correctly followed. ♦ check household voltage. ♦ try plugging the oven into the outlet receptacle. ♦ check that door is firmly closed . ♦ check that the cooking time is necessary: If noting on a separate electrical circuit. If oven floor or glass tray ...
.... ♦ check placement of aluminum strips used . ♦ be sure the Power Level is programmed properly. ♦ check instructions on the door and the oven surface. If food cooks unevenly: ♦ refer to your recipe for proper cooking procedures. ♦ be sure food is evenly...and power levels) were correctly followed. ♦ check household voltage. ♦ try plugging the oven into the outlet receptacle. ♦ check that door is firmly closed . ♦ check that the cooking time is necessary: If noting on a separate electrical circuit. If oven floor or glass tray ...


