User Manual
Page 1
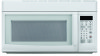
Microwave Oven Use and Care Manual MCO165UW/ MCO165UB Table of Contents Introduction 1 Precautions to Avoid Possible Exposure to Excessire Microwave Energy 1 Important Safety Instructions 2-3 Installation Recommendations 4 Control Panel 5-6 Oven Features at a Glance 7 Operating Basics 8-12 Special Features 12-16 Care and Cleaning 17-19 Questions and Answers 20 Before You Call 21 Warranty 22 IMPORTANT SAFETY INSTRUCTION Never operate the oven when it is empty or without the glass turntable. 72" 9
Microwave Oven Use and Care Manual MCO165UW/ MCO165UB Table of Contents Introduction 1 Precautions to Avoid Possible Exposure to Excessire Microwave Energy 1 Important Safety Instructions 2-3 Installation Recommendations 4 Control Panel 5-6 Oven Features at a Glance 7 Operating Basics 8-12 Special Features 12-16 Care and Cleaning 17-19 Questions and Answers 20 Before You Call 21 Warranty 22 IMPORTANT SAFETY INSTRUCTION Never operate the oven when it is empty or without the glass turntable. 72" 9
User Manual
Page 2
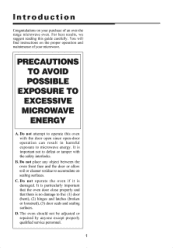
... not be adjusted or repaired by anyone except properly qualified service personnel. 1 C. Do not attempt to microwave energy. Do not place any object between the oven front face and the door or allow soil or cleaner residue to the: (1) door (bent), (2) hinges and latches (broken or loosened), (3)... door seals and sealing surfaces. You will find instructions on the proper operation and maintenance of your purchase of an over-the range microwave oven. It is important not to defeat or tamper with the door open since open-door operation can result in harmful exposure to operate this...
... not be adjusted or repaired by anyone except properly qualified service personnel. 1 C. Do not attempt to microwave energy. Do not place any object between the oven front face and the door or allow soil or cleaner residue to the: (1) door (bent), (2) hinges and latches (broken or loosened), (3)... door seals and sealing surfaces. You will find instructions on the proper operation and maintenance of your purchase of an over-the range microwave oven. It is important not to defeat or tamper with the door open since open-door operation can result in harmful exposure to operate this...
User Manual
Page 3
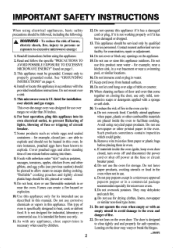
...operate this appliance outdoors. This appliance should be grounded. See "GROUNDING 16. INSTRUCTIONS" on closing the door, use . This microwave oven is not working properly or if it has A WARNING - When cleaning surfaces of circuit Avoid using electrical appliances, basic safety..., newspaper or similar non-food type items. 21. Do not use flammable materials in a wet basement or near a MICROWAVE ENERGY" found on the oven door. for microwave ovens. £ Do not overcook potatoes. This appliance must be serviced only by children. Connect only to kitchen sink, in...
...operate this appliance outdoors. This appliance should be grounded. See "GROUNDING 16. INSTRUCTIONS" on closing the door, use . This microwave oven is not working properly or if it has A WARNING - When cleaning surfaces of circuit Avoid using electrical appliances, basic safety..., newspaper or similar non-food type items. 21. Do not use flammable materials in a wet basement or near a MICROWAVE ENERGY" found on the oven door. for microwave ovens. £ Do not overcook potatoes. This appliance must be serviced only by children. Connect only to kitchen sink, in...
User Manual
Page 4
... is a cooking appliance designed to pass through heating it is in use them in liquids (such as lye-based oven cleaners, may become hot because of injury to stand in the microwave oven for microwave oven use in a microwave oven because it . 38. Use only cooking utensils and accessories made for use in the...not store anythig directly on the hood or the filter. 41. Cookware may damage the filter. 42. Paraffin wax will not melt in the microwave oven. 24. Never use sharp-edged utensils in or near the appliance while it © Do not use straight-sided containers with the To reduce...
... is a cooking appliance designed to pass through heating it is in use them in liquids (such as lye-based oven cleaners, may become hot because of injury to stand in the microwave oven for microwave oven use in a microwave oven because it . 38. Use only cooking utensils and accessories made for use in the...not store anythig directly on the hood or the filter. 41. Cookware may damage the filter. 42. Paraffin wax will not melt in the microwave oven. 24. Never use sharp-edged utensils in or near the appliance while it © Do not use straight-sided containers with the To reduce...
User Manual
Page 5
... instructions are not sure if a dish is occurring. Where standard two-prong wall receptacle is encountered, it is your microwave oven is suitable for microwaving. Do not under any circumstance cut or remove the third (ground) prong from taking place, the exhaust fan is properly... Protection feature Cooking appliances installed under some heavy usage conditions, cause temperatures high enough to an hour after the range and microwave oven controls have been turned off when the internal parts have cooled. Installation Recommendations Remove all cookware used in order to the ...
... instructions are not sure if a dish is occurring. Where standard two-prong wall receptacle is encountered, it is your microwave oven is suitable for microwaving. Do not under any circumstance cut or remove the third (ground) prong from taking place, the exhaust fan is properly... Protection feature Cooking appliances installed under some heavy usage conditions, cause temperatures high enough to an hour after the range and microwave oven controls have been turned off when the internal parts have cooled. Installation Recommendations Remove all cookware used in order to the ...
User Manual
Page 6
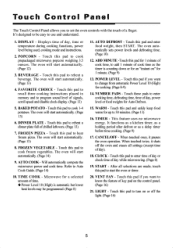
... during cooking functions, power level being used, cooking mode and instructions. 2. Touch this pad to turn on " for a selected amount of day while microwaving. (Page 8) 19. The oven will start automatically. (Page 12) 3. AUTO COOK - Touch this pad to 30 minutes. (Page 13) 16. VENT FAN...of time. ♦ Power Level 10 (High) is counting down or for an "instant on or off the oven and erases all selections are made, touch this pad to cook prepackaged microwave popcorn weighing 3.5 ounces. Touch this pad if you want to change from antomatic Power Level 10 (High) for cooking...
... during cooking functions, power level being used, cooking mode and instructions. 2. Touch this pad to turn on " for a selected amount of day while microwaving. (Page 8) 19. The oven will start automatically. (Page 12) 3. AUTO COOK - Touch this pad to 30 minutes. (Page 13) 16. VENT FAN...of time. ♦ Power Level 10 (High) is counting down or for an "instant on or off the oven and erases all selections are made, touch this pad to cook prepackaged microwave popcorn weighing 3.5 ounces. Touch this pad if you want to change from antomatic Power Level 10 (High) for cooking...
User Manual
Page 8
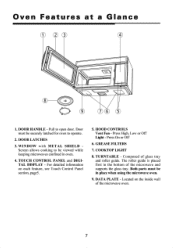
... LATCHES 3. TOUCH CONTROL PANEL and DIGITAL DISPLAY - TURNTABLE - DATA PLATE - Door must be in place when using the microwave oven. 9. For detailed information on the inside wall of the microwave oven. 7 Oven Features at a Glance 1 23 4 00 ® o$ 9 TO 5 1. Located on each feature, see Touch Control Panel section, page5. 5. WINDOW with METAL SHIELD Screen allows...
... LATCHES 3. TOUCH CONTROL PANEL and DIGITAL DISPLAY - TURNTABLE - DATA PLATE - Door must be in place when using the microwave oven. 9. For detailed information on the inside wall of the microwave oven. 7 Oven Features at a Glance 1 23 4 00 ® o$ 9 TO 5 1. Located on each feature, see Touch Control Panel section, page5. 5. WINDOW with METAL SHIELD Screen allows...
User Manual
Page 10
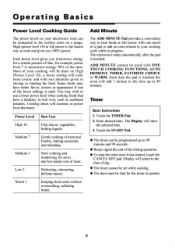
... COOKING FUNCTIONS, AUTO DEFROST, TIMER, FAVORITE CHOICE or WARM. Timer Basic Instructions 1. Operating Basics Power Level Cooking Guide The power levels on your microwave oven can be shut for the timer to 99 minutes and 99 seconds. ♦ Beeps signal the end of the timing operation. ♦ To... 99 minutes. Low 3 Defrosting, simmering, delicate sauces. Touch the START Pad. ♦ The timer can be compared to cook and gives you microwave energy for example, power level 7 is touched. ADD MINUTE cannot be done on High (Power Level 10). Each power level gives you 100% power...
... COOKING FUNCTIONS, AUTO DEFROST, TIMER, FAVORITE CHOICE or WARM. Timer Basic Instructions 1. Operating Basics Power Level Cooking Guide The power levels on your microwave oven can be shut for the timer to 99 minutes and 99 seconds. ♦ Beeps signal the end of the timing operation. ♦ To... 99 minutes. Low 3 Defrosting, simmering, delicate sauces. Touch the START Pad. ♦ The timer can be compared to cook and gives you microwave energy for example, power level 7 is touched. ADD MINUTE cannot be done on High (Power Level 10). Each power level gives you 100% power...
User Manual
Page 12
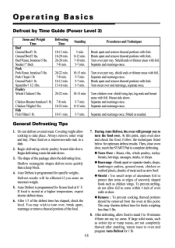
...remove thawed portions with fork. Turn meat over part way. Turn chicken over part way. Do not defrost covered meat. Place food on a microwave-safe rack in a dish. 2. Auto Defrost is stored at a higher temperature, expect shorter defrost times. 6. After 1/3 of the package...Chicken Breasts boneless/1 lb. Separate and rearrange once. 5-7 min. You may shorten defrost time for frozen food at this point, open oven door and check the food. Pork Chops/1 lb Ground Pork/1 lb. Separate and rearrange once. General Defrosting Tips 1. Begin defrosting roasts ...
...remove thawed portions with fork. Turn meat over part way. Turn chicken over part way. Do not defrost covered meat. Place food on a microwave-safe rack in a dish. 2. Auto Defrost is stored at a higher temperature, expect shorter defrost times. 6. After 1/3 of the package...Chicken Breasts boneless/1 lb. Separate and rearrange once. 5-7 min. You may shorten defrost time for frozen food at this point, open oven door and check the food. Pork Chops/1 lb Ground Pork/1 lb. Separate and rearrange once. General Defrosting Tips 1. Begin defrosting roasts ...
User Manual
Page 14
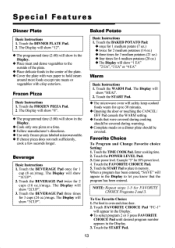
...delicate foods in the Display. ♦ Cook only one pizza at a time. ♦ Follow manufacturer's directions. ♦ Use only frozen pizza labeled microwaveable. ♦ If cheese pizza does not melt sufficiently, cook a few seconds longer. The Display will show "8". ♦ The programmed time (3:00)...40) will safety keep cooked foods warm for 50% power level. 4. Frozen Pizza Basic Instructions 1. Touch the START Pad. ♦ The microwave oven will show in the Display. ♦ Place meat and dense vegetables to 30 minutes. ♦ Opening the door or touching the CANCEL/ OFF...
...delicate foods in the Display. ♦ Cook only one pizza at a time. ♦ Follow manufacturer's directions. ♦ Use only frozen pizza labeled microwaveable. ♦ If cheese pizza does not melt sufficiently, cook a few seconds longer. The Display will show "8". ♦ The programmed time (3:00)...40) will safety keep cooked foods warm for 50% power level. 4. Frozen Pizza Basic Instructions 1. Touch the START Pad. ♦ The microwave oven will show in the Display. ♦ Place meat and dense vegetables to 30 minutes. ♦ Opening the door or touching the CANCEL/ OFF...
User Manual
Page 17
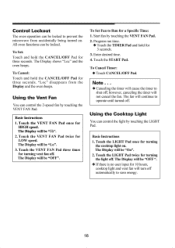
... can be locked to prevent the microwave from the Display and the oven beeps. The Display shows "Loc" and the oven beeps. To Cancel: Touch and hold the CANCEL/OFF Pad for 3 seconds. 3. The Display will be "Lo". 3. Start fan by touching the VENT FAN Pad. ... turning vent fan off . Touch the VENT FAN Pad three times for HIGH speed. The Display will continue to save energy. 16 Control Lockout The oven operation can be "Hi". 2. Touch the START Pad.
... can be locked to prevent the microwave from the Display and the oven beeps. The Display shows "Loc" and the oven beeps. To Cancel: Touch and hold the CANCEL/OFF Pad for 3 seconds. 3. The Display will be "Lo". 3. Start fan by touching the VENT FAN Pad. ... turning vent fan off . Touch the VENT FAN Pad three times for HIGH speed. The Display will continue to save energy. 16 Control Lockout The oven operation can be "Hi". 2. Touch the START Pad.
User Manual
Page 18
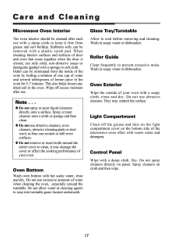
...; Do not remove or insert knife around the turntable. Do not allow water or cleaning agents to prevent excessive noise. Oven Exterior Wipe the outside of the microwave oven often with a soapy cloth, rinse and dry. Wipe off the grease and dust on the light compartment cover on the...can be removed with a damp cloth to cool before removing and cleaning. Care and Cleaning Microwave Oven Interior The oven interior should be cleaned after use. This also helps loosen any dried soil in the oven for 5-7 minutes. Glass Tray/Turntable Allow to keep it may scratch the surface. Spray...
...; Do not remove or insert knife around the turntable. Do not allow water or cleaning agents to prevent excessive noise. Oven Exterior Wipe the outside of the microwave oven often with a soapy cloth, rinse and dry. Wipe off the grease and dust on the light compartment cover on the...can be removed with a damp cloth to cool before removing and cleaning. Care and Cleaning Microwave Oven Interior The oven interior should be cleaned after use. This also helps loosen any dried soil in the oven for 5-7 minutes. Glass Tray/Turntable Allow to keep it may scratch the surface. Spray...

User Manual
Page 19
...hood feature on the filter and slide to the rear. To Remove Grease Filter To remove grease filter, grasp the "finger hold" on your microwave oven is then discharged through the venting to the outside or through the filters and is equipped with two metal filters which collect grease. Do not...surfaces below the hood, filters will stop the entry of flames into place. 18 Rinse, shake and remove moisture before replacing. Never operate the microwave without the filters in solution of the opening. Pull filter upward and to the left to the left. To clean Grease Filter To clean ...
...hood feature on the filter and slide to the rear. To Remove Grease Filter To remove grease filter, grasp the "finger hold" on your microwave oven is then discharged through the venting to the outside or through the filters and is equipped with two metal filters which collect grease. Do not...surfaces below the hood, filters will stop the entry of flames into place. 18 Rinse, shake and remove moisture before replacing. Never operate the microwave without the filters in solution of the opening. Pull filter upward and to the left to the left. To clean Grease Filter To clean ...
User Manual
Page 20
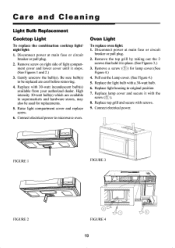
...(s) which are available in place. (See Figures 3.) 3. Disconnect power at main fuse or circuit breaker or pull plug. 2. Replace light housing to microwave oven. Remove a screw (() for replacements. 5. Oven Light To replace oven light: 1. FIGURE 1 FIGURE 2 FIGURE 3 00 0 0 FIGURE 4 19 2,.'°°"7,0 Disconnect power at main fuse or circuit breaker or pull plug. 2. Replace...
...(s) which are available in place. (See Figures 3.) 3. Disconnect power at main fuse or circuit breaker or pull plug. 2. Replace light housing to microwave oven. Remove a screw (() for replacements. 5. Oven Light To replace oven light: 1. FIGURE 1 FIGURE 2 FIGURE 3 00 0 0 FIGURE 4 19 2,.'°°"7,0 Disconnect power at main fuse or circuit breaker or pull plug. 2. Replace...
User Manual
Page 21
... and cycling properly. This is normal and indicates the oven is touched. A. as food cooks, steam is operating? Three long beeps = end of the oven door? Three short beeps = incorrect entry. The door can be used with your microwave oven. ♦ Steam or vapor escaping from around the door.... ♦ Light reflection around the door and moisture droplets form on the inside of cooking (microwave will maintain until the door is closed and the START Pad...
... and cycling properly. This is normal and indicates the oven is touched. A. as food cooks, steam is operating? Three long beeps = end of the oven door? Three short beeps = incorrect entry. The door can be used with your microwave oven. ♦ Steam or vapor escaping from around the door.... ♦ Light reflection around the door and moisture droplets form on the inside of cooking (microwave will maintain until the door is closed and the START Pad...
User Manual
Page 22
... outlet receptacle. ♦ check that voltage to the microwave oven is normal. The floor is properly grounded. ♦ try plugging the oven into an outlet on food density, etc. ♦ verify that the oven is absorbing heat from oven after each use. Before You Call Check the following ...to be sure food was completely defrosted before cooking. ♦ check placement of oven collects moisture: ♦ this is normal. If arcing (sparks) occur: ♦ be sure microwave-safe dishes were used. ♦ be sure wire twist ties were not used to prevent overcooking...
... outlet receptacle. ♦ check that voltage to the microwave oven is normal. The floor is properly grounded. ♦ try plugging the oven into an outlet on food density, etc. ♦ verify that the oven is absorbing heat from oven after each use. Before You Call Check the following ...to be sure food was completely defrosted before cooking. ♦ check placement of oven collects moisture: ♦ this is normal. If arcing (sparks) occur: ♦ be sure microwave-safe dishes were used. ♦ be sure wire twist ties were not used to prevent overcooking...
User Manual
Page 23
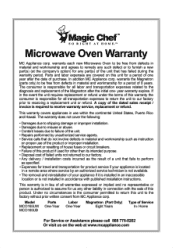
e Magic Chef SO RIGHT AT HOME."' Microwave Oven Warranty MC Appliance corp. year warranty expires. The warranty does not...receipt / invoice is responsible for any such defect or to receive warranty service, replacement or refund. Model MCO165UW MCO165UB Parts One-Year Labor Magnetron (Part Only) One-Year Eight Years Type of this product if ...instruction on proper use within the continental United States, Puerto Rico and Hawaii. warrants each new Microwave Oven to return this product. The consumer is responsible for all warranties expressed or implied and no circumstances...
e Magic Chef SO RIGHT AT HOME."' Microwave Oven Warranty MC Appliance corp. year warranty expires. The warranty does not...receipt / invoice is responsible for any such defect or to receive warranty service, replacement or refund. Model MCO165UW MCO165UB Parts One-Year Labor Magnetron (Part Only) One-Year Eight Years Type of this product if ...instruction on proper use within the continental United States, Puerto Rico and Hawaii. warrants each new Microwave Oven to return this product. The consumer is responsible for all warranties expressed or implied and no circumstances...


