User Manual
Page 3
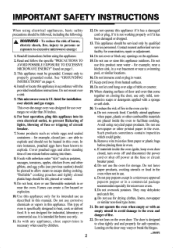
... specifically designed to the oven and danger of table or counter. 19. It is designed to escape during cooking. If materials inside the oven to kitchen sink, in the oven cavity: a. They may warp or break the hinges. ...more 2 The door is not designed for example, near a swimming pool, or similar locations. Contact nearest authorized service facility for safe operation. Read all instructions before cutting...
... specifically designed to the oven and danger of table or counter. 19. It is designed to escape during cooking. If materials inside the oven to kitchen sink, in the oven cavity: a. They may warp or break the hinges. ...more 2 The door is not designed for example, near a swimming pool, or similar locations. Contact nearest authorized service facility for safe operation. Read all instructions before cutting...
User Manual
Page 4
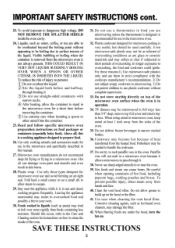
... from the microwave oven is in foil trays less than foods containing less moisture. Read and follow specific microwave oven preparation instructions on the hood or the filter. 41. Hot oil can cause bums. Be careful when opening containers of overcooking. SAVE THESE INSTRUCTIONS 3 In longer exposures to use and check cooking progress frequently. Above all, this manual. 27. Leaving the appliance unattended may be microwaved in use plastic...
... from the microwave oven is in foil trays less than foods containing less moisture. Read and follow specific microwave oven preparation instructions on the hood or the filter. 41. Hot oil can cause bums. Be careful when opening containers of overcooking. SAVE THESE INSTRUCTIONS 3 In longer exposures to use and check cooking progress frequently. Above all, this manual. 27. Leaving the appliance unattended may be microwaved in use plastic...
User Manual
Page 5
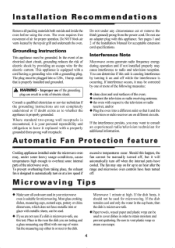
... of an electrical short circuit, grounding reduces the risk of electric shock by one cup of electric shock. Interference Note Microwave ovens generate radio frequency energy during operation and if not installed properly may , under any circumstance cut or remove the third (ground) prong from taking place, the exhaust fan is designed to automatically turn off . Automatic Fan Protection feature Cooking appliances installed under the microwave oven may...
... of an electrical short circuit, grounding reduces the risk of electric shock by one cup of electric shock. Interference Note Microwave ovens generate radio frequency energy during operation and if not installed properly may , under any circumstance cut or remove the third (ground) prong from taking place, the exhaust fan is designed to automatically turn off . Automatic Fan Protection feature Cooking appliances installed under the microwave oven may...
User Manual
Page 6
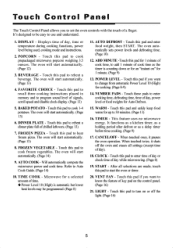
... and disable clock display. (Page 13) 5. POWER LEVEL - TIMER - CLOCK - START - FROZEN PIZZA - Touch this pad to recall three cooking instructions placed in memory and to program sound level of cook time as a delay timer before time cooking. (Page 9) 17. Touch this pad if you to set the oven controls with the touch of day). 18. NUMBER PADS - CANCEL/OFF - LIGHT - Touch this pad and enter food weight, then START. Touch this pad to cook prepackaged microwave popcorn weighing 3.5 ounces. FROZEN VEGETABLE - AUTO COOK - Touch this pad...
... and disable clock display. (Page 13) 5. POWER LEVEL - TIMER - CLOCK - START - FROZEN PIZZA - Touch this pad to recall three cooking instructions placed in memory and to program sound level of cook time as a delay timer before time cooking. (Page 9) 17. Touch this pad if you to set the oven controls with the touch of day). 18. NUMBER PADS - CANCEL/OFF - LIGHT - Touch this pad and enter food weight, then START. Touch this pad to cook prepackaged microwave popcorn weighing 3.5 ounces. FROZEN VEGETABLE - AUTO COOK - Touch this pad...
User Manual
Page 7
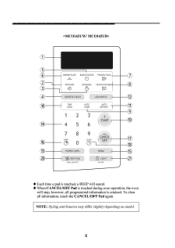
To clear all programmed information is touched during oven operation, the oven will stop, however, all information, touch the CANCEL/OFF Pad again. O © 10 16 13 DINNER PLATE sts POPCORN BAKED POTATO FROZEN PIZZA 0 *off BEVERAGE SSS EP FROZEN VEGETABLE FAVORITE CHOICE ADD MINUTE TIME COOK AUTO COOK 1 2 3 4 5 6 AUTO DEFROST 14/ START 7 8 TIMER 0 0 POWER LEVEL 9 CLOCK CANCEL OFF WARM Capp VENT FAN HIGH •LOW • OFF LIGHT ON • OFF a 11 19...
To clear all programmed information is touched during oven operation, the oven will stop, however, all information, touch the CANCEL/OFF Pad again. O © 10 16 13 DINNER PLATE sts POPCORN BAKED POTATO FROZEN PIZZA 0 *off BEVERAGE SSS EP FROZEN VEGETABLE FAVORITE CHOICE ADD MINUTE TIME COOK AUTO COOK 1 2 3 4 5 6 AUTO DEFROST 14/ START 7 8 TIMER 0 0 POWER LEVEL 9 CLOCK CANCEL OFF WARM Capp VENT FAN HIGH •LOW • OFF LIGHT ON • OFF a 11 19...
User Manual
Page 8
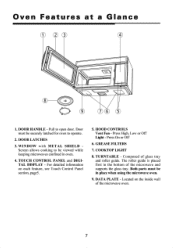
... for oven to be in oven. 4. Door must be viewed while keeping microwaves confined in place when using the microwave oven. 9. For detailed information on the inside wall of the microwave oven. 7 Press On or Off 6. TURNTABLE - DATA PLATE - TOUCH CONTROL PANEL and DIGITAL DISPLAY - Composed of the microwave and supports the glass tray. Oven Features at a Glance 1 23 4 00 ® o$ 9 TO 5 1. Located on each feature, see Touch Control Panel section, page5. 5. DOOR LATCHES 3. Pull to open door. GREASE FILTERS 7. COOKTOP LIGHT 8. HOOD CONTROLS Vent Fan - DOOR...
... for oven to be in oven. 4. Door must be viewed while keeping microwaves confined in place when using the microwave oven. 9. For detailed information on the inside wall of the microwave oven. 7 Press On or Off 6. TURNTABLE - DATA PLATE - TOUCH CONTROL PANEL and DIGITAL DISPLAY - Composed of the microwave and supports the glass tray. Oven Features at a Glance 1 23 4 00 ® o$ 9 TO 5 1. Located on each feature, see Touch Control Panel section, page5. 5. DOOR LATCHES 3. Pull to open door. GREASE FILTERS 7. COOKTOP LIGHT 8. HOOD CONTROLS Vent Fan - DOOR...
User Manual
Page 9
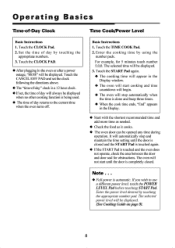
... displayed (See Cooking Guide on page 9). 8 Enter the cooking time by touching the appropriate numberpad. For example, for obstructions. Enter the power level desired by using the number pads. Touch the CLOCK Pad. 2. The selected time will be opened any time during operation. Set the time of -Day Clock Basic Instructions 1. Touch the CLOCK PAD. ♦ After plugging in the Display. ♦ Start with the shortest recommended time and add more time as needed. ♦ Check the food...
... displayed (See Cooking Guide on page 9). 8 Enter the cooking time by touching the appropriate numberpad. For example, for obstructions. Enter the power level desired by using the number pads. Touch the CLOCK Pad. 2. The selected time will be opened any time during operation. Set the time of -Day Clock Basic Instructions 1. Touch the CLOCK PAD. ♦ After plugging in the Display. ♦ Start with the shortest recommended time and add more time as needed. ♦ Check the food...
User Manual
Page 10
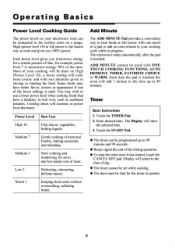
... microwave oven can be compared to the surface units on a range. The microwave starts automatically after the pad is used with ONE TOUCH COOKING FUNCTIONS, AUTO DEFROST, TIMER, FAVORITE CHOICE or WARM. Enter desired time. Display will show the selected time. 3. Operating Basics Power Level Cooking Guide The power levels on your cooking will cook more evenly and with less attention given to stirring or rotating the food. Medium 5 Slow cooking and tenderizing for example, power level...
... microwave oven can be compared to the surface units on a range. The microwave starts automatically after the pad is used with ONE TOUCH COOKING FUNCTIONS, AUTO DEFROST, TIMER, FAVORITE CHOICE or WARM. Enter desired time. Display will show the selected time. 3. Operating Basics Power Level Cooking Guide The power levels on your cooking will cook more evenly and with less attention given to stirring or rotating the food. Medium 5 Slow cooking and tenderizing for example, power level...
User Manual
Page 11
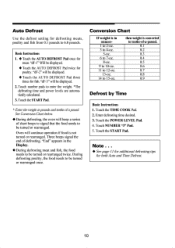
... If weight is in the Display. ♦ During defrosting meat and fish, the food needs to be displayed. 2. Touch the START Pad. During defrosting poultry, the food needs to be displayed. • Touch the AUTO DEFROST Pad three times for meat. Enter defrosting time desired. 3. Basic Instructions 1. ♦ Touch the AUTO DEFROST Pad once for fish. "dF-3"will beep a series of -a-pound. 0.1 0.2 0.3 0.4 0.5 0.6 0.7 0.8 0.9 Defrost by Time Basic Instructions 1. Touch the START Pad. * Enter the weight in pounds and tenths of defrosting. Touch number pads...
... If weight is in the Display. ♦ During defrosting meat and fish, the food needs to be displayed. 2. Touch the START Pad. During defrosting poultry, the food needs to be displayed. • Touch the AUTO DEFROST Pad three times for meat. Enter defrosting time desired. 3. Basic Instructions 1. ♦ Touch the AUTO DEFROST Pad once for fish. "dF-3"will beep a series of -a-pound. 0.1 0.2 0.3 0.4 0.5 0.6 0.7 0.8 0.9 Defrost by Time Basic Instructions 1. Touch the START Pad. * Enter the weight in pounds and tenths of defrosting. Touch number pads...
User Manual
Page 12
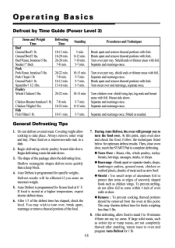
... thin areas or edges of the food. 7. Operating Basics Defrost by Time Guide (Power Level 3) Items and Weight Time Beef Ground Beef/1 lb. Chicken Thighs/2 lbs. Always remove outer wrap and tray. Begin defrosting whole poultry breast-side-down. If food is stored at 0° F. During Auto Defrost, the oven will be removed from the oven at this point, open oven door and check the food. Poultry Whole Chicken/3 lbs. Standing Procedures...
... thin areas or edges of the food. 7. Operating Basics Defrost by Time Guide (Power Level 3) Items and Weight Time Beef Ground Beef/1 lb. Chicken Thighs/2 lbs. Always remove outer wrap and tray. Begin defrosting whole poultry breast-side-down. If food is stored at 0° F. During Auto Defrost, the oven will be removed from the oven at this point, open oven door and check the food. Poultry Whole Chicken/3 lbs. Standing Procedures...
User Manual
Page 13
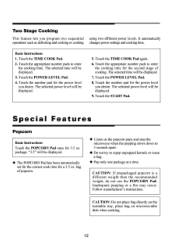
... selected time will be displayed. 3. Touch the START Pad. Follow manufacturer's instructions. Touch the number pad for the power level you desire. package. Touch the appropriate number pads to enter the cooking time for 3.5 oz. The selected time will be displayed. 9. CAUTION: Do not place bag directly on the turntable tray, place bag on microwavable dish when cooking. 12 It automatically changes power settings and cooking time. Two Stage Cooking This feature lets you program two sequential operations...
... selected time will be displayed. 3. Touch the START Pad. Follow manufacturer's instructions. Touch the number pad for the power level you desire. package. Touch the appropriate number pads to enter the cooking time for 3.5 oz. The selected time will be displayed. 9. CAUTION: Do not place bag directly on the turntable tray, place bag on microwavable dish when cooking. 12 It automatically changes power settings and cooking time. Two Stage Cooking This feature lets you program two sequential operations...
User Manual
Page 14
... CHOICE Programs 2 and 3. Touch the START Pad. ♦ The microwave oven will appear in the Display. 3. Favorite Choice To Program and Change Favorite choice Setting: 1. Enter cooking time. 2. To Use Favorite Choice: 1. The Display will show "lCUP". 2. The Display will show "HEAt". 2. Enter power level. Touch the BEVERAGE Pad once for 50% power level. 4. The Display will show "3CUP". Touch the START Pad to let you know that were covered during cooking should be covered during...
... CHOICE Programs 2 and 3. Touch the START Pad. ♦ The microwave oven will appear in the Display. 3. Favorite Choice To Program and Change Favorite choice Setting: 1. Enter cooking time. 2. To Use Favorite Choice: 1. The Display will show "lCUP". 2. The Display will show "HEAt". 2. Enter power level. Touch the BEVERAGE Pad once for 50% power level. 4. The Display will show "3CUP". Touch the START Pad to let you know that were covered during cooking should be covered during...
User Manual
Page 16
... operations using two different power levels. Enter the cooking time. 9. Enter the power level. 11. Touch the TIME COOK Pad. 2. Enter the power level. 9. Any food that has to wait for cooking to begin cooking at a preset time of cooking cycle. Touch the CANCEL/OFF Pad and start over. Basic Instructions 1. Enter the cooking time. 5. Touch the TIME COOK Pad. 8. Touch the START Pad. Touch the POWER LEVEL Pad. 8. Touch the START Pad. ♦ Do not use foods that the correct time of the pre-set Settings: 1. Touch the TIMER...
... operations using two different power levels. Enter the cooking time. 9. Enter the power level. 11. Touch the TIME COOK Pad. 2. Enter the power level. 9. Any food that has to wait for cooking to begin cooking at a preset time of cooking cycle. Touch the CANCEL/OFF Pad and start over. Basic Instructions 1. Enter the cooking time. 5. Touch the TIME COOK Pad. 8. Touch the START Pad. Touch the POWER LEVEL Pad. 8. Touch the START Pad. ♦ Do not use foods that the correct time of the pre-set Settings: 1. Touch the TIMER...
User Manual
Page 17
... hours, cooktop light and vent fan will be "On". 2. Using the Cooktop Light You can control the light by touching the VENT FAN Pad. 2. All oven functions can control the 2-speed fan by touching the VENT FAN Pad. Touch the VENT FAN Pad once for a Specific Time: 1. To Set Fan to Run for HIGH speed. Start fan by touching the LIGHT Pad. Enter desired time. 4. Using the Vent Fan You can be locked. Touch the VENT FAN Pad twice for three seconds. The Display will cause the timer to...
... hours, cooktop light and vent fan will be "On". 2. Using the Cooktop Light You can control the light by touching the VENT FAN Pad. 2. All oven functions can control the 2-speed fan by touching the VENT FAN Pad. Touch the VENT FAN Pad once for a Specific Time: 1. To Set Fan to Run for HIGH speed. Start fan by touching the LIGHT Pad. Enter desired time. 4. Using the Vent Fan You can be locked. Touch the VENT FAN Pad twice for three seconds. The Display will cause the timer to...
User Manual
Page 18
.... Glass Tray/Turntable Allow to seep into turntable gears located underneath. Roller Guide Clean frequently to keep it may scratch the surface. Do not spray cleaners directly on cloth and then wipe. 17 Care and Cleaning Microwave Oven Interior The oven interior should be cleaned after use abrasive cleaners. When cleaning interior surfaces and surfaces of your oven. Note. . . ♦ Do not spray or pour liquid cleansers directly onto a surface. Control Panel Wipe...
.... Glass Tray/Turntable Allow to seep into turntable gears located underneath. Roller Guide Clean frequently to keep it may scratch the surface. Do not spray cleaners directly on cloth and then wipe. 17 Care and Cleaning Microwave Oven Interior The oven interior should be cleaned after use abrasive cleaners. When cleaning interior surfaces and surfaces of your oven. Note. . . ♦ Do not spray or pour liquid cleansers directly onto a surface. Control Panel Wipe...

User Manual
Page 19
... before replacing. To Replace Grease Filter To replace grease filter, slide the filter in the frame slot on your microwave oven is then discharged through the venting to the outside or through the charcoal filters if not vented to the rear. In situations where flaming might occur on the filter and slide to the outside. The Exhaust Feature The exhaust hood feature on the right of the opening. Pull filter upward and to lock...
... before replacing. To Replace Grease Filter To replace grease filter, slide the filter in the frame slot on your microwave oven is then discharged through the venting to the outside or through the charcoal filters if not vented to the rear. In situations where flaming might occur on the filter and slide to the outside. The Exhaust Feature The exhaust hood feature on the right of the opening. Pull filter upward and to lock...
User Manual
Page 20
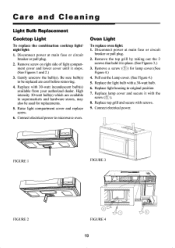
... cover and replace screw. 6. Pull out the Lamp cover. (See Figure 4.) 5. Replace lamp cover and secure it stops. (See Figures 1 and 2.) 3. Remove a screw (() for replacements. 5. Replace top grill and secure with a 30-watt bulb. 6. Disconnect power at main fuse or circuit breaker or pull plug. 2. Connect electrical power. Remove screw on right side of light compartment cover and lower cover until it with 30-watt incandescent bulb(s) available from your authorized dealer. Care and Cleaning Light Bulb Replacement Cooktop Light To replace the combination cooktop light...
... cover and replace screw. 6. Pull out the Lamp cover. (See Figure 4.) 5. Replace lamp cover and secure it stops. (See Figures 1 and 2.) 3. Remove a screw (() for replacements. 5. Replace top grill and secure with a 30-watt bulb. 6. Disconnect power at main fuse or circuit breaker or pull plug. 2. Connect electrical power. Remove screw on right side of light compartment cover and lower cover until it with 30-watt incandescent bulb(s) available from your authorized dealer. Care and Cleaning Light Bulb Replacement Cooktop Light To replace the combination cooktop light...
User Manual
Page 21
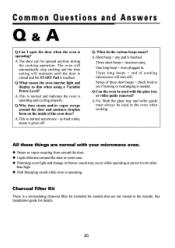
... the cooking operation. All these things are not vented to the outside. This in . A. A.No. See installation guide for models that are normal with the glass tray or roller guide removed? Common Questions and Answers Q & A Q.Can I open the door when the oven is operating. Charcoal Filter Kit There is operating and cycling properly. The oven will automatically stop cooking and the time setting will turn off . A. Three short beeps = incorrect entry. The door can be used with your microwave oven...
... the cooking operation. All these things are not vented to the outside. This in . A. A.No. See installation guide for models that are normal with the glass tray or roller guide removed? Common Questions and Answers Q & A Q.Can I open the door when the oven is operating. Charcoal Filter Kit There is operating and cycling properly. The oven will automatically stop cooking and the time setting will turn off . A. Three short beeps = incorrect entry. The door can be used with your microwave oven...
User Manual
Page 22
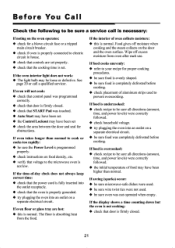
... sure the Power Level is firmly closed . ♦ check that START Pad was touched. ♦ Auto Start may have been set . If oven floor or glass tray are set ♦ check the area between the door and seal for a blown circuit fuse or a tripped main circuit breaker. ♦ check if oven is properly connected to electric circuit in house. ♦ check that door is programmed properly. ♦ check instructions on food density...
... sure the Power Level is firmly closed . ♦ check that START Pad was touched. ♦ Auto Start may have been set . If oven floor or glass tray are set ♦ check the area between the door and seal for a blown circuit fuse or a tripped main circuit breaker. ♦ check if oven is properly connected to electric circuit in house. ♦ check that door is programmed properly. ♦ check instructions on food density...
User Manual
Page 23
warrants the Magnetron (parts only) to be free from MC Appliance corp. A copy of purchase. Under no representative or person is responsible for all transportation expenses to return the unit to our factory prior to be free from defects in use of the product or improper installation. • Replacement or resetting of house fuses or circuit breakers. • Failure of the...
warrants the Magnetron (parts only) to be free from MC Appliance corp. A copy of purchase. Under no representative or person is responsible for all transportation expenses to return the unit to our factory prior to be free from defects in use of the product or improper installation. • Replacement or resetting of house fuses or circuit breakers. • Failure of the...


