
User's Guide
Page 4
... connected to the computer 43 Maintaining the printer 45 Maintaining print cartridges...45 Installing print cartridges...45 Removing used print cartridges...46 Refilling print cartridges...46 Using genuine Lexmark print cartridges...46 Aligning the print cartridges ...47 Cleaning the print cartridge nozzles...47 Wiping the print cartridge nozzles and contacts ...48 Preserving the print cartridges ...49 Cleaning the exterior of the...
... connected to the computer 43 Maintaining the printer 45 Maintaining print cartridges...45 Installing print cartridges...45 Removing used print cartridges...46 Refilling print cartridges...46 Using genuine Lexmark print cartridges...46 Aligning the print cartridges ...47 Cleaning the print cartridge nozzles...47 Wiping the print cartridge nozzles and contacts ...48 Preserving the print cartridges ...49 Cleaning the exterior of the...
User's Guide
Page 5
Ordering print cartridges ...50 Ordering paper and other supplies...50 Troubleshooting 52 Using the printer troubleshooting software (Windows only 52 Setup troubleshooting...52 Power button is not lit ...52 Software did not install...53 Page does not print...54 Solving printer power problems ...56 Removing and reinstalling the software ... is a firewall on the computer ...63 Wi-Fi indicator light is not lit...63 Wi-Fi indicator light is green but the printer does not print (Windows only 63 Wi-Fi indicator light is blinking orange during installation (Windows only 65 Wi-Fi indicator light is...
Ordering print cartridges ...50 Ordering paper and other supplies...50 Troubleshooting 52 Using the printer troubleshooting software (Windows only 52 Setup troubleshooting...52 Power button is not lit ...52 Software did not install...53 Page does not print...54 Solving printer power problems ...56 Removing and reinstalling the software ... is a firewall on the computer ...63 Wi-Fi indicator light is not lit...63 Wi-Fi indicator light is green but the printer does not print (Windows only 63 Wi-Fi indicator light is blinking orange during installation (Windows only 65 Wi-Fi indicator light is...

User's Guide
Page 11
...using . 2 1 3 If the light is not on the printer. 2 Plug the power cord into an electrical outlet that other electrical devices have been using a USB cable. Use the To 5 Access cover • Install or change the print cartridges. • Clear paper jams. 6 Paper feed guard Prevent ...items from falling into the paper slot. 7 Paper guides Keep paper straight when feeding. 8 Paper support Load paper. 1 Use the 1 USB port 2 Power supply 2 3 To Connect the printer to a power source using the...
...using . 2 1 3 If the light is not on the printer. 2 Plug the power cord into an electrical outlet that other electrical devices have been using a USB cable. Use the To 5 Access cover • Install or change the print cartridges. • Clear paper jams. 6 Paper feed guard Prevent ...items from falling into the paper slot. 7 Paper guides Keep paper straight when feeding. 8 Paper support Load paper. 1 Use the 1 USB port 2 Power supply 2 3 To Connect the printer to a power source using the...

User's Guide
Page 15
Note: Your printer may not come with cartridge installation. • Print a test page. • Print an alignment page. • Clean the print cartridge nozzles. • Order ink or supplies. • Register the printer. • Contact customer support. Use the To Lexmark Printer Utility • Get help with these applications, depending on a wireless network. Lexmark Wireless Setup Assistant Set up the printer on the features of the printer that you purchased. 15
Note: Your printer may not come with cartridge installation. • Print a test page. • Print an alignment page. • Clean the print cartridge nozzles. • Order ink or supplies. • Register the printer. • Contact customer support. Use the To Lexmark Printer Utility • Get help with these applications, depending on a wireless network. Lexmark Wireless Setup Assistant Set up the printer on the features of the printer that you purchased. 15
User's Guide
Page 45
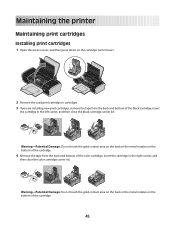
... the back and bottom of the color cartridge, insert the cartridge in the left carrier, and then close the color cartridge carrier lid. Warning-Potential Damage: Do not touch the gold contact area on the back or the metal nozzles on the cartridge carrier levers. Maintaining the printer Maintaining print cartridges Installing print cartridges 1 Open the access cover, and...
... the back and bottom of the color cartridge, insert the cartridge in the left carrier, and then close the color cartridge carrier lid. Warning-Potential Damage: Do not touch the gold contact area on the back or the metal nozzles on the cartridge carrier levers. Maintaining the printer Maintaining print cartridges Installing print cartridges 1 Open the access cover, and...

User's Guide
Page 46
... may cause damage to raise the cartridge carrier lid. For best results, use of a refilled cartridge. Lexmark does not recommend use Lexmark supplies. Refilling print cartridges The warranty does not cover repair of Original Lexmark Ink message, the original Lexmark ink in the indicated cartridge (s) has been depleted. 46 Using genuine Lexmark print cartridges Lexmark printers, print cartridges, and photo paper are designed...
... may cause damage to raise the cartridge carrier lid. For best results, use of a refilled cartridge. Lexmark does not recommend use Lexmark supplies. Refilling print cartridges The warranty does not cover repair of Original Lexmark Ink message, the original Lexmark ink in the indicated cartridge (s) has been depleted. 46 Using genuine Lexmark print cartridges Lexmark printers, print cartridges, and photo paper are designed...

User's Guide
Page 47
... from a computer, click Learn more on the message. 2 Click Report a non-Lexmark print cartridge. Aligning the print cartridges Using Windows 1 Load plain paper. 2 Click Start ΠPrograms or All Programs, and then click the printer folder. 3 From the printer folder, click Maintenance ΠAlign cartridges. 4 Click Print. 5 Follow the instructions on the computer screen. 6 If you...
... from a computer, click Learn more on the message. 2 Click Report a non-Lexmark print cartridge. Aligning the print cartridges Using Windows 1 Load plain paper. 2 Click Start ΠPrograms or All Programs, and then click the printer folder. 3 From the printer folder, click Maintenance ΠAlign cartridges. 4 Click Print. 5 Follow the instructions on the computer screen. 6 If you...

User's Guide
Page 48
...hold the cloth against the contacts for about three seconds, and then wipe in the direction shown. 48 Wiping the print cartridge nozzles and contacts 1 Remove the print cartridge(s). 2 Dampen a clean, lint-free cloth with water, and then place the cloth on the computer screen. 6 If...cartridge nozzles to clean them. 5 To test if the print quality has improved, print the document again. 6 If print quality has not improved, then try cleaning the nozzles up to two more times. Using Macintosh 1 Load plain paper. 2 From the Finder desktop, double click the printer folder. 3 Double-click the printer...
...hold the cloth against the contacts for about three seconds, and then wipe in the direction shown. 48 Wiping the print cartridge nozzles and contacts 1 Remove the print cartridge(s). 2 Dampen a clean, lint-free cloth with water, and then place the cloth on the computer screen. 6 If...cartridge nozzles to clean them. 5 To test if the print quality has improved, print the document again. 6 If print quality has not improved, then try cleaning the nozzles up to two more times. Using Macintosh 1 Load plain paper. 2 From the Finder desktop, double click the printer folder. 3 Double-click the printer...

User's Guide
Page 49
... Damage: Do not use household cleaners or detergents, as they may cause damage to remove any ink residue that the printer is still not satisfactory, replace the print cartridge(s). Warning-Potential Damage: Using a damp cloth to clean the interior may damage the finish of the... printer. 4 Wipe only the outside of the printer, making sure to your printer. 5 Make sure the paper support and paper exit tray are ready to install them. • Do not remove a cartridge from the printer except to the printer before beginning a new print job. 49...
... Damage: Do not use household cleaners or detergents, as they may cause damage to remove any ink residue that the printer is still not satisfactory, replace the print cartridge(s). Warning-Potential Damage: Using a damp cloth to clean the interior may damage the finish of the... printer. 4 Wipe only the outside of the printer, making sure to your printer. 5 Make sure the paper support and paper exit tray are ready to install them. • Do not remove a cartridge from the printer except to the printer before beginning a new print job. 49...
User's Guide
Page 54
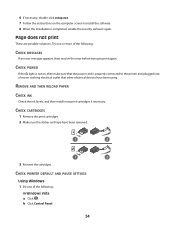
... PAPER CHECK INK Check the ink levels, and then install new print cartridges if necessary. CHECK POWER If the light is not on the computer screen to print again. b Click Control Panel. 54 CHECK PRINTER DEFAULT AND PAUSE SETTINGS Using Windows 1 Do one or more of the... double-click setup.exe. 7 Follow the instructions on , then make sure that the power cord is properly connected to the printer and plugged into a known working electrical outlet that other electrical devices have been removed. 1 2 1 2 3 Reinsert the cartridges. Page does not print These are possible solutions.
... PAPER CHECK INK Check the ink levels, and then install new print cartridges if necessary. CHECK POWER If the light is not on the computer screen to print again. b Click Control Panel. 54 CHECK PRINTER DEFAULT AND PAUSE SETTINGS Using Windows 1 Do one or more of the... double-click setup.exe. 7 Follow the instructions on , then make sure that the power cord is properly connected to the printer and plugged into a known working electrical outlet that other electrical devices have been removed. 1 2 1 2 3 Reinsert the cartridges. Page does not print These are possible solutions.
User's Guide
Page 85
... a printer 23 creating 20 additional computers installing wireless printer 19 aligning print cartridges 47 assigning IP address 30 C cable installation 26 USB 26 canceling print jobs 38 cartridges, print aligning 47 cleaning 47 installing 45 ordering 50 preserving 49 removing 46 using genuine Lexmark 46 ...wiping 48 CD printing photos from 43 changing wireless settings after installation (Mac) 18 changing wireless settings after installation (Windows) 18 cleaning exterior of the printer 49 cleaning print cartridge nozzles 47 Communication not available...
... a printer 23 creating 20 additional computers installing wireless printer 19 aligning print cartridges 47 assigning IP address 30 C cable installation 26 USB 26 canceling print jobs 38 cartridges, print aligning 47 cleaning 47 installing 45 ordering 50 preserving 49 removing 46 using genuine Lexmark 46 ...wiping 48 CD printing photos from 43 changing wireless settings after installation (Mac) 18 changing wireless settings after installation (Windows) 18 cleaning exterior of the printer 49 cleaning print cartridge nozzles 47 Communication not available...

User's Guide
Page 86
... lit 52 print cartridge nozzles, cleaning 47 print cartridges aligning 47 cleaning 47 installing 45 ordering 50 preserving 49 refilling 46 removing 46 using genuine Lexmark 46 wiping 48 print jobs canceling 38 print settings saving and deleting 41 printer cannot connect to wireless network 60 printer does not print wireless 63 printer does not print...
... lit 52 print cartridge nozzles, cleaning 47 print cartridges aligning 47 cleaning 47 installing 45 ordering 50 preserving 49 refilling 46 removing 46 using genuine Lexmark 46 wiping 48 print jobs canceling 38 print settings saving and deleting 41 printer cannot connect to wireless network 60 printer does not print wireless 63 printer does not print...


