
Technical Reference
Page 19
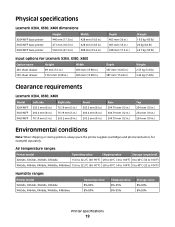
... value 8%-95% 8%-95% Storage value 8%-80% 8%-80% Printer specifications 19 Physical specifications Lexmark X264, X360, X460 dimensions X264 MFP base printer X360 MFP base printer X460 MFP base printer Height 440 mm (17.3 in.) 471 mm (18.5 in.) 546 mm ... lb) 22.7 kg (50 lb) Weight 2.55 kg (5.6 lb) 3.23 kg (7.2 lb) Clearance requirements Lexmark X264, X360, X460 Model X264 MFP X360 MFP X460 MFP Left side 203.2 mm (8 in.) 203.2 mm (8 in.) 76.19 mm (3 in.) Right side 76... or storing printers, always pack the printer supplies (cartridges and photoconductors, for example) separately.
... value 8%-95% 8%-95% Storage value 8%-80% 8%-80% Printer specifications 19 Physical specifications Lexmark X264, X360, X460 dimensions X264 MFP base printer X360 MFP base printer X460 MFP base printer Height 440 mm (17.3 in.) 471 mm (18.5 in.) 546 mm ... lb) 22.7 kg (50 lb) Weight 2.55 kg (5.6 lb) 3.23 kg (7.2 lb) Clearance requirements Lexmark X264, X360, X460 Model X264 MFP X360 MFP X460 MFP Left side 203.2 mm (8 in.) 203.2 mm (8 in.) 76.19 mm (3 in.) Right side 76... or storing printers, always pack the printer supplies (cartridges and photoconductors, for example) separately.
Technical Reference
Page 61
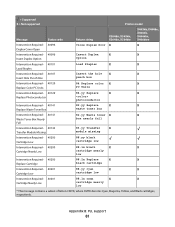
... X X Insert Hole Punch Box punch box Intervention Required - 40129 84 Replace color X X Replace Color PC Units PC Units Intervention Required - 40129 84.yy Replace X X Replace Photoconductor photoconductor Intervention Required - 40141 82.yy Replace X X Replace Waste Toner Box waste toner box Intervention Required - 40141 82.yy Waste toner X X Waste Toner Box Nearly box...
... X X Insert Hole Punch Box punch box Intervention Required - 40129 84 Replace color X X Replace Color PC Units PC Units Intervention Required - 40129 84.yy Replace X X Replace Photoconductor photoconductor Intervention Required - 40141 82.yy Replace X X Replace Waste Toner Box waste toner box Intervention Required - 40141 82.yy Waste toner X X Waste Toner Box Nearly box...

Technical Reference
Page 62
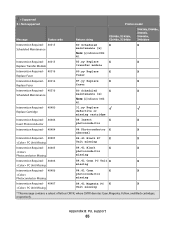
... Intervention Required - 40204 PC Kit Life Warning 84 PC kit life warning Intervention Required - 40204 84.yy X X Photoconductor Low photoconductor low Intervention Required - 40204 84 Photoconductor X X Photoconductor Low low Intervention Required - 40204 84.yy [color] X X Photoconductor Nearly Low photoconductor nearly low * This message contains a subset of letters CMYK, where CMYK denotes Cyan, Magenta, Yellow, and Black...
... Intervention Required - 40204 PC Kit Life Warning 84 PC kit life warning Intervention Required - 40204 84.yy X X Photoconductor Low photoconductor low Intervention Required - 40204 84 Photoconductor X X Photoconductor Low low Intervention Required - 40204 84.yy [color] X X Photoconductor Nearly Low photoconductor nearly low * This message contains a subset of letters CMYK, where CMYK denotes Cyan, Magenta, Yellow, and Black...

Technical Reference
Page 63
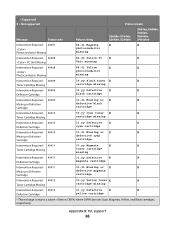
... Intervention Required - 40303 88 Replace yellow X X Replace Toner toner Intervention Required - 40304 Replace PC Kit 84 Replace PC Kit Intervention Required - 40304 84 Replace X X Replace Photoconductor photoconductor Intervention Required - 40305 84 Replace black X X 84 Replace Black PC Unit PC Unit Intervention Required - 40309 32.yy black X X Cartridge Part Number Unsupported cartridge part...
... Intervention Required - 40303 88 Replace yellow X X Replace Toner toner Intervention Required - 40304 Replace PC Kit 84 Replace PC Kit Intervention Required - 40304 84 Replace X X Replace Photoconductor photoconductor Intervention Required - 40305 84 Replace black X X 84 Replace Black PC Unit PC Unit Intervention Required - 40309 32.yy black X X Cartridge Part Number Unsupported cartridge part...
Technical Reference
Page 65
...: [x] indicates 100k kit. Appendix B: PJL support 65 Intervention Required - 40400 Replace Cartridge 31.yy Replace defective or missing cartridge Intervention Required - 40404 84 Insert X X Insert Photoconductor photoconductor Intervention Required - 40404 84 Photoconductor X X abnormal Intervention Required - 40405 84.41 Black PC X X PC Unit Missing Unit missing Intervention Required - 40405 84.41 Black...
...: [x] indicates 100k kit. Appendix B: PJL support 65 Intervention Required - 40400 Replace Cartridge 31.yy Replace defective or missing cartridge Intervention Required - 40404 84 Insert X X Insert Photoconductor photoconductor Intervention Required - 40404 84 Photoconductor X X abnormal Intervention Required - 40405 84.41 Black PC X X PC Unit Missing Unit missing Intervention Required - 40405 84.41 Black...
Technical Reference
Page 66
..., X363dn, X364dn, X364dw X463de, X464de, X466de, X466dte, X466dwe Intervention Required - 40407 84.41 Magenta X X Photoconductor Missing photoconductor missing Intervention Required - 40408 84.41 Yellow PC X X PC Unit Missing Unit missing Intervention Required - 40408 84.41 Yellow X X Photoconductor Missing photoconductor missing Intervention Required - 40409 30.yy Black toner X X Toner Cartridge Missing cartridge missing Intervention Required...
..., X363dn, X364dn, X364dw X463de, X464de, X466de, X466dte, X466dwe Intervention Required - 40407 84.41 Magenta X X Photoconductor Missing photoconductor missing Intervention Required - 40408 84.41 Yellow PC X X PC Unit Missing Unit missing Intervention Required - 40408 84.41 Yellow X X Photoconductor Missing photoconductor missing Intervention Required - 40409 30.yy Black toner X X Toner Cartridge Missing cartridge missing Intervention Required...

Technical Reference
Page 68
Photoconductor Exposure Warning 40025 Intervention Required - Check Orientation or Guides 4100x Intervention Required - Remove Paper Outbin 40019 Intervention Required - 40019 Remove ...Remove paper from X X bin Remove paper X X from Remove paper from standard output bin Remove X X Paper Remove Paper X X Output Bin Remove Paper X X Standard Bin Photoconductor X X exposure warning Check X X orientation or guides Check X X Paper Guide Paper changes X X needed Change X Appendix B: PJL support 68 Remove Paper 40019 Intervention Required -...
Photoconductor Exposure Warning 40025 Intervention Required - Check Orientation or Guides 4100x Intervention Required - Remove Paper Outbin 40019 Intervention Required - 40019 Remove ...Remove paper from X X bin Remove paper X X from Remove paper from standard output bin Remove X X Paper Remove Paper X X Output Bin Remove Paper X X Standard Bin Photoconductor X X exposure warning Check X X orientation or guides Check X X Paper Guide Paper changes X X needed Change X Appendix B: PJL support 68 Remove Paper 40019 Intervention Required -...
User Guide
Page 9
... of supplies from the printer control panel 232 Checking the status of supplies from a network computer 232 Ordering supplies...233 Ordering toner cartridges...233 Ordering a photoconductor kit ...233 Ordering ADF replacement parts...234 Moving the printer to another location...234 Shipping the printer...235 Administrative support 236 Finding advanced networking and...
... of supplies from the printer control panel 232 Checking the status of supplies from a network computer 232 Ordering supplies...233 Ordering toner cartridges...233 Ordering a photoconductor kit ...233 Ordering ADF replacement parts...234 Moving the printer to another location...234 Shipping the printer...235 Administrative support 236 Finding advanced networking and...
User Guide
Page 233
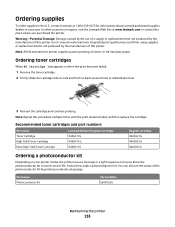
...High Yield Toner Cartridge Extra High Yield Toner Cartridge Lexmark Return Program Cartridge X463A11G X463H11G X463X11G Regular cartridge X463A21G X463H21G X463X21G Ordering a photoconductor kit Depending on letter- Part name Photoconductor kit Part number E260X22G Maintaining the printer 233 ...or A4-size plain paper. Note: All life estimates for information about Lexmark authorized supplies dealers in your printer...
...High Yield Toner Cartridge Extra High Yield Toner Cartridge Lexmark Return Program Cartridge X463A11G X463H11G X463X11G Regular cartridge X463A21G X463H21G X463X21G Ordering a photoconductor kit Depending on letter- Part name Photoconductor kit Part number E260X22G Maintaining the printer 233 ...or A4-size plain paper. Note: All life estimates for information about Lexmark authorized supplies dealers in your printer...
User Guide
Page 236
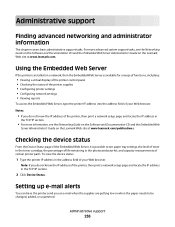
...you do not know the IP address of the printer, then print a network setup page and locate the IP address in the photoconductor kit, and capacity measurements of your Web browser. Administrative support Finding advanced networking and administrator information This chapter covers basic administrative support ...tasks. Checking the device status From the Device Status page of the Embedded Web Server, it is installed on the Lexmark Web site at www.lexmark.com/publications. Using the Embedded Web Server If the printer is possible to be changed, added, or unjammed. Note:...
...you do not know the IP address of the printer, then print a network setup page and locate the IP address in the photoconductor kit, and capacity measurements of your Web browser. Administrative support Finding advanced networking and administrator information This chapter covers basic administrative support ...tasks. Checking the device status From the Device Status page of the Embedded Web Server, it is installed on the Lexmark Web site at www.lexmark.com/publications. Using the Embedded Web Server If the printer is possible to be changed, added, or unjammed. Note:...

User Guide
Page 238
... locations Note: To resolve any message, all paper or specialty media must be cleared from the entire paper path. Inside are the toner cartridge and photoconductor kit. 2 Standard exit bin 3 Front door 4 Manual or multipurpose feeder door 5 Standard 250-sheet tray (Tray 1) 6 Optional 250- To clear a jam message and resume printing...
... locations Note: To resolve any message, all paper or specialty media must be cleared from the entire paper path. Inside are the toner cartridge and photoconductor kit. 2 Standard exit bin 3 Front door 4 Manual or multipurpose feeder door 5 Standard 250-sheet tray (Tray 1) 6 Optional 250- To clear a jam message and resume printing...

User Guide
Page 239
..., and then open the rear door. To reduce the risk of the following : • Remove Tray 1. • Open the front door, and then remove the photoconductor kit. Open the multipurpose feeder door. Open the front door, and then open the rear door.
..., and then open the rear door. To reduce the risk of the following : • Remove Tray 1. • Open the front door, and then remove the photoconductor kit. Open the multipurpose feeder door. Open the front door, and then open the rear door.

User Guide
Page 240
Clearing jams 240 2 Remove the jam if you see it here. 3 If you do not see the jam, open the front door, and then remove the photoconductor kit and toner cartridge. 4 Lift the flap at the front of the printer, and then remove any jammed sheets.
Clearing jams 240 2 Remove the jam if you see it here. 3 If you do not see the jam, open the front door, and then remove the photoconductor kit and toner cartridge. 4 Lift the flap at the front of the printer, and then remove any jammed sheets.

User Guide
Page 241
Clearing jams 241 If the paper is exiting the printer, then pull the paper out, and then touch Continue. 5 If you do not see any jammed sheets, open the rear door. 6 Remove the jam. 7 Close the rear door. 8 Insert the photoconductor kit and toner cartridge. 9 Close the front door. 10 Touch Continue. 202 paper jam Touch Status/Supplies to identify the location of the jam.
Clearing jams 241 If the paper is exiting the printer, then pull the paper out, and then touch Continue. 5 If you do not see any jammed sheets, open the rear door. 6 Remove the jam. 7 Close the rear door. 8 Insert the photoconductor kit and toner cartridge. 9 Close the front door. 10 Touch Continue. 202 paper jam Touch Status/Supplies to identify the location of the jam.

User Guide
Page 247
If the sheet is visible, gently pull the jammed sheet out. 251 paper jam A sheet of the printer, and then remove any jams. 3 Reinsert the photoconductor kit and toner cartridge. 4 Close the front door. 5 Touch Continue. Clearing jams 247 If it is not visible, complete the following steps: 1 Open the front door, and then remove the photoconductor kit and toner cartridge. 2 Lift the flap at the front of paper failed to feed from the multipurpose feeder.
If the sheet is visible, gently pull the jammed sheet out. 251 paper jam A sheet of the printer, and then remove any jams. 3 Reinsert the photoconductor kit and toner cartridge. 4 Close the front door. 5 Touch Continue. Clearing jams 247 If it is not visible, complete the following steps: 1 Open the front door, and then remove the photoconductor kit and toner cartridge. 2 Lift the flap at the front of paper failed to feed from the multipurpose feeder.
User Guide
Page 263
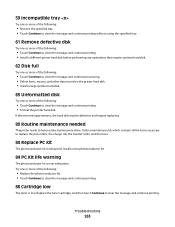
... to clear the message and continue printing. • Format the printer hard disk. Try one or more of the following : • Replace the photoconductor kit. • Touch Continue to replace the pick rollers, the charge roll, the transfer roller, and the fuser. 84 Replace PC Kit The... photoconductor kit is near exhaustion. Replace the toner cartridge, and then touch Continue to have routine maintenance done. Troubleshooting 263 If the error message remains...
... to clear the message and continue printing. • Format the printer hard disk. Try one or more of the following : • Replace the photoconductor kit. • Touch Continue to replace the pick rollers, the charge roll, the transfer roller, and the fuser. 84 Replace PC Kit The... photoconductor kit is near exhaustion. Replace the toner cartridge, and then touch Continue to have routine maintenance done. Troubleshooting 263 If the error message remains...
User Guide
Page 314
... load 94 Paper Weight menu 159 Parallel menu 173 pausing the current print job to make copies 111 PCL Emul menu 223 PDF menu 222 photoconductor kit ordering 233 photos copying 106 port settings configuring 65 PostScript menu 222 Power Saver adjusting 72 print job canceling from Macintosh 103 canceling from...
... load 94 Paper Weight menu 159 Parallel menu 173 pausing the current print job to make copies 111 PCL Emul menu 223 PDF menu 222 photoconductor kit ordering 233 photos copying 106 port settings configuring 65 PostScript menu 222 Power Saver adjusting 72 print job canceling from Macintosh 103 canceling from...
User Guide
Page 316
... 164 Standard USB menu 172 status of 232 storing 231 using recycled paper 70 supplies, ordering 233 ADF pick assembly 234 ADF separator roll 234 photoconductor kit 233 system board accessing 30 System busy, preparing resources for job. 258 System busy, preparing resources for job.
... 164 Standard USB menu 172 status of 232 storing 231 using recycled paper 70 supplies, ordering 233 ADF pick assembly 234 ADF separator roll 234 photoconductor kit 233 system board accessing 30 System busy, preparing resources for job. 258 System busy, preparing resources for job.


