Card Stock & Label Guide
Page 64
... Card stock should be sent through the manual feeder one sheet at a time. Using media higher than 300 Sheffield could result in Tray 1. Printer specifications 64 Card Stock Tag - Card stock must be grain short and set to 163 g/m2 (43 lb). Cover - The printer supports paper and... label stock from 60-90 g/m2 and index card stock up to 50 label sheets in printing degradation. Overview of paper office labels designed for laser printers. Tray 2 - - - Labels Paper 90 g/m2 90 g/m2 90 g/m2 Vinyl - - - Lexmark...
... Card stock should be sent through the manual feeder one sheet at a time. Using media higher than 300 Sheffield could result in Tray 1. Printer specifications 64 Card Stock Tag - Card stock must be grain short and set to 163 g/m2 (43 lb). Cover - The printer supports paper and... label stock from 60-90 g/m2 and index card stock up to 50 label sheets in printing degradation. Overview of paper office labels designed for laser printers. Tray 2 - - - Labels Paper 90 g/m2 90 g/m2 90 g/m2 Vinyl - - - Lexmark...

Card Stock & Label Guide
Page 65
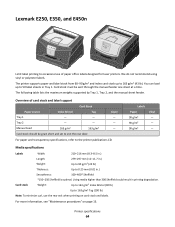
...and label stock from 60-90 g/m2 and index card stock up to 50 label sheets in Tray 1. Card stock must be grain short and set to exit the rear door. 163 g/m2 For paper and transparency specifications, see "Maintenance procedures" on card stock and labels. The following table ...by Tray 1, Tray 2, and the manual sheet feeder. Manual Feed 163 g/m2 Card stock should be sent through the manual feeder one sheet at a time. Cover - - - Lexmark E260, E260d, E260dn, E360d, E360dn, E460dn, E460dw, and E462dtn Limit label printing to occasional use the rear exit when printing on page 13. ...
...and label stock from 60-90 g/m2 and index card stock up to 50 label sheets in Tray 1. Card stock must be grain short and set to exit the rear door. 163 g/m2 For paper and transparency specifications, see "Maintenance procedures" on card stock and labels. The following table ...by Tray 1, Tray 2, and the manual sheet feeder. Manual Feed 163 g/m2 Card stock should be sent through the manual feeder one sheet at a time. Cover - - - Lexmark E260, E260d, E260dn, E360d, E360dn, E460dn, E460dw, and E462dtn Limit label printing to occasional use the rear exit when printing on page 13. ...

Card Stock & Label Guide
Page 93
...more information, see "Maintenance procedures" on card stock and labels. Partial sheets may contaminate the printer. Zone coating of the adhesive at a time through the manual bypass feeder. Printer specifications 93 Note: To minimize curl, us the rear exit when printing on page 13. Labels can ...components into the printer. • Use grain short card stock when possible. Lexmark X215 The Lexmark X215 prints on card stock: • Make sure the Paper Type is Card Stock. • Select the appropriate Paper Texture setting. • Be aware that may cause labels to the sheet edge. ...
...more information, see "Maintenance procedures" on card stock and labels. Partial sheets may contaminate the printer. Zone coating of the adhesive at a time through the manual bypass feeder. Printer specifications 93 Note: To minimize curl, us the rear exit when printing on page 13. Labels can ...components into the printer. • Use grain short card stock when possible. Lexmark X215 The Lexmark X215 prints on card stock: • Make sure the Paper Type is Card Stock. • Select the appropriate Paper Texture setting. • Be aware that may cause labels to the sheet edge. ...

Card Stock & Label Guide
Page 95
When printing on card stock: • Set the Paper Type to Card Stock from the printer driver. • Do not use preprinted card stock manufactured with the recommended print side faceup and ... sheet or are wrinkled, bubbled, or otherwise damaged. • Do not load a sheet of labels through the manual feeder one sheet at a time. It may contaminate the printer. Lexmark X264dn, X363dn, X364dn, and X364dw Limit label printing to 163 g/m2 (43 lb). It is recommended to 50 label sheets in the standard...
When printing on card stock: • Set the Paper Type to Card Stock from the printer driver. • Do not use preprinted card stock manufactured with the recommended print side faceup and ... sheet or are wrinkled, bubbled, or otherwise damaged. • Do not load a sheet of labels through the manual feeder one sheet at a time. It may contaminate the printer. Lexmark X264dn, X363dn, X364dn, and X364dw Limit label printing to 163 g/m2 (43 lb). It is recommended to 50 label sheets in the standard...

Common Criteria Installation Supplement and Administrator Guide
Page 3
... Administering the device 15 Using the Embedded Web Server...15 Settings for network-attached devices...16 Creating and modifying digital certificates...16 Setting up IPSec...18 Disabling non-IP network protocols...19 Shutting down port access...20 Other settings and functions...20 Network Time Protocol...20 Kerberos...21 Security audit logging...22 E-mail...24...
... Administering the device 15 Using the Embedded Web Server...15 Settings for network-attached devices...16 Creating and modifying digital certificates...16 Setting up IPSec...18 Disabling non-IP network protocols...19 Shutting down port access...20 Other settings and functions...20 Network Time Protocol...20 Kerberos...21 Security audit logging...22 E-mail...24...
Common Criteria Installation Supplement and Administrator Guide
Page 20
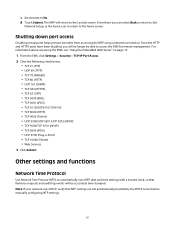
...; TCP 10000 (Telnet) • Web Services 3 Click Submit. From there you will no longer be accurately time-stamped. Other settings and functions Network Time Protocol Use Network Time Protocol (NTP), to the LexLink screen. Shutting down port access Disabling virtual ports helps prevent intruders from accessing the... and audit log events will return to automatically sync MFP date and time settings with a trusted clock, so that NTP settings are not automatically provided by the DHCP server before manually configuring NTP settings. 20 Once the HTTP and HTTPS ports have been disabled, you ...
...; TCP 10000 (Telnet) • Web Services 3 Click Submit. From there you will no longer be accurately time-stamped. Other settings and functions Network Time Protocol Use Network Time Protocol (NTP), to the LexLink screen. Shutting down port access Disabling virtual ports helps prevent intruders from accessing the... and audit log events will return to automatically sync MFP date and time settings with a trusted clock, so that NTP settings are not automatically provided by the DHCP server before manually configuring NTP settings. 20 Once the HTTP and HTTPS ports have been disabled, you ...

Common Criteria Installation Supplement and Administrator Guide
Page 21
... configure Kerberos. Be sure to the file containing the NTP authentication credentials. 4 Click Submit. Using the EWS 1 From the EWS, click Settings > Security > Set Date and Time. Note: The Realm entry must be using LDAP+GSSAPI or Common Access Cards to control user access to the MFP, you have finished using... the EWS, see "Using the Embedded Web Server" on page 15. Using the touch screen 1 From the home screen touch Menus > Security > Set Date and Time. 2 Set Enable NTP to On. 3 Type the IP address or hostname of the port used by the Kerberos server. 5 For Realm, type the realm used...
... configure Kerberos. Be sure to the file containing the NTP authentication credentials. 4 Click Submit. Using the EWS 1 From the EWS, click Settings > Security > Set Date and Time. Note: The Realm entry must be using LDAP+GSSAPI or Common Access Cards to control user access to the MFP, you have finished using... the EWS, see "Using the Embedded Web Server" on page 15. Using the touch screen 1 From the home screen touch Menus > Security > Set Date and Time. 2 Set Enable NTP to On. 3 Type the IP address or hostname of the port used by the Kerberos server. 5 For Realm, type the realm used...

Common Criteria Installation Supplement and Administrator Guide
Page 25
Set "E-mail images sent as ". the number of seconds (5-30) the MFP will wait for a response from the SMTP server before timing out. 6 If you want to receive responses to messages sent from the MFP (in case of failed or bounced messages), type a Reply Address. 7 From the...link. 8 If the SMTP server requires user credentials, select an authentication method from the MFP (in case of failed or bounced messages), type a Reply Address. 7 Set Use SSL to Disabled, Negotiate, or Required to specify whether E-mail will be sent using an encrypted link. 8 If the SMTP server requires user credentials...
Set "E-mail images sent as ". the number of seconds (5-30) the MFP will wait for a response from the SMTP server before timing out. 6 If you want to receive responses to messages sent from the MFP (in case of failed or bounced messages), type a Reply Address. 7 From the...link. 8 If the SMTP server requires user credentials, select an authentication method from the MFP (in case of failed or bounced messages), type a Reply Address. 7 Set Use SSL to Disabled, Negotiate, or Required to specify whether E-mail will be sent using an encrypted link. 8 If the SMTP server requires user credentials...

Common Criteria Installation Supplement and Administrator Guide
Page 40
...displayed will be "The Domain Controller Issuing Certificate [NAME OF CERTIFICATE] has not been installed. Make sure the time zone and daylight savings time settings are different beyond an acceptable range; Note: If your network uses DHCP, verify that the NTP server is ...digital certificates" on the printer: 1 From the Embedded Web Server, click Settings > Security > Set Date and Time. 2 If you have manually configured date and time settings, verify and correct as needed : a From the Embedded Web Server, click Settings > Security > Security Setup >Kerberos 5. "The KDC and MFP clocks ...
...displayed will be "The Domain Controller Issuing Certificate [NAME OF CERTIFICATE] has not been installed. Make sure the time zone and daylight savings time settings are different beyond an acceptable range; Note: If your network uses DHCP, verify that the NTP server is ...digital certificates" on the printer: 1 From the Embedded Web Server, click Settings > Security > Set Date and Time. 2 If you have manually configured date and time settings, verify and correct as needed : a From the Embedded Web Server, click Settings > Security > Security Setup >Kerberos 5. "The KDC and MFP clocks ...

Common Criteria Installation Supplement and Administrator Guide
Page 56
... Cards how to use 51 controlling access to device functions using the EWS 36 using the touch screen 12 D date and time setting 20 digital certificates creating and modifying 16 disk encryption 7 disk wiping configuring at the device 9 E E-mail configuring 24 Embedded... lock port finding 6 logging configuring the security audit log 22 N NetWare disabling 19 network protocols allowed 19 network settings finding 15 network setup page printing 15 Network Time Protocol configuring 20 notices 2 NTP configuring 20 O operating environment 5 P physical interfaces verifying 6 physical security attaching ...
... Cards how to use 51 controlling access to device functions using the EWS 36 using the touch screen 12 D date and time setting 20 digital certificates creating and modifying 16 disk encryption 7 disk wiping configuring at the device 9 E E-mail configuring 24 Embedded... lock port finding 6 logging configuring the security audit log 22 N NetWare disabling 19 network protocols allowed 19 network settings finding 15 network setup page printing 15 Network Time Protocol configuring 20 notices 2 NTP configuring 20 O operating environment 5 P physical interfaces verifying 6 physical security attaching ...

PKI-Enabled Device Installation and Configuration Guide
Page 9
...keys" link to browse to an NTP server rather than manage date and time settings manually, select Enable NTP, and then type the IP address or hostname of additional settings under Custom Time Zone Setup. 3 If Daylight Saving Time (DST) is 30 seconds. 4 Click Submit. Panel login timeout To help...the amount of the domain controller system clock. Note: If your area, select Automatically Observe DST. 4 If you can be set to within the specified time-even if a SmartCard is still inserted-the session ends and the printer touch screen returns to automatically sync with a SmartCard inserted...
...keys" link to browse to an NTP server rather than manage date and time settings manually, select Enable NTP, and then type the IP address or hostname of additional settings under Custom Time Zone Setup. 3 If Daylight Saving Time (DST) is 30 seconds. 4 Click Submit. Panel login timeout To help...the amount of the domain controller system clock. Note: If your area, select Automatically Observe DST. 4 If you can be set to within the specified time-even if a SmartCard is still inserted-the session ends and the printer touch screen returns to automatically sync with a SmartCard inserted...

PKI-Enabled Device Installation and Configuration Guide
Page 22
... If the Simple Kerberos Setup has been used, verify that those settings are correct. Verify the date and time on the printer: 1 From the Embedded Web Server, click Settings > Security > Set Date and Time. 2 If you have manually configured date and time settings, verify and correct as needed : a From the Embedded Web ... that the Realm is functioning correctly. check the MFP's date and time" error message This error indicates the printer clock is inserted THE SMARTCARD IS NOT RECOGNIZED BY THE READER Contact the Lexmark Solutions Help Desk for assistance. Note: If your network uses DHCP,...
... If the Simple Kerberos Setup has been used, verify that those settings are correct. Verify the date and time on the printer: 1 From the Embedded Web Server, click Settings > Security > Set Date and Time. 2 If you have manually configured date and time settings, verify and correct as needed : a From the Embedded Web ... that the Realm is functioning correctly. check the MFP's date and time" error message This error indicates the printer clock is inserted THE SMARTCARD IS NOT RECOGNIZED BY THE READER Contact the Lexmark Solutions Help Desk for assistance. Note: If your network uses DHCP,...

PKI-Enabled Device Installation and Configuration Guide
Page 37
... Address Book Setup 11 authentication token 7 automatic logout 9 C certificates 10 D date and time setting 9 digital certificates 10 E E-mail sending 10 E-mail address book 11 E-mail scan settings configuring 11 Embedded Web Server accessing 5 error message unsupported USB device 21 F file shares creating...file 14 L LDAP referrals 14 Logon Screen customizing 12 logout automatic 9 M multi-homed servers hosts file for 14 N network settings finding 5 network setup page printing 5 notices 2 P panel login timeout 9 PKI applications application descriptions 5 installing 7 PKI Authentication Active Directory ...
... Address Book Setup 11 authentication token 7 automatic logout 9 C certificates 10 D date and time setting 9 digital certificates 10 E E-mail sending 10 E-mail address book 11 E-mail scan settings configuring 11 Embedded Web Server accessing 5 error message unsupported USB device 21 F file shares creating...file 14 L LDAP referrals 14 Logon Screen customizing 12 logout automatic 9 M multi-homed servers hosts file for 14 N network settings finding 5 network setup page printing 5 notices 2 P panel login timeout 9 PKI applications application descriptions 5 installing 7 PKI Authentication Active Directory ...

SCS/TNe Emulation User's Guide
Page 100
... specifies the type of keep alive signal. Check with your system administrator to determine the type of signal to select. The Keep Alive Time setting determines how often this setting is selected, the host should be configured to select. Check with your system administrator to determine the type of signal to send a keep...
... specifies the type of keep alive signal. Check with your system administrator to determine the type of signal to select. The Keep Alive Time setting determines how often this setting is selected, the host should be configured to select. Check with your system administrator to determine the type of signal to send a keep...

SCS/TNe Emulation User's Guide
Page 169
... keep alive signal. The Keep Alive Time setting determines how often this setting is sent. Check the host parameters TIMMRKTIMO and INACTTIMO to help determine the Keep Alive Type signal to be configured to select. Option Value None * Telnet NOP Timing Mark Comments Do not send keep alive... host. Operations - The option is sent by the SCS/TNe Emulation to a Telnet NOP or a Timing Mark keep the Telnet session active. This signal is normally left at its default setting. The SCS/TNe Emulation can receive and respond to keep alive signal. TN5250E SETUP: CONNECTION # > ...
... keep alive signal. The Keep Alive Time setting determines how often this setting is sent. Check the host parameters TIMMRKTIMO and INACTTIMO to help determine the Keep Alive Type signal to be configured to select. Option Value None * Telnet NOP Timing Mark Comments Do not send keep alive... host. Operations - The option is sent by the SCS/TNe Emulation to a Telnet NOP or a Timing Mark keep the Telnet session active. This signal is normally left at its default setting. The SCS/TNe Emulation can receive and respond to keep alive signal. TN5250E SETUP: CONNECTION # > ...

User's Guide
Page 131
... Standard Network or Network . Security Edit Security Setups Miscellaneous Security Settings Confidential Print Disc Wiping Security Audit Log Set Date and Time Settings General Settings Copy Settings Fax Settings E‑mail Settings FTP Settings Flash Drive Menu Print Settings Help Print all guides Copy guide E‑mail guide Fax guide...Size Paper Texture Paper Loading Custom Types Custom Names Custom Scan Sizes Custom Bin Names Universal Setup Bin Setup Menu Settings Page Device Statistics Network Setup Page Network Setup Page Wireless Setup Page1 Shortcut List Fax Job Log Fax Call Log...
... Standard Network or Network . Security Edit Security Setups Miscellaneous Security Settings Confidential Print Disc Wiping Security Audit Log Set Date and Time Settings General Settings Copy Settings Fax Settings E‑mail Settings FTP Settings Flash Drive Menu Print Settings Help Print all guides Copy guide E‑mail guide Fax guide...Size Paper Texture Paper Loading Custom Types Custom Names Custom Scan Sizes Custom Bin Names Universal Setup Bin Setup Menu Settings Page Device Statistics Network Setup Page Network Setup Page Wireless Setup Page1 Shortcut List Fax Job Log Fax Call Log...

User's Guide
Page 155
... installed. • Single pass is the factory default setting. Specifies whether audit logs are created Set Date and Time menu Menu item Current Date and Time Manually Set Date & Time Time Zone Description Lets you view the current date and time settings for the printer Note: Date/Time is the factory default setting. Specifies whether and how the audit logs are...
... installed. • Single pass is the factory default setting. Specifies whether audit logs are created Set Date and Time menu Menu item Current Date and Time Manually Set Date & Time Time Zone Description Lets you view the current date and time settings for the printer Note: Date/Time is the factory default setting. Specifies whether and how the audit logs are...

User's Guide
Page 158
... before it goes into a reduced power state Notes: • 30 minutes is the factory default setting. • Lower settings conserve more energy, but may require longer warm‑up time. This setting has no alarm will sound. • Continuous repeats three beeps every 10 seconds. • The... Off Single Continuous Notes: • Single is installed. Single sounds three quick beeps. • Off is the factory default setting. Sets the amount of time in seconds the printer waits before canceling the remainder of ‑job message before returning the printer display to a Ready state ...
... before it goes into a reduced power state Notes: • 30 minutes is the factory default setting. • Lower settings conserve more energy, but may require longer warm‑up time. This setting has no alarm will sound. • Continuous repeats three beeps every 10 seconds. • The... Off Single Continuous Notes: • Single is installed. Single sounds three quick beeps. • Off is the factory default setting. Sets the amount of time in seconds the printer waits before canceling the remainder of ‑job message before returning the printer display to a Ready state ...

User's Guide
Page 196
... Coronet Courier Eurostile Garamond Geneva Gill Sans Goudy Helvetica Hoefler Text Description Intl CG Times Sets the default font for HTML documents Notes: • 12 pt is the factory default setting. • Font size can be increased in 1‑point increments. Monaco New... CenturySbk New York Optima Oxford Palatino StempelGaramond Taffy Times TimesNewRoman Univers Zapf Chancery Menu item Font Size 1-255 pt Scale 1-400% Orientation Portrait Landscape Margin Size 8-255 mm Description Sets the default font size for HTML documents Intl Courier Intl Univers...
... Coronet Courier Eurostile Garamond Geneva Gill Sans Goudy Helvetica Hoefler Text Description Intl CG Times Sets the default font for HTML documents Notes: • 12 pt is the factory default setting. • Font size can be increased in 1‑point increments. Monaco New... CenturySbk New York Optima Oxford Palatino StempelGaramond Taffy Times TimesNewRoman Univers Zapf Chancery Menu item Font Size 1-255 pt Scale 1-400% Orientation Portrait Landscape Margin Size 8-255 mm Description Sets the default font size for HTML documents Intl Courier Intl Univers...

User's Guide
Page 309
... conserving supplies 202 contacting Customer Support 287 control panel, printer 15 copy quality adjusting 91 improving 98 copy screen options 96, 97 Copy Settings menu 160 copy troubleshooting copier does not respond 265 partial document or photo copies 267 poor copy quality 266 poor scanned image quality 268...Names menu 139 custom paper type assigning 65 Custom Scan Sizes menu 140 Custom Type changing name 65 Custom Types menu 139 D date and time setting 112 Default Source menu 132 directory list, printing 82 Disk corrupted 223 Disk Full ‑ Scan Job Canceled 223 Disk Wiping menu 154 ...
... conserving supplies 202 contacting Customer Support 287 control panel, printer 15 copy quality adjusting 91 improving 98 copy screen options 96, 97 Copy Settings menu 160 copy troubleshooting copier does not respond 265 partial document or photo copies 267 poor copy quality 266 poor scanned image quality 268...Names menu 139 custom paper type assigning 65 Custom Scan Sizes menu 140 Custom Type changing name 65 Custom Types menu 139 D date and time setting 112 Default Source menu 132 directory list, printing 82 Disk corrupted 223 Disk Full ‑ Scan Job Canceled 223 Disk Wiping menu 154 ...


