User Guide
Page 2
... up wireless printing...34 Information you will need to set up the printer on a wireless network 34 Installing the printer on a wireless network (Windows 35 Installing the printer on a wireless network (Macintosh 37 Installing the printer on a wired network ...39 Minimizing your printer's environmental impact 42 Saving paper and toner...42 Using recycled paper and...
... up wireless printing...34 Information you will need to set up the printer on a wireless network 34 Installing the printer on a wireless network (Windows 35 Installing the printer on a wireless network (Macintosh 37 Installing the printer on a wired network ...39 Minimizing your printer's environmental impact 42 Saving paper and toner...42 Using recycled paper and...
User Guide
Page 3
Contents 3 Recycling...46 Recycling Lexmark products ...46 Recycling Lexmark packaging...46 Returning Lexmark cartridges for reuse or recycling 46 Loading paper and specialty media 47 Linking and unlinking trays...47 Linking trays ...47 Unlinking trays ...47 Assigning...letterhead ...58 Storing paper...59 Supported paper sizes, types, and weights 59 Paper sizes supported by the printer...59 Paper types supported by the printer ...61 Paper types and weights supported by the printer 61 Paper capacities ...63 Printing...64 Printing a document...64 Printing on specialty media...65 Tips on using...
Contents 3 Recycling...46 Recycling Lexmark products ...46 Recycling Lexmark packaging...46 Returning Lexmark cartridges for reuse or recycling 46 Loading paper and specialty media 47 Linking and unlinking trays...47 Linking trays ...47 Unlinking trays ...47 Assigning...letterhead ...58 Storing paper...59 Supported paper sizes, types, and weights 59 Paper sizes supported by the printer...59 Paper types supported by the printer ...61 Paper types and weights supported by the printer 61 Paper capacities ...63 Printing...64 Printing a document...64 Printing on specialty media...65 Tips on using...
User Guide
Page 4
... Printing a font sample list ...71 Printing a directory list...71 Printing the print quality test pages ...71 Canceling a print job...72 Canceling a print job from the printer control panel 72 Canceling a print job from the computer ...72 Copying...74 Making copies...74 Making a quick copy ...74 Copying using the ADF ...74 Copying...
... Printing a font sample list ...71 Printing a directory list...71 Printing the print quality test pages ...71 Canceling a print job...72 Canceling a print job from the printer control panel 72 Canceling a print job from the computer ...72 Copying...74 Making copies...74 Making a quick copy ...74 Copying using the ADF ...74 Copying...
User Guide
Page 5
...99 Setting the date and time ...99 Turning daylight saving time on or off ...99 Sending a fax...100 Sending a fax using the printer control panel 100 Sending a fax using the computer ...100 Creating shortcuts...101 Creating a fax destination shortcut using the Embedded Web Server 101... Creating a fax destination shortcut using the printer control panel 102 Using shortcuts and the address book 103 Using fax destination shortcuts ...103 Using the address book ...103 Customizing fax ...
...99 Setting the date and time ...99 Turning daylight saving time on or off ...99 Sending a fax...100 Sending a fax using the printer control panel 100 Sending a fax using the computer ...100 Creating shortcuts...101 Creating a fax destination shortcut using the Embedded Web Server 101... Creating a fax destination shortcut using the printer control panel 102 Using shortcuts and the address book 103 Using fax destination shortcuts ...103 Using the address book ...103 Customizing fax ...
User Guide
Page 6
... jam...117 230 paper jam...119 235 paper jam...119 242 and 243 paper jams...119 250 paper jam...120 290 paper jam...120 Understanding printer menus 122 Menus list...122 Supplies menu...123 Paper menu...123 Default Source menu ...123 Size/Type menu ...124 Paper Texture menu ...126 Paper Weight...
... jam...117 230 paper jam...119 235 paper jam...119 242 and 243 paper jams...119 250 paper jam...120 290 paper jam...120 Understanding printer menus 122 Menus list...122 Supplies menu...123 Paper menu...123 Default Source menu ...123 Size/Type menu ...124 Paper Texture menu ...126 Paper Weight...
User Guide
Page 7
......142 Flash Drive menu ...148 Print Settings...151 Set Date and Time...160 Understanding printer messages 163 List of status and error messages...163 Maintaining the printer 178 Storing supplies...178 Checking the status of supplies...178 Checking the status of supplies... black and color imaging kit...190 Replacing a toner cartridge...196 Replacing a developer unit ...198 Cleaning the exterior of the printer...204 Cleaning the scanner glass...205 Moving the printer...205 Before moving the printer ...205 Moving the printer to another location...206 Shipping the printer ...206 Administrative...
......142 Flash Drive menu ...148 Print Settings...151 Set Date and Time...160 Understanding printer messages 163 List of status and error messages...163 Maintaining the printer 178 Storing supplies...178 Checking the status of supplies...178 Checking the status of supplies... black and color imaging kit...190 Replacing a toner cartridge...196 Replacing a developer unit ...198 Cleaning the exterior of the printer...204 Cleaning the scanner glass...205 Moving the printer...205 Before moving the printer ...205 Moving the printer to another location...206 Shipping the printer ...206 Administrative...

User Guide
Page 8
... the Embedded Web Server...207 Setting up e‑mail alerts...208 Viewing reports...208 Troubleshooting 209 Solving basic printer problems...209 Solving printing problems...209 Multiple‑language PDFs do not print...209 Printer control panel display is blank or displays only diamonds 209 Error message about reading USB drive appears 209...
... the Embedded Web Server...207 Setting up e‑mail alerts...208 Viewing reports...208 Troubleshooting 209 Solving basic printer problems...209 Solving printing problems...209 Multiple‑language PDFs do not print...209 Printer control panel display is blank or displays only diamonds 209 Error message about reading USB drive appears 209...

User Guide
Page 10
... safely. If the power cord is incorrectly replaced. Inspect the power cord regularly for signs of the printer might be obvious. CAUTION-POTENTIAL INJURY: This product uses a laser. Use care when you are properly installed in their marked plug-in hazardous radiation exposure. Do not ...pinch the power cord between objects such as well, and unplug any cables going into the printer. Safety information 10 Safety information Connect ...
... safely. If the power cord is incorrectly replaced. Inspect the power cord regularly for signs of the printer might be obvious. CAUTION-POTENTIAL INJURY: This product uses a laser. Use care when you are properly installed in their marked plug-in hazardous radiation exposure. Do not ...pinch the power cord between objects such as well, and unplug any cables going into the printer. Safety information 10 Safety information Connect ...

User Guide
Page 11
... a lightning storm. CAUTION-SHOCK HAZARD: To avoid the risk of electric shock when cleaning the exterior of the printer, unplug the power cord from the wall outlet and disconnect all cables from the printer before proceeding. Safety information 11 Refer service or repairs, other than those described in the user documentation, to...
... a lightning storm. CAUTION-SHOCK HAZARD: To avoid the risk of electric shock when cleaning the exterior of the printer, unplug the power cord from the wall outlet and disconnect all cables from the printer before proceeding. Safety information 11 Refer service or repairs, other than those described in the user documentation, to...
User Guide
Page 12
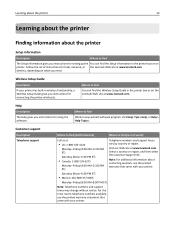
.... Wireless Setup Guide Description If your printer. Visit our Web site at www.lexmark.com. Learning about the printer 12 Learning about the printer Finding information about contacting Lexmark, see the printed warranty statement that came with your printer has built‑in wireless functionality, ...country or region, and then select the Customer Support link. Note: For additional information about the printer Setup information Description Where to find the Setup information in any Lexmark software program, click Help, Tips > Help, or Help > Help Topics. Where to find...
.... Wireless Setup Guide Description If your printer. Visit our Web site at www.lexmark.com. Learning about the printer 12 Learning about the printer Finding information about contacting Lexmark, see the printed warranty statement that came with your printer has built‑in wireless functionality, ...country or region, and then select the Customer Support link. Note: For additional information about the printer Setup information Description Where to find the Setup information in any Lexmark software program, click Help, Tips > Help, or Help > Help Topics. Where to find...

User Guide
Page 13
...sturdy, and stable surface. • Keep the printer: - Visit our Web site at www.lexmark.com. It is important to: • Make sure airflow in some instances. Learning about contacting Lexmark, see the printed warranty that came with your printer model. 5 From the Support Tools section, ...world) For e-mail support, visit our Web site: www.lexmark.com. 1 Click SUPPORT. 2 Click Technical Support. 3 Select your printer type. 4 Select your printer. Selecting a location for the printer When selecting a location for the printer, leave enough room to install any options, leave enough ...
...sturdy, and stable surface. • Keep the printer: - Visit our Web site at www.lexmark.com. It is important to: • Make sure airflow in some instances. Learning about contacting Lexmark, see the printed warranty that came with your printer model. 5 From the Support Tools section, ...world) For e-mail support, visit our Web site: www.lexmark.com. 1 Click SUPPORT. 2 Click Technical Support. 3 Select your printer type. 4 Select your printer. Selecting a location for the printer When selecting a location for the printer, leave enough room to install any options, leave enough ...
User Guide
Page 14
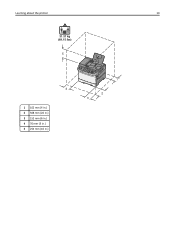
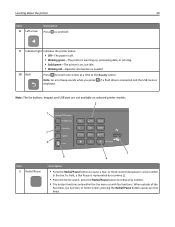
Learning about the printer 14 31.37 kg (69.15 lbs) 5 4 1 102 mm (4 in.) 2 508 mm (20 in.) 3 152 mm (6 in.) 4 76 mm (3 in.) 5 254 mm (10 in.) 1@!. 4 GHI 2 ABC 5 JKL 3 DEF 7 PQRS 6 MNO 8 TUV * 9 WXYZ 0 # 2 3 1
Learning about the printer 14 31.37 kg (69.15 lbs) 5 4 1 102 mm (4 in.) 2 508 mm (20 in.) 3 152 mm (6 in.) 4 76 mm (3 in.) 5 254 mm (10 in.) 1@!. 4 GHI 2 ABC 5 JKL 3 DEF 7 PQRS 6 MNO 8 TUV * 9 WXYZ 0 # 2 3 1
User Guide
Page 15
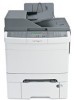
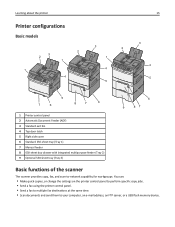
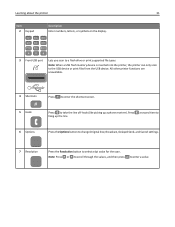
...; Send a fax to multiple fax destinations at the same time. • Scan documents and send them to -network capability for workgroups. Learning about the printer Printer configurations Basic models 1 3 2 1 1@!. 4 GHI 2 ABC 5 JKL 3 DEF 7 PQRS 6 MNO 8 TUV * 9 WXYZ 0 # 4 ... 8 TUV * 9 WXYZ 0 # 4 5 15 3 2 1@!. 4 GHI 2 ABC 5 JKL 3 DEF 7 PQRS 8 TUV 6 MNO * 9 WXYZ 0 # 4 5 5 7 6 8 7 6 1 Printer control panel 2 Automatic Document Feeder (ADF) 3 Standard exit bin 4 Top door latch 5 Right side cover 6 Standard 250-sheet tray (Tray 1) 7 Manual feeder 8 650-sheet duo...
...; Send a fax to multiple fax destinations at the same time. • Scan documents and send them to -network capability for workgroups. Learning about the printer Printer configurations Basic models 1 3 2 1 1@!. 4 GHI 2 ABC 5 JKL 3 DEF 7 PQRS 6 MNO 8 TUV * 9 WXYZ 0 # 4 ... 8 TUV * 9 WXYZ 0 # 4 5 15 3 2 1@!. 4 GHI 2 ABC 5 JKL 3 DEF 7 PQRS 8 TUV 6 MNO * 9 WXYZ 0 # 4 5 5 7 6 8 7 6 1 Printer control panel 2 Automatic Document Feeder (ADF) 3 Standard exit bin 4 Top door latch 5 Right side cover 6 Standard 250-sheet tray (Tray 1) 7 Manual feeder 8 650-sheet duo...
User Guide
Page 16
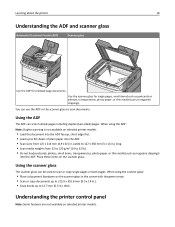
... copy documents up to 215.9 x 355.6 mm (8.5 x 14 in.). • Copy books up to 50 sheets of plain paper into the ADF. Learning about the printer 16 Understanding the ADF and scanner glass Automatic Document Feeder (ADF) Scanner glass ABC 1@!. 4 GHI 2 ABC 5 JKL 3 DEF 7 PQRS 8 TUV 6 MNO * 9...• Do not load postcards, photos, small items, transparencies, photo paper, or thin media (such as magazine clippings). Place these items on selected printer models. • Load the document into the ADF faceup, short edge first. • Load up to 12.7 mm (0.5 in.) thick. When ...
... copy documents up to 215.9 x 355.6 mm (8.5 x 14 in.). • Copy books up to 50 sheets of plain paper into the ADF. Learning about the printer 16 Understanding the ADF and scanner glass Automatic Document Feeder (ADF) Scanner glass ABC 1@!. 4 GHI 2 ABC 5 JKL 3 DEF 7 PQRS 8 TUV 6 MNO * 9...• Do not load postcards, photos, small items, transparencies, photo paper, or thin media (such as magazine clippings). Place these items on selected printer models. • Load the document into the ADF faceup, short edge first. • Load up to 12.7 mm (0.5 in.) thick. When ...
User Guide
Page 17
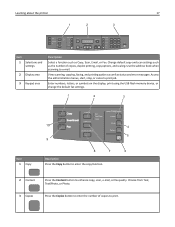
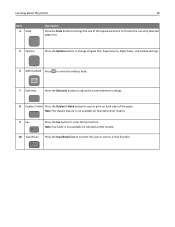
Learning about the printer 17 1 2 3 Copy Scan/Email Content Darkness Text Text/Photo Photo Fax Duplex/2-Sided Copy Copies Scale Options Menu Back Select Stop/Cancel Start Black Color Fax Redial/Pause Resolution Options Hook 1@!. 2 ABC 3 DEF 4 5 JKL 6 MNO 7PQRS 8 TUV 9WXYZ * 0 # Shortcuts Item 1 Selections and settings 2 Display area 3 Keypad area Description Select...
Learning about the printer 17 1 2 3 Copy Scan/Email Content Darkness Text Text/Photo Photo Fax Duplex/2-Sided Copy Copies Scale Options Menu Back Select Stop/Cancel Start Black Color Fax Redial/Pause Resolution Options Hook 1@!. 2 ABC 3 DEF 4 5 JKL 6 MNO 7PQRS 8 TUV 9WXYZ * 0 # Shortcuts Item 1 Selections and settings 2 Display area 3 Keypad area Description Select...
User Guide
Page 18
Note: The duplex feature is not available on both sides of the paper. Learning about the printer 18 Item 4 Scale Description Press the Scale button to change the size of the copied document to fit onto the currently selected paper size. 5 Options ... Press the Duplex 2‑Sided button to enter the fax function. Note: Fax mode is not available on selected printer models. 9 Fax Press the Fax button to scan or print on selected printer models. 10 Scan/Email Press the Scan/Email button to enter the scan or scan to e‑mail function.
Note: The duplex feature is not available on both sides of the paper. Learning about the printer 18 Item 4 Scale Description Press the Scale button to change the size of the copied document to fit onto the currently selected paper size. 5 Options ... Press the Duplex 2‑Sided button to enter the fax function. Note: Fax mode is not available on selected printer models. 9 Fax Press the Fax button to scan or print on selected printer models. 10 Scan/Email Press the Scan/Email button to enter the scan or scan to e‑mail function.
User Guide
Page 19
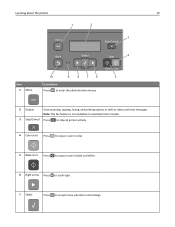
Learning about the printer 1 2 19 3 4 10 9 8 7 6 5 Item 1 Menu Description Press to enter the administration menus. 2 Display View scanning, copying, faxing, and printing options as well as status and error messages Note: The fax feature is not available on selected printer models. 3 Stop/Cancel Press to stop all printer activity. 4 Color start Press to copy or scan in color. 5 Black start Press to copy or scan in black and white. 6 Right arrow Press to scroll right. 7 Select Press to accept menu selections and settings.
Learning about the printer 1 2 19 3 4 10 9 8 7 6 5 Item 1 Menu Description Press to enter the administration menus. 2 Display View scanning, copying, faxing, and printing options as well as status and error messages Note: The fax feature is not available on selected printer models. 3 Stop/Cancel Press to stop all printer activity. 4 Color start Press to copy or scan in color. 5 Black start Press to copy or scan in black and white. 6 Right arrow Press to scroll right. 7 Select Press to accept menu selections and settings.
User Guide
Page 20
...and the USB menu is displayed. Learning about the printer 20 Item 8 Left arrow Description Press to scroll left. 9 Indicator light Indicates the printer status: • Off-The power is off. • Blinking green-The printer is warming up, processing data, or printing. &#...8226; Solid green-The printer is on selected printer models. 2 1 7 6 Item 1 Redial/Pause 3 5 4 ...
...and the USB menu is displayed. Learning about the printer 20 Item 8 Left arrow Description Press to scroll left. 9 Indicator light Indicates the printer status: • Off-The power is off. • Blinking green-The printer is warming up, processing data, or printing. &#...8226; Solid green-The printer is on selected printer models. 2 1 7 6 Item 1 Redial/Pause 3 5 4 ...
User Guide
Page 21
... *0 # 3 Front USB port Lets you scan to a flash drive or print supported file types Note: When a USB flash memory device is inserted into the printer, the printer can only scan to enter a value. Press a second time to hang up a phone receiver). Note: Press or to scroll through the values, and then press... the Options button to change Original Size, Broadcast, Delayed Send, and Cancel settings. 7 Resolution Press the Resolution button to enter the shortcut screen. All other printer functions are unavailable. 4 Shortcuts # 5 Hook Press # to select a dpi value for the scan.
... *0 # 3 Front USB port Lets you scan to a flash drive or print supported file types Note: When a USB flash memory device is inserted into the printer, the printer can only scan to enter a value. Press a second time to hang up a phone receiver). Note: Press or to scroll through the values, and then press... the Options button to change Original Size, Broadcast, Delayed Send, and Cancel settings. 7 Resolution Press the Resolution button to enter the shortcut screen. All other printer functions are unavailable. 4 Shortcuts # 5 Hook Press # to select a dpi value for the scan.
User Guide
Page 22
... card for removal. If you are accessing the system board or installing optional hardware or memory devices sometime after setting up the printer, then turn the printer off , and unplug the power cord from the wall outlet before continuing. You can also use them . a Turn the ... system board or installing optional hardware or memory devices sometime after setting up the printer, then turn the printer off , and unplug the power cord from the printer, and then remove it. Memory cards • Printer memory • Flash memory • Font cards Installing a memory card CAUTION-SHOCK...
... card for removal. If you are accessing the system board or installing optional hardware or memory devices sometime after setting up the printer, then turn the printer off , and unplug the power cord from the wall outlet before continuing. You can also use them . a Turn the ... system board or installing optional hardware or memory devices sometime after setting up the printer, then turn the printer off , and unplug the power cord from the printer, and then remove it. Memory cards • Printer memory • Flash memory • Font cards Installing a memory card CAUTION-SHOCK...


