
User's Guide
Page 4
... custom-size paper...51 Loading banner paper...51 Loading original documents on the scanner glass 52 Printing 53 Printing basic documents...53 Printing a document...53 Printing a Web page ...53 Printing photos or images from a Web page ...54 Printing multiple copies of a document... page order)...56 Printing multiple pages on one sheet (N-Up)...56 Pausing print jobs...56 Canceling print jobs...56 Printing specialty documents...57 Choosing compatible specialty paper types ...57 Printing envelopes ...57 Printing greeting cards, index cards, photo cards, and postcards 57 Printing a document...
... custom-size paper...51 Loading banner paper...51 Loading original documents on the scanner glass 52 Printing 53 Printing basic documents...53 Printing a document...53 Printing a Web page ...53 Printing photos or images from a Web page ...54 Printing multiple copies of a document... page order)...56 Printing multiple pages on one sheet (N-Up)...56 Pausing print jobs...56 Canceling print jobs...56 Printing specialty documents...57 Choosing compatible specialty paper types ...57 Printing envelopes ...57 Printing greeting cards, index cards, photo cards, and postcards 57 Printing a document...

User's Guide
Page 7
......110 Setting the distinctive ring...110 Setting the number of rings before receiving a fax automatically 111 Setting up Speed Dial...111 Printing fax activity reports...112 Maintaining the printer 113 Replacing print cartridges...113 Installing print cartridges...113 Removing a used print cartridge ...Using genuine Lexmark print cartridges...115 Aligning print cartridges...115 Cleaning the print cartridge nozzles...116 Wiping the print cartridge nozzles and contacts 116 Preserving the print cartridges...117 Cleaning the scanner glass...118 Cleaning the exterior of the printer...118 Ordering...
......110 Setting the distinctive ring...110 Setting the number of rings before receiving a fax automatically 111 Setting up Speed Dial...111 Printing fax activity reports...112 Maintaining the printer 113 Replacing print cartridges...113 Installing print cartridges...113 Removing a used print cartridge ...Using genuine Lexmark print cartridges...115 Aligning print cartridges...115 Cleaning the print cartridge nozzles...116 Wiping the print cartridge nozzles and contacts 116 Preserving the print cartridges...117 Cleaning the scanner glass...118 Cleaning the exterior of the printer...118 Ordering...
User's Guide
Page 9
...happens when memory card is inserted ...150 Copy troubleshooting...151 Copier does not respond ...151 Scanner unit does not close...151 Poor copy quality...151 Partial document or photo copies...152 Scan troubleshooting...153 Scanner does not respond ...153 Scan was not successful ...153 Scanning......154 Partial document or photo scans...155 Cannot scan to a computer over a network...155 Fax troubleshooting...155 Cannot send or receive a fax...155 Can send but not receive faxes...158 Can receive but not send faxes...158 Printer receives a blank fax...160 Received fax has poor print quality...160...
...happens when memory card is inserted ...150 Copy troubleshooting...151 Copier does not respond ...151 Scanner unit does not close...151 Poor copy quality...151 Partial document or photo copies...152 Scan troubleshooting...153 Scanner does not respond ...153 Scan was not successful ...153 Scanning......154 Partial document or photo scans...155 Cannot scan to a computer over a network...155 Fax troubleshooting...155 Cannot send or receive a fax...155 Can send but not receive faxes...158 Can receive but not send faxes...158 Printer receives a blank fax...160 Received fax has poor print quality...160...

User's Guide
Page 23
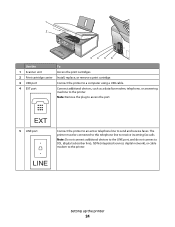
... alignment page may differ from the one shown. • Streaks on page 35. 5 Paper exit tray Hold paper as it exits. 6 Paper guide Keep paper straight when feeding. 7 Top cover Access the scanner glass. 8 Scanner glass Copy, scan, fax, or remove an item. Understanding the parts of the printer 1 6 7 8 5 43 2 Use the To 1 Paper support...
... alignment page may differ from the one shown. • Streaks on page 35. 5 Paper exit tray Hold paper as it exits. 6 Paper guide Keep paper straight when feeding. 7 Top cover Access the scanner glass. 8 Scanner glass Copy, scan, fax, or remove an item. Understanding the parts of the printer 1 6 7 8 5 43 2 Use the To 1 Paper support...
User's Guide
Page 24
... network), or cable modem to the printer. LINE Setting up the printer 24 1 2 34 5 6 Use the To 1 Scanner unit Access the print cartridges. 2 Print cartridge carrier Install, replace, or remove a print cartridge. 3 USB port Connect the printer to a computer using a USB cable. 4 EXT port Connect additional devices, such as a data/fax modem, telephone, or answering machine to...
... network), or cable modem to the printer. LINE Setting up the printer 24 1 2 34 5 6 Use the To 1 Scanner unit Access the print cartridges. 2 Print cartridge carrier Install, replace, or remove a print cartridge. 3 USB port Connect the printer to a computer using a USB cable. 4 EXT port Connect additional devices, such as a data/fax modem, telephone, or answering machine to...

User's Guide
Page 52
Loading original documents on the scanner glass You can scan a document for faxing. 1 Make sure the computer and the printer are on. 2 Open the top cover. 3 Place the original document or item facedown on the scanner glass in the upper left corner. 4 Close the top cover to avoid dark edges on the scanned image. Loading paper and original documents 52 You can scan and then print photos, text documents, magazine articles, newspapers, and other publications.
Loading original documents on the scanner glass You can scan a document for faxing. 1 Make sure the computer and the printer are on. 2 Open the top cover. 3 Place the original document or item facedown on the scanner glass in the upper left corner. 4 Close the top cover to avoid dark edges on the scanned image. Loading paper and original documents 52 You can scan and then print photos, text documents, magazine articles, newspapers, and other publications.
User's Guide
Page 58
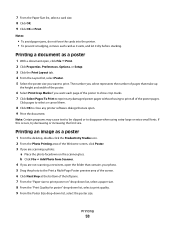
... a document as it exits, and let it dry before stacking. Notes: • To avoid paper jams, do not force the cards into the printer. • To prevent smudging, remove each page of the poster to show crop marks. 7 Click Select Pages To Print to reprint any... print. Note: Certain programs may cause text to be clipped or to print poster on the scanner glass. b Click File Œ Add Photo from Scanner. 4 If you are scanning a photo: a Place the photo facedown on " drop-down list, select a paper size. 8 From the "Print Quality for poster" drop-down list, select a print quality. 9...
... a document as it exits, and let it dry before stacking. Notes: • To avoid paper jams, do not force the cards into the printer. • To prevent smudging, remove each page of the poster to show crop marks. 7 Click Select Pages To Print to reprint any... print. Note: Certain programs may cause text to be clipped or to print poster on the scanner glass. b Click File Œ Add Photo from Scanner. 4 If you are scanning a photo: a Place the photo facedown on " drop-down list, select a paper size. 8 From the "Print Quality for poster" drop-down list, select a print quality. 9...
User's Guide
Page 74
... the image by clicking Automatic Brightness on the scanner glass. 3 From the desktop, double-click the Productivity Studio icon. 4 Click Scan. 5 Select the Photo or Several Photos option. 6 Click Start. Changing the Brightness / Contrast settings of a photo 1 From the Productivity Studio Welcome Screen, click.... 4 Apply a color effect. Applying a color effect to a photo 1 From the Productivity Studio Welcome Screen, click File ΠOpen to select the image you want to a computer, and both the printer and the computer are on. 2 Load an original document facedown on the Quick Fixes tab....
... the image by clicking Automatic Brightness on the scanner glass. 3 From the desktop, double-click the Productivity Studio icon. 4 Click Scan. 5 Select the Photo or Several Photos option. 6 Click Start. Changing the Brightness / Contrast settings of a photo 1 From the Productivity Studio Welcome Screen, click.... 4 Apply a color effect. Applying a color effect to a photo 1 From the Productivity Studio Welcome Screen, click File ΠOpen to select the image you want to a computer, and both the printer and the computer are on. 2 Load an original document facedown on the Quick Fixes tab....
User's Guide
Page 78
...the numbers assigned to print, and then press . 10 Press Start Color or Start Black. 11 Press Start Color or Start Black again. Note: If you want to them on the scanner glass. 12 If needed, press or repeatedly until Photo Number appears. 6 Press . 7 Use the keypad to enter ...the number of copies, red-eye reduction, page layout, print options, color effects, and paper size. One or more information, see "Inserting a memory card" on page 63 or "Inserting a flash drive" on page 64. 3 Press or repeatedly until Print Photos appears. 4 Press . 5 Press or repeatedly until Scan Proof Sheet...
...the numbers assigned to print, and then press . 10 Press Start Color or Start Black. 11 Press Start Color or Start Black again. Note: If you want to them on the scanner glass. 12 If needed, press or repeatedly until Photo Number appears. 6 Press . 7 Use the keypad to enter ...the number of copies, red-eye reduction, page layout, print options, color effects, and paper size. One or more information, see "Inserting a memory card" on page 63 or "Inserting a flash drive" on page 64. 3 Press or repeatedly until Print Photos appears. 4 Press . 5 Press or repeatedly until Scan Proof Sheet...

User's Guide
Page 82
... you want to the previous menus and make other setting selections. 6 Press Start Color or Start Black. Copying 82 Copying photos 1 Load photo paper with the paper.) 2 Place a photo facedown on the scanner glass. 3 From the control panel, press Copy Mode. 4 Press Start Color or Start Black. Copying Making a copy 1 Load paper. 2 Load an original document...
... you want to the previous menus and make other setting selections. 6 Press Start Color or Start Black. Copying 82 Copying photos 1 Load photo paper with the paper.) 2 Place a photo facedown on the scanner glass. 3 From the control panel, press Copy Mode. 4 Press Start Color or Start Black. Copying Making a copy 1 Load paper. 2 Load an original document...
User's Guide
Page 83
...the computer 1 Place the photo facedown on the scanner glass. 3 If necessary, press Copy Mode. 4 Press . 5 Press or repeatedly until the size you want appears. 16 Press Start Color or Start Black. Use the drop-down list, select the paper size. 8 To select multiple prints of a photo, or to view and select... in the right pane. 6 From the Quality drop-down list, select the copy quality. 7 From the Paper Size in Printer drop-down list in the last column to select photo sizes other sizes. 9 Click Copy Now in the table. the higher the dpi count, the higher the resolution and copy quality...
...the computer 1 Place the photo facedown on the scanner glass. 3 If necessary, press Copy Mode. 4 Press . 5 Press or repeatedly until the size you want appears. 16 Press Start Color or Start Black. Use the drop-down list, select the paper size. 8 To select multiple prints of a photo, or to view and select... in the right pane. 6 From the Quality drop-down list, select the copy quality. 7 From the Paper Size in Printer drop-down list in the last column to select photo sizes other sizes. 9 Click Copy Now in the table. the higher the dpi count, the higher the resolution and copy quality...

User's Guide
Page 84
... 5 Press or repeatedly until Collate appears. 6 Press . 7 Press or repeatedly until the quality you want appears. 8 Press . 9 Press Start Color or Start Black. Collating copies using the scanner glass, a message appears prompting you for additional pages. Collated Not collated 1 Load paper. 2 Load an original document facedown on the... until the number of copies you want to print appears. 8 Press Start Color or Start Black. Copying 84 Making a copy lighter or darker If you want to adjust the look of a copy or photo, you can choose to print each copy as a set (collated) or to...
... 5 Press or repeatedly until Collate appears. 6 Press . 7 Press or repeatedly until the quality you want appears. 8 Press . 9 Press Start Color or Start Black. Collating copies using the scanner glass, a message appears prompting you for additional pages. Collated Not collated 1 Load paper. 2 Load an original document facedown on the... until the number of copies you want to print appears. 8 Press Start Color or Start Black. Copying 84 Making a copy lighter or darker If you want to adjust the look of a copy or photo, you can choose to print each copy as a set (collated) or to...

User's Guide
Page 85
... If you select Borderless, the printer will reduce or enlarge the document or photo as necessary to Automatic or Photo. 8 Press Start Color or Start Black. Copying 85 Repeating an image on one page You can print the same image multiple times on the scanner glass. 3 From the control panel... paper type selection to print a borderless copy on one page appears. 8 Press Start Color or Start Black. For best results with this resize setting, use photo or heavyweight matte paper, with the paper.) 2 Load an original document facedown on the scanner glass. 3 From the control panel, press Copy ...
... If you select Borderless, the printer will reduce or enlarge the document or photo as necessary to Automatic or Photo. 8 Press Start Color or Start Black. Copying 85 Repeating an image on one page You can print the same image multiple times on the scanner glass. 3 From the control panel... paper type selection to print a borderless copy on one page appears. 8 Press Start Color or Start Black. For best results with this resize setting, use photo or heavyweight matte paper, with the paper.) 2 Load an original document facedown on the scanner glass. 3 From the control panel, press Copy ...
User's Guide
Page 87
...Load an original document facedown on the scanner glass. 2 From the control panel, press Scan Mode. 3 Press or repeatedly until the destination to which you want to scan appears. 4 Press Start Color or Start Black. 5 If you want to a computer, and both the printer and the computer are on. 1... Load an original document facedown on the scanner glass. 2 From the desktop, double-click the Productivity Studio icon. 3 Click...
...Load an original document facedown on the scanner glass. 2 From the control panel, press Scan Mode. 3 Press or repeatedly until the destination to which you want to scan appears. 4 Press Start Color or Start Black. 5 If you want to a computer, and both the printer and the computer are on. 1... Load an original document facedown on the scanner glass. 2 From the desktop, double-click the Productivity Studio icon. 3 Click...
User's Guide
Page 88
... Optical Character Recognition (OCR) software feature to turn scanned images into your default word processing application. Scanning a photo to a computer, and both the printer and the computer are on. 2 Load an original document facedown on the scanner glass. 2 From the desktop, double-click the Productivity Studio icon. 3 Click View / Print Library. 4 From the...
... Optical Character Recognition (OCR) software feature to turn scanned images into your default word processing application. Scanning a photo to a computer, and both the printer and the computer are on. 2 Load an original document facedown on the scanner glass. 2 From the desktop, double-click the Productivity Studio icon. 3 Click View / Print Library. 4 From the...
User's Guide
Page 89
...Library. 7 To add or scan another image, do one of the scan area. 2 From the desktop, double-click the Productivity Studio icon. 3 Click Scan. 4 Select the Several Photos option. 5 Click Start. Select or deselect images by clicking on the scanner glass. Click Add Files when you have made your ...selections. 8 Select Save all images as one PDF file or Save each image as individual PDF file. 9 Click...
...Library. 7 To add or scan another image, do one of the scan area. 2 From the desktop, double-click the Productivity Studio icon. 3 Click Scan. 4 Select the Several Photos option. 5 Click Start. Select or deselect images by clicking on the scanner glass. Click Add Files when you have made your ...selections. 8 Select Save all images as one PDF file or Save each image as individual PDF file. 9 Click...
User's Guide
Page 92
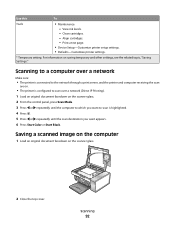
...the related topic, "Saving Settings." Print a test page. • Device Setup-Customize printer setup settings. • Defaults-Customize printer settings. * Temporary setting. Scanning 92 Clean cartridges. - For information on the scanner glass. 2 Close the top cover. Scanning to a computer over a network Make ... facedown on the scanner glass. 2 From the control panel, press Scan Mode. 3 Press or repeatedly until the computer to which you want to scan is highlighted. 4 Press . 5 Press or repeatedly until the scan destination you want appears. 6 Press Start Color or Start Black...
...the related topic, "Saving Settings." Print a test page. • Device Setup-Customize printer setup settings. • Defaults-Customize printer settings. * Temporary setting. Scanning 92 Clean cartridges. - For information on the scanner glass. 2 Close the top cover. Scanning to a computer over a network Make ... facedown on the scanner glass. 2 From the control panel, press Scan Mode. 3 Press or repeatedly until the computer to which you want to scan is highlighted. 4 Press . 5 Press or repeatedly until the scan destination you want appears. 6 Press Start Color or Start Black...
User's Guide
Page 94
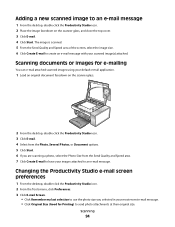
...From the desktop, double-click the Productivity Studio icon. 2 Place the image facedown on the scanner glass. 2 From the desktop, double-click the Productivity Studio icon. 3 Click E-mail. 4 Select from the Photo, Several Photos, or Document options. 5 Click Start. 6 If you selected in your most recent e-mail... default e-mail application. 1 Load an original document facedown on the scanner glass, and close the top cover. 3 Click E-mail. 4 Click Start. Scanning 94 Scanning documents or images for Printing) to send photo attachments at their original size. The image is scanned. 5 From ...
...From the desktop, double-click the Productivity Studio icon. 2 Place the image facedown on the scanner glass. 2 From the desktop, double-click the Productivity Studio icon. 3 Click E-mail. 4 Select from the Photo, Several Photos, or Document options. 5 Click Start. 6 If you selected in your most recent e-mail... default e-mail application. 1 Load an original document facedown on the scanner glass, and close the top cover. 3 Click E-mail. 4 Click Start. Scanning 94 Scanning documents or images for Printing) to send photo attachments at their original size. The image is scanned. 5 From ...
User's Guide
Page 96
... how to add Speed Dial or Group Dial numbers using any electrical or cabling connections, such as part of the fax number. • Enter a maximum of 64 digits in a fax number. • Press Pause / Redial to insert a three-second pause in a number you are entering to... enter the number of numbers (broadcast fax): a Press . Sending a fax Entering a fax number 1 From the control panel, press Fax Mode. 2 Enter a fax number using: The text box Enter a fax number using the control panel, see "Using the Phone Book" on the scanner glass. 2 From the desktop, double-click the ...
... how to add Speed Dial or Group Dial numbers using any electrical or cabling connections, such as part of the fax number. • Enter a maximum of 64 digits in a fax number. • Press Pause / Redial to insert a three-second pause in a number you are entering to... enter the number of numbers (broadcast fax): a Press . Sending a fax Entering a fax number 1 From the control panel, press Fax Mode. 2 Enter a fax number using: The text box Enter a fax number using the control panel, see "Using the Phone Book" on the scanner glass. 2 From the desktop, double-click the ...

User's Guide
Page 97
...page 96. For more information, see "Setting up Speed Dial" on the printer. Faxing 97 b Set a time and date. 10 If you must navigate an automated answering system or enter a calling card number before sending your fax. 11 Click Send. Note: To set up to 64 numbers, commas, ...then click Next. 9 To send your fax, select Print a copy of 30 fax numbers have been entered. 6 Press Start Color or Start Black. You can include up Speed Dial, see "Entering a fax number" on the scanner glass. 3 From the control panel, press Fax Mode. 4 Enter a fax number, or press Phone Book to select ...
...page 96. For more information, see "Setting up Speed Dial" on the printer. Faxing 97 b Set a time and date. 10 If you must navigate an automated answering system or enter a calling card number before sending your fax. 11 Click Send. Note: To set up to 64 numbers, commas, ...then click Next. 9 To send your fax, select Print a copy of 30 fax numbers have been entered. 6 Press Start Color or Start Black. You can include up Speed Dial, see "Entering a fax number" on the scanner glass. 3 From the control panel, press Fax Mode. 4 Enter a fax number, or press Phone Book to select ...


