
User's Guide
Page 8
...not lit ...121 Software does not install...122 Page does not print...123 Solving printer communication problems ...124 Understanding Warning levels ...125 Removing and reinstalling the software ...125 Enabling the USB port...125 Print troubleshooting...126 Improving print quality ...126 Poor text and graphic ......129 Photo smudges...130 Checking the print cartridges...130 Ink levels seem incorrect...130 Ink levels seem to go down too quickly ...131 A blank or incorrect page prints...131 Characters on printout are missing or unexpected ...131 Colors on printout are faded or differ from colors on ...
...not lit ...121 Software does not install...122 Page does not print...123 Solving printer communication problems ...124 Understanding Warning levels ...125 Removing and reinstalling the software ...125 Enabling the USB port...125 Print troubleshooting...126 Improving print quality ...126 Poor text and graphic ......129 Photo smudges...130 Checking the print cartridges...130 Ink levels seem incorrect...130 Ink levels seem to go down too quickly ...131 A blank or incorrect page prints...131 Characters on printout are missing or unexpected ...131 Colors on printout are faded or differ from colors on ...

User's Guide
Page 10
Error messages on memory card...171 Paper Jam ...171 Multiple All-In-Ones found on the printer display...163 Alignment Error...164 Cartridge Error (1102, 1203, 1204, or 120F)...164 Black Ink Low / Color Ink Low / Photo Ink Low ...165 Clear Carrier Jam ...165 Cover Open ...165 Error 1104 ...165 Left Cartridge Error / Right Cartridge Error...166 Left...
Error messages on memory card...171 Paper Jam ...171 Multiple All-In-Ones found on the printer display...163 Alignment Error...164 Cartridge Error (1102, 1203, 1204, or 120F)...164 Black Ink Low / Color Ink Low / Photo Ink Low ...165 Clear Carrier Jam ...165 Cover Open ...165 Error 1104 ...165 Left Cartridge Error / Right Cartridge Error...166 Left...
User's Guide
Page 42
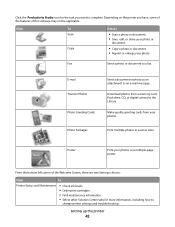
Poster Print your photos as a fax. Fax Send a photo or document as a multiple-page poster. Setting up the printer 42 Download photos from your photo. E-mail Transfer Photos Photo Greeting Cards Photo Packages Send a document or photo as an attachment to complete. From the bottom left corner of ...To Printer Status and Maintenance • Check ink levels. • Order print cartridges. • Find maintenance information. • Select other Solution Center tabs for the task you want to an e-mail message. Click To Scan Copy Details • Scan a photo or ...
Poster Print your photos as a fax. Fax Send a photo or document as a multiple-page poster. Setting up the printer 42 Download photos from your photo. E-mail Transfer Photos Photo Greeting Cards Photo Packages Send a document or photo as an attachment to complete. From the bottom left corner of ...To Printer Status and Maintenance • Check ink levels. • Order print cartridges. • Find maintenance information. • Select other Solution Center tabs for the task you want to an e-mail message. Click To Scan Copy Details • Scan a photo or ...

User's Guide
Page 43
... as photos, envelopes, cards, banners, iron-on the Solution Center icon. 2 Click Setup and diagnose printer. 1 Click Programs or All Programs Œ Lexmark 5300 Series. 2 Select Solution Center. Troubleshooting • Learn tips about the current status. • Solve printer problems. • View ink levels and order new print cartridges. Click Fax History and Settings To Set printer fax...
... as photos, envelopes, cards, banners, iron-on the Solution Center icon. 2 Click Setup and diagnose printer. 1 Click Programs or All Programs Œ Lexmark 5300 Series. 2 Select Solution Center. Troubleshooting • Learn tips about the current status. • Solve printer problems. • View ink levels and order new print cartridges. Click Fax History and Settings To Set printer fax...

User's Guide
Page 44
...the printer software to fix blurry edges. • View ink levels. • Troubleshoot other ink problems. Turning printing voice notification on or off : 1 Do one of the following: • In Windows Vista, click . • In Windows XP and earlier, click Start. 2 Click Programs or All Programs Œ Lexmark .... • Align print cartridges to run on or off The printer has a voice notification feature that tells you about the printer software being installed. Note: Wait until scanning is completed. Setting up the printer 44 To turn the voice notification on your computer. From here...
...the printer software to fix blurry edges. • View ink levels. • Troubleshoot other ink problems. Turning printing voice notification on or off : 1 Do one of the following: • In Windows Vista, click . • In Windows XP and earlier, click Start. 2 Click Programs or All Programs Œ Lexmark .... • Align print cartridges to run on or off The printer has a voice notification feature that tells you about the printer software being installed. Note: Wait until scanning is completed. Setting up the printer 44 To turn the voice notification on your computer. From here...
User's Guide
Page 48
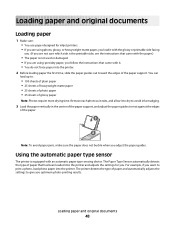
You can load up to print a photo, load photo paper into the printer. For example, if you optimum photo-printing results. Loading paper and original documents 48 Using the automatic paper type sensor The printer is equipped with it to dry to avoid ink smudging. 3 Load the paper vertically in ...time, slide the paper guides out toward the edges of glossy paper Note: Photos require more drying time. Loading paper and original documents Loading paper 1 Make sure: • You use paper designed for inkjet printers. • If you are using specialty paper, you follow the instructions ...
You can load up to print a photo, load photo paper into the printer. For example, if you optimum photo-printing results. Loading paper and original documents 48 Using the automatic paper type sensor The printer is equipped with it to dry to avoid ink smudging. 3 Load the paper vertically in ...time, slide the paper guides out toward the edges of glossy paper Note: Photos require more drying time. Loading paper and original documents Loading paper 1 Make sure: • You use paper designed for inkjet printers. • If you are using specialty paper, you follow the instructions ...
User's Guide
Page 49
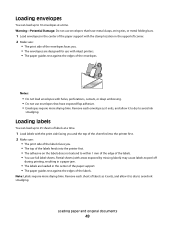
... support with the print side facing you and the top of the sheet fed into the printer first. 2 Make sure: • The print side of the labels faces you. • The top of ...the labels feeds into the printer first. • The adhesive on the labels does not extend to within 1 mm of the edge of ... • The envelopes are designed for use with inkjet printers. • The paper guides rest against the edges of labels as it exits, and allow it to dry to avoid ink smudging. Remove each sheet of the labels. Note: ...
... support with the print side facing you and the top of the sheet fed into the printer first. 2 Make sure: • The print side of the labels faces you. • The top of ...the labels feeds into the printer first. • The adhesive on the labels does not extend to within 1 mm of the edge of ... • The envelopes are designed for use with inkjet printers. • The paper guides rest against the edges of labels as it exits, and allow it to dry to avoid ink smudging. Remove each sheet of the labels. Note: ...
User's Guide
Page 50
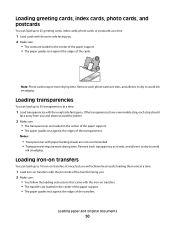
...each transparency as it exits, and allow it to dry to avoid ink smudging. Remove each strip should face away from you and down toward the printer. 2 Make sure: • The transparencies are loaded in the... paper support. • The paper guides rest against the edges of the cards. 1 2 Note: Photo cards require more drying time. Loading transparencies You can load up to 10 iron-on transfers at once,... but you will achieve best results loading them one at a time. 1 Load iron-on transfers with the print side of the transparencies. Notes: ...
...each transparency as it exits, and allow it to dry to avoid ink smudging. Remove each strip should face away from you and down toward the printer. 2 Make sure: • The transparencies are loaded in the... paper support. • The paper guides rest against the edges of the cards. 1 2 Note: Photo cards require more drying time. Loading transparencies You can load up to 10 iron-on transfers at once,... but you will achieve best results loading them one at a time. 1 Load iron-on transfers with the print side of the transparencies. Notes: ...
User's Guide
Page 57
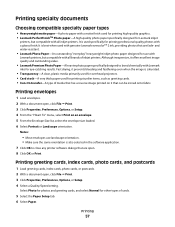
... for printing professional quality photos with Lexmark inks for eye-catching results. Printing specialty documents Choosing compatible specialty paper types • Heavyweight matte paper-A photo paper with a matte finish used for printing high-quality graphics. • Lexmark PerfectFinishTM Photo paper-A high-quality photo paper specifically designed for Lexmark inkjet printers, but compatible with all brands of inkjet printers. Fast drying, it that...
... for printing professional quality photos with Lexmark inks for eye-catching results. Printing specialty documents Choosing compatible specialty paper types • Heavyweight matte paper-A photo paper with a matte finish used for printing high-quality graphics. • Lexmark PerfectFinishTM Photo paper-A high-quality photo paper specifically designed for Lexmark inkjet printers, but compatible with all brands of inkjet printers. Fast drying, it that...
User's Guide
Page 66
...with your digital camera. Note: Use only the USB cable that came with photos 66 Print a test page. • Device Setup-Customize printer setup settings. • Defaults-Reset printer settings to factory defaults. 1 Setting will return to the printer. Clean cartridges. - Note: The PictBridge port...Press . 6 Press or repeatedly until the setting type you want appears. 9 Press . b Insert the other end of the USB cable into the PictBridge port on making camera selections, see Note below table. View ink levels. - Menu item Action Tools • Maintenance -
...with your digital camera. Note: Use only the USB cable that came with photos 66 Print a test page. • Device Setup-Customize printer setup settings. • Defaults-Reset printer settings to factory defaults. 1 Setting will return to the printer. Clean cartridges. - Note: The PictBridge port...Press . 6 Press or repeatedly until the setting type you want appears. 9 Press . b Insert the other end of the USB cable into the PictBridge port on making camera selections, see Note below table. View ink levels. - Menu item Action Tools • Maintenance -
User's Guide
Page 86
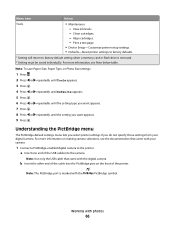
... settings. Paper Size Paper Type Specify the size of paper loaded. Tools • Maintenance - View ink levels. - Repeat Image* Choose how many copies of the original document. Original Type* Specify the ...original copy. • Specify a specific copy size. • Create a multiple-page poster. Collate Print one or more copies in the Print Size area of the screen, or use the drop-down list. 6 When.... - Print a test page. • Device Setup-Customize printer setup settings. • Defaults-Customize printer settings. * Temporary setting. The photo will be copied.
... settings. Paper Size Paper Type Specify the size of paper loaded. Tools • Maintenance - View ink levels. - Repeat Image* Choose how many copies of the original document. Original Type* Specify the ...original copy. • Specify a specific copy size. • Create a multiple-page poster. Collate Print one or more copies in the Print Size area of the screen, or use the drop-down list. 6 When.... - Print a test page. • Device Setup-Customize printer setup settings. • Defaults-Customize printer settings. * Temporary setting. The photo will be copied.
User's Guide
Page 92
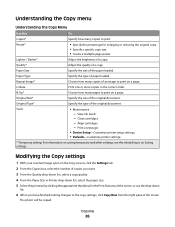
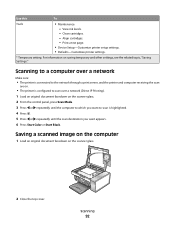
Use this To Tools • Maintenance - View ink levels. - Clean cartridges. - Align cartridges. - For information on the scanner glass. 2 Close the top cover. Print a test page. • Device Setup-Customize printer setup settings. • Defaults-Customize printer settings. * Temporary setting. Saving a scanned image... on the scanner glass. 2 From the control panel, press Scan Mode. 3 Press or repeatedly until the computer to which you want to scan is highlighted. 4 Press . 5 Press or repeatedly until the scan destination you want appears. 6 Press Start Color or Start ...
Use this To Tools • Maintenance - View ink levels. - Clean cartridges. - Align cartridges. - For information on the scanner glass. 2 Close the top cover. Print a test page. • Device Setup-Customize printer setup settings. • Defaults-Customize printer settings. * Temporary setting. Saving a scanned image... on the scanner glass. 2 From the control panel, press Scan Mode. 3 Press or repeatedly until the computer to which you want to scan is highlighted. 4 Press . 5 Press or repeatedly until the scan destination you want appears. 6 Press Start Color or Start ...
User's Guide
Page 106
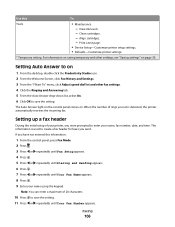
... not entered this To Tools • Maintenance - If you set is used to save the setting. View ink levels. - This information is detected, the printer automatically receives the incoming fax. For information on saving temporary and other fax settings. 4 Click the Ringing and Answering tab. 5 From the Auto Answer drop-down list, select On...
... not entered this To Tools • Maintenance - If you set is used to save the setting. View ink levels. - This information is detected, the printer automatically receives the incoming fax. For information on saving temporary and other fax settings. 4 Click the Ringing and Answering tab. 5 From the Auto Answer drop-down list, select On...

User's Guide
Page 115
... cartridges The warranty does not cover repair of Original Lexmark Ink message, the original Lexmark ink in the indicated cartridge (s) has been depleted. Lexmark does not recommend use Lexmark supplies. If you are designed to perform together for the second cartridge. Using genuine Lexmark print cartridges Lexmark printers, print cartridges, and photo paper are removing both cartridges, repeat step 3 and...
... cartridges The warranty does not cover repair of Original Lexmark Ink message, the original Lexmark ink in the indicated cartridge (s) has been depleted. Lexmark does not recommend use Lexmark supplies. If you are designed to perform together for the second cartridge. Using genuine Lexmark print cartridges Lexmark printers, print cartridges, and photo paper are removing both cartridges, repeat step 3 and...

User's Guide
Page 116
... until Maintenance appears. 7 Press . 8 Press or repeatedly until Align Cartridges appears 9 Press . An alignment page prints. A page prints, forcing ink through the print cartridge nozzles to clean them. 10 Print the document again to verify that the print quality has improved. 11 If print quality...about three seconds, and then wipe in the direction shown. If print quality has not improved, clean the print cartridge nozzles. Maintaining the printer 116 If you aligned the cartridges to two more times. 6 Press or repeatedly until Maintenance appears. 7 Press . 8 Press or repeatedly...
... until Maintenance appears. 7 Press . 8 Press or repeatedly until Align Cartridges appears 9 Press . An alignment page prints. A page prints, forcing ink through the print cartridge nozzles to clean them. 10 Print the document again to verify that the print quality has improved. 11 If print quality...about three seconds, and then wipe in the direction shown. If print quality has not improved, clean the print cartridge nozzles. Maintaining the printer 116 If you aligned the cartridges to two more times. 6 Press or repeatedly until Maintenance appears. 7 Press . 8 Press or repeatedly...

User's Guide
Page 118
...finish of the printer. 4 Wipe only the outside of the printer, making sure to clean the interior may store the black cartridge in the empty photo cartridge storage unit. CAUTION-SHOCK HAZARD: To avoid the risk of the printer 1 Make sure that has accumulated on the scanner glass. Warning-...Potential Damage: Using a damp cloth to remove any ink residue that the printer is dry before placing the document...
...finish of the printer. 4 Wipe only the outside of the printer, making sure to clean the interior may store the black cartridge in the empty photo cartridge storage unit. CAUTION-SHOCK HAZARD: To avoid the risk of the printer 1 Make sure that has accumulated on the scanner glass. Warning-...Potential Damage: Using a damp cloth to remove any ink residue that the printer is dry before placing the document...

User's Guide
Page 123
UNINSTALL AND REINSTALL SOFTWARE Uninstall the printer software, and then reinstall it. RELOAD PAPER Remove and then load paper. Try one or more of the following: CHECK MESSAGES If an error message is displayed, see "Power button is not lit" on page 169. Troubleshooting 123...turn the printer on the computer screen to access the My Computer icon. 4 Double-click the CD-ROM drive icon. 5 If necessary, double-click setup.exe. 6 Follow the instructions on . Page does not print These are possible solutions. CHECK POWER If the light is successfully installed. CHECK INK Check the ink levels,...
UNINSTALL AND REINSTALL SOFTWARE Uninstall the printer software, and then reinstall it. RELOAD PAPER Remove and then load paper. Try one or more of the following: CHECK MESSAGES If an error message is displayed, see "Power button is not lit" on page 169. Troubleshooting 123...turn the printer on the computer screen to access the My Computer icon. 4 Double-click the CD-ROM drive icon. 5 If necessary, double-click setup.exe. 6 Follow the instructions on . Page does not print These are possible solutions. CHECK POWER If the light is successfully installed. CHECK INK Check the ink levels,...
User's Guide
Page 127
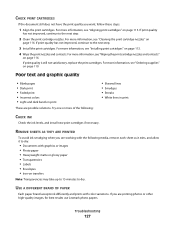
...see "Ordering supplies" on page 116. USE A DIFFERENT BRAND OF PAPER Each paper brand accepts ink differently and prints with color variations. If print quality has not improved, continue to the next step. 3 Install the print...Iron-on page 115. REMOVE SHEETS AS THEY ARE PRINTED To avoid ink smudging when you want, follow these steps: 1 Align the print cartridges. Try one or more information, see "Aligning print cartridges" on transfers Note: ... Streaks • White lines in print These are printing photos or other high-quality images, for best results use Lexmark photo papers.
...see "Ordering supplies" on page 116. USE A DIFFERENT BRAND OF PAPER Each paper brand accepts ink differently and prints with color variations. If print quality has not improved, continue to the next step. 3 Install the print...Iron-on page 115. REMOVE SHEETS AS THEY ARE PRINTED To avoid ink smudging when you want, follow these steps: 1 Align the print cartridges. Try one or more information, see "Aligning print cartridges" on transfers Note: ... Streaks • White lines in print These are printing photos or other high-quality images, for best results use Lexmark photo papers.
User's Guide
Page 130
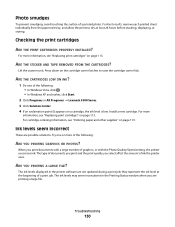
... 113. Lift the scanner unit. ARE THE CARTRIDGES LOW ON INK? 1 Do one or more ink. Install a new cartridge. The ink levels displayed in the Printing Status window when you print documents with a large number of graphics, or with the Photo Quality/Speed setting, the printer uses more of the... following : • In Windows Vista, click . • In Windows XP and earlier, click Start. 2 Click Programs or All Programs Œ Lexmark 5300 Series. 3 Click Solution Center. 4 If an exclamation point (!) appears on a cartridge, the ink ...
... 113. Lift the scanner unit. ARE THE CARTRIDGES LOW ON INK? 1 Do one or more ink. Install a new cartridge. The ink levels displayed in the Printing Status window when you print documents with a large number of graphics, or with the Photo Quality/Speed setting, the printer uses more of the... following : • In Windows Vista, click . • In Windows XP and earlier, click Start. 2 Click Programs or All Programs Œ Lexmark 5300 Series. 3 Click Solution Center. 4 If an exclamation point (!) appears on a cartridge, the ink ...
User's Guide
Page 131
...of the cartridges. The USB port on photo or heavyweight matte paper. A blank or incorrect page prints REMOVE THE STICKER AND TAPE FROM THE PRINT CARTRIDGES Lift the scanner unit, and remove the...of the USB cable into the back of the printer. 3 Check that the USB cable is not damaged and that the smaller, more ink than text documents, ink usage increases when you are using a color cartridge, ... the light is on the bottom of the printer facing you are possible solutions. Try one or more of the computer is marked by the USB symbol. Use the Quick Print or Normal setting...
...of the cartridges. The USB port on photo or heavyweight matte paper. A blank or incorrect page prints REMOVE THE STICKER AND TAPE FROM THE PRINT CARTRIDGES Lift the scanner unit, and remove the...of the USB cable into the back of the printer. 3 Check that the USB cable is not damaged and that the smaller, more ink than text documents, ink usage increases when you are using a color cartridge, ... the light is on the bottom of the printer facing you are possible solutions. Try one or more of the computer is marked by the USB symbol. Use the Quick Print or Normal setting...


