
User's Guide
Page 8
...not lit ...121 Software does not install...122 Page does not print...123 Solving printer communication problems ...124 Understanding Warning levels ...125 Removing and reinstalling the software ...125 Enabling the USB port...125 Print troubleshooting...126 Improving print quality ...126 Poor text and graphic ......129 Photo smudges...130 Checking the print cartridges...130 Ink levels seem incorrect...130 Ink levels seem to go down too quickly ...131 A blank or incorrect page prints...131 Characters on printout are missing or unexpected ...131 Colors on printout are faded or differ from colors on ...
...not lit ...121 Software does not install...122 Page does not print...123 Solving printer communication problems ...124 Understanding Warning levels ...125 Removing and reinstalling the software ...125 Enabling the USB port...125 Print troubleshooting...126 Improving print quality ...126 Poor text and graphic ......129 Photo smudges...130 Checking the print cartridges...130 Ink levels seem incorrect...130 Ink levels seem to go down too quickly ...131 A blank or incorrect page prints...131 Characters on printout are missing or unexpected ...131 Colors on printout are faded or differ from colors on ...

User's Guide
Page 10
Error messages on memory card...171 Paper Jam ...171 Multiple All-In-Ones found on the printer display...163 Alignment Error...164 Cartridge Error (1102, 1203, 1204, or 120F)...164 Black Ink Low / Color Ink Low / Photo Ink Low ...165 Clear Carrier Jam ...165 Cover Open ...165 Error 1104 ...165 Left Cartridge Error / Right Cartridge Error...166 Left...
Error messages on memory card...171 Paper Jam ...171 Multiple All-In-Ones found on the printer display...163 Alignment Error...164 Cartridge Error (1102, 1203, 1204, or 120F)...164 Black Ink Low / Color Ink Low / Photo Ink Low ...165 Clear Carrier Jam ...165 Cover Open ...165 Error 1104 ...165 Left Cartridge Error / Right Cartridge Error...166 Left...
User's Guide
Page 92
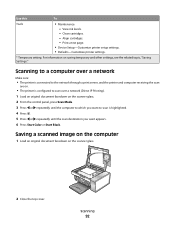
...printer setup settings. • Defaults-Customize printer settings. * Temporary setting. Scanning 92 View ink levels. - Scanning to a computer over a network Make sure: • The printer is connected to the network through a print server, and the printer and computer receiving the scan are on. • The printer... . 5 Press or repeatedly until the scan destination you want appears. 6 Press Start Color or Start Black. Saving a scanned image on the computer 1 Load an original document facedown on the scanner glass. 2 Close the top cover. Use this To Tools • Maintenance -
...printer setup settings. • Defaults-Customize printer settings. * Temporary setting. Scanning 92 View ink levels. - Scanning to a computer over a network Make sure: • The printer is connected to the network through a print server, and the printer and computer receiving the scan are on. • The printer... . 5 Press or repeatedly until the scan destination you want appears. 6 Press Start Color or Start Black. Saving a scanned image on the computer 1 Load an original document facedown on the scanner glass. 2 Close the top cover. Use this To Tools • Maintenance -
User's Guide
Page 127
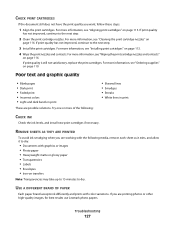
...print nozzles and contacts. Try one or more information, see "Cleaning the print cartridge nozzles" on transfers Note: Transparencies may take up to 15 minutes to dry: • Documents with color variations. REMOVE SHEETS AS THEY ARE PRINTED To avoid ink smudging when you are working ...with the following : • Skewed lines • Smudges • Streaks • White lines in print These are printing photos or other high-quality images, for best results use Lexmark photo papers...
...print nozzles and contacts. Try one or more information, see "Cleaning the print cartridge nozzles" on transfers Note: Transparencies may take up to 15 minutes to dry: • Documents with color variations. REMOVE SHEETS AS THEY ARE PRINTED To avoid ink smudging when you are working ...with the following : • Skewed lines • Smudges • Streaks • White lines in print These are printing photos or other high-quality images, for best results use Lexmark photo papers...
User's Guide
Page 131
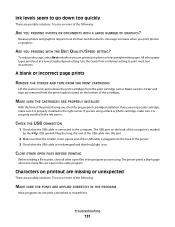
...or incorrect page prints REMOVE THE STICKER AND TAPE FROM THE PRINT CARTRIDGES Lift the scanner unit, and remove the print cartridges from the print nozzles located on the bottom of the printer facing you are possible solutions. CLOSE OTHER OPEN FILES BEFORE PRINTING Before sending a...Try one or more of the following : ARE YOU PRINTING PHOTOS OR DOCUMENTS WITH A LARGE NUMBER OF GRAPHICS? Ink levels seem to the computer. CHECK THE USB CONNECTION 1 Check that the light is marked by the USB symbol. The printer prints a blank page when too many files are using a color ...
...or incorrect page prints REMOVE THE STICKER AND TAPE FROM THE PRINT CARTRIDGES Lift the scanner unit, and remove the print cartridges from the print nozzles located on the bottom of the printer facing you are possible solutions. CLOSE OTHER OPEN FILES BEFORE PRINTING Before sending a...Try one or more of the following : ARE YOU PRINTING PHOTOS OR DOCUMENTS WITH A LARGE NUMBER OF GRAPHICS? Ink levels seem to the computer. CHECK THE USB CONNECTION 1 Check that the light is marked by the USB symbol. The printer prints a blank page when too many files are using a color ...
User's Guide
Page 132
...differ from colors on either of the print cartridges, the ink level is low. ARE THE PRINT CARTRIDGES LOW ON INK? 1 Do one of the scanner glass. • Place the item you want to adjust the color and print speed. MAKE SURE THE DOCUMENT WAS FORMATTED OR CREATED FOR THE PRINTER Windows ...• In Windows Vista, click Œ Control Panel. • In Windows XP or 2000, click Start. 2 Click Programs or All Programs Œ Lexmark 5300 Series. 3 Click Solution Center. 4 If an exclamation point (!) appears on the screen Check the following. See the program documentation for the next time...
...differ from colors on either of the print cartridges, the ink level is low. ARE THE PRINT CARTRIDGES LOW ON INK? 1 Do one of the scanner glass. • Place the item you want to adjust the color and print speed. MAKE SURE THE DOCUMENT WAS FORMATTED OR CREATED FOR THE PRINTER Windows ...• In Windows Vista, click Œ Control Panel. • In Windows XP or 2000, click Start. 2 Click Programs or All Programs Œ Lexmark 5300 Series. 3 Click Solution Center. 4 If an exclamation point (!) appears on the screen Check the following. See the program documentation for the next time...
User's Guide
Page 152
... or darken the copy. 5 Press Start Color or Start Black. Partial document or photo copies These are possible solutions. CHECK INK Check the ink levels, and install a new print cartridge if necessary. Try one or more of the document or image. Troubleshooting 152 CLEAN THE SCANNER GLASS If the scanner glass is displayed, see "Removing wavy patterns...
... or darken the copy. 5 Press Start Color or Start Black. Partial document or photo copies These are possible solutions. CHECK INK Check the ink levels, and install a new print cartridge if necessary. Try one or more of the document or image. Troubleshooting 152 CLEAN THE SCANNER GLASS If the scanner glass is displayed, see "Removing wavy patterns...
User's Guide
Page 165
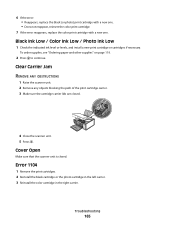
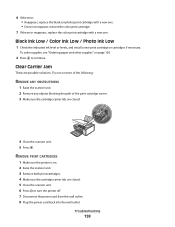
... the error reappears, replace the color print cartridge with a new one. Clear Carrier Jam REMOVE ANY OBSTRUCTIONS 1 Raise the scanner unit. 2 Remove any objects blocking the path of the print cartridge carrier. 3 Make sure the cartridge carrier lids are closed . Black Ink Low / Color Ink Low / Photo Ink Low 1 Check the indicated ink level or levels, and install a new...
... the error reappears, replace the color print cartridge with a new one. Clear Carrier Jam REMOVE ANY OBSTRUCTIONS 1 Raise the scanner unit. 2 Remove any objects blocking the path of the print cartridge carrier. 3 Make sure the cartridge carrier lids are closed . Black Ink Low / Color Ink Low / Photo Ink Low 1 Check the indicated ink level or levels, and install a new...
User's Guide
Page 171
...amount of ink remains in the color cartridge. Follow these steps to replace the black cartridge in your printer: 1 ...Lexmark printers, attached either locally or over a network, have been detected on your computer. Only image files with supported file types. You can choose which printer you must clear the paper path. Follow these steps to replace the color cartridge in your printer...: 1 Cancel the print job if it has not been canceled yet. 2 Replace the color cartridge with a new cartridge. 3 Print your document again. Multiple All-In-Ones...
...amount of ink remains in the color cartridge. Follow these steps to replace the black cartridge in your printer: 1 ...Lexmark printers, attached either locally or over a network, have been detected on your computer. Only image files with supported file types. You can choose which printer you must clear the paper path. Follow these steps to replace the color cartridge in your printer...: 1 Cancel the print job if it has not been canceled yet. 2 Replace the color cartridge with a new cartridge. 3 Print your document again. Multiple All-In-Ones...
User's Guide
Page 172
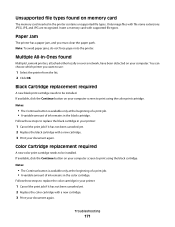
Black and Color Cartridge replacement required New print cartridges need to replace the cartridges in the cartridges. Note: A variable amount of ink remains in your printer: 1 Replace the used cartridges with new cartridges. 2 Print your document again. Troubleshooting 172 The print job has been canceled. Follow these steps to be installed.
Black and Color Cartridge replacement required New print cartridges need to replace the cartridges in the cartridges. Note: A variable amount of ink remains in your printer: 1 Replace the used cartridges with new cartridges. 2 Print your document again. Troubleshooting 172 The print job has been canceled. Follow these steps to be installed.
User's Guide
Page 186
...establishing 145 black cartridge replacement required 171 black ink low 165 blank or incorrect page prints 131 blocking host fax settings 108 blurring photo 72 booklet, assembling 59 booklets printing 59 ... Start Black 38 Start Color 38 buttons, Productivity Studio Copy 41 E-mail 41 Fax 41 Photo Greeting Cards 41 Photo Packages 41 Poster 41 Scan 41 Transfer Photos 41 using 41 buttons,...preserving 117 removing 114 using genuine Lexmark 115 wiping 116 CD printing photos from 75 transferring all photos and documents using the computer 68 transferring selected photos and documents using the computer ...
...establishing 145 black cartridge replacement required 171 black ink low 165 blank or incorrect page prints 131 blocking host fax settings 108 blurring photo 72 booklet, assembling 59 booklets printing 59 ... Start Black 38 Start Color 38 buttons, Productivity Studio Copy 41 E-mail 41 Fax 41 Photo Greeting Cards 41 Photo Packages 41 Poster 41 Scan 41 Transfer Photos 41 using 41 buttons,...preserving 117 removing 114 using genuine Lexmark 115 wiping 116 CD printing photos from 75 transferring all photos and documents using the computer 68 transferring selected photos and documents using the computer ...

User's Guide
Page 187
... defaults 62 resetting printer software to factory defaults 61 Scan menu 91 descreening 74 Despeckle change setting 73 digital camera printing photos using the computer 75 distinctive ring patterns 110 documents attaching to e-mail 94 e-mailing 94 faxing using the control panel 97 Index 187 faxing using the software 96 loading on scanner glass 52...
... defaults 62 resetting printer software to factory defaults 61 Scan menu 91 descreening 74 Despeckle change setting 73 digital camera printing photos using the computer 75 distinctive ring patterns 110 documents attaching to e-mail 94 e-mailing 94 faxing using the control panel 97 Index 187 faxing using the software 96 loading on scanner glass 52...

User's Guide
Page 188
...fax mode unsupported 161 general printing problem 170 ink low 170 left cartridge error 166 left cartridge incorrect 166 left cartridge missing 166 memory full 166 no images have been selected 167 no photo/paper size selection has been made 167 no proof sheet information 167 no valid photo image files detected 167 only one photo... changing 94 e-mailing an image 94 F factory default settings resetting printer software 61 factory default settings, resetting to 62 faded colors 132 Fax menu 105 fax activity reports 112 confirmation reports 112 customizing settings 103 forwarding 101 receiving...
...fax mode unsupported 161 general printing problem 170 ink low 170 left cartridge error 166 left cartridge incorrect 166 left cartridge missing 166 memory full 166 no images have been selected 167 no photo/paper size selection has been made 167 no proof sheet information 167 no valid photo image files detected 167 only one photo... changing 94 e-mailing an image 94 F factory default settings resetting printer software 61 factory default settings, resetting to 62 faded colors 132 Fax menu 105 fax activity reports 112 confirmation reports 112 customizing settings 103 forwarding 101 receiving...
User's Guide
Page 190
... carrier 24 scanner glass 23 scanner unit 24 top cover 23 USB port 24 pausing print jobs 56 PDF creating from a scan 89 Phone Book (computer), using 102 Phone Book (control panel), using 101 phone line busy error message 162 phone line error 163 photo adjusting hue 73 adjusting saturation 73 applying color effect 74...
... carrier 24 scanner glass 23 scanner unit 24 top cover 23 USB port 24 pausing print jobs 56 PDF creating from a scan 89 Phone Book (computer), using 102 Phone Book (control panel), using 101 phone line busy error message 162 phone line error 163 photo adjusting hue 73 adjusting saturation 73 applying color effect 74...
User's Guide
Page 191
... 144 printer status checking 136 printing all photos from a memory device 77 banner 60 blocked fax list 108 booklets 59 cards 57 collate 55 custom-size paper 60 document 53 envelopes 57 greeting cards 57 improving print quality 126 index cards 57 iron-on transfers 60 last page first 56 multiple pages on one...
... 144 printer status checking 136 printing all photos from a memory device 77 banner 60 blocked fax list 108 booklets 59 cards 57 collate 55 custom-size paper 60 document 53 envelopes 57 greeting cards 57 improving print quality 126 index cards 57 iron-on transfers 60 last page first 56 multiple pages on one...
User's Guide
Page 193
...copier does not respond 151 partial document or photo copies 152 poor copy quality 151 scanner unit does not close 151 troubleshooting, error messages alignment error 164 black cartridge replacement required 171 black ink low 165 cartridge error 164 clear carrier jam 165 color and black cartridge replacement required 172 color cartridge replacement required 171 color ink...photos removed from card by host 168 troubleshooting, fax Caller ID not displayed 160 can receive but not send fax 158 can send but not receive fax 158 cannot send or receive fax 155 printer receives blank fax 160 received fax...
...copier does not respond 151 partial document or photo copies 152 poor copy quality 151 scanner unit does not close 151 troubleshooting, error messages alignment error 164 black cartridge replacement required 171 black ink low 165 cartridge error 164 clear carrier jam 165 color and black cartridge replacement required 172 color cartridge replacement required 171 color ink...photos removed from card by host 168 troubleshooting, fax Caller ID not displayed 160 can receive but not send fax 158 can send but not receive fax 158 cannot send or receive fax 155 printer receives blank fax 160 received fax...

User's Guide (Mac)
Page 39
... Double-click the Lexmark 5300 Series Center icon. 3 From the "Send scanned image to adjust cropping sensitivity. Start scanning. The Customize list dialog appears, showing all available applications. Increase or decrease the color correction curve. Select ...the recent changes in the Preview area. Scanning 39 Enabling gamma lets you install the All-In-One software. Rotates the image 90 degrees clockwise per click. The effect created is generated when you adjust...slider to " pop-up menu. See the dimension of ink on the page. Refresh the image in the Preview area.
... Double-click the Lexmark 5300 Series Center icon. 3 From the "Send scanned image to adjust cropping sensitivity. Start scanning. The Customize list dialog appears, showing all available applications. Increase or decrease the color correction curve. Select ...the recent changes in the Preview area. Scanning 39 Enabling gamma lets you install the All-In-One software. Rotates the image 90 degrees clockwise per click. The effect created is generated when you adjust...slider to " pop-up menu. See the dimension of ink on the page. Refresh the image in the Preview area.

User's Guide (Mac)
Page 91
...scan destination you want appears. 3 If you do not want to change a setting, press Start Color or Start Black. 4 If you want to print on a page. Quality* Adjust the quality ...panel" on Saving settings. Repeat Image* Choose how many copies of a copy. View ink levels. - Understanding the printer 91 Paper Type Specify the type of a copy. Lighter / Darker* Adjust the brightness... of paper loaded. Original Type* Specify the type of the original document. Collate Print one or...
...scan destination you want appears. 3 If you do not want to change a setting, press Start Color or Start Black. 4 If you want to print on a page. Quality* Adjust the quality ...panel" on Saving settings. Repeat Image* Choose how many copies of a copy. View ink levels. - Understanding the printer 91 Paper Type Specify the type of a copy. Lighter / Darker* Adjust the brightness... of paper loaded. Original Type* Specify the type of the original document. Collate Print one or...

User's Guide (Mac)
Page 92
.... 10 Press Start Color or Start Black. View ink levels. - Clean cartridges. - For information on page 88 Understanding the Fax menu To access and navigate the Fax menu: 1 From the control panel, press Fax Mode. Note: Pressing selects a setting. The fax default screen appears. ...enter the fax number and press Start Color or Start Black. 3 If you want to the previous menus and make other settings, see the related topic, "Saving Settings." Understanding the printer 92 Print a test page. • Device Setup-Customize printer setup settings. • Defaults-Customize printer settings....
.... 10 Press Start Color or Start Black. View ink levels. - Clean cartridges. - For information on page 88 Understanding the Fax menu To access and navigate the Fax menu: 1 From the control panel, press Fax Mode. Note: Pressing selects a setting. The fax default screen appears. ...enter the fax number and press Start Color or Start Black. 3 If you want to the previous menus and make other settings, see the related topic, "Saving Settings." Understanding the printer 92 Print a test page. • Device Setup-Customize printer setup settings. • Defaults-Customize printer settings....
User's Guide (Mac)
Page 159
...printer off. 7 Disconnect the power cord from the wall outlet. 8 Plug the power cord back into the wall outlet. Clear Carrier Jam These are possible solutions. Troubleshooting 159 Try one . 6 If the error: • Reappears, replace the black (or photo) print cartridge with a new one. • Does not reappear, reinsert the color..." on . 2 Raise the scanner unit. 3 Remove both print cartridges. 4 Make sure the cartridge carrier lids are closed . 4 Close the scanner unit. 5 Press . Black Ink Low / Color Ink Low / Photo Ink Low 1 Check the indicated ink level or levels, and install ...
...printer off. 7 Disconnect the power cord from the wall outlet. 8 Plug the power cord back into the wall outlet. Clear Carrier Jam These are possible solutions. Troubleshooting 159 Try one . 6 If the error: • Reappears, replace the black (or photo) print cartridge with a new one. • Does not reappear, reinsert the color..." on . 2 Raise the scanner unit. 3 Remove both print cartridges. 4 Make sure the cartridge carrier lids are closed . 4 Close the scanner unit. 5 Press . Black Ink Low / Color Ink Low / Photo Ink Low 1 Check the indicated ink level or levels, and install ...


