User's Guide
Page 3
... Configured models...10 Understanding the control panel...13 Getting the printer ready to fax...16 Choosing a fax connection ...16 Using an RJ11 adapter...16 Connecting directly to a telephone wall jack 19 Connecting directly to a telephone wall ... number 25 Setting the date ...25 Setting the time...26 Installing options...27 Installing a 530-sheet drawer...27 Securing the 530-sheet drawer to the printer 28 Attaching cables...29 Loading paper and specialty media 31 Loading trays...31 Converting the standard tray to a legal-size tray 34 Setting the Paper...
... Configured models...10 Understanding the control panel...13 Getting the printer ready to fax...16 Choosing a fax connection ...16 Using an RJ11 adapter...16 Connecting directly to a telephone wall jack 19 Connecting directly to a telephone wall ... number 25 Setting the date ...25 Setting the time...26 Installing options...27 Installing a 530-sheet drawer...27 Securing the 530-sheet drawer to the printer 28 Attaching cables...29 Loading paper and specialty media 31 Loading trays...31 Converting the standard tray to a legal-size tray 34 Setting the Paper...

User's Guide
Page 4
... Supported paper sizes, types, and weights 44 Supported paper sizes...44 Supported paper types ...45 Supported paper weights...46 Paper capacities ...46 Printing...48 Installing printer software...48 Printing a document from Windows 48 Printing a document from a Macintosh computer 48 Printing the configuration page...48 Printing the demo page...49 Canceling a print...
... Supported paper sizes, types, and weights 44 Supported paper sizes...44 Supported paper types ...45 Supported paper weights...46 Paper capacities ...46 Printing...48 Installing printer software...48 Printing a document from Windows 48 Printing a document from a Macintosh computer 48 Printing the configuration page...48 Printing the demo page...49 Canceling a print...

User's Guide
Page 6
...Print menu...90 Admin Settings menu...91 Understanding printer messages 94 List of status and error messages...94 Maintaining the printer 99 Storing supplies...99 Conserving toner...99 Cleaning the printer...99 Cleaning the exterior of the printer ...99 Cleaning the scanner glass ...100 ......107 Ordering a waste toner bottle ...107 Moving the printer...107 Before moving the printer ...107 Locking the scanner ...108 Removing the printer from the 530-sheet drawer 109 Moving the printer to another location ...112 Setting the printer up in a new location ...112 Administrative support 114 ...
...Print menu...90 Admin Settings menu...91 Understanding printer messages 94 List of status and error messages...94 Maintaining the printer 99 Storing supplies...99 Conserving toner...99 Cleaning the printer...99 Cleaning the exterior of the printer ...99 Cleaning the scanner glass ...100 ......107 Ordering a waste toner bottle ...107 Moving the printer...107 Before moving the printer ...107 Locking the scanner ...108 Removing the printer from the 530-sheet drawer 109 Moving the printer to another location ...112 Setting the printer up in a new location ...112 Administrative support 114 ...
User's Guide
Page 7
Using the Embedded Web Server 116 Troubleshooting...117 Online customer support...117 Checking an unresponsive printer 117 Solving printing problems...117 Multiple-language PDFs do not print ...117 Control panel display is blank...117 Jobs do not print ...117 Job takes ...
Using the Embedded Web Server 116 Troubleshooting...117 Online customer support...117 Checking an unresponsive printer 117 Solving printing problems...117 Multiple-language PDFs do not print ...117 Control panel display is blank...117 Jobs do not print ...117 Job takes ...
User's Guide
Page 10
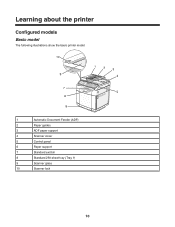
Learning about the printer Configured models Basic model The following illustrations show the basic printer model. 1 Automatic Document Feeder (ADF) 2 Paper guides 3 ADF paper support 4 Scanner cover 5 Control panel 6 Paper support 7 Standard exit bin 8 Standard 250-sheet tray (Tray 1) 9 Scanner glass 10 Scanner lock 10
Learning about the printer Configured models Basic model The following illustrations show the basic printer model. 1 Automatic Document Feeder (ADF) 2 Paper guides 3 ADF paper support 4 Scanner cover 5 Control panel 6 Paper support 7 Standard exit bin 8 Standard 250-sheet tray (Tray 1) 9 Scanner glass 10 Scanner lock 10
User's Guide
Page 12
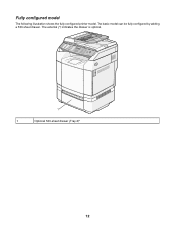
The asterisk (*) indicates the drawer is optional. 1 Optional 530-sheet drawer (Tray 2)* 12 The basic model can be fully configured by adding a 530-sheet drawer. Fully configured model The following illustration shows the fully configured printer model.
The asterisk (*) indicates the drawer is optional. 1 Optional 530-sheet drawer (Tray 2)* 12 The basic model can be fully configured by adding a 530-sheet drawer. Fully configured model The following illustration shows the fully configured printer model.

User's Guide
Page 14
Control panel item 12 Display 13 Keypad 14 Stop / Clear Description Shows messages describing the current state of the printer and indicating possible printer problems you must resolve In Copy mode: Enter the number of copies or prints you want to make. Access Quick Dial numbers 11-20 by ... time shown on all models. 9 Image quality 10 Directory 11 Shift Access the copy, scan, and fax quality options. Reset the printer when performing an action, or return the printer to 20 entries can be stored in the Scan directory. Note: The Fax function is not available on the display. In Fax...
Control panel item 12 Display 13 Keypad 14 Stop / Clear Description Shows messages describing the current state of the printer and indicating possible printer problems you must resolve In Copy mode: Enter the number of copies or prints you want to make. Access Quick Dial numbers 11-20 by ... time shown on all models. 9 Image quality 10 Directory 11 Shift Access the copy, scan, and fax quality options. Reset the printer when performing an action, or return the printer to 20 entries can be stored in the Scan directory. Note: The Fax function is not available on the display. In Fax...
User's Guide
Page 16
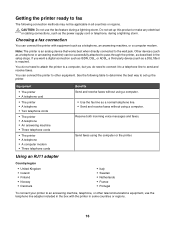
... Benefits Send and receive faxes without using a computer. • Use the fax line as a telephone or answering machine) can connect the printer with the printer in some countries or regions. 16 Receive both incoming voice messages and faxes. Other devices (such as a normal telephone line. • ...Send and receive faxes without using the computer or the printer. CAUTION: Do not use the telephone line adapter included in the box with equipment such as described in all countries or regions. See...
... Benefits Send and receive faxes without using a computer. • Use the fax line as a telephone or answering machine) can connect the printer with the printer in some countries or regions. 16 Receive both incoming voice messages and faxes. Other devices (such as a normal telephone line. • ...Send and receive faxes without using the computer or the printer. CAUTION: Do not use the telephone line adapter included in the box with equipment such as described in all countries or regions. See...
User's Guide
Page 17
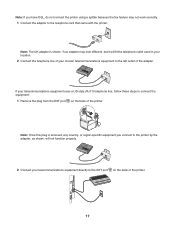
...style (RJ11) telephone line, follow these steps to the EXT port on the back of the printer. Note: Once this plug is shown. or region-specific equipment you have DSL, do not connect the printer using a splitter because the fax feature may look different, but it will not function properly.... 2 Connect your chosen telecommunications equipment to the telephone cord that came with the printer. Note: The UK adapter is removed, any country- Note: If you connect to the printer by the adapter, as shown, will fit the telephone outlet used in your location. 2 Connect ...
...style (RJ11) telephone line, follow these steps to the EXT port on the back of the printer. Note: Once this plug is shown. or region-specific equipment you have DSL, do not connect the printer using a splitter because the fax feature may look different, but it will not function properly.... 2 Connect your chosen telecommunications equipment to the telephone cord that came with the printer. Note: The UK adapter is removed, any country- Note: If you connect to the printer by the adapter, as shown, will fit the telephone outlet used in your location. 2 Connect ...
User's Guide
Page 18
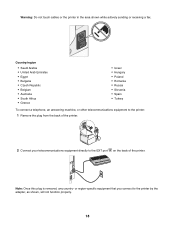
...removed, any country- or region-specific equipment that you connect to the EXT port on the back of the printer. 2 Connect your telecommunications equipment directly to the printer by the adapter, as shown, will not function properly. 18 Country/region • Saudi Arabia •...Russia • Slovenia • Spain • Turkey To connect a telephone, an answering machine, or other telecommunications equipment to the printer: 1 Remove the plug from the back of the printer. Warning: Do not touch cables or the printer in the area shown while actively sending or receiving a fax.
...removed, any country- or region-specific equipment that you connect to the EXT port on the back of the printer. 2 Connect your telecommunications equipment directly to the printer by the adapter, as shown, will not function properly. 18 Country/region • Saudi Arabia •...Russia • Slovenia • Spain • Turkey To connect a telephone, an answering machine, or other telecommunications equipment to the printer: 1 Remove the plug from the back of the printer. Warning: Do not touch cables or the printer in the area shown while actively sending or receiving a fax.
User's Guide
Page 19
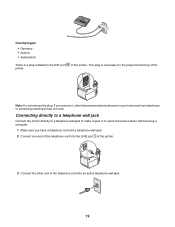
...plug is a plug installed in your home (such as telephones or answering machines) may not work. Connecting directly to a telephone wall jack Connect the printer directly to a telephone wall jack to make copies or to send and receive faxes without using a computer. 1 Make sure you remove it, other... end of the telephone cord into the LINE port of the printer. 3 Connect the other telecommunications devices in the EXT port of the printer. Note: Do not remove the plug. If you have a telephone cord and a telephone wall jack. 2 Connect ...
...plug is a plug installed in your home (such as telephones or answering machines) may not work. Connecting directly to a telephone wall jack Connect the printer directly to a telephone wall jack to make copies or to send and receive faxes without using a computer. 1 Make sure you remove it, other... end of the telephone cord into the LINE port of the printer. 3 Connect the other telecommunications devices in the EXT port of the printer. Note: Do not remove the plug. If you have a telephone cord and a telephone wall jack. 2 Connect ...
User's Guide
Page 20
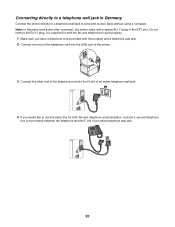
... Make sure you would like to send and receive faxes without using a computer. Connecting directly to a telephone wall jack in Germany Connect the printer directly to a telephone wall jack to use the same line for both fax and telephone communication, connect a second telephone line (not provided) between... the telephone and the F slot of the printer. 3 Connect the other countries), the printer ships with a special RJ-11 plug in the EXT port. Note: In Germany (and some other end of the telephone...
... Make sure you would like to send and receive faxes without using a computer. Connecting directly to a telephone wall jack in Germany Connect the printer directly to a telephone wall jack to use the same line for both fax and telephone communication, connect a second telephone line (not provided) between... the telephone and the F slot of the printer. 3 Connect the other countries), the printer ships with a special RJ-11 plug in the EXT port. Note: In Germany (and some other end of the telephone...
User's Guide
Page 21
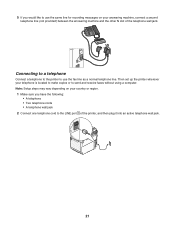
... telephone wall jack 2 Connect one telephone cord to the LINE port of the telephone wall jack. Connecting to a telephone Connect a telephone to the printer to use the same line for recording messages on your answering machine, connect a second telephone line (not provided) between the answering machine and the... other N slot of the printer, and then plug it into an active telephone wall jack. 21 Then set up the printer wherever your telephone is located to make copies or to use the fax line as a normal telephone...
... telephone wall jack 2 Connect one telephone cord to the LINE port of the telephone wall jack. Connecting to a telephone Connect a telephone to the printer to use the same line for recording messages on your answering machine, connect a second telephone line (not provided) between the answering machine and the... other N slot of the printer, and then plug it into an active telephone wall jack. 21 Then set up the printer wherever your telephone is located to make copies or to use the fax line as a normal telephone...
User's Guide
Page 22
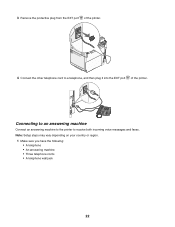
3 Remove the protective plug from the EXT port of the printer. 4 Connect the other telephone cord to receive both incoming voice messages and faxes. Connecting to an answering machine Connect an answering machine to the printer to a telephone, and then plug it into the EXT port of the printer. Note: Setup steps may vary depending on your country or region. 1 Make sure you have the following: • A telephone • An answering machine • Three telephone cords • A telephone wall jack 22
3 Remove the protective plug from the EXT port of the printer. 4 Connect the other telephone cord to receive both incoming voice messages and faxes. Connecting to an answering machine Connect an answering machine to the printer to a telephone, and then plug it into the EXT port of the printer. Note: Setup steps may vary depending on your country or region. 1 Make sure you have the following: • A telephone • An answering machine • Three telephone cords • A telephone wall jack 22
User's Guide
Page 23
2 Connect one telephone cord into the LINE port of the printer, and then plug it into an active telephone wall jack. 3 Remove the protective plug from the EXT port of the printer. 4 Connect a second telephone cord from the telephone to the answering machine. 5 Connect a third telephone cord from the answering machine to the EXT port of the printer. 23
2 Connect one telephone cord into the LINE port of the printer, and then plug it into an active telephone wall jack. 3 Remove the protective plug from the EXT port of the printer. 4 Connect a second telephone cord from the telephone to the answering machine. 5 Connect a third telephone cord from the answering machine to the EXT port of the printer. 23
User's Guide
Page 24
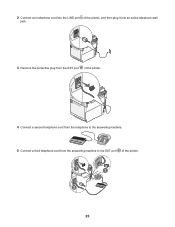
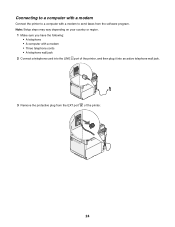
Note: Setup steps may vary depending on your country or region. 1 Make sure you have the following: • A telephone • A computer with a modem to send faxes from the EXT port of the printer, and then plug it into an active telephone wall jack. 3 Remove the protective plug from the software program. Connecting to a computer with a modem Connect the printer to a computer with a modem • Three telephone cords • A telephone wall jack 2 Connect a telephone cord into the LINE port of the printer. 24
Note: Setup steps may vary depending on your country or region. 1 Make sure you have the following: • A telephone • A computer with a modem to send faxes from the EXT port of the printer, and then plug it into an active telephone wall jack. 3 Remove the protective plug from the software program. Connecting to a computer with a modem Connect the printer to a computer with a modem • Three telephone cords • A telephone wall jack 2 Connect a telephone cord into the LINE port of the printer. 24

User's Guide
Page 25
... Name appears, and then press . 7 Use the keypad to type the user name, and then press . 8 Press to return to the EXT port of the printer. 4 Connect a second telephone cord from the telephone to the computer modem. 5 Connect a third telephone cord from the computer modem to the Ready state.
... Name appears, and then press . 7 Use the keypad to type the user name, and then press . 8 Press to return to the EXT port of the printer. 4 Connect a second telephone cord from the telephone to the computer modem. 5 Connect a third telephone cord from the computer modem to the Ready state.

User's Guide
Page 27
Installing options Installing a 530-sheet drawer The printer supports one optional drawer which allows an additional 530 sheets of paper to be loaded. CAUTION: If you are installing a 530-sheet drawer after setting up the printer, turn the printer off, and unplug the power cord before continuing. 1 Unpack the 530-sheet drawer, and remove any packing material. 2 Place the drawer in the location chosen for the printer. 3 Align the printer with the 530-sheet drawer, and lower the printer into place. 27
Installing options Installing a 530-sheet drawer The printer supports one optional drawer which allows an additional 530 sheets of paper to be loaded. CAUTION: If you are installing a 530-sheet drawer after setting up the printer, turn the printer off, and unplug the power cord before continuing. 1 Unpack the 530-sheet drawer, and remove any packing material. 2 Place the drawer in the location chosen for the printer. 3 Align the printer with the 530-sheet drawer, and lower the printer into place. 27
User's Guide
Page 28
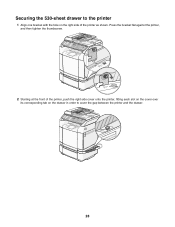
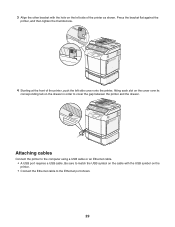
Securing the 530-sheet drawer to the printer 1 Align one bracket with the hole on the drawer in order to cover the gap between the printer and the drawer. 28 Press the bracket flat against the printer, and then tighten the thumbscrew. 2 Starting at the front of the printer, push the right side cover onto the printer, fitting each slot on the cover over its corresponding tab on the right side of the printer as shown.
Securing the 530-sheet drawer to the printer 1 Align one bracket with the hole on the drawer in order to cover the gap between the printer and the drawer. 28 Press the bracket flat against the printer, and then tighten the thumbscrew. 2 Starting at the front of the printer, push the right side cover onto the printer, fitting each slot on the cover over its corresponding tab on the right side of the printer as shown.
User's Guide
Page 29
... the Ethernet port shown. 29 Press the bracket flat against the printer, and then tighten the thumbscrew. 4 Starting at the front of the printer, push the left side of the printer as shown. Be sure to match the USB symbol on the cable with the hole on the left side cover onto the... printer, fitting each slot on the cover over its corresponding tab on the printer. • Connect the Ethernet cable to the computer using a USB cable or an Ethernet cable. • A USB port requires...
... the Ethernet port shown. 29 Press the bracket flat against the printer, and then tighten the thumbscrew. 4 Starting at the front of the printer, push the left side of the printer as shown. Be sure to match the USB symbol on the cable with the hole on the left side cover onto the... printer, fitting each slot on the cover over its corresponding tab on the printer. • Connect the Ethernet cable to the computer using a USB cable or an Ethernet cable. • A USB port requires...


