User's Guide
Page 20
... dialog To Adjust the print settings and schedule print jobs. • Access the printer utility. • Troubleshoot. • Order ink or supplies. • Contact Lexmark. • Check the printer software version installed on the computer. Use the Lexmark Fax Setup Utility to set the Speed Dial and Group Dial numbers, set Ringing and Answering, and...
... dialog To Adjust the print settings and schedule print jobs. • Access the printer utility. • Troubleshoot. • Order ink or supplies. • Contact Lexmark. • Check the printer software version installed on the computer. Use the Lexmark Fax Setup Utility to set the Speed Dial and Group Dial numbers, set Ringing and Answering, and...

User's Guide
Page 21
... a memory device to the computer over a network. Note: Your printer may not come with cartridge installation. • Print a test page. • Print an alignment page. • Clean the print cartridge nozzles. • Order ink or supplies. • Register the printer. • Contact customer support. Lexmark Printer Utility • Get help with these applications, depending on...
... a memory device to the computer over a network. Note: Your printer may not come with cartridge installation. • Print a test page. • Print an alignment page. • Clean the print cartridge nozzles. • Order ink or supplies. • Register the printer. • Contact customer support. Lexmark Printer Utility • Get help with these applications, depending on...
User's Guide
Page 22
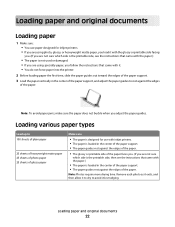
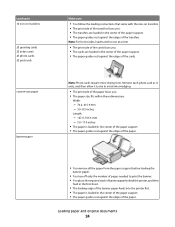
... of glossy paper Make sure • The paper is designed for use paper designed for inkjet printers. • If you are using specialty paper, you follow the instructions that came with the ...the paper guides. Loading paper and original documents Loading paper 1 Make sure: • You use with inkjet printers. • The paper is loaded in the center of the paper support. • The paper guides ...glossy, or heavyweight matte paper, you load it . • You do not force paper into the printer. 2 Before loading paper the first time, slide the paper guides out toward the edges of the paper...
... of glossy paper Make sure • The paper is designed for use paper designed for inkjet printers. • If you are using specialty paper, you follow the instructions that came with the ...the paper guides. Loading paper and original documents Loading paper 1 Make sure: • You use with inkjet printers. • The paper is loaded in the center of the paper support. • The paper guides ...glossy, or heavyweight matte paper, you load it . • You do not force paper into the printer. 2 Before loading paper the first time, slide the paper guides out toward the edges of the paper...
User's Guide
Page 23
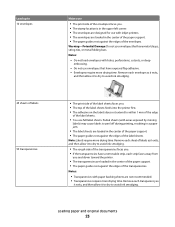
...ties, or metal folding bars. Remove each sheet of the transparencies. Remove each strip faces away from you and down toward the printer. • The transparencies are not recommended. • Transparencies require more drying time. Notes: • Transparencies with areas exposed... by missing labels) may cause labels to avoid ink smudging. • The rough side of the transparencies faces you. • If the transparencies have exposed flap adhesive. - Notes: ...
...ties, or metal folding bars. Remove each sheet of the transparencies. Remove each strip faces away from you and down toward the printer. • The transparencies are not recommended. • Transparencies require more drying time. Notes: • Transparencies with areas exposed... by missing labels) may cause labels to avoid ink smudging. • The rough side of the transparencies faces you. • If the transparencies have exposed flap adhesive. - Notes: ...
User's Guide
Page 24
Loading paper and original documents 24 Remove each photo card as it exits, and then allow it to dry to avoid ink smudging. • The print side of the paper faces you . • The cards are loaded in the center of the paper support. • The paper ... needed to print the banner. • You place the required stack of banner paper behind the printer, and then feed in the first sheet. • The leading edge of the banner paper feeds into the printer first. • The paper is loaded in the center of the paper support. • The paper...
Loading paper and original documents 24 Remove each photo card as it exits, and then allow it to dry to avoid ink smudging. • The print side of the paper faces you . • The cards are loaded in the center of the paper support. • The paper ... needed to print the banner. • You place the required stack of banner paper behind the printer, and then feed in the first sheet. • The leading edge of the banner paper feeds into the printer first. • The paper is loaded in the center of the paper support. • The paper...
User's Guide
Page 32
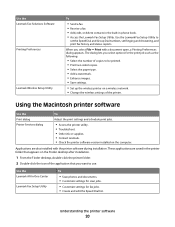
...Vista, click . • In Windows XP and earlier, click Start. Using Macintosh 1 While the document is great for use with Lexmark printers, but compatible with all brands of media that has a reverse image printed on it offers excellent image quality and outstanding value. •...to cancel, and then click Delete. It is the printable side, then see the instructions that came with all inkjet printers. It is used with Lexmark's evercolorTM inks for printing professional quality photos with a special coating. It is best when used specifically for eye-catching, color-rich ...
...Vista, click . • In Windows XP and earlier, click Start. Using Macintosh 1 While the document is great for use with Lexmark printers, but compatible with all brands of media that has a reverse image printed on it offers excellent image quality and outstanding value. •...to cancel, and then click Delete. It is the printable side, then see the instructions that came with all inkjet printers. It is used with Lexmark's evercolorTM inks for printing professional quality photos with a special coating. It is best when used specifically for eye-catching, color-rich ...
User's Guide
Page 35
...Paper Size dialog appears. 4 Set the paper size. 5 Select the measurement units to use (inches or millimeters). 6 Click OK to close any printer software dialogs that are set . c From the custom sizes list on the left of the dialog, double-click Untitled, and then type a name... for the custom paper size you want to avoid ink smudging. Note: Labels require more information, see the "Loading Paper" chapter. Using Windows 1 With a document open , choose File Print. 2 From the printer pop-up menu, choose the printer. 3 If necessary, click the disclosure triangle. 4 From the...
...Paper Size dialog appears. 4 Set the paper size. 5 Select the measurement units to use (inches or millimeters). 6 Click OK to close any printer software dialogs that are set . c From the custom sizes list on the left of the dialog, double-click Untitled, and then type a name... for the custom paper size you want to avoid ink smudging. Note: Labels require more information, see the "Loading Paper" chapter. Using Windows 1 With a document open , choose File Print. 2 From the printer pop-up menu, choose the printer. 3 If necessary, click the disclosure triangle. 4 From the...

User's Guide
Page 45
... an Out of Original Lexmark Ink message appears: 1 Click Learn More on the message. 2 Click Report a non-Lexmark print cartridge. Lexmark does not recommend use Lexmark supplies. For best results, use of failures or damage caused by a refilled cartridge. Maintaining the printer 45 To prevent the... more on the cartridge carrier latch to raise the cartridge carrier lid. 4 Remove the used print cartridge. Using genuine Lexmark print cartridges Lexmark printers, print cartridges, and photo paper are removing both cartridges, repeat step 3 and step 4 for superior print quality. The...
... an Out of Original Lexmark Ink message appears: 1 Click Learn More on the message. 2 Click Report a non-Lexmark print cartridge. Lexmark does not recommend use Lexmark supplies. For best results, use of failures or damage caused by a refilled cartridge. Maintaining the printer 45 To prevent the... more on the cartridge carrier latch to raise the cartridge carrier lid. 4 Remove the used print cartridge. Using genuine Lexmark print cartridges Lexmark printers, print cartridges, and photo paper are removing both cartridges, repeat step 3 and step 4 for superior print quality. The...
User's Guide
Page 46
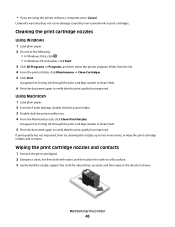
...6 Print the document again to two more times, or wipe the print cartridge nozzles and contacts. Lexmark's warranty does not cover damage caused by non-Lexmark ink or print cartridges. A page prints, forcing ink through the print cartridge nozzles to clean them . 5 Print the document again to verify that the... hold the nozzles against the cloth for about three seconds, and then wipe in the direction shown. • If you are using the printer without a computer, press Cancel. If print quality has not improved, then try cleaning the nozzles up to verify that the print quality has...
...6 Print the document again to two more times, or wipe the print cartridge nozzles and contacts. Lexmark's warranty does not cover damage caused by non-Lexmark ink or print cartridges. A page prints, forcing ink through the print cartridge nozzles to clean them . 5 Print the document again to verify that the... hold the nozzles against the cloth for about three seconds, and then wipe in the direction shown. • If you are using the printer without a computer, press Cancel. If print quality has not improved, then try cleaning the nozzles up to verify that the print quality has...
User's Guide
Page 47
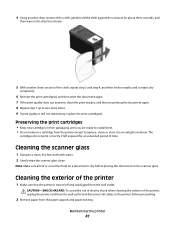
...of the cloth, gently hold the cloth against the contacts for an extended period of time. Note: Make sure all cables to the printer before placing the document on a document is turned off and unplugged from the paper support and paper exit tray. Preserving the print cartridges... when cleaning the exterior of the printer 1 Make sure that the printer is dry before proceeding. 2 Remove paper from the wall outlet. Maintaining the printer 47 Cleaning the exterior of the printer, unplug the power cord from the wall outlet and disconnect all ink or corrective fluid on the scanner ...
...of the cloth, gently hold the cloth against the contacts for an extended period of time. Note: Make sure all cables to the printer before placing the document on a document is turned off and unplugged from the paper support and paper exit tray. Preserving the print cartridges... when cleaning the exterior of the printer 1 Make sure that the printer is dry before proceeding. 2 Remove paper from the wall outlet. Maintaining the printer 47 Cleaning the exterior of the printer, unplug the power cord from the wall outlet and disconnect all ink or corrective fluid on the scanner ...
User's Guide
Page 48
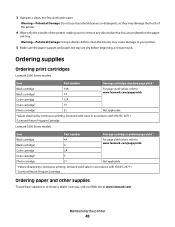
...obtained by continuous printing. Ordering supplies Ordering print cartridges Lexmark 2600 Series models Item Part number Average cartridge standard page yield 1 Black cartridge 14A Black cartridge2 14 For page yield values, refer to remove any ink residue that has accumulated on the paper exit tray.... Declared yield value in accordance with water. Warning-Potential Damage: Using a damp cloth to clean the interior may damage the finish of the printer. 4 Wipe only the outside of the printer, making sure to www.lexmark.com...
...obtained by continuous printing. Ordering supplies Ordering print cartridges Lexmark 2600 Series models Item Part number Average cartridge standard page yield 1 Black cartridge 14A Black cartridge2 14 For page yield values, refer to remove any ink residue that has accumulated on the paper exit tray.... Declared yield value in accordance with water. Warning-Potential Damage: Using a damp cloth to clean the interior may damage the finish of the printer. 4 Wipe only the outside of the printer, making sure to www.lexmark.com...
User's Guide
Page 52
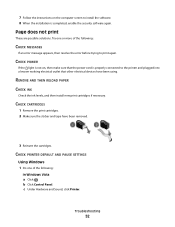
...is properly connected to the printer and plugged into a known working electrical outlet that other electrical devices have been removed. 3 Reinsert the cartridges. Try one of the following : In Windows Vista a Click . REMOVE AND THEN RELOAD PAPER CHECK INK Check the ink levels, and then install ...new print cartridges if necessary. CHECK CARTRIDGES 1 Remove the print cartridges. 2 Make sure the sticker and tape have been using. CHECK PRINTER DEFAULT AND PAUSE SETTINGS Using Windows 1 Do one or ...
...is properly connected to the printer and plugged into a known working electrical outlet that other electrical devices have been removed. 3 Reinsert the cartridges. Try one of the following : In Windows Vista a Click . REMOVE AND THEN RELOAD PAPER CHECK INK Check the ink levels, and then install ...new print cartridges if necessary. CHECK CARTRIDGES 1 Remove the print cartridges. 2 Make sure the sticker and tape have been using. CHECK PRINTER DEFAULT AND PAUSE SETTINGS Using Windows 1 Do one or ...
User's Guide
Page 62
... any subsequent user of this single use during the warranty period. PRINTER LICENSE AGREEMENT I agree that this patented printer is licensed for, and designed to work with only genuine Lexmark ink cartridges for the Software Program. I agree to: (1) use only genuine Lexmark ink cartridges with this printer (except I may include internet links to other software applications and...
... any subsequent user of this single use during the warranty period. PRINTER LICENSE AGREEMENT I agree that this patented printer is licensed for, and designed to work with only genuine Lexmark ink cartridges for the Software Program. I agree to: (1) use only genuine Lexmark ink cartridges with this printer (except I may include internet links to other software applications and...


