User's Guide
Page 4
... a fax...42 Receiving a fax automatically...42 Maintaining the printer 44 Maintaining print cartridges...44 Installing print cartridges...44 Removing used print cartridges...45 Refilling print cartridges...46 Using genuine Lexmark print cartridges...46 Wiping the print cartridge nozzles and contacts ...46 Preserving the print cartridges ...47 Cleaning the scanner glass...47 Cleaning the exterior of the printer...48...
... a fax...42 Receiving a fax automatically...42 Maintaining the printer 44 Maintaining print cartridges...44 Installing print cartridges...44 Removing used print cartridges...45 Refilling print cartridges...46 Using genuine Lexmark print cartridges...46 Wiping the print cartridge nozzles and contacts ...46 Preserving the print cartridges ...47 Cleaning the scanner glass...47 Cleaning the exterior of the printer...48...
User's Guide
Page 10
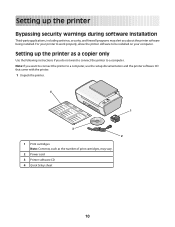
...firewall programs may vary. 2 Power cord 3 Printer software CD 4 Quick Setup sheet 10 Setting up the printer as the number of print cartridges, may alert you do not want to connect the printer to a computer, use the setup documentation and the printer software CD that came ...with the printer. 1 Unpack the printer. 4 1 2 1 3 3 2 1 Print cartridges Note: Contents, such as a copier only Use the following instructions if you about the printer software being installed. For your printer to work properly, allow...
...firewall programs may vary. 2 Power cord 3 Printer software CD 4 Quick Setup sheet 10 Setting up the printer as the number of print cartridges, may alert you do not want to connect the printer to a computer, use the setup documentation and the printer software CD that came ...with the printer. 1 Unpack the printer. 4 1 2 1 3 3 2 1 Print cartridges Note: Contents, such as a copier only Use the following instructions if you about the printer software being installed. For your printer to work properly, allow...
User's Guide
Page 12
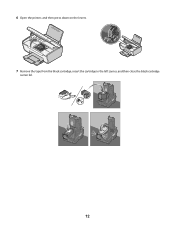
6 Open the printer, and then press down on the levers. 7 Remove the tape from the black cartridge, insert the cartridge in the left carrier, and then close the black cartridge carrier lid. 12
6 Open the printer, and then press down on the levers. 7 Remove the tape from the black cartridge, insert the cartridge in the left carrier, and then close the black cartridge carrier lid. 12
User's Guide
Page 13
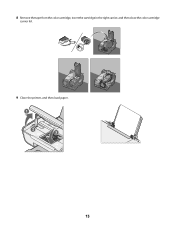
8 Remove the tape from the color cartridge, insert the cartridge in the right carrier, and then close the color cartridge carrier lid. 9 Close the printer, and then load paper. 1 2 3 13
8 Remove the tape from the color cartridge, insert the cartridge in the right carrier, and then close the color cartridge carrier lid. 9 Close the printer, and then load paper. 1 2 3 13
User's Guide
Page 16
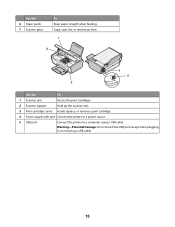
Copy, scan, fax, or remove an item. 1 2 4 5 3 Use the To 1 Scanner unit Access the print cartridges. 2 Scanner support Hold up the scanner unit. 3 Print cartridge carrier Install, replace, or remove a print cartridge. 4 Power supply with port Connect the printer to a power source. 5 USB port Connect the printer to a computer using a USB cable. Use the 6 Paper guide 7 Scanner glass To Keep paper straight when feeding. Warning-Potential Damage: Do not touch the USB port except when plugging in or removing a USB cable. 16
Copy, scan, fax, or remove an item. 1 2 4 5 3 Use the To 1 Scanner unit Access the print cartridges. 2 Scanner support Hold up the scanner unit. 3 Print cartridge carrier Install, replace, or remove a print cartridge. 4 Power supply with port Connect the printer to a power source. 5 USB port Connect the printer to a computer using a USB cable. Use the 6 Paper guide 7 Scanner glass To Keep paper straight when feeding. Warning-Potential Damage: Do not touch the USB port except when plugging in or removing a USB cable. 16

User's Guide
Page 18
light • Determine if the color print cartridge is missing or invalid. 18 light • Determine if the black or photo print cartridge is missing or invalid. 3 The • Determine if the black or photo print cartridge needs to be replaced. 1 2 3 Check To 1 The display Determine the number of copies to be printed. 2 The • Determine if the color print cartridge needs to be replaced.
light • Determine if the color print cartridge is missing or invalid. 18 light • Determine if the black or photo print cartridge is missing or invalid. 3 The • Determine if the black or photo print cartridge needs to be replaced. 1 2 3 Check To 1 The display Determine the number of copies to be printed. 2 The • Determine if the color print cartridge needs to be replaced.
User's Guide
Page 22
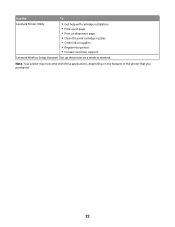
Note: Your printer may not come with cartridge installation. • Print a test page. • Print an alignment page. • Clean the print cartridge nozzles. • Order ink or supplies. • Register the printer. • Contact customer support. Lexmark Wireless Setup Assistant Set up the printer on the features of the printer that you purchased. 22 Use the To Lexmark Printer Utility • Get help with these applications, depending on a wireless network.
Note: Your printer may not come with cartridge installation. • Print a test page. • Print an alignment page. • Clean the print cartridge nozzles. • Order ink or supplies. • Register the printer. • Contact customer support. Lexmark Wireless Setup Assistant Set up the printer on the features of the printer that you purchased. 22 Use the To Lexmark Printer Utility • Get help with these applications, depending on a wireless network.
User's Guide
Page 44
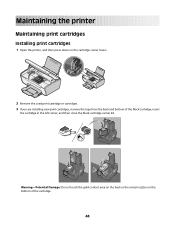
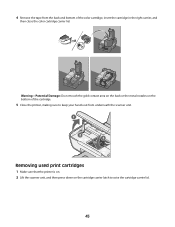
Warning-Potential Damage: Do not touch the gold contact area on the back or the metal nozzles on the cartridge carrier levers. 2 Remove the used print cartridge or cartridges. 3 If you are installing new print cartridges, remove the tape from the back and bottom of the cartridge. 44 Maintaining the printer Maintaining print cartridges Installing print cartridges 1 Open the printer, and then press down on the bottom of the black cartridge, insert the cartridge in the left carrier, and then close the black cartridge carrier lid.
Warning-Potential Damage: Do not touch the gold contact area on the back or the metal nozzles on the cartridge carrier levers. 2 Remove the used print cartridge or cartridges. 3 If you are installing new print cartridges, remove the tape from the back and bottom of the cartridge. 44 Maintaining the printer Maintaining print cartridges Installing print cartridges 1 Open the printer, and then press down on the bottom of the black cartridge, insert the cartridge in the left carrier, and then close the black cartridge carrier lid.
User's Guide
Page 45
Warning-Potential Damage: Do not touch the gold contact area on the back or the metal nozzles on the cartridge carrier latch to keep your hands out from the back and bottom of the color cartridge, insert the cartridge in the right carrier, and then close the color cartridge carrier lid. 4 Remove the tape from underneath the scanner unit. 1 2 3 Removing used print cartridges 1 Make sure that the printer is on. 2 Lift the scanner unit, and then press down on the bottom of the cartridge. 5 Close the printer, making sure to raise the cartridge carrier lid. 45
Warning-Potential Damage: Do not touch the gold contact area on the back or the metal nozzles on the cartridge carrier latch to keep your hands out from the back and bottom of the color cartridge, insert the cartridge in the right carrier, and then close the color cartridge carrier lid. 4 Remove the tape from underneath the scanner unit. 1 2 3 Removing used print cartridges 1 Make sure that the printer is on. 2 Lift the scanner unit, and then press down on the bottom of the cartridge. 5 Close the printer, making sure to raise the cartridge carrier lid. 45
User's Guide
Page 46
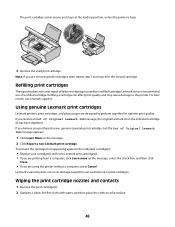
.... 46 Using genuine Lexmark print cartridges Lexmark printers, print cartridges, and photo paper are removing both cartridges, then repeat step 3 and step 4 for the second cartridge. Lexmark's warranty does not cover damage caused by a refilled cartridge. Note: If you purchased a new, genuine Lexmark print cartridge, but the Out of Original Lexmark Ink message, the original Lexmark ink in the indicated cartridge (s) has been...
.... 46 Using genuine Lexmark print cartridges Lexmark printers, print cartridges, and photo paper are removing both cartridges, then repeat step 3 and step 4 for the second cartridge. Lexmark's warranty does not cover damage caused by a refilled cartridge. Note: If you purchased a new, genuine Lexmark print cartridge, but the Out of Original Lexmark Ink message, the original Lexmark ink in the indicated cartridge (s) has been...
User's Guide
Page 47
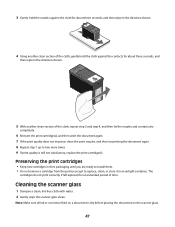
...printer except to two more times. 9 If print quality is dry before placing the document on a document is still not satisfactory, replace the print cartridge(s). Cleaning the scanner glass 1 Dampen a clean, lint-free cloth with water. 2 Gently wipe the scanner glass clean. 3 Gently hold the ... Using another clean section of the cloth, repeat step 3 and step 4, and then let the nozzles and contacts dry completely. 6 Reinsert the print cartridge(s), and then print the document again. 7 If the print quality does not improve, clean the print nozzles, and then try printing the document again...
...printer except to two more times. 9 If print quality is dry before placing the document on a document is still not satisfactory, replace the print cartridge(s). Cleaning the scanner glass 1 Dampen a clean, lint-free cloth with water. 2 Gently wipe the scanner glass clean. 3 Gently hold the ... Using another clean section of the cloth, repeat step 3 and step 4, and then let the nozzles and contacts dry completely. 6 Reinsert the print cartridge(s), and then print the document again. 7 If the print quality does not improve, clean the print nozzles, and then try printing the document again...
User's Guide
Page 48
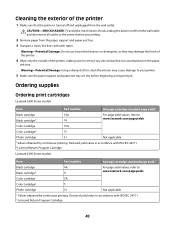
... paper exit tray. 3 Dampen a clean, lint-free cloth with ISO/IEC 24711 2Licensed Return Program Cartridge Lexmark 2690 Series models Item Part number Average cartridge standard page yield 1 Black cartridge 4A Black cartridge2 4 For page yield values, refer to www.lexmark.com/pageyields. Declared yield value in accordance with ISO/IEC 24711 2 Licensed Return Program...
... paper exit tray. 3 Dampen a clean, lint-free cloth with ISO/IEC 24711 2Licensed Return Program Cartridge Lexmark 2690 Series models Item Part number Average cartridge standard page yield 1 Black cartridge 4A Black cartridge2 4 For page yield values, refer to www.lexmark.com/pageyields. Declared yield value in accordance with ISO/IEC 24711 2 Licensed Return Program...
User's Guide
Page 49
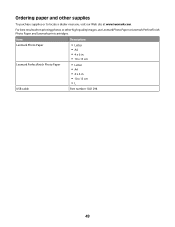
Item Description Lexmark Photo Paper Lexmark PerfectFinish Photo Paper • Letter • A4 • 4 x 6 in. • 10 x 15 cm • Letter • A4 • 4 x 6 in. • 10 x 15 cm •L USB cable Part number 1021294 49 Ordering paper and other high-quality images, use Lexmark Photo Paper or Lexmark PerfectFinish Photo Paper and Lexmark print cartridges. For best results when printing photos or other supplies To purchase supplies or to locate a dealer near you, visit our Web site at www.lexmark.com.
Item Description Lexmark Photo Paper Lexmark PerfectFinish Photo Paper • Letter • A4 • 4 x 6 in. • 10 x 15 cm • Letter • A4 • 4 x 6 in. • 10 x 15 cm •L USB cable Part number 1021294 49 Ordering paper and other high-quality images, use Lexmark Photo Paper or Lexmark PerfectFinish Photo Paper and Lexmark print cartridges. For best results when printing photos or other supplies To purchase supplies or to locate a dealer near you, visit our Web site at www.lexmark.com.
User's Guide
Page 52
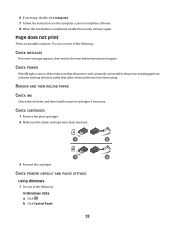
... Panel. 52 REMOVE AND THEN RELOAD PAPER CHECK INK Check the ink levels, and then install new print cartridges if necessary. Page does not print These are possible solutions. CHECK CARTRIDGES 1 Remove the print cartridges. 2 Make sure the sticker and tape have been using. CHECK PRINTER DEFAULT AND PAUSE SETTINGS Using Windows 1 Do... Windows Vista a Click . 6 If necessary, double-click setup.exe. 7 Follow the instructions on , then make sure that other electrical devices have been removed. 1 2 1 2 3 Reinsert the cartridges.
... Panel. 52 REMOVE AND THEN RELOAD PAPER CHECK INK Check the ink levels, and then install new print cartridges if necessary. Page does not print These are possible solutions. CHECK CARTRIDGES 1 Remove the print cartridges. 2 Make sure the sticker and tape have been using. CHECK PRINTER DEFAULT AND PAUSE SETTINGS Using Windows 1 Do... Windows Vista a Click . 6 If necessary, double-click setup.exe. 7 Follow the instructions on , then make sure that other electrical devices have been removed. 1 2 1 2 3 Reinsert the cartridges.
User's Guide
Page 64
...warranty. 2 DISCLAIMER AND LIMITATION OF WARRANTIES. LEXMARK SOFTWARE LICENSE AGREEMENT This Software License Agreement ("License Agreement") is a legal agreement between you (either an individual or a single entity) and Lexmark International, Inc. ("Lexmark") that cartridge. IF YOU DO NOT AGREE WITH THE... return this single use during the warranty period. Lexmark warrants that the media (e.g., diskette or compact disk) on or provided by Lexmark for the Software Program. 64 Lexmark will remain in the cartridge when replacement is delivered to stop working after delivering...
...warranty. 2 DISCLAIMER AND LIMITATION OF WARRANTIES. LEXMARK SOFTWARE LICENSE AGREEMENT This Software License Agreement ("License Agreement") is a legal agreement between you (either an individual or a single entity) and Lexmark International, Inc. ("Lexmark") that cartridge. IF YOU DO NOT AGREE WITH THE... return this single use during the warranty period. Lexmark warrants that the media (e.g., diskette or compact disk) on or provided by Lexmark for the Software Program. 64 Lexmark will remain in the cartridge when replacement is delivered to stop working after delivering...
User's Guide
Page 68
...Feed 17 Power 17 Scan 17 Up arrow 17 C canceling print jobs 32 scan job 41 cards loading 25 cartridges, print installing 44 ordering 48 preserving 47 removing 45 using genuine Lexmark 46 wiping 46 cleaning exterior of the printer 48 copying 39 4 x 6 photos 39 custom-size paper, ... 28 glossy paper, loading 23 greeting cards loading 25 H heavyweight matte paper, loading 23 I index cards loading 25 information, finding 8 installing print cartridges 44 printer software 19, 54 iron-on transfers, loading 25 L labels, loading 24 labels, printing 35 last page first, printing 30 loading banner paper...
...Feed 17 Power 17 Scan 17 Up arrow 17 C canceling print jobs 32 scan job 41 cards loading 25 cartridges, print installing 44 ordering 48 preserving 47 removing 45 using genuine Lexmark 46 wiping 46 cleaning exterior of the printer 48 copying 39 4 x 6 photos 39 custom-size paper, ... 28 glossy paper, loading 23 greeting cards loading 25 H heavyweight matte paper, loading 23 I index cards loading 25 information, finding 8 installing print cartridges 44 printer software 19, 54 iron-on transfers, loading 25 L labels, loading 24 labels, printing 35 last page first, printing 30 loading banner paper...
User's Guide
Page 69
...33 postcards loading 25 power button is not lit 50 power supply port 16 print cartridge carrier 16 print cartridges installing 44 ordering 48 preserving 47 refilling 46 removing 45 using genuine Lexmark 46 wiping 46 print jobs, canceling 32 print settings saving and deleting 37 printer...page order 30 specialty documents 37 Web page 28 publications, finding 8 R receiving a fax 42 recycling WEEE statement 62 refilling print cartridges 46 removing print cartridges 45 reverse page order 30 S safety information 7 saving and deleting print settings 37 scanner glass 16 cleaning 47 loading documents 26,...
...33 postcards loading 25 power button is not lit 50 power supply port 16 print cartridge carrier 16 print cartridges installing 44 ordering 48 preserving 47 refilling 46 removing 45 using genuine Lexmark 46 wiping 46 print jobs, canceling 32 print settings saving and deleting 37 printer...page order 30 specialty documents 37 Web page 28 publications, finding 8 R receiving a fax 42 recycling WEEE statement 62 refilling print cartridges 46 removing print cartridges 45 reverse page order 30 S safety information 7 saving and deleting print settings 37 scanner glass 16 cleaning 47 loading documents 26,...


