User's Guide
Page 4
......37 Copying 39 Making a copy...39 Copying 4 x 6 photos...39 Scanning 40 Scanning original documents...40 Canceling scan jobs...41 Faxing 42 Sending a fax...42 Receiving a fax automatically...42 Maintaining the printer 44 Maintaining print cartridges...44 Installing print cartridges...44 Removing used print... Refilling print cartridges...46 Using genuine Lexmark print cartridges...46 Wiping the print cartridge nozzles and contacts ...46 Preserving the print cartridges ...47 Cleaning the scanner glass...47 Cleaning the exterior of the printer...48 Ordering supplies...48 Ordering print ...
......37 Copying 39 Making a copy...39 Copying 4 x 6 photos...39 Scanning 40 Scanning original documents...40 Canceling scan jobs...41 Faxing 42 Sending a fax...42 Receiving a fax automatically...42 Maintaining the printer 44 Maintaining print cartridges...44 Installing print cartridges...44 Removing used print... Refilling print cartridges...46 Using genuine Lexmark print cartridges...46 Wiping the print cartridge nozzles and contacts ...46 Preserving the print cartridges ...47 Cleaning the scanner glass...47 Cleaning the exterior of the printer...48 Ordering supplies...48 Ordering print ...
User's Guide
Page 16
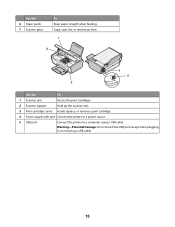
Use the 6 Paper guide 7 Scanner glass To Keep paper straight when feeding. Copy, scan, fax, or remove an item. 1 2 4 5 3 Use the To 1 Scanner unit Access the print cartridges. 2 Scanner support Hold up the scanner unit. 3 Print cartridge carrier Install, replace, or remove a print cartridge. 4 Power supply with port Connect the printer to a power source. 5 USB port Connect the printer to a computer using a USB cable. Warning-Potential Damage: Do not touch the USB port except when plugging in or removing a USB cable. 16
Use the 6 Paper guide 7 Scanner glass To Keep paper straight when feeding. Copy, scan, fax, or remove an item. 1 2 4 5 3 Use the To 1 Scanner unit Access the print cartridges. 2 Scanner support Hold up the scanner unit. 3 Print cartridge carrier Install, replace, or remove a print cartridge. 4 Power supply with port Connect the printer to a power source. 5 USB port Connect the printer to a computer using a USB cable. Warning-Potential Damage: Do not touch the USB port except when plugging in or removing a USB cable. 16

User's Guide
Page 17
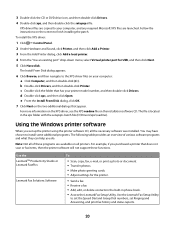
Using the printer control panel 1 2 8 3 4 7 5 6 Press 1 To Start a color copy of a document or photo. 2 Start a black-and-white copy of a document or photo. 3 Start a 4 x 6-inch color photo copy. 4 Scan a document or photo to the computer. 5 Load or eject paper. 6 • Turn the printer on or off. • Cancel a print, copy, or scan job in progress. • Reset the printer. 7 Cancel a print, copy, or scan job in progress. 8 Set the number of copies. 17
Using the printer control panel 1 2 8 3 4 7 5 6 Press 1 To Start a color copy of a document or photo. 2 Start a black-and-white copy of a document or photo. 3 Start a 4 x 6-inch color photo copy. 4 Scan a document or photo to the computer. 5 Load or eject paper. 6 • Turn the printer on or off. • Cancel a print, copy, or scan job in progress. • Reset the printer. 7 Cancel a print, copy, or scan job in progress. 8 Set the number of copies. 17
User's Guide
Page 20
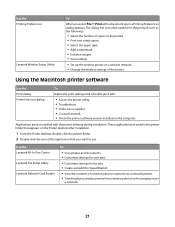
... the installation software CD. Use the LexmarkTM Productivity Studio or Lexmark FastPics Lexmark Fax Solutions Software To • Scan, copy, fax, e-mail, or print a photo or document. • Transfer photos. • Make photo greeting cards. • Adjust settings for USB, and then click Next. 5 Click Have disk. The... contacts in the built-in the xps folder with the setupxps batch file (D:\Drivers\xps\readme). Using the Windows printer software When you purchased a printer that has your computer, and any required Microsoft XPS files are copied to set the Speed Dial and Group Dial...
... the installation software CD. Use the LexmarkTM Productivity Studio or Lexmark FastPics Lexmark Fax Solutions Software To • Scan, copy, fax, e-mail, or print a photo or document. • Transfer photos. • Make photo greeting cards. • Adjust settings for USB, and then click Next. 5 Click Have disk. The... contacts in the built-in the xps folder with the setupxps batch file (D:\Drivers\xps\readme). Using the Windows printer software When you purchased a printer that has your computer, and any required Microsoft XPS files are copied to set the Speed Dial and Group Dial...
User's Guide
Page 21
.... • Save settings. • Set up the wireless printer on the computer. These applications are also installed with a document open, a Printing Preferences dialog appears. Use the Lexmark All-In-One Center Lexmark Fax Setup Utility Lexmark Network Card Reader To • Scan photos and documents. • Customize settings for scan jobs. • Customize settings for the print job...
.... • Save settings. • Set up the wireless printer on the computer. These applications are also installed with a document open, a Printing Preferences dialog appears. Use the Lexmark All-In-One Center Lexmark Fax Setup Utility Lexmark Network Card Reader To • Scan photos and documents. • Customize settings for scan jobs. • Customize settings for the print job...
User's Guide
Page 26
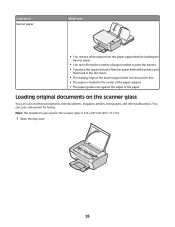
Loading original documents on the scanner glass You can scan a document for the scanner glass is loaded in .). 1 Open the top cover. 26 Note: The maximum scan area for faxing. Load up to banner paper Make sure • You remove all the paper from the paper support before loading the...leading edge of the banner paper feeds into the printer first. • The paper is 216 x 297 mm (8.5 x 11.7 in the center of the paper support. • The paper guides rest against the edges of the paper. You can scan and then print photos, text documents, magazine articles, newspapers, and other ...
Loading original documents on the scanner glass You can scan a document for the scanner glass is loaded in .). 1 Open the top cover. 26 Note: The maximum scan area for faxing. Load up to banner paper Make sure • You remove all the paper from the paper support before loading the...leading edge of the banner paper feeds into the printer first. • The paper is 216 x 297 mm (8.5 x 11.7 in the center of the paper support. • The paper guides rest against the edges of the paper. You can scan and then print photos, text documents, magazine articles, newspapers, and other ...

User's Guide
Page 27
2 Place the original document or item facedown on the scanned image. 27 Note: Photos should be loaded as shown. 3 Close the top cover to avoid dark edges on the scanner glass in the lower right corner.
2 Place the original document or item facedown on the scanned image. 27 Note: Photos should be loaded as shown. 3 Close the top cover to avoid dark edges on the scanner glass in the lower right corner.
User's Guide
Page 40
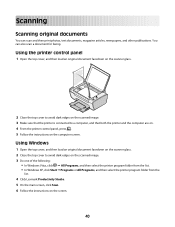
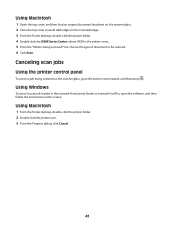
... cover, and then load an original document facedown on the scanner glass. 2 Close the top cover to avoid dark edges on the scanned image. 3 Make sure that the printer is connected to avoid dark edges on the scanned image. 3 Do one of the following: • In Windows Vista, click &#... Programs, and then select the printer program folder from the list. 4 Click Lexmark Productivity Studio. 5 On the main screen, click Scan. 6 Follow the instructions on the computer screen. Using Windows 1 Open the top cover, and then load an original document facedown on the scanner glass. 2 Close the top cover...
... cover, and then load an original document facedown on the scanner glass. 2 Close the top cover to avoid dark edges on the scanned image. 3 Make sure that the printer is connected to avoid dark edges on the scanned image. 3 Do one of the following: • In Windows Vista, click &#... Programs, and then select the printer program folder from the list. 4 Click Lexmark Productivity Studio. 5 On the main screen, click Scan. 6 Follow the instructions on the computer screen. Using Windows 1 Open the top cover, and then load an original document facedown on the scanner glass. 2 Close the top cover...
User's Guide
Page 41
...Lexmark Productivity Studio or Lexmark FastPics, open the software, and then follow the instructions on the scanned image. 3 From the Finder desktop, double-click the printer folder. 4 Double-click the XXXX Series Center, where XXXX is the printer series. 5 From the "What is being scanned on the scanner glass, go to be scanned. 6 Click Scan.... list, choose the type of document to the printer control panel, and then press . Using Macintosh 1...
...Lexmark Productivity Studio or Lexmark FastPics, open the software, and then follow the instructions on the scanned image. 3 From the Finder desktop, double-click the printer folder. 4 Double-click the XXXX Series Center, where XXXX is the printer series. 5 From the "What is being scanned on the scanner glass, go to be scanned. 6 Click Scan.... list, choose the type of document to the printer control panel, and then press . Using Macintosh 1...
User's Guide
Page 62
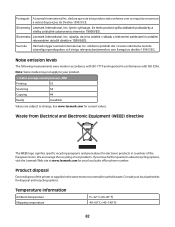
... relevanta bestämmelser som framgår av direktiv 1999/5/EG. Português A Lexmark International Inc. Consult your local authorities for your product. 1-meter average sound pressure, dBA Printing 53 Scanning 34 Copying Ready 44 inaudible Values are subject to change. Waste from Electrical and Electronic...com os requisitos essenciais e outras disposições da Diretiva 1999/5/CE. We encourage the recycling of the printer or supplies in countries of the European Union. See www.lexmark.com for electronic products in the same manner as normal household waste.
... relevanta bestämmelser som framgår av direktiv 1999/5/EG. Português A Lexmark International Inc. Consult your local authorities for your product. 1-meter average sound pressure, dBA Printing 53 Scanning 34 Copying Ready 44 inaudible Values are subject to change. Waste from Electrical and Electronic...com os requisitos essenciais e outras disposições da Diretiva 1999/5/CE. We encourage the recycling of the printer or supplies in countries of the European Union. See www.lexmark.com for electronic products in the same manner as normal household waste.

User's Guide
Page 63
... is equivalent to your product. The Power Saver Mode is generating hard-copy output from the wall outlet. See www.lexmark.com for this product (in the previous table represent time-averaged measurements. Since power consumption claims are subject to calculate ...the total product energy usage. Scanning The product is scanning hard-copy documents. 7.24 Ready The product is waiting for a specified period of the product. Mode Printing Description Power...
... is equivalent to your product. The Power Saver Mode is generating hard-copy output from the wall outlet. See www.lexmark.com for this product (in the previous table represent time-averaged measurements. Since power consumption claims are subject to calculate ...the total product energy usage. Scanning The product is scanning hard-copy documents. 7.24 Ready The product is waiting for a specified period of the product. Mode Printing Description Power...
User's Guide
Page 68
...6 color copy 39 buttons, printer control panel 4 x 6 Copy 17 Black Copy 17 Cancel 17 Color Copy 17 Paper Feed 17 Power 17 Scan 17 Up arrow 17 C canceling print jobs 32 scan job 41 cards loading 25 cartridges, print installing 44 ordering 48 preserving 47 removing 45 using genuine Lexmark 46 ...wiping 46 cleaning exterior of the printer 48 copying 39 4 x 6 photos 39 custom-size paper, loading 25, 36 custom-size paper, printing 36 D document multiple copies, printing 29 documents loading on scanner glass 40 loading on the scanner glass 26 printing 28 scanning using FastPics...
...6 color copy 39 buttons, printer control panel 4 x 6 Copy 17 Black Copy 17 Cancel 17 Color Copy 17 Paper Feed 17 Power 17 Scan 17 Up arrow 17 C canceling print jobs 32 scan job 41 cards loading 25 cartridges, print installing 44 ordering 48 preserving 47 removing 45 using genuine Lexmark 46 ...wiping 46 cleaning exterior of the printer 48 copying 39 4 x 6 photos 39 custom-size paper, loading 25, 36 custom-size paper, printing 36 D document multiple copies, printing 29 documents loading on scanner glass 40 loading on the scanner glass 26 printing 28 scanning using FastPics...
User's Guide
Page 69
...port 16 print cartridge carrier 16 printer control panel 15 scanner glass 16 scanner support 16 scanner unit 16 top cover 15 USB port 16 photo cards, loading 25 photo paper, loading 23 photos copying 4 x 6 photos 39 loading on the scanner glass 26 printing photos using FastPics or Productivity Studio ... saving and deleting print settings 37 scanner glass 16 cleaning 47 loading documents 26, 40 scanner support 16 scanner unit 16 scanning canceling a scan 41 using All-In-One Center (Macintosh) 40 using FastPics or Productivity Studio 40 using the printer control panel 40 security information 10 ...
...port 16 print cartridge carrier 16 printer control panel 15 scanner glass 16 scanner support 16 scanner unit 16 top cover 15 USB port 16 photo cards, loading 25 photo paper, loading 23 photos copying 4 x 6 photos 39 loading on the scanner glass 26 printing photos using FastPics or Productivity Studio ... saving and deleting print settings 37 scanner glass 16 cleaning 47 loading documents 26, 40 scanner support 16 scanner unit 16 scanning canceling a scan 41 using All-In-One Center (Macintosh) 40 using FastPics or Productivity Studio 40 using the printer control panel 40 security information 10 ...


