
User's Guide
Page 1
1200 Series All-In-One User's Guide
1200 Series All-In-One User's Guide

User's Guide
Page 2
..., program, or service may not always be used . UNITED STATES GOVERNMENT RIGHTS This software and any accompanying documentation provided under this statement may be obvious. The safety features of specific Lexmark components. Changes are periodically made at any time. Evaluation and verification of operation in conjunction with the use of some parts may be addressed to Lexmark International, Inc., Department F95/032-2, 740 West New Circle...
..., program, or service may not always be used . UNITED STATES GOVERNMENT RIGHTS This software and any accompanying documentation provided under this statement may be obvious. The safety features of specific Lexmark components. Changes are periodically made at any time. Evaluation and verification of operation in conjunction with the use of some parts may be addressed to Lexmark International, Inc., Department F95/032-2, 740 West New Circle...

User's Guide
Page 3
... All-In-One 4 Setting up the All-In-One 4 Understanding the parts of the All-In-One 4 Using the control panel 5 Understanding the software 5 Using the Lexmark All-In-One Center 5 Using Print Properties 7 Using the Lexmark Solution Center 8 Using the Lexmark Photo Editor 9 Using the All-In-One 9 Printing 9 Scanning 11 Copying 12 Faxing 12 Creating fun projects 13 Replacing print cartridges 13 Troubleshooting 14 Troubleshooting checklist 14 Setup troubleshooting 14 Printing troubleshooting 15 Scanning, copying, and faxing troubleshooting ........16 Removing and reinstalling...
... All-In-One 4 Setting up the All-In-One 4 Understanding the parts of the All-In-One 4 Using the control panel 5 Understanding the software 5 Using the Lexmark All-In-One Center 5 Using Print Properties 7 Using the Lexmark Solution Center 8 Using the Lexmark Photo Editor 9 Using the All-In-One 9 Printing 9 Scanning 11 Copying 12 Faxing 12 Creating fun projects 13 Replacing print cartridges 13 Troubleshooting 14 Troubleshooting checklist 14 Setup troubleshooting 14 Printing troubleshooting 15 Scanning, copying, and faxing troubleshooting ........16 Removing and reinstalling...
User's Guide
Page 4
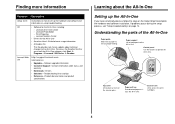
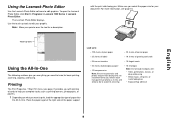
... file provides last-minute updates about technical changes to the All-In-One. Control panel Use the buttons to hold paper as it exits the All-In-One. Paper exit tray Extend to operate the All-In-One. Print Properties - If problems occur during the setup process, see "Setup troubleshooting" on the Setup Sheet to complete the hardware and software installation. Paper support Lift to access the print cartridges. 4 Scanner unit Lift to load paper into the All-In-One. To access the Readme file...
... file provides last-minute updates about technical changes to the All-In-One. Control panel Use the buttons to hold paper as it exits the All-In-One. Paper exit tray Extend to operate the All-In-One. Print Properties - If problems occur during the setup process, see "Setup troubleshooting" on the Setup Sheet to complete the hardware and software installation. Paper support Lift to access the print cartridges. 4 Scanner unit Lift to load paper into the All-In-One. To access the Readme file...

User's Guide
Page 5
...1 2 1 2 3 USB cable Power cord Using the control panel The All-In-One has a control panel that lets you scan and copy with the press of four main components: • The Lexmark 1200 Series All-In-One Center (scanning, copying, and faxing) • Print Properties (printing) • The Lexmark Solution Center (troubleshooting, maintenance, and cartridge ordering information) • The Lexmark Photo Editor (editing graphics) Using the Lexmark All-In-One Center Use the Lexmark 1200 Series All-In-One Center software to scan, copy, and fax documents.There are three ways to make copies...
...1 2 1 2 3 USB cable Power cord Using the control panel The All-In-One has a control panel that lets you scan and copy with the press of four main components: • The Lexmark 1200 Series All-In-One Center (scanning, copying, and faxing) • Print Properties (printing) • The Lexmark Solution Center (troubleshooting, maintenance, and cartridge ordering information) • The Lexmark Photo Editor (editing graphics) Using the Lexmark All-In-One Center Use the Lexmark 1200 Series All-In-One Center software to scan, copy, and fax documents.There are three ways to make copies...
User's Guide
Page 6
... scanned image to view all settings. The View Saved Images page consists of four main sections: Scan, Copy, Creative Tasks, and Preview. Print a Copy... • Choose the quantity and color of your copies. • Select a quality setting for your copies. • Adjust the size of image is being scanned. • Choose how the scan will be used. Choose from these topics: • Maintain or fix quality problems • Troubleshoot All-In-One problems • Device status and ink...
... scanned image to view all settings. The View Saved Images page consists of four main sections: Scan, Copy, Creative Tasks, and Preview. Print a Copy... • Choose the quantity and color of your copies. • Select a quality setting for your copies. • Adjust the size of image is being scanned. • Choose how the scan will be used. Choose from these topics: • Maintain or fix quality problems • Troubleshoot All-In-One problems • Device status and ink...
User's Guide
Page 7
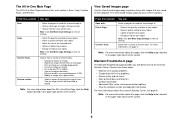
.../Speed setting. Print Color Images in black and white. Layout - You can change these settings, open Print Properties. Print Properties Quality Copies tab and I Want To" menu Select one of the projects from the menu, and then click the Help button on both sides of the Print Properties software: Quality/Copies, Paper Setup, and Print Layout. "I Want To menu Print Properties tabs Use the Quality/ Copies, Paper Setup, and Print Layout tabs to print color images in Black and White - Type - Select this to select the print settings. You can open Print...
.../Speed setting. Print Color Images in black and white. Layout - You can change these settings, open Print Properties. Print Properties Quality Copies tab and I Want To" menu Select one of the projects from the menu, and then click the Help button on both sides of the Print Properties software: Quality/Copies, Paper Setup, and Print Layout. "I Want To menu Print Properties tabs Use the Quality/ Copies, Paper Setup, and Print Layout tabs to print color images in Black and White - Type - Select this to select the print settings. You can open Print...
User's Guide
Page 8
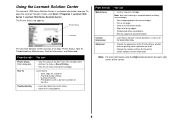
...Printer Status tab appears. To open the Lexmark Solution Center, click Start Programs Lexmark 1200 Series Lexmark 1200 Series Solution Center. For example, while printing, the status is Busy Printing. • View the ink levels of the Printing Status window and turn printing voice notification on or off. • Change the network settings for new cartridges. • Print a test page. • Clean to fix horizontal streaks. • Align to fix blurry edges. • Troubleshoot other ink problems. • Remove Japanese postcard residue. • Learn how to : • Scan, copy, fax...
...Printer Status tab appears. To open the Lexmark Solution Center, click Start Programs Lexmark 1200 Series Lexmark 1200 Series Solution Center. For example, while printing, the status is Busy Printing. • View the ink levels of the Printing Status window and turn printing voice notification on or off. • Change the network settings for new cartridges. • Print a test page. • Clean to fix horizontal streaks. • Align to fix blurry edges. • Troubleshoot other ink problems. • Remove Japanese postcard residue. • Learn how to : • Scan, copy, fax...
User's Guide
Page 9
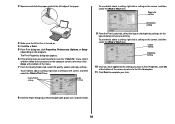
... you with printing wizards to know for basic printing, scanning, copying, and faxing. Printing The Print Properties "I Want To" menu (see page 10. Touch-up tools to edit graphics. Use the touch-up tools Using the All-In-One The following sections give you everything you . English Using the Lexmark Photo Editor Use the Lexmark Photo Editor software to edit your document. To open the Lexmark Photo Editor, click Start Programs Lexmark 1200 Series Lexmark Photo Editor. The Lexmark Photo Editor displays.
... you with printing wizards to know for basic printing, scanning, copying, and faxing. Printing The Print Properties "I Want To" menu (see page 10. Touch-up tools to edit graphics. Use the touch-up tools Using the All-In-One The following sections give you everything you . English Using the Lexmark Photo Editor Use the Lexmark Photo Editor software to edit your document. To open the Lexmark Photo Editor, click Start Programs Lexmark 1200 Series Lexmark Photo Editor. The Lexmark Photo Editor displays.
User's Guide
Page 10
Quality/Speed settings Copy settings 9 From the Print Layout tab, select the layout and duplexing settings for the type of document you want to perform is turned on. 4 Click File Print. 5 From Print dialog box, click Properties, Preferences, Options, or Setup (depending on the program). Paper size setting Orientation setting 3 Make sure the All-In-One is on the "I Want To" menu, click it, and then follow the instructions on the screen, and then select the...
Quality/Speed settings Copy settings 9 From the Print Layout tab, select the layout and duplexing settings for the type of document you want to perform is turned on. 4 Click File Print. 5 From Print dialog box, click Properties, Preferences, Options, or Setup (depending on the program). Paper size setting Orientation setting 3 Make sure the All-In-One is on the "I Want To" menu, click it, and then follow the instructions on the screen, and then select the...
User's Guide
Page 11
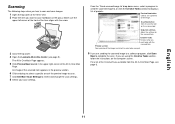
... arrow 3 Close the top cover. 4 Open the Lexmark All-In-One Center (see page 5). From the "Send scanned image to" drop-down menu, select a program to send the scanned image to, or click the Creative Tasks section to display a list of the preview image to scan. 7 Click See More Scan Settings to review and change the scan settings. 8 Select your scan settings. Copy now settings Adjust the settings for the scanned item. An image of the scanned item appears in the upper...
... arrow 3 Close the top cover. 4 Open the Lexmark All-In-One Center (see page 5). From the "Send scanned image to" drop-down menu, select a program to send the scanned image to, or click the Creative Tasks section to display a list of the preview image to scan. 7 Click See More Scan Settings to review and change the scan settings. 8 Select your scan settings. Copy now settings Adjust the settings for the scanned item. An image of the scanned item appears in the upper...
User's Guide
Page 12
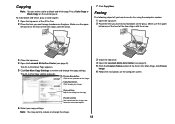
... change the copy settings. Note: You may want to copy your copy settings. Copying Note: You can make black-and-white, gray, or color copies: 1 Open the top cover of the item aligns with the arrow. 7 Click Copy Now. Make sure the upper left corner of the front of the All-In-One Main Page, click Fax an image. 6 Follow the instructions on the glass. Copy Now button Click to fax facedown on the computer screen. Faxing...
... change the copy settings. Note: You may want to copy your copy settings. Copying Note: You can make black-and-white, gray, or color copies: 1 Open the top cover of the item aligns with the arrow. 7 Click Copy Now. Make sure the upper left corner of the front of the All-In-One Main Page, click Fax an image. 6 Follow the instructions on the glass. Copy Now button Click to fax facedown on the computer screen. Faxing...
User's Guide
Page 13
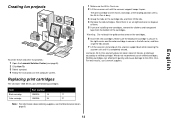
..., use of refilled cartridges. We do not recommend use Lexmark supplies. 13 Refilling cartridges can affect print quality and cause damage to the All-In-One. Replacing print cartridges The Lexmark 1200 Series uses the following cartridges: Item: Part number: Black cartridge 10N0016 16 17 Color cartridge 10N0026 26 27 Note: For information about ordering supplies, see page 8). 2 Click How To. 3 Select a project. 4 Follow the instructions on the cartridges. 6 Insert the new cartridges. Make sure the black print cartridge...
..., use of refilled cartridges. We do not recommend use Lexmark supplies. 13 Refilling cartridges can affect print quality and cause damage to the All-In-One. Replacing print cartridges The Lexmark 1200 Series uses the following cartridges: Item: Part number: Black cartridge 10N0016 16 17 Color cartridge 10N0026 26 27 Note: For information about ordering supplies, see page 8). 2 Click How To. 3 Select a project. 4 Follow the instructions on the cartridges. 6 Insert the new cartridges. Make sure the black print cartridge...
User's Guide
Page 14
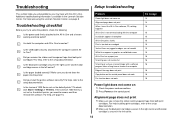
... solve the problem, check the following: Is the power cord firmly attached to the All-In-One and a known working electrical outlet? Alignment page does not print 1 Make sure you remove the sticker and transparent tape from both print cartridges. For help accessing the Lexmark Solution Center, see page 16. To check, click Start Settings Printers. Is the USB cable securely attached to the setup documentation. Is the Lexmark 1200 Series set as the default printer? If the Lexmark 1200 Series is...
... solve the problem, check the following: Is the power cord firmly attached to the All-In-One and a known working electrical outlet? Alignment page does not print 1 Make sure you remove the sticker and transparent tape from both print cartridges. For help accessing the Lexmark Solution Center, see page 16. To check, click Start Settings Printers. Is the USB cable securely attached to the setup documentation. Is the Lexmark 1200 Series set as the default printer? If the Lexmark 1200 Series is...
User's Guide
Page 15
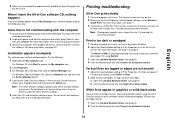
... lines are jagged or edges are too low, you loaded the paper correctly and did not force the paper into the All-In-One. To align the print cartridges: a Open the Lexmark Solution Center (see page 7. To clean the cartridge nozzles: 1 Open the Lexmark Solution Center (see page 7. 3 Try printing a smaller file. Installation appears incomplete The software may be installed properly. For Windows XP, click Start to fix horizontal streaks. For more information, see page 8). 2 From the Maintenance tab...
... lines are jagged or edges are too low, you loaded the paper correctly and did not force the paper into the All-In-One. To align the print cartridges: a Open the Lexmark Solution Center (see page 7. To clean the cartridge nozzles: 1 Open the Lexmark Solution Center (see page 7. 3 Try printing a smaller file. Installation appears incomplete The software may be installed properly. For Windows XP, click Start to fix horizontal streaks. For more information, see page 8). 2 From the Maintenance tab...
User's Guide
Page 16
...-In-One has a paper jam 1 Follow the instructions on the screen for clearing the paper jam. 2 Make sure you are loading the paper correctly. A phone connection is not an option on the menu, see page 5). 2 From the Copy section, click See More Copy Settings. 3 From the Reduce/Enlarge section, click the second button, and then select Fit to remove, and then reinstall the printer software. 1 From the desktop, click Start Programs Lexmark 1200 Series Uninstall Lexmark 1200 Series. For a list...
...-In-One has a paper jam 1 Follow the instructions on the screen for clearing the paper jam. 2 Make sure you are loading the paper correctly. A phone connection is not an option on the menu, see page 5). 2 From the Copy section, click See More Copy Settings. 3 From the Reduce/Enlarge section, click the second button, and then select Fit to remove, and then reinstall the printer software. 1 From the desktop, click Start Programs Lexmark 1200 Series Uninstall Lexmark 1200 Series. For a list...
User's Guide
Page 17
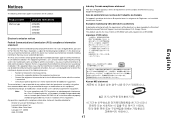
... and receiver. • Connect the equipment into an outlet on electromagnetic interference for a Class B computing device, use a properly shielded and grounded cable such as Lexmark part number 1021294. This product satisfies the Class B limits of EN 55022 and safety requirements of purchase or service representative for additional suggestions. Use of a substitute cable not properly shielded and grounded may cause undesired operation. European...
... and receiver. • Connect the equipment into an outlet on electromagnetic interference for a Class B computing device, use a properly shielded and grounded cable such as Lexmark part number 1021294. This product satisfies the Class B limits of EN 55022 and safety requirements of purchase or service representative for additional suggestions. Use of a substitute cable not properly shielded and grounded may cause undesired operation. European...
User's Guide
Page 18
ENERGY STAR Waste from Electrical and Electronic Equipment (WEEE) directive 18 Noise emission levels The following measurements were made in accordance with ISO 7779 and reported in conformance with ISO 9296: 1-meter average sound pressure, dBA Printing 44 Scanning 38 Copying 44 Idling 0 Values are subject to change. See www.lexmark.com for current values.
ENERGY STAR Waste from Electrical and Electronic Equipment (WEEE) directive 18 Noise emission levels The following measurements were made in accordance with ISO 7779 and reported in conformance with ISO 9296: 1-meter average sound pressure, dBA Printing 44 Scanning 38 Copying 44 Idling 0 Values are subject to change. See www.lexmark.com for current values.
User's Guide
Page 19
...-In-One Center, see Lexmark All-In-One Center All-In-One Main Page Copy section 6 Creative Tasks section 6 Preview section 6 Scan section 6 All-In-One status 8 B banner printing 7 banner paper 9 banners printing 7 black and white, printing in 7 both sides, printing on, see duplexing C card stock 9 cartridges part numbers 13 viewing ink levels of 8 Contact Information tab 8 control panel 5 copies 7 copy settings 6 copying 12 D duplexing 7 E electronic emission statement 17 emission statement 17 envelopes printing 7 F faxing 12 FCC statement 17 G glossy paper 9 H hardware setup software setup...
...-In-One Center, see Lexmark All-In-One Center All-In-One Main Page Copy section 6 Creative Tasks section 6 Preview section 6 Scan section 6 All-In-One status 8 B banner printing 7 banner paper 9 banners printing 7 black and white, printing in 7 both sides, printing on, see duplexing C card stock 9 cartridges part numbers 13 viewing ink levels of 8 Contact Information tab 8 control panel 5 copies 7 copy settings 6 copying 12 D duplexing 7 E electronic emission statement 17 emission statement 17 envelopes printing 7 F faxing 12 FCC statement 17 G glossy paper 9 H hardware setup software setup...
User's Guide
Page 20
... notification turning on the glass 11 settings, saving for future use 7 setup 4 software reinstalling 16 removing 16 sound, see voice notification Status tab 8 T top cover 4 transparencies 9 troubleshooting copying problems 16 faxing problems 16 scanning problems 16 troubleshooting checklist 14 Troubleshooting tab 8 V View Saved Images page 6 Open with... parts of your All-In-One 4 photo paper 9 photos printing 7 scanning 11 poor quality printing 15 posters printing 7 Preview Now button 11 Preview section Preview Now button 11 Print/Copy preview 6 Scan preview 6 print cartridges viewing ink...
... notification turning on the glass 11 settings, saving for future use 7 setup 4 software reinstalling 16 removing 16 sound, see voice notification Status tab 8 T top cover 4 transparencies 9 troubleshooting copying problems 16 faxing problems 16 scanning problems 16 troubleshooting checklist 14 Troubleshooting tab 8 V View Saved Images page 6 Open with... parts of your All-In-One 4 photo paper 9 photos printing 7 scanning 11 poor quality printing 15 posters printing 7 Preview Now button 11 Preview section Preview Now button 11 Print/Copy preview 6 Scan preview 6 print cartridges viewing ink...


