User's Guide
Page 8
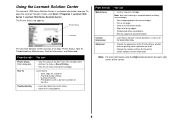
...• View the ink levels of the print cartridges. Learn how to contact Lexmark by phone, e-mail, or on the World Wide Web. • Change the appearance of the Printing Status window and turn printing voice notification on or off. • Change the network settings... the current status. • Solve All-In-One problems. From this tab: Printer Status (Main dialog box) How To Troubleshooting You can : • Install a new print cartridge. To open the Lexmark Solution Center, click Start Programs Lexmark 1200 Series Lexmark 1200 Series Solution Center. For example, while printing...
...• View the ink levels of the print cartridges. Learn how to contact Lexmark by phone, e-mail, or on the World Wide Web. • Change the appearance of the Printing Status window and turn printing voice notification on or off. • Change the network settings... the current status. • Solve All-In-One problems. From this tab: Printer Status (Main dialog box) How To Troubleshooting You can : • Install a new print cartridge. To open the Lexmark Solution Center, click Start Programs Lexmark 1200 Series Lexmark 1200 Series Solution Center. For example, while printing...
User's Guide
Page 15
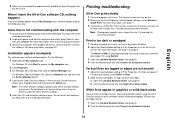
... category. 5 Insert the CD, and install the software again. Do not delete any Lexmark items unless they are any Lexmark devices shown here, highlight them and, then press the Delete key. Printing troubleshooting All-In-One prints slowly 1 Close all programs not in Print Properties. The memory resources may be ..., click Start to the setup documentation. For help, refer to access the My computer icon. 2 Click Properties. 3 For Windows 98 or Windows Me, click the Device Manager tab. For more information, see page 8). 4 From the Maintenance tab, click Clean to print larger files. Try ...
... category. 5 Insert the CD, and install the software again. Do not delete any Lexmark items unless they are any Lexmark devices shown here, highlight them and, then press the Delete key. Printing troubleshooting All-In-One prints slowly 1 Close all programs not in Print Properties. The memory resources may be ..., click Start to the setup documentation. For help, refer to access the My computer icon. 2 Click Properties. 3 For Windows 98 or Windows Me, click the Device Manager tab. For more information, see page 8). 4 From the Maintenance tab, click Clean to print larger files. Try ...
User's Guide
Page 20
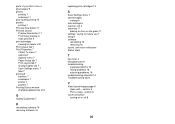
...scanning problems 16 troubleshooting checklist 14 Troubleshooting tab 8 V View Saved Images page 6 Open with... parts of your All-In-One 4 photo paper 9 photos printing 7 scanning 11 poor quality printing 15 posters printing 7 Preview Now button 11 Preview section ... Setup tab 7 Print Layout tab 7 Quality/Copies tab 7 Save Settings menu 7 tabs 7 printing 9 banners 7 envelopes 7 photos 7 posters 7 Printing Status window changing appearance of 8 Q Quality/Copies tab 7 R reinstalling software 16 removing software 16 replacing print cartridges 13 S Save Settings menu 7 saved images viewing 6 ...
...scanning problems 16 troubleshooting checklist 14 Troubleshooting tab 8 V View Saved Images page 6 Open with... parts of your All-In-One 4 photo paper 9 photos printing 7 scanning 11 poor quality printing 15 posters printing 7 Preview Now button 11 Preview section ... Setup tab 7 Print Layout tab 7 Quality/Copies tab 7 Save Settings menu 7 tabs 7 printing 9 banners 7 envelopes 7 photos 7 posters 7 Printing Status window changing appearance of 8 Q Quality/Copies tab 7 R reinstalling software 16 removing software 16 replacing print cartridges 13 S Save Settings menu 7 saved images viewing 6 ...


