User's Guide
Page 4
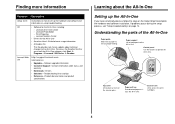
...exits the All-In-One. Paper exit tray Extend to operate the All-In-One. Print Properties - Scanner unit Lift to set up the hardware and software and information on setup troubleshooting • Software for basic usage ...information • A Readme file This file provides last-minute updates about the All-In-One Setting up the All-In-One If you install the All-In-One software, click Start Æ Programs Æ Lexmark...
...exits the All-In-One. Paper exit tray Extend to operate the All-In-One. Print Properties - Scanner unit Lift to set up the hardware and software and information on setup troubleshooting • Software for basic usage ...information • A Readme file This file provides last-minute updates about the All-In-One Setting up the All-In-One If you install the All-In-One software, click Start Æ Programs Æ Lexmark...
User's Guide
Page 11
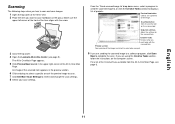
...with the arrow 3 Close the top cover. 4 Open the Lexmark All-In-One Center (see page 6. English 11 See a preview of the image. Copy now settings Adjust the settings for the scanned item. If you are sending the scanned image to a software program, click Scan Now to see a preview of the ...area to be scanned. 9 If you want to scan facedown on the scanner bed. An image of the scanned item appears in the upper right corner of projects. Preview Now button Click to complete the scan. The All-In-One Main Page appears. 5 Click Preview Now located in the preview section. ...
...with the arrow 3 Close the top cover. 4 Open the Lexmark All-In-One Center (see page 6. English 11 See a preview of the image. Copy now settings Adjust the settings for the scanned item. If you are sending the scanned image to a software program, click Scan Now to see a preview of the ...area to be scanned. 9 If you want to scan facedown on the scanner bed. An image of the scanned item appears in the upper right corner of projects. Preview Now button Click to complete the scan. The All-In-One Main Page appears. 5 Click Preview Now located in the preview section. ...
User's Guide
Page 20
...scanning problems 16 troubleshooting checklist 14 Troubleshooting tab 8 V View Saved Images page 6 Open with... parts of your All-In-One 4 photo paper 9 photos printing 7 scanning 11 poor quality printing 15 posters printing 7 Preview Now button 11 Preview section ...7 tabs 7 printing 9 banners 7 envelopes 7 photos 7 posters 7 Printing Status window changing appearance of 8 Q Quality/Copies tab 7 R reinstalling software 16 removing software 16 replacing print cartridges 13 S Save Settings menu 7 saved images viewing 6 scan settings 6 scanner unit 4 scanning 11 placing an item on or off 8 20
...scanning problems 16 troubleshooting checklist 14 Troubleshooting tab 8 V View Saved Images page 6 Open with... parts of your All-In-One 4 photo paper 9 photos printing 7 scanning 11 poor quality printing 15 posters printing 7 Preview Now button 11 Preview section ...7 tabs 7 printing 9 banners 7 envelopes 7 photos 7 posters 7 Printing Status window changing appearance of 8 Q Quality/Copies tab 7 R reinstalling software 16 removing software 16 replacing print cartridges 13 S Save Settings menu 7 saved images viewing 6 scan settings 6 scanner unit 4 scanning 11 placing an item on or off 8 20


