Setup Guide (1.4 MB)
Page 2
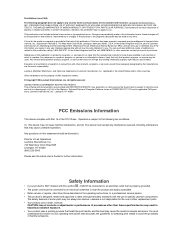
... If the form has been removed, comments may cause the media to avoid the possibility of the information you . Lexmark, MarkNet, MarkVision, and Optra are the user's responsibility. FCC Emissions Information This device complies with other countries, contact your product is provided at ... described may use of other replacement parts. • Your product uses a laser, exercise CAUTION: Use of controls or adjustments or performance of this product by the Government is subject to Lexmark International, Inc., Department F95/035-3, 740 West New Circle Road, Lexington, Kentucky...
... If the form has been removed, comments may cause the media to avoid the possibility of the information you . Lexmark, MarkNet, MarkVision, and Optra are the user's responsibility. FCC Emissions Information This device complies with other countries, contact your product is provided at ... described may use of other replacement parts. • Your product uses a laser, exercise CAUTION: Use of controls or adjustments or performance of this product by the Government is subject to Lexmark International, Inc., Department F95/035-3, 740 West New Circle Road, Lexington, Kentucky...
Setup Guide (1.4 MB)
Page 3
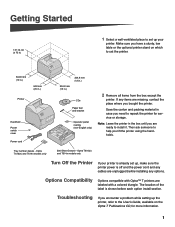
... the label is shown before installing any options. Tray number decals - Options Compatibility Options compatible with Optra™ T printers are missing, contact the place where you have a sturdy, low table or the optional printer stand on the Optra T Publications CD, for service or storage. If any cables are ready to help you encounter a problem...
... the label is shown before installing any options. Tray number decals - Options Compatibility Options compatible with Optra™ T printers are missing, contact the place where you have a sturdy, low table or the optional printer stand on the Optra T Publications CD, for service or storage. If any cables are ready to help you encounter a problem...
Setup Guide (1.4 MB)
Page 5
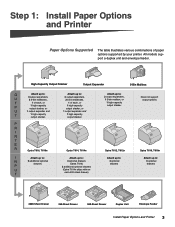
... mailbox, or 1 high-capacity output stacker. Optra T612, T612n Attach up to: 3 optional drawers Does not support output options Optra T610, T610n Attach up to : 3 output expanders, 2 5-bin mailboxes, 1 of paper options supported by your printer. Optra T614, T614n Attach up to: 4 optional drawers (Optra T614) 3 additional optional drawers (Optra T614n ships with an extra 500-sheet...
... mailbox, or 1 high-capacity output stacker. Optra T612, T612n Attach up to: 3 optional drawers Does not support output options Optra T610, T610n Attach up to : 3 output expanders, 2 5-bin mailboxes, 1 of paper options supported by your printer. Optra T614, T614n Attach up to: 4 optional drawers (Optra T614) 3 additional optional drawers (Optra T614n ships with an extra 500-sheet...
Setup Guide (1.4 MB)
Page 6
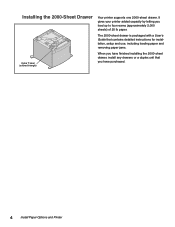
Installing the 2000-Sheet Drawer Optra T label (colored triangle) Your printer supports one 2000-sheet drawer. The 2000-sheet drawer is packaged with a User's Guide that contains detailed instructions for installation, setup and use, including loading paper and removing paper jams. When you have finished installing the 2000-sheet drawer, install any drawers or a duplex unit that you load up to four reams (approximately 2,000 sheets) of 20 lb paper. It gives your printer added capacity by letting you have purchased. 4 Install Paper Options and Printer
Installing the 2000-Sheet Drawer Optra T label (colored triangle) Your printer supports one 2000-sheet drawer. The 2000-sheet drawer is packaged with a User's Guide that contains detailed instructions for installation, setup and use, including loading paper and removing paper jams. When you have finished installing the 2000-sheet drawer, install any drawers or a duplex unit that you load up to four reams (approximately 2,000 sheets) of 20 lb paper. It gives your printer added capacity by letting you have purchased. 4 Install Paper Options and Printer
Setup Guide (1.4 MB)
Page 7
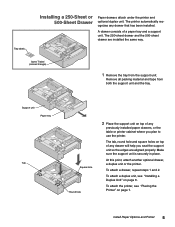
... 2. To attach a duplex unit, see "Placing the Printer" on page 6. The printer automatically recognizes any previously installed paper drawers, or the table or printer cabinet where you seat the support unit so the edges are installed the same way. Optra T label (colored triangle) 1 Remove the tray from ...both the support unit and the tray. To attach the printer, see "Installing a Duplex Unit" on page 7. Tray labels Installing a 250-Sheet...
... 2. To attach a duplex unit, see "Placing the Printer" on page 6. The printer automatically recognizes any previously installed paper drawers, or the table or printer cabinet where you seat the support unit so the edges are installed the same way. Optra T label (colored triangle) 1 Remove the tray from ...both the support unit and the tray. To attach the printer, see "Installing a Duplex Unit" on page 7. Tray labels Installing a 250-Sheet...
Setup Guide (1.4 MB)
Page 8
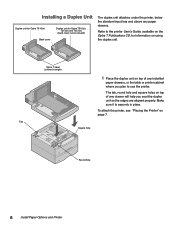
Refer to the printer User's Guide, available on the Optra T Publications CD, for Optra T616(n), T614(n) and T612(n) (back cover curves inward) The duplex unit attaches under the printer, below the standard input tray and above any drawer will help you plan to use the printer. Make sure ... Square hole Round hole 6 Install Paper Options and Printer Installing a Duplex Unit Duplex unit for Optra T610(n) Back cover Duplex unit for information on page 7. To attach the printer, see "Placing the Printer" on using the duplex unit. Optra T label (colored triangle) 1 Place the duplex ...
Refer to the printer User's Guide, available on the Optra T Publications CD, for Optra T616(n), T614(n) and T612(n) (back cover curves inward) The duplex unit attaches under the printer, below the standard input tray and above any drawer will help you plan to use the printer. Make sure ... Square hole Round hole 6 Install Paper Options and Printer Installing a Duplex Unit Duplex unit for Optra T610(n) Back cover Duplex unit for information on page 7. To attach the printer, see "Placing the Printer" on using the duplex unit. Optra T label (colored triangle) 1 Place the duplex ...
Setup Guide (1.4 MB)
Page 10
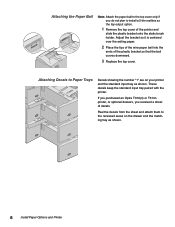
If you purchased an Optra T616(n) or T614n printer, or optional drawers, you do not plan to install a 5-bin mailbox as the top output option. 1 Remove the top cover of the printer and slide the plastic bracket onto the static brush holder. Peel the decals from the sheet and attach them to the... recessed areas on your printer and the standard input tray as shown. 8 Install Paper Options and Printer These decals keep the standard input tray paired with the printer. Attaching the Paper Bail Note: Attach the paper bail to the top cover only...
If you purchased an Optra T616(n) or T614n printer, or optional drawers, you do not plan to install a 5-bin mailbox as the top output option. 1 Remove the top cover of the printer and slide the plastic bracket onto the static brush holder. Peel the decals from the sheet and attach them to the... recessed areas on your printer and the standard input tray as shown. 8 Install Paper Options and Printer These decals keep the standard input tray paired with the printer. Attaching the Paper Bail Note: Attach the paper bail to the top cover only...
Setup Guide (1.4 MB)
Page 12
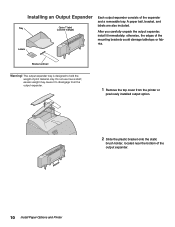
... to disengage from the output expander. 1 Remove the top cover from the printer or previously installed output option. 2 Slide the plastic bracket onto the static brush holder, located near the bottom of print material only. Installing an Output Expander Tray Optra T label (colored triangle) Labels Each output expander consists of the mounting... the output expander, install it as a shelf; excess weight may cause it to hold the weight of the output expander. 10 Install Paper Options and Printer
... to disengage from the output expander. 1 Remove the top cover from the printer or previously installed output option. 2 Slide the plastic bracket onto the static brush holder, located near the bottom of print material only. Installing an Output Expander Tray Optra T label (colored triangle) Labels Each output expander consists of the mounting... the output expander, install it as a shelf; excess weight may cause it to hold the weight of the output expander. 10 Install Paper Options and Printer
Setup Guide (1.4 MB)
Page 14
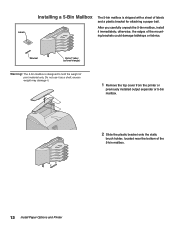
... mailbox, install it as a shelf; otherwise, the edges of the 5-bin mailbox. 12 Install Paper Options and Printer Bracket Optra T label (colored triangle) Warning! excess weight may damage it. 1 Remove the top cover from the printer or previously installed output expander or 5-bin mailbox. 2 Slide the plastic bracket onto the static brush holder...
... mailbox, install it as a shelf; otherwise, the edges of the 5-bin mailbox. 12 Install Paper Options and Printer Bracket Optra T label (colored triangle) Warning! excess weight may damage it. 1 Remove the top cover from the printer or previously installed output expander or 5-bin mailbox. 2 Slide the plastic bracket onto the static brush holder...

Setup Guide (1.4 MB)
Page 16
... attaches to the User's Guide, available on the Optra T Publications CD, for information on using it, making the printer more compact. The high-capacity output stacker is installed properly. 14 Install Paper Options and Printer It can be removed when you are not using ...printer behind the lower front door. The envelope feeder tilts downward at a slight angle when it snaps into the opening until it is packaged with the slots on the envelope feeder with installation instructions. Installing a High-Capacity Output Stacker Optra T printer models T616(n), T614(n) and T612...
... attaches to the User's Guide, available on the Optra T Publications CD, for information on using it, making the printer more compact. The high-capacity output stacker is installed properly. 14 Install Paper Options and Printer It can be removed when you are not using ...printer behind the lower front door. The envelope feeder tilts downward at a slight angle when it snaps into the opening until it is packaged with the slots on the envelope feeder with installation instructions. Installing a High-Capacity Output Stacker Optra T printer models T616(n), T614(n) and T612...
Setup Guide (1.4 MB)
Page 23
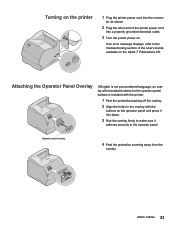
... translated names for the operator panel buttons is included with the printer. 1 Peel the protective backing off the overlay. 2 Align the holes in the overlay with the buttons on the printer 1 Plug the printer power cord into the connec- Turning on the operator panel and... press it into place. 3 Rub the overlay firmly to make sure it adheres securely to the troubleshooting section of the printer power cord into a properly grounded electrical outlet. 3 Turn the printer power on the Optra...
... translated names for the operator panel buttons is included with the printer. 1 Peel the protective backing off the overlay. 2 Align the holes in the overlay with the buttons on the printer 1 Plug the printer power cord into the connec- Turning on the operator panel and... press it into place. 3 Rub the overlay firmly to make sure it adheres securely to the troubleshooting section of the printer power cord into a properly grounded electrical outlet. 3 Turn the printer power on the Optra...
Setup Guide (1.4 MB)
Page 25
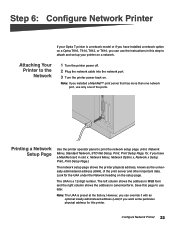
... off. 2 Plug the network cable into the network port. 3 Turn the printer power back on. Note: If you have installed a network option on a Optra T616, T614, T612, or T610, you can override it with an optional locally administered address (LAA) if you want some particular physical... only one network port, use later. Note: The UAA is a 12-digit number. Configure Network Printer 23 However, you can use the instructions in canonical form. Step 6: Configure Network Printer If your Optra T printer is a network model or if you have a MarkNet card in slot x: Network Menu, Network Option...
... off. 2 Plug the network cable into the network port. 3 Turn the printer power back on. Note: If you have installed a network option on a Optra T616, T614, T612, or T610, you can override it with an optional locally administered address (LAA) if you want some particular physical... only one network port, use later. Note: The UAA is a 12-digit number. Configure Network Printer 23 However, you can use the instructions in canonical form. Step 6: Configure Network Printer If your Optra T printer is a network model or if you have a MarkNet card in slot x: Network Menu, Network Option...
Setup Guide (1.4 MB)
Page 33
...charge. If you may only be provided: • for the Optra T616n, Optra T616, Optra T614n or Optra T614, at your use, and not for the Optra T612n, Optra T612, Optra T610n or Optra T610, at a Remarketer or a Lexmark designated location. The replacement item assumes the remaining warranty period of...statement applies only when that came with your area, please contact Lexmark at http://www.lexmark.com. You should transfer proof of original purchase and this product if it was designed. Optra T Laser Printers This Statement of Limited Warranty applies to this statement to the ...
...charge. If you may only be provided: • for the Optra T616n, Optra T616, Optra T614n or Optra T614, at your use, and not for the Optra T612n, Optra T612, Optra T610n or Optra T610, at a Remarketer or a Lexmark designated location. The replacement item assumes the remaining warranty period of...statement applies only when that came with your area, please contact Lexmark at http://www.lexmark.com. You should transfer proof of original purchase and this product if it was designed. Optra T Laser Printers This Statement of Limited Warranty applies to this statement to the ...
Setup Guide (1.4 MB)
Page 35
.... Please refer those questions or comments to improve the book? 5. Questions or comments about this publication, with the understanding that Lexmark may use ? Was the content of purchase. Setup Guide Optra T Part Number 11K1601 6/99 You may use or distribute whatever information you supply in any way it believes appropriate without incurring...
.... Please refer those questions or comments to improve the book? 5. Questions or comments about this publication, with the understanding that Lexmark may use ? Was the content of purchase. Setup Guide Optra T Part Number 11K1601 6/99 You may use or distribute whatever information you supply in any way it believes appropriate without incurring...
Setup Guide (1.4 MB)
Page 37
www.lexmark.com P/N 11K1601 E.C. 1K0252 Printed in the United States and/or other countries. © 1999 Lexmark International, Inc. 740 West New Circle Road, Lexington, Kentucky 40550 Lexmark, Lexmark with diamond design and Optra are trademarks of Lexmark International, Inc., registered in USA 06/99 This publication is printed on recycled paper.
www.lexmark.com P/N 11K1601 E.C. 1K0252 Printed in the United States and/or other countries. © 1999 Lexmark International, Inc. 740 West New Circle Road, Lexington, Kentucky 40550 Lexmark, Lexmark with diamond design and Optra are trademarks of Lexmark International, Inc., registered in USA 06/99 This publication is printed on recycled paper.


