
Quick Reference
Page 3
...telephone line 30 Step 2: Check the dial tone 37 Step 3: Set your fax name and fax number 37 Step 4: Set the printer to receive faxes automatically or manually 37 Step 5: Set the number of rings 38 Step 6: Create a contact list 38 Faxing 39 Sending faxes...39 Receiving faxes...39... Wireless networking 41 Information you will need to set up the printer on a wireless network 41 Installing the printer on a wireless network 41 ...
...telephone line 30 Step 2: Check the dial tone 37 Step 3: Set your fax name and fax number 37 Step 4: Set the printer to receive faxes automatically or manually 37 Step 5: Set the number of rings 38 Step 6: Create a contact list 38 Faxing 39 Sending faxes...39 Receiving faxes...39... Wireless networking 41 Information you will need to set up the printer on a wireless network 41 Installing the printer on a wireless network 41 ...
Quick Reference
Page 5
...at http://support.lexmark.com. 5 Minimizing your printer's environmental impact We are committed to protecting the environment and are continually improving our printers to 16 page images on one side of a sheet of paper. • Print on both sides of the paper manually or automatically (... • Quick Setup Sheet • Hardware Setup Wizard1 Additional setup and instructions for reuse or recycling through the Lexmark Cartridge Collection Program. By selecting certain printer settings or tasks, you may be able to be used to request a postage‑paid bag. • ...
...at http://support.lexmark.com. 5 Minimizing your printer's environmental impact We are committed to protecting the environment and are continually improving our printers to 16 page images on one side of a sheet of paper. • Print on both sides of the paper manually or automatically (... • Quick Setup Sheet • Hardware Setup Wizard1 Additional setup and instructions for reuse or recycling through the Lexmark Cartridge Collection Program. By selecting certain printer settings or tasks, you may be able to be used to request a postage‑paid bag. • ...
Quick Reference
Page 14
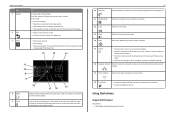
... Photo mode: Enter the number of your printer and access the network settings. 17 Wi‑Fi indicator Check the wireless connection of copies or prints you have already begun entering the number. 10 Dial tone 14 Dial the telephone number manually using the keypad before sending the fax. ... eject paper. Press and hold the button for three seconds to black‑and‑white mode. Switch to feed or eject paper from the printer. 8 Redial 9 Pause Display the last number dialed. Start a job, depending on the display. • Return to the previous screen. • Exit from a ...
... Photo mode: Enter the number of your printer and access the network settings. 17 Wi‑Fi indicator Check the wireless connection of copies or prints you have already begun entering the number. 10 Dial tone 14 Dial the telephone number manually using the keypad before sending the fax. ... eject paper. Press and hold the button for three seconds to black‑and‑white mode. Switch to feed or eject paper from the printer. 8 Redial 9 Pause Display the last number dialed. Start a job, depending on the display. • Return to the previous screen. • Exit from a ...
Quick Reference
Page 19
... all the necessary software was installed. Using the Internet 1 Go to the Lexmark Web site at http://support.lexmark.com. 19 Installing the printer software Note: If you did not install these additional programs during printer installation When you set up to 500MB of various software programs and what they...table provides an overview of free disk space. If the installation dialog does not appear after a minute, then launch the CD manually: a Click , or click Start and then click Run. You may have chosen to reinstall the software, then uninstall the current software first.
... all the necessary software was installed. Using the Internet 1 Go to the Lexmark Web site at http://support.lexmark.com. 19 Installing the printer software Note: If you did not install these additional programs during printer installation When you set up to 500MB of various software programs and what they...table provides an overview of free disk space. If the installation dialog does not appear after a minute, then launch the CD manually: a Click , or click Start and then click Run. You may have chosen to reinstall the software, then uninstall the current software first.

Quick Reference
Page 25
...to the option you want . Use the ADF for making a two‑sided copy manually. Making copies 1 Load paper. 25 2 Load an original document faceup into the ADF or facedown on the scanner glass. 3 From the printer control panel, navigate to: > Copy > > Copies 4 Press the left or ...small items, transparencies, photo paper, or thin media (such as magazine clippings). Note: The ADF is in place with the settings you purchased a printer without an ADF, then load original documents or photos on . 7 Press . If you want to specify the page orientation and layout of the ...
...to the option you want . Use the ADF for making a two‑sided copy manually. Making copies 1 Load paper. 25 2 Load an original document faceup into the ADF or facedown on the scanner glass. 3 From the printer control panel, navigate to: > Copy > > Copies 4 Press the left or ...small items, transparencies, photo paper, or thin media (such as magazine clippings). Note: The ADF is in place with the settings you purchased a printer without an ADF, then load original documents or photos on . 7 Press . If you want to specify the page orientation and layout of the ...
Quick Reference
Page 30
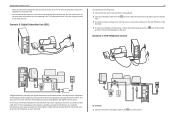
...from the to the port. Scenario 1: Standard telephone line Setup 1: Printer is applicable to your telephone service. port of the printer. Tips for this setup: • You can set the printer to receive faxes automatically (Auto Answer On) or manually (Auto Answer Off). • If you want . Step 1:... Connect the printer to the telephone line Check the scenarios below ...
...from the to the port. Scenario 1: Standard telephone line Setup 1: Printer is applicable to your telephone service. port of the printer. Tips for this setup: • You can set the printer to receive faxes automatically (Auto Answer On) or manually (Auto Answer Off). • If you want . Step 1:... Connect the printer to the telephone line Check the scenarios below ...
Quick Reference
Page 31
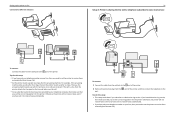
...; This setup works best if you subscribe to pick up calls first and your line, then you need to set the printer to receive faxes manually (Auto Answer Off). port of the printer. If you have only one telephone number on your voice calls are received. This way, the answering machine picks up...
...; This setup works best if you subscribe to pick up calls first and your line, then you need to set the printer to receive faxes manually (Auto Answer Off). port of the printer. If you have only one telephone number on your voice calls are received. This way, the answering machine picks up...
Quick Reference
Page 32
... port on the DSL filter. 3 To continue using voice mail more often than fax. Setting up the printer to fax When you answer the telephone and you hear fax tones, press *9* or the manual answer code on the telephone to receive the fax. • You can use the same line for analog... voice calls (including faxes) and digital Internet access. To connect: 1 Connect one end of a telephone cable to install a DSL filter for the printer, and slow Internet connection on...
... port on the DSL filter. 3 To continue using voice mail more often than fax. Setting up the printer to fax When you answer the telephone and you hear fax tones, press *9* or the manual answer code on the telephone to receive the fax. • You can use the same line for analog... voice calls (including faxes) and digital Internet access. To connect: 1 Connect one end of a telephone cable to install a DSL filter for the printer, and slow Internet connection on...

Quick Reference
Page 37
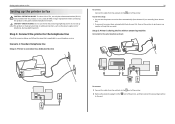
...dial tone, then the telephone line and the wall jack are working . In some countries, you send. Step 4: Set the printer to receive faxes automatically or manually If the printer is properly connected to the same wall jack, then connect the devices as shown. If you do not hear a dial tone... footer of the cable to the RJ‑11 adapter, and then connect the adapter to an N port. 3 If you can set the printer to receive faxes manually. 1 From the printer control panel, navigate to: > Setup > > Fax Setup > > Ringing and Answering > > Auto Answer > 2 Press the arrow buttons to scroll to...
...dial tone, then the telephone line and the wall jack are working . In some countries, you send. Step 4: Set the printer to receive faxes automatically or manually If the printer is properly connected to the same wall jack, then connect the devices as shown. If you do not hear a dial tone... footer of the cable to the RJ‑11 adapter, and then connect the adapter to an N port. 3 If you can set the printer to receive faxes manually. 1 From the printer control panel, navigate to: > Setup > > Fax Setup > > Ringing and Answering > > Auto Answer > 2 Press the arrow buttons to scroll to...
Quick Reference
Page 39
...dark edges on and connected to enter another number, and then press . If you want, press to receive faxes manually (Auto Answer Off), then make sure that the printer is in the printer. You can send a broadcast fax to up this step to add more numbers. 4 Press the Color/Black ...while actively sending a Tip: • You can enter fax numbers manually or by using the scanner glass, close the scanner cover, if possible, to the width of your printer. Receiving faxes Tips for sending faxes • Make sure the printer is selected. 4 Enter the recipient fax number or numbers in the...
...dark edges on and connected to enter another number, and then press . If you want, press to receive faxes manually (Auto Answer Off), then make sure that the printer is in the printer. You can send a broadcast fax to up this step to add more numbers. 4 Press the Color/Black ...while actively sending a Tip: • You can enter fax numbers manually or by using the scanner glass, close the scanner cover, if possible, to the width of your printer. Receiving faxes Tips for sending faxes • Make sure the printer is selected. 4 Enter the recipient fax number or numbers in the...
Quick Reference
Page 40
... Tips: • The default code for answering faxes manually is *9*, but for your code. When the number of rings before the printer picks up to 7 characters for increased security, you set is a fax, then the printer detects the fax signal on a single line, or if... receive faxes even if you have multiple numbers on the line and takes over the call is detected, the printer automatically receives the incoming fax. Receiving faxes manually 1 Turn off Auto Answer: From the printer control panel, navigate to: > Setup > > Fax Setup > > Ringing and Answering > > Auto Answer > >...
... Tips: • The default code for answering faxes manually is *9*, but for your code. When the number of rings before the printer picks up to 7 characters for increased security, you set is a fax, then the printer detects the fax signal on a single line, or if... receive faxes even if you have multiple numbers on the line and takes over the call is detected, the printer automatically receives the incoming fax. Receiving faxes manually 1 Turn off Auto Answer: From the printer control panel, navigate to: > Setup > > Fax Setup > > Ringing and Answering > > Auto Answer > >...
Quick Reference
Page 41
..., and then follow the instructions on the computer screen. If the installation dialog does not appear after a minute, then launch the CD manually: a Click , or click Start and then click Run. Note: Select Wireless connection when prompted to select a connection type. It is...point, or consult your system support person. ASCII characters in connecting to a wireless network: • Personal Identification Number (PIN)-A PIN on the printer is WPS certified: c Press Enter, or click OK. 3 Follow the instructions on the computer screen. Note: Select Wireless connection when prompted to...
..., and then follow the instructions on the computer screen. If the installation dialog does not appear after a minute, then launch the CD manually: a Click , or click Start and then click Run. Note: Select Wireless connection when prompted to select a connection type. It is...point, or consult your system support person. ASCII characters in connecting to a wireless network: • Personal Identification Number (PIN)-A PIN on the printer is WPS certified: c Press Enter, or click OK. 3 Follow the instructions on the computer screen. Note: Select Wireless connection when prompted to...
Quick Reference
Page 42
... button on the wireless router. Wait for wireless connection and you want to begin WPS configuration. USE THE PERSONAL IDENTIFICATION NUMBER (PIN) METHOD 1 From the printer control panel, navigate to : > Setup > > Network Setup > > Wireless 802.11b/g/n > > Network Connection Setup > > Wireless > > Wi‑Fi Protected Setup ...information, see the documentation that came with the access point or contact your system support person. Configuring Wi‑Fi Protected Setup manually Note: Make sure your access point. If nothing happens after 30 seconds, then do one of the following: USE THE ...
... button on the wireless router. Wait for wireless connection and you want to begin WPS configuration. USE THE PERSONAL IDENTIFICATION NUMBER (PIN) METHOD 1 From the printer control panel, navigate to : > Setup > > Network Setup > > Wireless 802.11b/g/n > > Network Connection Setup > > Wireless > > Wi‑Fi Protected Setup ...information, see the documentation that came with the access point or contact your system support person. Configuring Wi‑Fi Protected Setup manually Note: Make sure your access point. If nothing happens after 30 seconds, then do one of the following: USE THE ...
Quick Reference
Page 43
...press . If Troubleshooting does not solve your problem Visit our Web site at http://support.lexmark.com to find the following: • Knowledgebase articles with the latest information and troubleshooting for your printer • Live online technical support • Contact numbers for telephone technical support Setup ...wait about 10 seconds, and then turn the printer back on. Note: Make sure the printer is not in the printers folder or as a printer option when sending a print job, then try one or more of the following : LAUNCH THE PRINTER CD MANUALLY For Windows users 1 Click , or click ...
...press . If Troubleshooting does not solve your problem Visit our Web site at http://support.lexmark.com to find the following: • Knowledgebase articles with the latest information and troubleshooting for your printer • Live online technical support • Contact numbers for telephone technical support Setup ...wait about 10 seconds, and then turn the printer back on. Note: Make sure the printer is not in the printers folder or as a printer option when sending a print job, then try one or more of the following : LAUNCH THE PRINTER CD MANUALLY For Windows users 1 Click , or click ...
Quick Reference
Page 47
... the following : MAKE SURE THAT YOU HAVE CONFIGURED THE CORRECT SETTINGS FOR YOUR SETUP The fax settings depend on your manual pickup code to a number that the printer is connected to an analog port on the correct distinctive ring (if you are set: • Auto Answer is sharing the telephone ...has Internet access, then try one number on the telephone line). • The printer picks up on the PBX. If you are set the printer to receive faxes manually (Auto Answer Off), then you need to connect the printer to voice mail, then make sure that only you can print it prints the...
... the following : MAKE SURE THAT YOU HAVE CONFIGURED THE CORRECT SETTINGS FOR YOUR SETUP The fax settings depend on your manual pickup code to a number that the printer is connected to an analog port on the correct distinctive ring (if you are set: • Auto Answer is sharing the telephone ...has Internet access, then try one number on the telephone line). • The printer picks up on the PBX. If you are set the printer to receive faxes manually (Auto Answer Off), then you need to connect the printer to voice mail, then make sure that only you can print it prints the...
Quick Reference
Page 51
... SURE BIDIRECTIONAL COMMUNICATION IS ENABLED Note: This solution applies to the manual that it is a USB port, then scroll through the list and select the port with your wireless router, is working and is operating correctly, then continue troubleshooting. Check the printer model in the Description column. Troubleshooting 51 • Make sure...
... SURE BIDIRECTIONAL COMMUNICATION IS ENABLED Note: This solution applies to the manual that it is a USB port, then scroll through the list and select the port with your wireless router, is working and is operating correctly, then continue troubleshooting. Check the printer model in the Description column. Troubleshooting 51 • Make sure...
Quick Reference
Page 53
...47 cannot run fax software 47 cannot send faxes 46 fax troubleshooting checklist 46 faxing Auto Answer setting 37 receiving automatically 40 receiving manually 40 sending a broadcast fax immediately 39 sending using the control panel 39 setting sender information 37 tips, receiving 39 tips, sending... 23 scanning to 27 G Group List 38 53 I incorrect language appears on display 43 information finding 5 information needed for setting up printer on wireless network 41 ink conserving 5 ink cartridge access area location 13 ink cartridges installing 16 ordering 16 removing 16 replacing 16 inserting ...
...47 cannot run fax software 47 cannot send faxes 46 fax troubleshooting checklist 46 faxing Auto Answer setting 37 receiving automatically 40 receiving manually 40 sending a broadcast fax immediately 39 sending using the control panel 39 setting sender information 37 tips, receiving 39 tips, sending... 23 scanning to 27 G Group List 38 53 I incorrect language appears on display 43 information finding 5 information needed for setting up printer on wireless network 41 ink conserving 5 ink cartridge access area location 13 ink cartridges installing 16 ordering 16 removing 16 replacing 16 inserting ...
Quick Reference
Page 54
...print queue 45 printer features 6 models 6 setting up 6 printer control panel buttons 13 location 12 using 13 printer does not respond 45 printer features 6 printer models 6 printer parts diagram 12 printer printing blank pages 44 printer problems, basic solutions 43 printer software installing 19 printers supported 24 printhead...8209;sided 22 publications finding 5 Push Button Configuration method using 42 R receiving faxes Auto Answer setting 37, 40 automatically 40 manually 40 tips 40 recycling 5 replacing ink cartridges 16 RJ‑11 adapter 34 S safety information 2, 30 scan job canceling...
...print queue 45 printer features 6 models 6 setting up 6 printer control panel buttons 13 location 12 using 13 printer does not respond 45 printer features 6 printer models 6 printer parts diagram 12 printer printing blank pages 44 printer problems, basic solutions 43 printer software installing 19 printers supported 24 printhead...8209;sided 22 publications finding 5 Push Button Configuration method using 42 R receiving faxes Auto Answer setting 37, 40 automatically 40 manually 40 tips 40 recycling 5 replacing ink cartridges 16 RJ‑11 adapter 34 S safety information 2, 30 scan job canceling...

Quick Reference
Page 55
Index 55 Printing Preferences 19 Product Update 19 Status Messenger 19 Status Monitor Center 19 Tools for Office 19 Wireless Setup Utility 19 wireless network information needed for setting up wireless printing 41 installing printer on (Macintosh) 41 installing printer on (Windows) 41 troubleshooting 47 wireless setup information needed for 41 wireless troubleshooting cannot print over wireless network 48 Wi‑Fi Protected Setup configuring manually 42 using 41 Wi‑Fi Protected Setup logo identifying 41
Index 55 Printing Preferences 19 Product Update 19 Status Messenger 19 Status Monitor Center 19 Tools for Office 19 Wireless Setup Utility 19 wireless network information needed for setting up wireless printing 41 installing printer on (Macintosh) 41 installing printer on (Windows) 41 troubleshooting 47 wireless setup information needed for 41 wireless troubleshooting cannot print over wireless network 48 Wi‑Fi Protected Setup configuring manually 42 using 41 Wi‑Fi Protected Setup logo identifying 41

User's Guide
Page 7
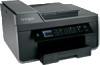
...allows you to 16 page images on both sides of the paper manually or automatically (depending on track fast. To get back on your printer model). • Preview print jobs before printing. Wireless/network printers allow you to help us know. Duplexing lets you print on ...the margins of documents to Sleep mode after the printer has been idle for choosing this printer! About your printer 7 About your printer Thank you for a set amount of time (the Sleep timeout). • Share your printer. To start using your new printer right away, use the setup materials that came ...
...allows you to 16 page images on both sides of the paper manually or automatically (depending on track fast. To get back on your printer model). • Preview print jobs before printing. Wireless/network printers allow you to help us know. Duplexing lets you print on ...the margins of documents to Sleep mode after the printer has been idle for choosing this printer! About your printer 7 About your printer Thank you for a set amount of time (the Sleep timeout). • Share your printer. To start using your new printer right away, use the setup materials that came ...


