User's Guide
Page 4
Using photo storage devices 27 Inserting a memory card 27 Inserting a USB flash drive 29 Using the CD drive 30 Printing directly from digital cameras, mobile phones, and PDAs 32 Printing from mobile phones 32 Bluetooth wireless support 32 Using a PictBridge-enabled digital camera to control printing photos............34 Printing a DPOF selection 34 Maintaining the printer 36 Maintaining the cartridge 36 Refilling the print cartridge 42 Troubleshooting 43 General troubleshooting 43 Photo storage device troubleshooting 47 Error messages 48 Notices 50 Index 54 4
Using photo storage devices 27 Inserting a memory card 27 Inserting a USB flash drive 29 Using the CD drive 30 Printing directly from digital cameras, mobile phones, and PDAs 32 Printing from mobile phones 32 Bluetooth wireless support 32 Using a PictBridge-enabled digital camera to control printing photos............34 Printing a DPOF selection 34 Maintaining the printer 36 Maintaining the cartridge 36 Refilling the print cartridge 42 Troubleshooting 43 General troubleshooting 43 Photo storage device troubleshooting 47 Error messages 48 Notices 50 Index 54 4
User's Guide
Page 9
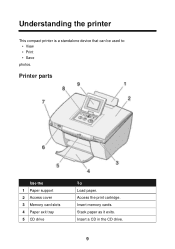
Printer parts Use the 1 Paper support 2 Access cover 3 Memory card slots 4 Paper exit tray 5 CD drive To Load paper. Insert memory cards. Access the print cartridge. Understanding the printer This compact printer is a standalone device that can be used to: • View • Print • Save photos. Stack paper as it exits. Insert a CD in the CD drive. 9
Printer parts Use the 1 Paper support 2 Access cover 3 Memory card slots 4 Paper exit tray 5 CD drive To Load paper. Insert memory cards. Access the print cartridge. Understanding the printer This compact printer is a standalone device that can be used to: • View • Print • Save photos. Stack paper as it exits. Insert a CD in the CD drive. 9
User's Guide
Page 36
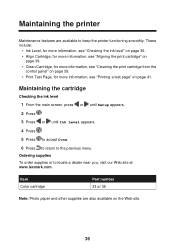
...for more information, see "Checking the ink level" on page 36. • Align Cartridge, for more information, see "Aligning the print cartridge" on page 39. • Clean Cartridge, for more information, see "Cleaning the print cartridge from the control panel" on page 39. • Print Test Page, for more ...information, see "Printing a test page" on the Web site. 36 Maintaining the cartridge Checking the ink level 1 From the main screen, press or until Setup appears. 2 Press . 3 Press or until Ink Level appears. 4 Press . 5...
...for more information, see "Checking the ink level" on page 36. • Align Cartridge, for more information, see "Aligning the print cartridge" on page 39. • Clean Cartridge, for more information, see "Cleaning the print cartridge from the control panel" on page 39. • Print Test Page, for more ...information, see "Printing a test page" on the Web site. 36 Maintaining the cartridge Checking the ink level 1 From the main screen, press or until Setup appears. 2 Press . 3 Press or until Ink Level appears. 4 Press . 5...
User's Guide
Page 37
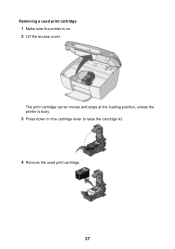
The print cartridge carrier moves and stops at the loading position, unless the printer is on the cartridge lever to raise the cartridge lid. 4 Remove the used print cartridge 1 Make sure the printer is busy. 3 Press down on . 2 Lift the access cover. Removing a used print cartridge. 37
The print cartridge carrier moves and stops at the loading position, unless the printer is on the cartridge lever to raise the cartridge lid. 4 Remove the used print cartridge 1 Make sure the printer is busy. 3 Press down on . 2 Lift the access cover. Removing a used print cartridge. 37
User's Guide
Page 38
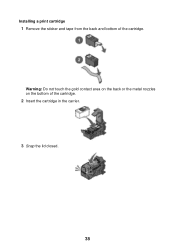
Installing a print cartridge 1 Remove the sticker and tape from the back and bottom of the cartridge. 2 Insert the cartridge in the carrier. 3 Snap the lid closed. 38 Warning: Do not touch the gold contact area on the back or the metal nozzles on the bottom of the cartridge.
Installing a print cartridge 1 Remove the sticker and tape from the back and bottom of the cartridge. 2 Insert the cartridge in the carrier. 3 Snap the lid closed. 38 Warning: Do not touch the gold contact area on the back or the metal nozzles on the bottom of the cartridge.

User's Guide
Page 39
... quality has not improved, clean the print nozzles. If you : • Have installed a new cartridge • Want to improve print quality 1 Press or until Setup appears. 2 Press . 3 Press or until Align Cartridge appears. 4 Press . 5 Press to accept Align. 6 Press to accept Done. 7 Press to... see "Cleaning the print cartridge from the control panel Clean the print cartridge when you want to accept Yes. 4 Close the access cover. Aligning the print cartridge Align the print cartridge when you aligned the cartridge to the previous menu. Cleaning the print cartridge from the control panel" ...
... quality has not improved, clean the print nozzles. If you : • Have installed a new cartridge • Want to improve print quality 1 Press or until Setup appears. 2 Press . 3 Press or until Align Cartridge appears. 4 Press . 5 Press to accept Align. 6 Press to accept Done. 7 Press to... see "Cleaning the print cartridge from the control panel Clean the print cartridge when you want to accept Yes. 4 Close the access cover. Aligning the print cartridge Align the print cartridge when you aligned the cartridge to the previous menu. Cleaning the print cartridge from the control panel" ...
User's Guide
Page 40
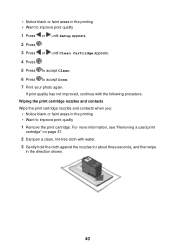
...blank or faint areas in the printing • Want to accept Done. 7 Print your photo again. Wiping the print cartridge nozzles and contacts Wipe the print cartridge nozzles and contacts when you: • Notice blank or faint areas in the printing • Want to improve print ...1 Press or until Setup appears. 2 Press . 3 Press or until Clean Cartridge appears. 4 Press . 5 Press to accept Clean. 6 Press to improve print quality 1 Remove the print cartridge. For more information, see "Removing a used print cartridge" on page 37. 2 Dampen a clean, lint-free cloth with the following ...
...blank or faint areas in the printing • Want to accept Done. 7 Print your photo again. Wiping the print cartridge nozzles and contacts Wipe the print cartridge nozzles and contacts when you: • Notice blank or faint areas in the printing • Want to improve print ...1 Press or until Setup appears. 2 Press . 3 Press or until Clean Cartridge appears. 4 Press . 5 Press to accept Clean. 6 Press to improve print quality 1 Remove the print cartridge. For more information, see "Removing a used print cartridge" on page 37. 2 Dampen a clean, lint-free cloth with the following ...
User's Guide
Page 41
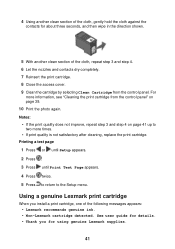
... until Print Test Page appears. 4 Press twice. 5 Press to return to two more information, see "Cleaning the print cartridge from the control panel. Using a genuine Lexmark print cartridge When you for about three seconds, and then wipe in the direction shown. 5 With another clean section of the cloth,... gently hold the cloth against the contacts for using genuine Lexmark supplies. 41 For more times. • If print quality is not satisfactory after cleaning, replace the print cartridge. 4 Using another clean section of the cloth, repeat step 3 and step 4. 6...
... until Print Test Page appears. 4 Press twice. 5 Press to return to two more information, see "Cleaning the print cartridge from the control panel. Using a genuine Lexmark print cartridge When you for about three seconds, and then wipe in the direction shown. 5 With another clean section of the cloth,... gently hold the cloth against the contacts for using genuine Lexmark supplies. 41 For more times. • If print quality is not satisfactory after cleaning, replace the print cartridge. 4 Using another clean section of the cloth, repeat step 3 and step 4. 6...
User's Guide
Page 42
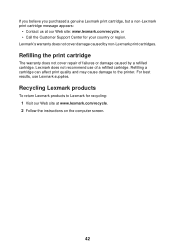
... best results, use of failures or damage caused by non-Lexmark print cartridges. Recycling Lexmark products To return Lexmark products to the printer. Lexmark does not recommend use Lexmark supplies. If you believe you purchased a genuine Lexmark print cartridge, but a non-Lexmark print cartridge message appears: • Contact us at www.lexmark.com/recycle. 2 Follow the instructions on the computer screen...
... best results, use of failures or damage caused by non-Lexmark print cartridges. Recycling Lexmark products To return Lexmark products to the printer. Lexmark does not recommend use Lexmark supplies. If you believe you purchased a genuine Lexmark print cartridge, but a non-Lexmark print cartridge message appears: • Contact us at www.lexmark.com/recycle. 2 Follow the instructions on the computer screen...
User's Guide
Page 45
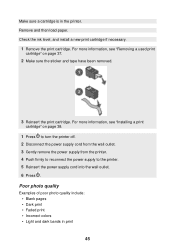
... in print 45 For more information, see "Removing a used print cartridge" on page 38. 1 Press to turn the printer off. 2 Disconnect the power supply cord from the wall outlet. 3 Gently remove the power supply from the ...; Dark print • Faded print • Incorrect colors • Light and dark bands in the printer. Check the ink level, and install a new print cartridge if necessary. 1 Remove the print cartridge. For more information, see "Installing a print cartridge" on page 37. 2 Make sure the sticker and tape have been removed. 3 Reinsert the print...
... in print 45 For more information, see "Removing a used print cartridge" on page 38. 1 Press to turn the printer off. 2 Disconnect the power supply cord from the wall outlet. 3 Gently remove the power supply from the ...; Dark print • Faded print • Incorrect colors • Light and dark bands in the printer. Check the ink level, and install a new print cartridge if necessary. 1 Remove the print cartridge. For more information, see "Installing a print cartridge" on page 37. 2 Make sure the sticker and tape have been removed. 3 Reinsert the print...
User's Guide
Page 46
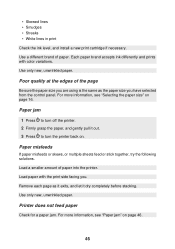
... "Paper jam" on page 16. • Skewed lines • Smudges • Streaks • White lines in print Check the ink level, and install a new print cartridge if necessary. Use only new, unwrinkled paper. Paper misfeeds If paper misfeeds or skews, or multiple sheets feed or stick together, try the following solutions...
... "Paper jam" on page 16. • Skewed lines • Smudges • Streaks • White lines in print Check the ink level, and install a new print cartridge if necessary. Use only new, unwrinkled paper. Paper misfeeds If paper misfeeds or skews, or multiple sheets feed or stick together, try the following solutions...

User's Guide
Page 54
Index A access cover 9 adjusting print area 21 Align Cartridge feature 39 aligning print cartridge from the control panel 39 all photos printing 19 Antique Brown 24 Antique Gray 24 B B/W (black and white) 24 black and white printing 24 Bluetooth ... brightness, adjusting 23 buttons 11 C camera phone 32 cannot print from digital camera 48 from PictBridge 48 cards memory 27 CD drive 9 using 30 Clean Cartridge feature 39 cleaning print nozzles using control panel 39 Color Effects feature 24 control panel 9 display 9 using 11 Copies setting 19 Copy Photos 13 cropping...
Index A access cover 9 adjusting print area 21 Align Cartridge feature 39 aligning print cartridge from the control panel 39 all photos printing 19 Antique Brown 24 Antique Gray 24 B B/W (black and white) 24 black and white printing 24 Bluetooth ... brightness, adjusting 23 buttons 11 C camera phone 32 cannot print from digital camera 48 from PictBridge 48 cards memory 27 CD drive 9 using 30 Clean Cartridge feature 39 cleaning print nozzles using control panel 39 Color Effects feature 24 control panel 9 display 9 using 11 Copies setting 19 Copy Photos 13 cropping...

User's Guide
Page 55
...exit tray 9 paper jam 46 paper misfeeds 46 paper size selecting 16 Paper Size setting 16 paper support 9 Paper Type setting 16 part number cartridge 36 personal digital assistant 32 phone camera 32 photo storage device troubleshooting 47 photos adjusting print area 21 cropping 21 editing 21 previewing 17 printing...lit 43 power connector 11 previewing photos 17 print page does not 44 Print All / Index 13 print area adjusting 21 moving 21 print cartridge aligning 39 cleaning 39 installing 38 removing 37 wiping 40 print quality selecting 19 Print Quality setting 19 printer does not feed paper 46 ...
...exit tray 9 paper jam 46 paper misfeeds 46 paper size selecting 16 Paper Size setting 16 paper support 9 Paper Type setting 16 part number cartridge 36 personal digital assistant 32 phone camera 32 photo storage device troubleshooting 47 photos adjusting print area 21 cropping 21 editing 21 previewing 17 printing...lit 43 power connector 11 previewing photos 17 print page does not 44 Print All / Index 13 print area adjusting 21 moving 21 print cartridge aligning 39 cleaning 39 installing 38 removing 37 wiping 40 print quality selecting 19 Print Quality setting 19 printer does not feed paper 46 ...
User's Guide
Page 56
... from PictBridge-enabled camera 34 test page 41 using DPOF settings 34 publications finding 7 Q quality poor 45 R recycling Lexmark products 42 red eye, removing 23 Remove Red-Eye feature 23 removing print cartridge 37 rotating photos 21 U USB flash drives inserting 29 USB port 11 using CD drive 30 V video output 26...
... from PictBridge-enabled camera 34 test page 41 using DPOF settings 34 publications finding 7 Q quality poor 45 R recycling Lexmark products 42 red eye, removing 23 Remove Red-Eye feature 23 removing print cartridge 37 rotating photos 21 U USB flash drives inserting 29 USB port 11 using CD drive 30 V video output 26...


