Print Drivers for UNIX and LINUX Systems
Page 48
Index A Add Print Queue Wizard 19 administrative group adding a user 17 changing the group name 16 removing user 17 administrator mode 34 B banner program using 29 writing 29 C collating copies 26 command line 33 creating print queues 19 creating virtual devices 18 printing from 24 CUPS 39 Customer Support, contacting 40 D default settings 34 Device Manager 17 duplex printing 26 H holding print jobs 28 hostname troubleshooting 38 I installing printer drivers before installing 8 finding space 13 on Debian Linux 11...
Index A Add Print Queue Wizard 19 administrative group adding a user 17 changing the group name 16 removing user 17 administrator mode 34 B banner program using 29 writing 29 C collating copies 26 command line 33 creating print queues 19 creating virtual devices 18 printing from 24 CUPS 39 Customer Support, contacting 40 D default settings 34 Device Manager 17 duplex printing 26 H holding print jobs 28 hostname troubleshooting 38 I installing printer drivers before installing 8 finding space 13 on Debian Linux 11...
Universal Print Driver Version 2.0 White Paper
Page 4
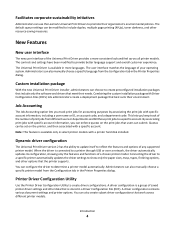
... a Driver Configuration File (DCF). The Universal Print Driver is available in select printer models with specific account information, you keep track of the number of saved printer driver settings and other options that is available only in more consistent look and feel across different printer models. Note: This feature is stored in the Printer Properties dialog. You can use the Lexmark Universal Print Drivers to show only the paper sizes, trays, types, finishing options, and other data that the printer supports...
... a Driver Configuration File (DCF). The Universal Print Driver is available in select printer models with specific account information, you keep track of the number of saved printer driver settings and other options that is available only in more consistent look and feel across different printer models. Note: This feature is stored in the Printer Properties dialog. You can use the Lexmark Universal Print Drivers to show only the paper sizes, trays, types, finishing options, and other data that the printer supports...
Universal Print Driver Version 2.0 White Paper
Page 13
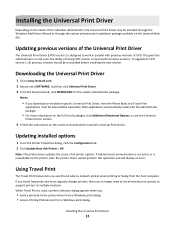
...‑specific Universal Print Driver, then the Phone Book and Travel Print applications must regularly change printers, then you : • Send a print job to support printers at multiple locations. Installing the Universal Print Driver 13 Downloading the Universal Print Driver 1 Go to www.lexmark.com. 2 Mouse over SOFTWARE, and then click Universal Print Driver. 3 From the Download tab, click DOWNLOAD for the printer, then the printer driver cannot perform this operation and will display an error. Updating installed options 1 From the Printer Properties dialog, click the Configuration...
...‑specific Universal Print Driver, then the Phone Book and Travel Print applications must regularly change printers, then you : • Send a print job to support printers at multiple locations. Installing the Universal Print Driver 13 Downloading the Universal Print Driver 1 Go to www.lexmark.com. 2 Mouse over SOFTWARE, and then click Universal Print Driver. 3 From the Download tab, click DOWNLOAD for the printer, then the printer driver cannot perform this operation and will display an error. Updating installed options 1 From the Printer Properties dialog, click the Configuration...
Universal Print Driver Version 2.0 White Paper
Page 16
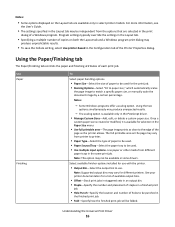
... use. Some Windows programs offer a scaling option. Once a custom paper size is created or modified, it is available only in some drivers. Note: Supported output bins may be independent from different paper trays in the finished print job. • Fold-Specify how the finished print job will be punched in the same print job. Select available finisher options installed for use with the printer. • Output Bin-Select the output bin to be folded. Understanding the Universal Print Driver...
... use. Some Windows programs offer a scaling option. Once a custom paper size is created or modified, it is available only in some drivers. Note: Supported output bins may be independent from different paper trays in the finished print job. • Fold-Specify how the finished print job will be punched in the same print job. Select available finisher options installed for use with the printer. • Output Bin-Select the output bin to be folded. Understanding the Universal Print Driver...
Universal Print Driver Version 2.0 White Paper
Page 17
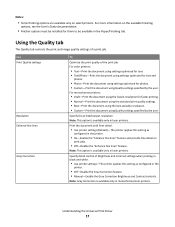
... printing in black and white. • Use printer settings-The printer applies this setting as configured in the Paper/Finishing tab. Understanding the Universal Print Driver 17 Specify detail control of a print job. Notes: • Some finishing options are available only on the available finishing options, see the User's Guide documentation. • Finisher options must be installed for them to be available in the printer. • Off-Disable the Gray Correction feature. • Manual-Enable...
... printing in black and white. • Use printer settings-The printer applies this setting as configured in the Paper/Finishing tab. Understanding the Universal Print Driver 17 Specify detail control of a print job. Notes: • Some finishing options are available only on the available finishing options, see the User's Guide documentation. • Finisher options must be installed for them to be available in the printer. • Off-Disable the Gray Correction feature. • Manual-Enable...
Card Stock & Label Guide
Page 54
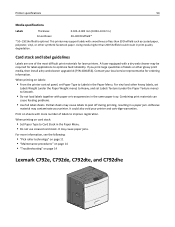
... print materials can cause feeding problems. • Use full label sheets. When printing on page 14 Lexmark C792e, C792de, C792dte, and C792dhe Contact your local service representative for laser printers. Print on card stock: • Set Paper Type to peel off during printing, resulting in print quality degradation. Adhesive material may cause labels to Card Stock in the Paper Menu. When printing on sheets with more information, see the following: • "Pick roller technology" on page 11 • "Maintenance...
... print materials can cause feeding problems. • Use full label sheets. When printing on page 14 Lexmark C792e, C792de, C792dte, and C792dhe Contact your local service representative for laser printers. Print on card stock: • Set Paper Type to peel off during printing, resulting in print quality degradation. Adhesive material may cause labels to Card Stock in the Paper Menu. When printing on sheets with more information, see the following: • "Pick roller technology" on page 11 • "Maintenance...
Card Stock & Label Guide
Page 55
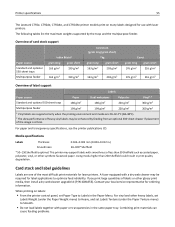
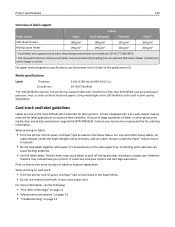
... for use with paper or transparencies in the same paper tray. For vinyl and other synthetic facestock paper. Printer specifications 55 The Lexmark C792e, C792de, C792dte, and C792dhe printer models print on labels: • From the printer control panel, set Labels Texture (under the Paper Weight menu) to Heavy, and set Paper Type to Labels in the Paper Menu. Media specifications Labels Thickness: 0.102-0.305 mm (0.004-0.012 in print quality degradation. Overview of card stock support Paper source Standard and optional 550‑sheet trays Multipurpose feeder...
... for use with paper or transparencies in the same paper tray. For vinyl and other synthetic facestock paper. Printer specifications 55 The Lexmark C792e, C792de, C792dte, and C792dhe printer models print on labels: • From the printer control panel, set Labels Texture (under the Paper Weight menu) to Heavy, and set Paper Type to Labels in the Paper Menu. Media specifications Labels Thickness: 0.102-0.305 mm (0.004-0.012 in print quality degradation. Overview of card stock support Paper source Standard and optional 550‑sheet trays Multipurpose feeder...
Card Stock & Label Guide
Page 140
... the printer User's Guide on page 14 Partial sheets may support labels with a dry web cleaner may be required for label applications to Card Stock in a paper jam. It could result in .) Smoothness: 50-300* Sheffield * 50-150 Sheffield is critical. Contact your printer and cartridge warranties. When printing on labels: • From the printer control panel, set Paper Type to optimize feed reliability. Combining print materials can cause feeding problems. • Use full label sheets. For paper and transparency specifications...
... the printer User's Guide on page 14 Partial sheets may support labels with a dry web cleaner may be required for label applications to Card Stock in a paper jam. It could result in .) Smoothness: 50-300* Sheffield * 50-150 Sheffield is critical. Contact your printer and cartridge warranties. When printing on labels: • From the printer control panel, set Paper Type to optimize feed reliability. Combining print materials can cause feeding problems. • Use full label sheets. For paper and transparency specifications...
Print Quality Guide
Page 12
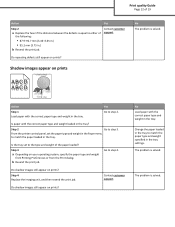
... the tray? No Load paper with the correct paper type and weight loaded in the tray. Is paper with the correct paper type and weight in the tray to step 2. b Resend the print job. Change the paper loaded in the tray. Step 2 Go to step 4. Do shadow images still appear on prints? Print quality Guide Page 12 of 19 Action Yes Step 2 a Replace the fuser if the distance between the defects is solved. Contact customer support. Do...
... the tray? No Load paper with the correct paper type and weight loaded in the tray. Is paper with the correct paper type and weight in the tray to step 2. b Resend the print job. Change the paper loaded in the tray. Step 2 Go to step 4. Do shadow images still appear on prints? Print quality Guide Page 12 of 19 Action Yes Step 2 a Replace the fuser if the distance between the defects is solved. Contact customer support. Do...
Print Quality Guide
Page 15
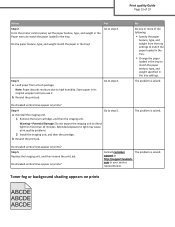
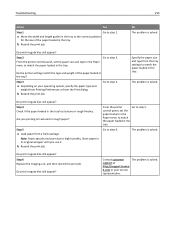
... your service representative. Step 3 a Load paper from the tray settings to match the paper loaded in the tray. • Change the paper loaded in the tray to match the paper texture, type, and weight specified in the tray settings. b Resend the print job. The problem is solved. Step 5 Replace the imaging unit, and then resend the print job. Contact customer The problem is solved. support at http://support.lexmark. Store paper in the tray? Do streaked vertical lines appear on prints? Go to direct light...
... your service representative. Step 3 a Load paper from the tray settings to match the paper loaded in the tray. • Change the paper loaded in the tray to match the paper texture, type, and weight specified in the tray settings. b Resend the print job. The problem is solved. Step 5 Replace the imaging unit, and then resend the print job. Contact customer The problem is solved. support at http://support.lexmark. Store paper in the tray? Do streaked vertical lines appear on prints? Go to direct light...
Supplies Guide
Page 2
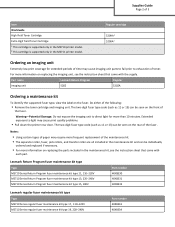
... be seen on replacing the imaging unit, see the instruction sheet that came with the supply. Supplies Guide Page 2 of the following: • Remove the toner cartridge and imaging unit. Part name Lexmark Return Program Regular Imaging unit 520Z 520ZA Ordering a maintenance kit To identify the supported fuser type, view the label on the rear of the maintenance kit. • The separator roller, fuser, pick rollers, and transfer roller are all included in the MS711 printer model. Notes: • Using certain types of paper may require...
... be seen on replacing the imaging unit, see the instruction sheet that came with the supply. Supplies Guide Page 2 of the following: • Remove the toner cartridge and imaging unit. Part name Lexmark Return Program Regular Imaging unit 520Z 520ZA Ordering a maintenance kit To identify the supported fuser type, view the label on the rear of the maintenance kit. • The separator roller, fuser, pick rollers, and transfer roller are all included in the MS711 printer model. Notes: • Using certain types of paper may require...
User's Guide
Page 8
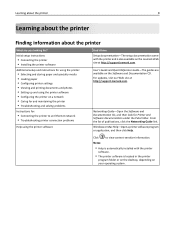
... updates, visit our Web site at http://support.lexmark.com. User's Guide and Quick Reference Guide-The guides are you looking for? Initial setup instructions: • Connecting the printer • Installing the printer software Additional setup and instructions for using the printer: • Selecting and storing paper and specialty media • Loading paper • Configuring printer settings • Viewing and printing documents and photos • Setting up and using the printer software Find it here Setup documentation-The setup documentation came with the printer software...
... updates, visit our Web site at http://support.lexmark.com. User's Guide and Quick Reference Guide-The guides are you looking for? Initial setup instructions: • Connecting the printer • Installing the printer software Additional setup and instructions for using the printer: • Selecting and storing paper and specialty media • Loading paper • Configuring printer settings • Viewing and printing documents and photos • Setting up and using the printer software Find it here Setup documentation-The setup documentation came with the printer software...

User's Guide
Page 93
... to print servers. Print a list of profiles stored in the printer. Understanding printer menus Reports menu Reports menu Use Menu Settings Page Device Statistics Stapler Test Network Setup Page Network [x] Setup Page Profiles List Print Fonts PCL Fonts PostScript Fonts Print Directory Asset Report 93 To Print a report containing information about the paper loaded in trays, installed memory, total page count, alarms, timeouts, printer control panel language, TCP/IP address, status of supplies, status of all the resources stored in an optional flash memory card or printer hard disk...
... to print servers. Print a list of profiles stored in the printer. Understanding printer menus Reports menu Reports menu Use Menu Settings Page Device Statistics Stapler Test Network Setup Page Network [x] Setup Page Profiles List Print Fonts PCL Fonts PostScript Fonts Print Directory Asset Report 93 To Print a report containing information about the paper loaded in trays, installed memory, total page count, alarms, timeouts, printer control panel language, TCP/IP address, status of supplies, status of all the resources stored in an optional flash memory card or printer hard disk...

User's Guide
Page 118
... the printer display, but downloads are bound and printed. Notes: • Long Edge is the factory default setting. Understanding printer menus 118 Use Download Target RAM Flash Disk Resource Save On Off Finishing menu Use Sides (Duplex) 1 sided 2 sided Duplex Binding Long Edge Short Edge Copies 1-999 To Set the storage location for all print jobs. For Windows users: Click File > Print, and then click Properties, Preferences, Options, or Setup. This sets the printer to process print jobs. • On retains the downloads during language changes and printer resets...
... the printer display, but downloads are bound and printed. Notes: • Long Edge is the factory default setting. Understanding printer menus 118 Use Download Target RAM Flash Disk Resource Save On Off Finishing menu Use Sides (Duplex) 1 sided 2 sided Duplex Binding Long Edge Short Edge Copies 1-999 To Set the storage location for all print jobs. For Windows users: Click File > Print, and then click Properties, Preferences, Options, or Setup. This sets the printer to process print jobs. • On retains the downloads during language changes and printer resets...
User's Guide
Page 199
... turn the printer back on custom‑size paper, then make it is securely connected to step 4. Go to step 2. Print a menu settings page, and then check if the tray is below the maximum paper fill indicator. • Make sure paper lies flat in the printer driver. Contact customer support. Troubleshooting 199 Action Yes No Step 2 The problem is solved. Is the tray working ? Is the tray available in the Installed Features list. Use the correct cable, and then check...
... turn the printer back on custom‑size paper, then make it is securely connected to step 4. Go to step 2. Print a menu settings page, and then check if the tray is below the maximum paper fill indicator. • Make sure paper lies flat in the printer driver. Contact customer support. Troubleshooting 199 Action Yes No Step 2 The problem is solved. Is the tray working ? Is the tray available in the Installed Features list. Use the correct cable, and then check...
User's Guide
Page 215
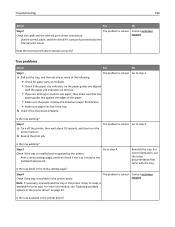
Troubleshooting 215 Action Yes Step 1 Go to step 5. The problem is solved. From the printer Go to step 2. control panel, set the paper size and type in the Paper menu to match the paper loaded in the tray. Step 6 Replace the imaging unit, and then resend the print job. Contact customer The problem is solved. No The problem is solved. b Resend the print job. b Resend the print job. From the printer control panel, set the paper texture in the Paper menu to match the...
Troubleshooting 215 Action Yes Step 1 Go to step 5. The problem is solved. From the printer Go to step 2. control panel, set the paper size and type in the Paper menu to match the paper loaded in the tray. Step 6 Replace the imaging unit, and then resend the print job. Contact customer The problem is solved. No The problem is solved. b Resend the print job. b Resend the print job. From the printer control panel, set the paper texture in the Paper menu to match the...
User's Guide
Page 242
...standard bin jam. [203] 166 [x]‑page jam, remove tray 1 to clear duplex. [235-239] 167 A Active NIC menu 94 adjusting printer display brightness 133 adjusting Sleep mode 132 adjusting toner darkness 75 administrator settings Embedded Web Server 154 AppleTalk menu 99 attaching cables 36 available internal options 14 avoiding jams 71 avoiding paper jams 156 B Bin Setup menu 91 buttons, printer control panel 12 C cables Ethernet 36 USB 36 canceling print job, from computer 80 canceling a print job from a computer 80 from the printer control panel 80 cannot open Embedded Web Server 228 card...
...standard bin jam. [203] 166 [x]‑page jam, remove tray 1 to clear duplex. [235-239] 167 A Active NIC menu 94 adjusting printer display brightness 133 adjusting Sleep mode 132 adjusting toner darkness 75 administrator settings Embedded Web Server 154 AppleTalk menu 99 attaching cables 36 available internal options 14 avoiding jams 71 avoiding paper jams 156 B Bin Setup menu 91 buttons, printer control panel 12 C cables Ethernet 36 USB 36 canceling print job, from computer 80 canceling a print job from a computer 80 from the printer control panel 80 cannot open Embedded Web Server 228 card...

User's Guide
Page 243
...memory 137 erasing volatile memory 137 Error reading USB drive. Remove USB. 180 Error reading USB hub. Securely clearing disk space. 180 disk wiping 138 Disk Wiping menu 107 display troubleshooting printer display is blank 196 display, printer control panel 12 adjusting brightness 133 disposing of printer hard disk 136 documents, printing from Macintosh 75 from Windows 75 E Eco‑Mode setting 131 embedded solutions erasing 137 Embedded Web Server adjusting brightness 133 administrator settings 154 checking the status of parts 141 checking the status of the printer cleaning 140 F factory...
...memory 137 erasing volatile memory 137 Error reading USB drive. Remove USB. 180 Error reading USB hub. Securely clearing disk space. 180 disk wiping 138 Disk Wiping menu 107 display troubleshooting printer display is blank 196 display, printer control panel 12 adjusting brightness 133 disposing of printer hard disk 136 documents, printing from Macintosh 75 from Windows 75 E Eco‑Mode setting 131 embedded solutions erasing 137 Embedded Web Server adjusting brightness 133 administrator settings 154 checking the status of parts 141 checking the status of the printer cleaning 140 F factory...

User's Guide
Page 245
... expander door 175 in standard bin 166 in staple finisher 170 in the tray 168 inside the printer 160 Paper Loading menu 89 Paper Size/Type menu 83 paper sizes supported 72 Paper Texture menu 86 paper types supported 71 Paper Weight menu 87 paper weights supported 71 Parallel [x] menu 101 Parallel port [x] disabled [56] 187 parts checking status 141 checking, using the Embedded Web Server 141 using genuine Lexmark 142 parts and supplies, status of checking, on printer control panel 141 PCL Emul menu 124 PDF menu 124 Personal Identification Number method using 43 port settings configuring 45...
... expander door 175 in standard bin 166 in staple finisher 170 in the tray 168 inside the printer 160 Paper Loading menu 89 Paper Size/Type menu 83 paper sizes supported 72 Paper Texture menu 86 paper types supported 71 Paper Weight menu 87 paper weights supported 71 Parallel [x] menu 101 Parallel port [x] disabled [56] 187 parts checking status 141 checking, using the Embedded Web Server 141 using genuine Lexmark 142 parts and supplies, status of checking, on printer control panel 141 PCL Emul menu 124 PDF menu 124 Personal Identification Number method using 43 port settings configuring 45...

User's Guide
Page 246
...paper type] [paper size] load [orientation] 178 Check tray [x] connection 178 Close door or insert cartridge 179 Close front door 179 Complex page, some data may be incomplete. 187 printer hard disk disposing of 136 encrypting 138 installing 25 removing 30 wiping 138 printer hard disk encryption 138 printer hard disk memory erasing 138 printer information where to find 8 printer is printing blank pages 218 printer messages [x]‑page jam, clear manual feeder. [250] 169 [x]‑page jam, lift front cover to restart. Remove hub. 180 Imaging unit low [84.xy] 180 Imaging unit nearly low...
...paper type] [paper size] load [orientation] 178 Check tray [x] connection 178 Close door or insert cartridge 179 Close front door 179 Complex page, some data may be incomplete. 187 printer hard disk disposing of 136 encrypting 138 installing 25 removing 30 wiping 138 printer hard disk encryption 138 printer hard disk memory erasing 138 printer information where to find 8 printer is printing blank pages 218 printer messages [x]‑page jam, clear manual feeder. [250] 169 [x]‑page jam, lift front cover to restart. Remove hub. 180 Imaging unit low [84.xy] 180 Imaging unit nearly low...


