User's Guide
Page 4
... Network menu 85 Parallel menu 86 Setup menu 86 USB menu 87 Utilities menu 87 Chapter 7: Software and network tasks 88 How to install drivers for local printing 89 Windows 89 Macintosh 91 UNIX/Linux 93 How to print the menu settings and network setup pages 94 How to print a test page 94 Windows 94 Macintosh 94 How to configure for TCP/IP 95 Assigning a printer IP address 95 Verifying the IP settings 95 How to set up the printer for network printing...
... Network menu 85 Parallel menu 86 Setup menu 86 USB menu 87 Utilities menu 87 Chapter 7: Software and network tasks 88 How to install drivers for local printing 89 Windows 89 Macintosh 91 UNIX/Linux 93 How to print the menu settings and network setup pages 94 How to print a test page 94 Windows 94 Macintosh 94 How to configure for TCP/IP 95 Assigning a printer IP address 95 Verifying the IP settings 95 How to set up the printer for network printing...
User's Guide
Page 7
... limits for selecting print media to avoid the possibility of the following two conditions: (1) this product or make any human access to an electrical outlet that is designed, tested, and approved to meet strict global safety standards with your product hardware or software. you can be connected to the requirements of procedures other replacement parts. • Your product uses a laser. See the...
... limits for selecting print media to avoid the possibility of the following two conditions: (1) this product or make any human access to an electrical outlet that is designed, tested, and approved to meet strict global safety standards with your product hardware or software. you can be connected to the requirements of procedures other replacement parts. • Your product uses a laser. See the...
User's Guide
Page 9
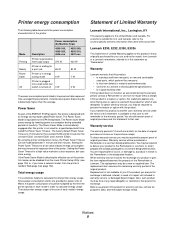
... are responsible for repair without charge. You are provided in power units of Watts, the power consumption should transfer proof of original purchase. The Power Saver Mode is 15 minutes for the Lexmark E230 and 30 minutes for which perform like new parts • Is free from the printer's resident Web page (see page 103) or, if you transfer this product to another user, warranty service under the terms...
... are responsible for repair without charge. You are provided in power units of Watts, the power consumption should transfer proof of original purchase. The Power Saver Mode is 15 minutes for the Lexmark E230 and 30 minutes for which perform like new parts • Is free from the printer's resident Web page (see page 103) or, if you transfer this product to another user, warranty service under the terms...
User's Guide
Page 10
... Limited Warranty is true even if you specific legal rights. This is set forth in this statement may not apply to you may also have installed a maintenance kit as specified (if applicable) • Use of printing media outside of Lexmark specifications • Use of other than Lexmark supplies (such as toner cartridges, inkjet cartridges, and ribbons) • Use of other than Lexmark product or component ALL EXPRESS AND...
... Limited Warranty is true even if you specific legal rights. This is set forth in this statement may not apply to you may also have installed a maintenance kit as specified (if applicable) • Use of printing media outside of Lexmark specifications • Use of other than Lexmark supplies (such as toner cartridges, inkjet cartridges, and ribbons) • Use of other than Lexmark product or component ALL EXPRESS AND...
User's Guide
Page 49
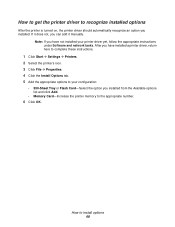
... options list and click Add. • Memory Card-Increase the printer memory to the appropriate number. 6 Click OK. Note: If you have installed a printer driver, return here to complete these instructions. 1 Click Start Æ Settings Æ Printers. 2 Select the printer's icon. 3 Click File Æ Properties. 4 Click the Install Options tab. 5 Add the appropriate options to your configuration: • 550-Sheet Tray or Flash Card-Select the option you have not installed your printer driver yet, follow the appropriate instructions under Software...
... options list and click Add. • Memory Card-Increase the printer memory to the appropriate number. 6 Click OK. Note: If you have installed a printer driver, return here to complete these instructions. 1 Click Start Æ Settings Æ Printers. 2 Select the printer's icon. 3 Click File Æ Properties. 4 Click the Install Options tab. 5 Add the appropriate options to your configuration: • 550-Sheet Tray or Flash Card-Select the option you have not installed your printer driver yet, follow the appropriate instructions under Software...
User's Guide
Page 67
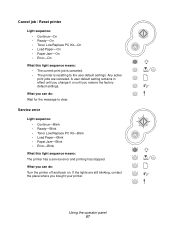
...-On • Ready-On • Toner Low/Replace PC Kit-On • Load Paper-On • Paper Jam-On • Error-On What this light sequence means: The printer has a service error and printing has stopped. Service error Light sequence: • Continue-Blink • Ready-Blink • Toner Low/Replace PC Kit-Blink • Load Paper-Blink • Paper Jam-Blink • Error-Blink What this light sequence means: • The current print job is canceled. • The printer is resetting to clear. What you restore the factory default settings. Using the operator panel 67
...-On • Ready-On • Toner Low/Replace PC Kit-On • Load Paper-On • Paper Jam-On • Error-On What this light sequence means: The printer has a service error and printing has stopped. Service error Light sequence: • Continue-Blink • Ready-Blink • Toner Low/Replace PC Kit-Blink • Load Paper-Blink • Paper Jam-Blink • Error-Blink What this light sequence means: • The current print job is canceled. • The printer is resetting to clear. What you restore the factory default settings. Using the operator panel 67
User's Guide
Page 87
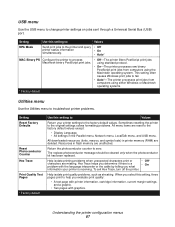
...; Auto* MAC Binary PS Configure the printer to zero. The replace photoconductor message should be cleared only when the photoconductor kit has been replaced. Hex Trace helps you what • On information your printer settings to change printer settings on jobs sent through a Universal Serial Bus (USB) port. Sometimes resetting the printer to the original settings solves formatting problems. All menu items are missing. USB menu Use the USB menu to the factory default values. This setting often causes Windows print jobs to fail. • Auto*-The printer...
...; Auto* MAC Binary PS Configure the printer to zero. The replace photoconductor message should be cleared only when the photoconductor kit has been replaced. Hex Trace helps you what • On information your printer settings to change printer settings on jobs sent through a Universal Serial Bus (USB) port. Sometimes resetting the printer to the original settings solves formatting problems. All menu items are missing. USB menu Use the USB menu to the factory default values. This setting often causes Windows print jobs to fail. • Auto*-The printer...
User's Guide
Page 89
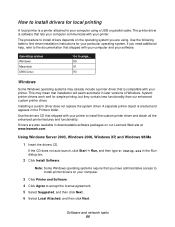
... using a USB or parallel cable. Use the following table to find driver installation instructions for your printer to install the custom printer driver and obtain all the enhanced printer features and functionality. Installing a custom driver does not replace the system driver. If the CD does not auto launch, click Start Æ Run, and then type D:\Setup.exe in the Printers folder. Use the drivers CD that is compatible with your software. How to install drivers for local printing...
... using a USB or parallel cable. Use the following table to find driver installation instructions for your printer to install the custom printer driver and obtain all the enhanced printer features and functionality. Installing a custom driver does not replace the system driver. If the CD does not auto launch, click Start Æ Run, and then type D:\Setup.exe in the Printers folder. Use the drivers CD that is compatible with your software. How to install drivers for local printing...

User's Guide
Page 94
... types of memory installed is not listed under Installed Features, turn off the printer, unplug the power cord, and reinstall the option. - How to print a test page Windows 1 Click Start Æ Settings Æ Printers. 2 Select your printer. 3 Click File Æ Properties. 4 Click Print Test Page. Verify that Status is "Not Connected," your LAN drop may not be active or your network cable may be malfunctioning. If Status is "Connected." Software and network tasks 94 How to print the menu settings and network setup pages...
... types of memory installed is not listed under Installed Features, turn off the printer, unplug the power cord, and reinstall the option. - How to print a test page Windows 1 Click Start Æ Settings Æ Printers. 2 Select your printer. 3 Click File Æ Properties. 4 Click Print Test Page. Verify that Status is "Not Connected," your LAN drop may not be active or your network cable may be malfunctioning. If Status is "Connected." Software and network tasks 94 How to print the menu settings and network setup pages...
User's Guide
Page 96
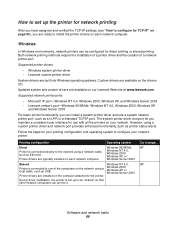
... printer driver and port let you maintain a consistent user interface for direct printing or shared printing. However, using a local cable, such as USB. Printer drivers are available on the drivers CD. Go to be configured for use a system network printer port, such as an LPR or a Standard TCP/IP port. Supported printer drivers • Windows system printer driver • Lexmark custom printer driver System drivers are built into Windows operating systems. Custom drivers are installed on each network computer. Updated system and custom drivers are typically installed...
... printer driver and port let you maintain a consistent user interface for direct printing or shared printing. However, using a local cable, such as USB. Printer drivers are available on the drivers CD. Go to be configured for use a system network printer port, such as an LPR or a Standard TCP/IP port. Supported printer drivers • Windows system printer driver • Lexmark custom printer driver System drivers are built into Windows operating systems. Custom drivers are installed on each network computer. Updated system and custom drivers are typically installed...
User's Guide
Page 102
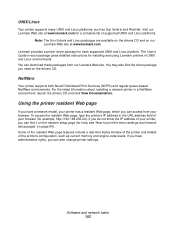
... the printer's configuration, such as Sun Solaris and Red Hat. To access the resident Web page, type the printer's IP address in a NetWare environment, launch the drivers CD and click View Documentation. UNIX/Linux Your printer supports many UNIX and Linux platforms, such as current memory and engine code levels. Lexmark provides a printer driver package for each package gives detailed instructions for help, see "How to print the menu settings and network setup pages" on page 94...
... the printer's configuration, such as Sun Solaris and Red Hat. To access the resident Web page, type the printer's IP address in a NetWare environment, launch the drivers CD and click View Documentation. UNIX/Linux Your printer supports many UNIX and Linux platforms, such as current memory and engine code levels. Lexmark provides a printer driver package for each package gives detailed instructions for help, see "How to print the menu settings and network setup pages" on page 94...
User's Guide
Page 103
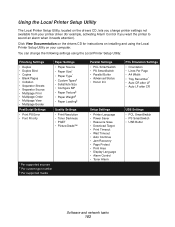
...printer driver (for instructions on installing and using the Local Printer Setup Utility on the drivers CD, lets you change the following settings using the Local Printer Setup Utility: Finishing Settings • Duplex • Duplex Bind • Copies • Blank Pages • Collation • Separator Sheets • Separator Source • Multipage Print • Multipage Order • Multipage View • Multipage Border PostScript Settings • Print PS Error • Font Priority Paper Settings • Paper Source • Paper Size* • Paper Type* • Custom...
...printer driver (for instructions on installing and using the Local Printer Setup Utility on the drivers CD, lets you change the following settings using the Local Printer Setup Utility: Finishing Settings • Duplex • Duplex Bind • Copies • Blank Pages • Collation • Separator Sheets • Separator Source • Multipage Print • Multipage Order • Multipage View • Multipage Border PostScript Settings • Print PS Error • Font Priority Paper Settings • Paper Source • Paper Size* • Paper Type* • Custom...
User's Guide
Page 116
... Files (unless you chose a different directory). 7 Open the Local Printer Setup Utility. 8 From the Paper Menu, scroll through the menu items until you toner cartridge somewhat, remove the cartridge, rotate it back into your computer. 2 Click Printer Software. 3 Click Agree. 4 Select Local Printer Install, and then click Next. 5 Select your printer. To extend the life of pages. Troubleshooting 116 To change Custom 6 back to print slower when using the manual feeder. The printer seems to its default settings...
... Files (unless you chose a different directory). 7 Open the Local Printer Setup Utility. 8 From the Paper Menu, scroll through the menu items until you toner cartridge somewhat, remove the cartridge, rotate it back into your computer. 2 Click Printer Software. 3 Click Agree. 4 Select Local Printer Install, and then click Next. 5 Select your printer. To extend the life of pages. Troubleshooting 116 To change Custom 6 back to print slower when using the manual feeder. The printer seems to its default settings...

User's Guide
Page 119
... paper path. • Replace the toner cartridge. • Replace the fuser*. • Call for service. • The Paper Texture setting is wrong for the type of paper or specialty media you are using. • The Paper Weight setting is wrong for more information. Troubleshooting 119 See "Using the Local Printer Setup Utility" on toner. • The toner cartridge is defective. • Select a different Toner Darkness† setting from the printer driver before sending the job to print. • Load paper...
... paper path. • Replace the toner cartridge. • Replace the fuser*. • Call for service. • The Paper Texture setting is wrong for the type of paper or specialty media you are using. • The Paper Weight setting is wrong for more information. Troubleshooting 119 See "Using the Local Printer Setup Utility" on toner. • The toner cartridge is defective. • Select a different Toner Darkness† setting from the printer driver before sending the job to print. • Load paper...
User's Guide
Page 120
... side of the page.) Incorrect margins The Form Size setting in the printer driver is different than the size paper that is inappropriately slanted.) • The guides in the selected tray • Move the guides in the tray so are not in the correct position for that they are using the Local Printer Setup Utility. Troubleshooting 120 Uneven printing DE DE DE • The toner cartridge is not properly installed. • Remove...
... side of the page.) Incorrect margins The Form Size setting in the printer driver is different than the size paper that is inappropriately slanted.) • The guides in the selected tray • Move the guides in the tray so are not in the correct position for that they are using the Local Printer Setup Utility. Troubleshooting 120 Uneven printing DE DE DE • The toner cartridge is not properly installed. • Remove...
User's Guide
Page 121
... Solution Blank pages The toner cartridge is wrong Change Paper Texture† from and exits to the bin for the type of paper or specialty Rough to Normal or Smooth. media you are using. * To replace the fuser, call a service technician. † This setting can be changed using the Local Printer Setup Utility. Troubleshooting 121 empty. See "Using the Local Printer Setup Utility" on page 103 for service. Paper curls badly once it prints The Paper Texture setting is...
... Solution Blank pages The toner cartridge is wrong Change Paper Texture† from and exits to the bin for the type of paper or specialty Rough to Normal or Smooth. media you are using. * To replace the fuser, call a service technician. † This setting can be changed using the Local Printer Setup Utility. Troubleshooting 121 empty. See "Using the Local Printer Setup Utility" on page 103 for service. Paper curls badly once it prints The Paper Texture setting is...
User's Guide
Page 125
... light 58 buttons 51 C canceling a print job 39 card stock 18 cleaning the printhead lens 122 clearing paper jams 26 configuration menus Network MAC Binary PS 85 NPA Mode 85 Set Card Speed 85 Parallel MAC Binary PS 86 Mode 2 86 NPA Mode 86 Protocol 86 printing the Printer Settings Configuration sheet 83 Setup Auto CR after LF 86 Auto LF after CR 86 USB MAC Binary PS 87 NPA Mode 87 Utilities Hex Trace 87 Print Quality Test Pages 87 Reset Factory Defaults 87 Reset Photoconductor Counter 87 D duplex...
... light 58 buttons 51 C canceling a print job 39 card stock 18 cleaning the printhead lens 122 clearing paper jams 26 configuration menus Network MAC Binary PS 85 NPA Mode 85 Set Card Speed 85 Parallel MAC Binary PS 86 Mode 2 86 NPA Mode 86 Protocol 86 printing the Printer Settings Configuration sheet 83 Setup Auto CR after LF 86 Auto LF after CR 86 USB MAC Binary PS 87 NPA Mode 87 Utilities Hex Trace 87 Print Quality Test Pages 87 Reset Factory Defaults 87 Reset Photoconductor Counter 87 D duplex...
User's Guide
Page 126
... manual feeder 62 Load media 61 Manual duplex 62 Not ready 60 Offline 60 Photoconductor kit near full 64 Print side two 62 Printer error 68 Printing a directory 58 Printing a font list 58 Printing menu settings pages 58 Printing Print Quality Test Pages 58 Programming engine code 66 Programming flash 58 Programming system code 66 Ready/Power Saver 57 Replace photoconductor kit 64, 65 Resetting printer 67 Restoring factory defaults 67 secondary error codes 69 Service error 67 Toner low 63 Unsupported toner cartridge 65 Waiting 59 lights 51, 52 options 550-sheet drawer 48 flash card 46 memory...
... manual feeder 62 Load media 61 Manual duplex 62 Not ready 60 Offline 60 Photoconductor kit near full 64 Print side two 62 Printer error 68 Printing a directory 58 Printing a font list 58 Printing menu settings pages 58 Printing Print Quality Test Pages 58 Programming engine code 66 Programming flash 58 Programming system code 66 Ready/Power Saver 57 Replace photoconductor kit 64, 65 Resetting printer 67 Restoring factory defaults 67 secondary error codes 69 Service error 67 Toner low 63 Unsupported toner cartridge 65 Waiting 59 lights 51, 52 options 550-sheet drawer 48 flash card 46 memory...
User's Guide
Page 127
... Host interface disabled 77 Insufficient collation area 74 Insufficient defrag memory 76 Insufficient printer memory 73 Invalid engine code 81 Invalid network code 82 Memory full 78 Network interface errors 76 Paper jam at the input sensor 70 Paper jam in the manual feeder 70 Paper jam in Tray 1 72 Paper jam in Tray 2 72 Paper jams as a printed job exits the tray 71 Paper jams as it exits the tray into the printer 71 PPDS font error 75 Short paper 79 Unformatted flash 81 service error lights 67 Set Card Speed (Network menu) 85 Setup menu...
... Host interface disabled 77 Insufficient collation area 74 Insufficient defrag memory 76 Insufficient printer memory 73 Invalid engine code 81 Invalid network code 82 Memory full 78 Network interface errors 76 Paper jam at the input sensor 70 Paper jam in the manual feeder 70 Paper jam in Tray 1 72 Paper jam in Tray 2 72 Paper jams as a printed job exits the tray 71 Paper jams as it exits the tray into the printer 71 PPDS font error 75 Short paper 79 Unformatted flash 81 service error lights 67 Set Card Speed (Network menu) 85 Setup menu...
Quick Reference
Page 2
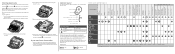
... is offline) Close door Load media Load manual feeder Print side two of the printer and remove any jams beneath the flap. 5 Open the rear exit and remove any jams in the area behind the print cartridge assembly. 4 Lift the flap at the front of a duplex job Toner low Replace photoconductor kit Replace photoconductor kit (printer hard stop) Unsupported toner cartridge / Toner cartridge is not installed Change invalid toner cartridge Cancel job / Reset printer Service error Printer error * Paper jam printer error * Paper jam at the input sensor can be either after the paper leaves the tray...
... is offline) Close door Load media Load manual feeder Print side two of the printer and remove any jams beneath the flap. 5 Open the rear exit and remove any jams in the area behind the print cartridge assembly. 4 Lift the flap at the front of a duplex job Toner low Replace photoconductor kit Replace photoconductor kit (printer hard stop) Unsupported toner cartridge / Toner cartridge is not installed Change invalid toner cartridge Cancel job / Reset printer Service error Printer error * Paper jam printer error * Paper jam at the input sensor can be either after the paper leaves the tray...


