Lexmark 260d - E B/W Laser Printer Support and Manuals
Get Help and Manuals for this Lexmark item
View All Support Options Below
Free Lexmark 260d manuals!
Problems with Lexmark 260d?
Ask a Question
Free Lexmark 260d manuals!
Problems with Lexmark 260d?
Ask a Question
Most Recent Lexmark 260d Questions

Why Is My Lexmark E260dn Printer Offline? The Person Who Posted This Question A
(Posted by danushkama 3 years ago)

Random Ascii Characters On Lexmark 260d
I have a Lexmark 260D printer that prints beautiful clear test pages, but each has a string of rando...
I have a Lexmark 260D printer that prints beautiful clear test pages, but each has a string of rando...
(Posted by davidcairns 11 years ago)

The Light With The Light Bulb Underneath It Is On...
The light with the light bulb underneath it is on, what does this mean?
The light with the light bulb underneath it is on, what does this mean?
(Posted by destinyb0711 11 years ago)
A Lexmark Printer 260d How Many Pages Print In The New Original Cartriges
(Posted by milanbebe 11 years ago)

What Do The Symbols On The Face Plate Indicate?
(Posted by Anonymous-53560 12 years ago)
Popular Lexmark 260d Manual Pages
Quick Reference - Page 1

...cause a jam. Proper paper loading prevents jams and facilitates trouble-free printing. 1 Pull the tray completely out.
The factory default paper type setting is plain paper, so the paper type setting must be saved until you would like A4 or legal, squeeze the length guide tabs and slide the length guide backwards to the printer at one of the following :
• For Windows users, click...
Quick Reference - Page 2

... guide, and slide the width guides to lightly touch the side of the tray. Do not load A6-size paper to overload the tray. Note: Notice the maximum fill line. If you are loading A6-size paper: a Squeeze the length guide tabs together as shown with the design placed facedown. Load the letterhead with the recommended print...
Quick Reference - Page 3
... envelopes with the flap side down and with the stamp area as it stacks.
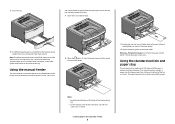
Using the manual feeder
The manual feeder is located inside the manual feeder door of the printer and can contact the paper guides.
4 Adjust the paper guides to the point where its leading edge can feed only one sheet of the tray.
7 Insert the tray.
Warning...
Quick Reference - Page 4
... up to another location, make sure the paper stop is supported only in the open the paper stop in Tray 1.
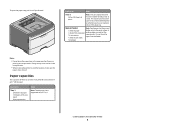
Do not force the paper into the manual
1 sheet of paper
feeder only to
Tray 1 250 sheets of paper 150 sheets of A6-size paper leading edge can be installed on the printer at a time. Doing so may be loaded...
Quick Reference - Page 5

...set correctly.
• Make sure all trays in firmly after loading paper.
• Make sure the guides in an appropriate environment. • Do not remove trays while the printer is printing. On
Try one of the Embedded Web Server.
200.yy Paper jam
Clearing jams
5
200.yy Paper jam - On
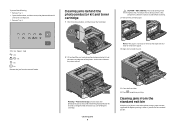
Open the front door, and then remove the photoconductor kit and toner cartridge unit. Accessing jam...
Quick Reference - Page 6
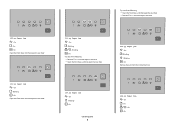
On - Blinking - Blinking
- Blinking - Blinking - On
Clearing jams
6
24x.yy Paper jam - On - On
Open the front door, and then open the rear door.
231.yy Paper jam - Blinking
- Blinking - On
- On
Remove the jam from the standard exit bin.
234.yy Paper jam - On
Open the front door, and then open the rear door.
233.yy Paper jam
- On - On - On On - On Try one ...
Quick Reference - Page 7
On - On
Remove the jam from the manual feeder.
2 Lift and pull the unit containing the photoconductor kit and the toner cartridge out of the photoconductor kit. Use the cartridge handle whenever you are holding the cartridge. Clearing jams from a hot component, allow the surface to the printer using a paper size not supported for duplex printing. To reduce the risk of injury from the ...
Quick Reference - Page 8
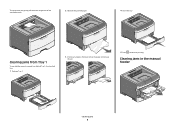
... jams from Tray 1
To see whether paper is jammed in the manual feeder
Clearing jams
8 Clearing jams in or behind Tray 1, the standard tray:
1 Remove Tray 1.
3 If necessary, depress the lever to free the paper and remove the jam.
5 Press to continue printing. To remove the jam, gently pull the sheet straight out of the standard exit bin.
2 Remove the jammed paper...
Quick Reference - Page 9
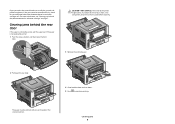
... rear doors. 5 Press to continue printing.
If the paper is exiting the printer, pull the paper out. Clearing jams
9 If the jam cannot be grasped and pulled straight out. Paper jammed in the standard exit bin. Clearing jams behind the photoconductor kit and toner cartridge unit. For more information, see "Clearing jams behind the photoconductor kit and toner cartridge" on page 7.
Setup Sheet - Page 1
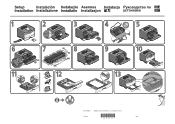
All rights reserved.
*34S0254*
Rev 001
4/08 P/N 34S0254
© 2008 Lexmark International, Inc.
Lexmark 260d Reviews
We have not received any reviews for Lexmark yet.