
Quick Reference
Page 5
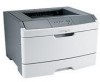
..., damp, or curled paper. • Flex, fan, and straighten paper before removing a tray. On • Do not load the manual feeder while the printer is the unit housing the toner cartridge and photoconductor kit. 2 Standard exit bin 3 Front door 4 Manual feeder door 5 Standard 250-sheet tray (Tray 1) 6 Optional tray (Tray 2) 7 Rear door Understanding...
..., damp, or curled paper. • Flex, fan, and straighten paper before removing a tray. On • Do not load the manual feeder while the printer is the unit housing the toner cartridge and photoconductor kit. 2 Standard exit bin 3 Front door 4 Manual feeder door 5 Standard 250-sheet tray (Tray 1) 6 Optional tray (Tray 2) 7 Rear door Understanding...
Quick Reference
Page 7
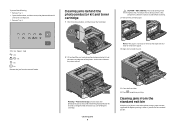
...8226; Remove Tray 2. On Remove the jam from the manual feeder. 2 Lift and pull the unit containing the photoconductor kit and the toner cartridge out of the printer might be hot. Note: If the paper is jammed in the standard exit bin. Try one of injury from the standard exit bin ...A duplex print job was sent to the printer using a paper size not supported for duplex printing. Clearing jams behind the photoconductor kit and toner cartridge 1 Push the release button, and then lower the front door. On - Warning-Potential Damage: ...
...8226; Remove Tray 2. On Remove the jam from the manual feeder. 2 Lift and pull the unit containing the photoconductor kit and the toner cartridge out of the printer might be hot. Note: If the paper is jammed in the standard exit bin. Try one of injury from the standard exit bin ...A duplex print job was sent to the printer using a paper size not supported for duplex printing. Clearing jams behind the photoconductor kit and toner cartridge 1 Push the release button, and then lower the front door. On - Warning-Potential Damage: ...
Quick Reference
Page 9
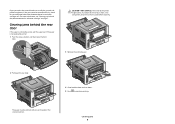
Clearing jams behind the rear door If the paper is not exiting the printer: 1 Push the release button, and then lower the front door CAUTION-HOT SURFACE: The inside of injury from a hot component, allow the surface to cool .... For more information, see "Clearing jams behind the photoconductor kit and toner cartridge unit. To reduce the risk of the printer might be removed this way, check for jammed paper behind the photoconductor kit and toner cartridge" on page 7. If the paper is exiting the printer, pull the paper out. If the jam cannot be hot...
Clearing jams behind the rear door If the paper is not exiting the printer: 1 Push the release button, and then lower the front door CAUTION-HOT SURFACE: The inside of injury from a hot component, allow the surface to cool .... For more information, see "Clearing jams behind the photoconductor kit and toner cartridge unit. To reduce the risk of the printer might be removed this way, check for jammed paper behind the photoconductor kit and toner cartridge" on page 7. If the paper is exiting the printer, pull the paper out. If the jam cannot be hot...


