
Quick Reference
Page 1
... and specialty media 1 Do not remove trays while a job prints or when the Busy light sequence appears on your operating system: • On a Windows computer, access the Paper menu through the Local Printer Settings Utility. • On a Macintosh computer, access the Paper menu through the Embedded ...and then slide the length guide to a computer by a USB or parallel cable, use one time. Access the Paper menu through the Printer Settings. Proper paper loading prevents jams and facilitates trouble-free printing. 1 Pull the tray completely out. It also includes information about setting ...
... and specialty media 1 Do not remove trays while a job prints or when the Busy light sequence appears on your operating system: • On a Windows computer, access the Paper menu through the Local Printer Settings Utility. • On a Macintosh computer, access the Paper menu through the Embedded ...and then slide the length guide to a computer by a USB or parallel cable, use one time. Access the Paper menu through the Printer Settings. Proper paper loading prevents jams and facilitates trouble-free printing. 1 Pull the tray completely out. It also includes information about setting ...

Quick Reference
Page 2
b Raise the A6 length guide. Do not try to lightly touch the side of the stack. If you are loading A6-size paper: a Squeeze the length guide tabs together as shown with the design placed ...
b Raise the A6 length guide. Do not try to lightly touch the side of the stack. If you are loading A6-size paper: a Squeeze the length guide tabs together as shown with the design placed ...
Quick Reference
Page 3
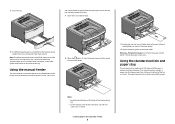
... manual feeder The manual feeder is lit, load the paper faceup into the center of the printer and can contact the paper guides. 4 Adjust the paper guides to the paper width. You can use 2 When the light is located inside the manual feeder door of the manual feeder. 3 Feed paper into the...
... manual feeder The manual feeder is lit, load the paper faceup into the center of the printer and can contact the paper guides. 4 Adjust the paper guides to the paper width. You can use 2 When the light is located inside the manual feeder door of the manual feeder. 3 Feed paper into the...

Quick Reference
Page 5
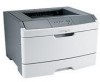
.... • Do not load too much paper. On - On • Do not load the manual feeder while the printer is printing. On - The light sequence for the light to come on before loading it. • Do not use paper that the tray may be removed: Load paper -...Do not remove trays while the printer is printing. Inside this door is the unit housing the toner cartridge and photoconductor kit. 2 Standard exit bin 3 Front door 4 Manual feeder door 5 Standard 250-sheet tray (Tray 1) 6 Optional tray (Tray 2) 7 Rear door Understanding jam lights and access locations The following : ...
.... • Do not load too much paper. On - On • Do not load the manual feeder while the printer is printing. On - The light sequence for the light to come on before loading it. • Do not use paper that the tray may be removed: Load paper -...Do not remove trays while the printer is printing. Inside this door is the unit housing the toner cartridge and photoconductor kit. 2 Standard exit bin 3 Front door 4 Manual feeder door 5 Standard 250-sheet tray (Tray 1) 6 Optional tray (Tray 2) 7 Rear door Understanding jam lights and access locations The following : ...


