
Quick Reference
Page 1
... Windows users, click File Œ Print, and then click Properties, Preferences, Options, or Setup. • For Macintosh users, choose File > Print, and then adjust the settings from the print dialog and pop-up menus. Loading the standard 250-sheet tray The printer has two trays to access the Paper menu, depending on the printer control panel. Loading paper and specialty media 1 Do not remove trays while a job prints or when the Busy light sequence appears on your Web browser. If you reset factory default settings. Proper paper loading prevents jams...
... Windows users, click File Œ Print, and then click Properties, Preferences, Options, or Setup. • For Macintosh users, choose File > Print, and then adjust the settings from the print dialog and pop-up menus. Loading the standard 250-sheet tray The printer has two trays to access the Paper menu, depending on the printer control panel. Loading paper and specialty media 1 Do not remove trays while a job prints or when the Busy light sequence appears on your Web browser. If you reset factory default settings. Proper paper loading prevents jams...

Quick Reference
Page 2
... the A6 size position. Load the letterhead with the recommended print side facedown. Note: The standard tray accommodates only 150 sheets of A6-size paper. 1 Maximum fill line Note: When loading letterhead, place the top edge of the sheet toward the front of the stack. Loading paper and specialty media 2 the tray holds only 150 sheets of A6-size paper. 6 Squeeze the width guide tabs on a level surface. 5 Load the paper stack...
... the A6 size position. Load the letterhead with the recommended print side facedown. Note: The standard tray accommodates only 150 sheets of A6-size paper. 1 Maximum fill line Note: When loading letterhead, place the top edge of the sheet toward the front of the stack. Loading paper and specialty media 2 the tray holds only 150 sheets of A6-size paper. 6 Squeeze the width guide tabs on a level surface. 5 Load the paper stack...
Quick Reference
Page 3
... print jobs facedown. The paper stop also aids in the tray, change the Paper Type setting. You can use 2 When the light is located inside the manual feeder door of the printer and can contact the paper guides. 4 Adjust the paper guides to 150 sheets of paper at a time. Note: The difference between the standard 250-sheet tray and the optional 250- Forcing the paper causes jams. Using the standard exit bin and paper stop that the standard tray accommodates up to the paper width. The standard exit bin includes a paper stop...
... print jobs facedown. The paper stop also aids in the tray, change the Paper Type setting. You can use 2 When the light is located inside the manual feeder door of the printer and can contact the paper guides. 4 Adjust the paper guides to 150 sheets of paper at a time. Note: The difference between the standard 250-sheet tray and the optional 250- Forcing the paper causes jams. Using the standard exit bin and paper stop that the standard tray accommodates up to the paper width. The standard exit bin includes a paper stop...
Quick Reference
Page 4
... paper size is closed. Loading paper and specialty media 4 To open position if you have an optional 250- Load up to Notes Tray 2 250 or 550 sheets of paper Note: Only one optional drawer may cause creases in the transparencies. • When moving the printer to Tray 1 250 sheets of paper 150 sheets of the trays and the manual feeder are printing on the printer at a time. Load up to another location, make sure the paper stop is supported...
... paper size is closed. Loading paper and specialty media 4 To open position if you have an optional 250- Load up to Notes Tray 2 250 or 550 sheets of paper Note: Only one optional drawer may cause creases in the transparencies. • When moving the printer to Tray 1 250 sheets of paper 150 sheets of the trays and the manual feeder are printing on the printer at a time. Load up to another location, make sure the paper stop is supported...

Quick Reference
Page 5
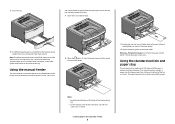
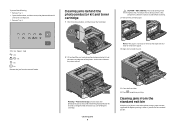
... this door is printing. On Open the front door, and then remove the photoconductor kit and toner cartridge unit. On • Do not load the manual feeder while the printer is the unit housing the toner cartridge and photoconductor kit. 2 Standard exit bin 3 Front door 4 Manual feeder door 5 Standard 250-sheet tray (Tray 1) 6 Optional tray (Tray 2) 7 Rear door Understanding jam lights and access locations The following hints can help you avoid jams: • Use only recommended paper or specialty media. • Do not load too much paper. More detailed instructions...
... this door is printing. On Open the front door, and then remove the photoconductor kit and toner cartridge unit. On • Do not load the manual feeder while the printer is the unit housing the toner cartridge and photoconductor kit. 2 Standard exit bin 3 Front door 4 Manual feeder door 5 Standard 250-sheet tray (Tray 1) 6 Optional tray (Tray 2) 7 Rear door Understanding jam lights and access locations The following hints can help you avoid jams: • Use only recommended paper or specialty media. • Do not load too much paper. More detailed instructions...
Quick Reference
Page 6
... then open the rear door. 233.yy Paper jam - Blinking - Blinking - Blinking - On - On - On - On - On Remove the jam from the standard exit bin. 234.yy Paper jam - Try one of the following : • Remove Tray 1, and then depress the lever. • Open the front door, and then open the rear door. 235.yy Paper jam - Blinking - Blinking - On Try one of the following : • Open the front door, and then open the rear door. • Remove Tray...
... then open the rear door. 233.yy Paper jam - Blinking - Blinking - Blinking - On - On - On - On - On Remove the jam from the standard exit bin. 234.yy Paper jam - Try one of the following : • Remove Tray 1, and then depress the lever. • Open the front door, and then open the rear door. 235.yy Paper jam - Blinking - Blinking - On Try one of the following : • Open the front door, and then open the rear door. • Remove Tray...
Quick Reference
Page 7
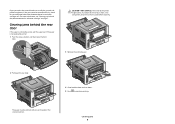
On - On Remove the jam from the manual feeder. 2 Lift and pull the unit containing the photoconductor kit and the toner cartridge out of the photoconductor kit. On - Note: If the paper is jammed in the standard exit bin. On - Warning-Potential Damage: Do not touch the photoconductor on a flat, clean surface. A sheet is not easy to remove, then open the rear door to the printer using a paper size not supported for duplex printing. CAUTION-HOT SURFACE...
On - On Remove the jam from the manual feeder. 2 Lift and pull the unit containing the photoconductor kit and the toner cartridge out of the photoconductor kit. On - Note: If the paper is jammed in the standard exit bin. On - Warning-Potential Damage: Do not touch the photoconductor on a flat, clean surface. A sheet is not easy to remove, then open the rear door to the printer using a paper size not supported for duplex printing. CAUTION-HOT SURFACE...
Quick Reference
Page 8
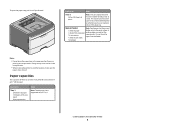
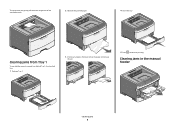
To remove the jam, gently pull the sheet straight out of the standard exit bin. 2 Remove the jammed paper. 4 Insert the tray. Clearing jams from Tray 1 To see whether paper is jammed in the manual feeder Clearing jams 8 Clearing jams in or behind Tray 1, the standard tray: 1 Remove Tray 1. 3 If necessary, depress the lever to free the paper and remove the jam. 5 Press to continue printing.
To remove the jam, gently pull the sheet straight out of the standard exit bin. 2 Remove the jammed paper. 4 Insert the tray. Clearing jams from Tray 1 To see whether paper is jammed in the manual feeder Clearing jams 8 Clearing jams in or behind Tray 1, the standard tray: 1 Remove Tray 1. 3 If necessary, depress the lever to free the paper and remove the jam. 5 Press to continue printing.
Quick Reference
Page 9
... of injury from a hot component, allow the surface to cool before touching. 3 Remove the jammed paper. . 2 Pull open the rear door. 4 Close both the front and rear doors. 5 Press to continue printing. Paper jammed in the manual feeder can usually be jammed with one end caught in the standard exit bin. If the jam cannot be hot. For more information, see "Clearing jams behind the photoconductor kit and toner cartridge unit.
... of injury from a hot component, allow the surface to cool before touching. 3 Remove the jammed paper. . 2 Pull open the rear door. 4 Close both the front and rear doors. 5 Press to continue printing. Paper jammed in the manual feeder can usually be jammed with one end caught in the standard exit bin. If the jam cannot be hot. For more information, see "Clearing jams behind the photoconductor kit and toner cartridge unit.
Setup Sheet
Page 1
All rights reserved. *34S0254* Rev 001 4/08 P/N 34S0254 © 2008 Lexmark International, Inc.
All rights reserved. *34S0254* Rev 001 4/08 P/N 34S0254 © 2008 Lexmark International, Inc.


