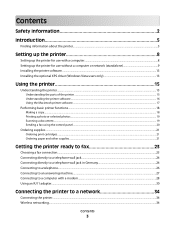
Getting Started
Page 3
... optional XPS driver (Windows Vista users only 13 Using the printer 15 Understanding the printer...15 Understanding the parts of the printer ...15 Understanding the printer software...16 Using the Macintosh printer software...17 Performing basic printer functions...18 Making a copy...18 Printing a photo or selected... fax using the control panel ...20 Ordering supplies...21 Ordering print cartridges ...21 Ordering paper and other supplies...21 Getting the printer ready to fax 23 Choosing a fax connection...23 Connecting directly to a telephone wall jack...24 Connecting directly to a telephone ...
... optional XPS driver (Windows Vista users only 13 Using the printer 15 Understanding the printer...15 Understanding the parts of the printer ...15 Understanding the printer software...16 Using the Macintosh printer software...17 Performing basic printer functions...18 Making a copy...18 Printing a photo or selected... fax using the control panel ...20 Ordering supplies...21 Ordering print cartridges ...21 Ordering paper and other supplies...21 Getting the printer ready to fax 23 Choosing a fax connection...23 Connecting directly to a telephone wall jack...24 Connecting directly to a telephone ...

Getting Started
Page 4
...need to set up the printer on a wireless network 34 Installing the printer on a wireless network...35 Interpreting the colors of the Wi-Fi indicator light...36 Finding the signal strength...36 Wired networking...36 Installing the printer on a wired (Ethernet) network ...36 Connecting the printer directly to the computer with ... does not print...40 Wireless troubleshooting...41 Check your security keys...41 Wireless setup program cannot communicate with the printer during installation 42 Wi-Fi indicator light is blinking orange during installation 43 Wi-Fi indicator light is still orange ...45...
...need to set up the printer on a wireless network 34 Installing the printer on a wireless network...35 Interpreting the colors of the Wi-Fi indicator light...36 Finding the signal strength...36 Wired networking...36 Installing the printer on a wired (Ethernet) network ...36 Connecting the printer directly to the computer with ... does not print...40 Wireless troubleshooting...41 Check your security keys...41 Wireless setup program cannot communicate with the printer during installation 42 Wi-Fi indicator light is blinking orange during installation 43 Wi-Fi indicator light is still orange ...45...
Getting Started
Page 5
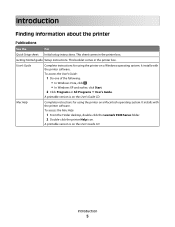
...CD. Mac Help Complete instructions for using the printer on a Windows operating system. User's Guide Complete instructions for using the printer on a Macintosh operating system. It installs with the printer software. It installs with the printer software. Introduction 5 To access the User's ...printer box. This booklet comes in the printer box. Getting Started guide Setup instructions. To access the Mac Help: 1 From the Finder desktop, double-click the Lexmark 9500 Series folder. 2 Double-click the printer Help icon. Introduction Finding information about the printer...
...CD. Mac Help Complete instructions for using the printer on a Windows operating system. User's Guide Complete instructions for using the printer on a Macintosh operating system. It installs with the printer software. It installs with the printer software. Introduction 5 To access the User's ...printer box. This booklet comes in the printer box. Getting Started guide Setup instructions. To access the Mac Help: 1 From the Finder desktop, double-click the Lexmark 9500 Series folder. 2 Double-click the printer Help icon. Introduction Finding information about the printer...

Getting Started
Page 6
...Support numbers and times may not be available in some instances. Note: For additional information about contacting Lexmark, see the printed warranty statement that shipped with your printer. Select a country or region, and then select the Customer Support link. E-mail support For e-mail... support, visit our Web site: www.lexmark.com. 1 Click CUSTOMER SUPPORT. 2 Click Technical Support. 3 Select your printer family. 4 Select your printer. Visit our Web site at www.lexmark.com. Select a country or region, and then select the Customer Support link...
...Support numbers and times may not be available in some instances. Note: For additional information about contacting Lexmark, see the printed warranty statement that shipped with your printer. Select a country or region, and then select the Customer Support link. E-mail support For e-mail... support, visit our Web site: www.lexmark.com. 1 Click CUSTOMER SUPPORT. 2 Click Technical Support. 3 Select your printer family. 4 Select your printer. Visit our Web site at www.lexmark.com. Select a country or region, and then select the Customer Support link...

Getting Started
Page 7
...Guide for Windows and the Mac Help for a www.lexmark.com. For complete descriptions, see the Statement of country or region. Introduction 7 Record the following information (located on the store receipt and the back of the printer), and have it ready when you faster: • ... and workmanship for Macintosh. original date of purchase. 2 Click Warranty Information. 3 From the Statement of Limited Warranty section, click Inkjet & All-In-One Printers. 4 Scroll through the Web page to find (US) Where to view the warranty. Limited Warranty Description Where to find (rest...
...Guide for Windows and the Mac Help for a www.lexmark.com. For complete descriptions, see the Statement of country or region. Introduction 7 Record the following information (located on the store receipt and the back of the printer), and have it ready when you faster: • ... and workmanship for Macintosh. original date of purchase. 2 Click Warranty Information. 3 From the Statement of Limited Warranty section, click Inkjet & All-In-One Printers. 4 Scroll through the Web page to find (US) Where to view the warranty. Limited Warranty Description Where to find (rest...

Getting Started
Page 8
...Follow the instructions on the computer screen to communicate with your computer system. Your security software may notify you that Lexmark software is necessary for Macintosh, depending on which operating system you unpack the printer or attach anything, locate the CD for Windows or the CD for the... printer to work properly. This is trying to set up the printer. You can set up the printer to work either with a computer 1 Before you use...
...Follow the instructions on the computer screen to communicate with your computer system. Your security software may notify you that Lexmark software is necessary for Macintosh, depending on which operating system you unpack the printer or attach anything, locate the CD for Windows or the CD for the... printer to work properly. This is trying to set up the printer. You can set up the printer to work either with a computer 1 Before you use...
Getting Started
Page 9
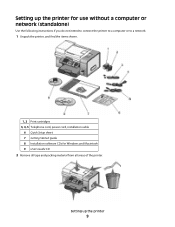
Setting up the printer for use without a computer or network (standalone) Use the following instructions if you do not intend to connect the printer to a computer or to a network. 1 Unpack the printer, and find the items shown. 1, 2 Print cartridges 3, 4, 5 Telephone cord, power cord, installation cable 6 Quick Setup sheet 7 Getting Started guide 8 Installation software CDs for Windows and Macintosh 9 User's Guide CD 2 Remove all tape and packing material from all areas of the printer. Setting up the printer 9
Setting up the printer for use without a computer or network (standalone) Use the following instructions if you do not intend to connect the printer to a computer or to a network. 1 Unpack the printer, and find the items shown. 1, 2 Print cartridges 3, 4, 5 Telephone cord, power cord, installation cable 6 Quick Setup sheet 7 Getting Started guide 8 Installation software CDs for Windows and Macintosh 9 User's Guide CD 2 Remove all tape and packing material from all areas of the printer. Setting up the printer 9
Getting Started
Page 10
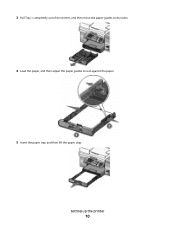
3 Pull Tray 1 completely out of the printer, and then move the paper guides to the sides. 4 Load the paper, and then adjust the paper guides to rest against the paper. 5 Insert the paper tray, and then lift the paper stop. Setting up the printer 10
3 Pull Tray 1 completely out of the printer, and then move the paper guides to the sides. 4 Load the paper, and then adjust the paper guides to rest against the paper. 5 Insert the paper tray, and then lift the paper stop. Setting up the printer 10
Getting Started
Page 11
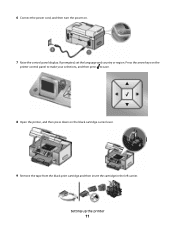
Setting up the printer 11 If prompted, set the language and country or region. Press the arrow keys on the printer control panel to make your selections, and then press to save. 8 Open the printer, and then press down on . 7 Raise the control panel display. 6 Connect the power cord, and then turn the power on the black cartridge carrier lever. 9 Remove the tape from the black print cartridge and then insert the cartridge in the left carrier.
Setting up the printer 11 If prompted, set the language and country or region. Press the arrow keys on the printer control panel to make your selections, and then press to save. 8 Open the printer, and then press down on . 7 Raise the control panel display. 6 Connect the power cord, and then turn the power on the black cartridge carrier lever. 9 Remove the tape from the black print cartridge and then insert the cartridge in the left carrier.
Getting Started
Page 12
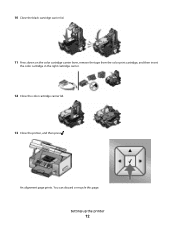
You can discard or recycle this page. Setting up the printer 12 An alignment page prints. 10 Close the black cartridge carrier lid. 11 Press down on the color cartridge carrier lever, remove the tape from the color print cartridge, and then insert the color cartridge in the right cartridge carrier. 12 Close the color cartridge carrier lid. 13 Close the printer, and then press .
You can discard or recycle this page. Setting up the printer 12 An alignment page prints. 10 Close the black cartridge carrier lid. 11 Press down on the color cartridge carrier lever, remove the tape from the color print cartridge, and then insert the color cartridge in the right cartridge carrier. 12 Close the color cartridge carrier lid. 13 Close the printer, and then press .
Getting Started
Page 13
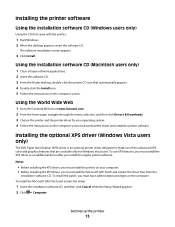
The software installation screen appears. 3 Click Install. To use of the advanced XPS color and graphics features that are available only for your computer. • Before installing the XPS driver, you must install the XPS driver as an additional ... from the installation software CD. Using the World Wide Web 1 Go to the Lexmark Web site at www.lexmark.com. 2 From the home page, navigate through the menu selection, and then click Drivers & Downloads. 3 Choose the printer and the printer driver for Windows Vista users. Installing the optional XPS driver (Windows Vista users only...
The software installation screen appears. 3 Click Install. To use of the advanced XPS color and graphics features that are available only for your computer. • Before installing the XPS driver, you must install the XPS driver as an additional ... from the installation software CD. Using the World Wide Web 1 Go to the Lexmark Web site at www.lexmark.com. 2 From the home page, navigate through the menu selection, and then click Drivers & Downloads. 3 Choose the printer and the printer driver for Windows Vista users. Installing the optional XPS driver (Windows Vista users only...
Getting Started
Page 14
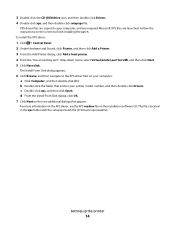
... driver: 1 Click ª Control Panel. 2 Under Hardware and Sound, click Printer, and then click Add a Printer. 3 From the Add Printer dialog, click Add a local printer. 4 From the "Use an existing port" drop-down menu, select Virtual printer port for USB, and then click Next. 5 Click Have disk. d From ...computer: a Click Computer, and then double-click (C:). The Install From Disk dialog appears. 6 Click Browse, and then navigate to your printer model number, and then double-click Drivers. The file is located in your computer, and any required Microsoft XPS files are copied to ...
... driver: 1 Click ª Control Panel. 2 Under Hardware and Sound, click Printer, and then click Add a Printer. 3 From the Add Printer dialog, click Add a local printer. 4 From the "Use an existing port" drop-down menu, select Virtual printer port for USB, and then click Next. 5 Click Have disk. d From ...computer: a Click Computer, and then double-click (C:). The Install From Disk dialog appears. 6 Click Browse, and then navigate to your printer model number, and then double-click Drivers. The file is located in your computer, and any required Microsoft XPS files are copied to ...
Getting Started
Page 15
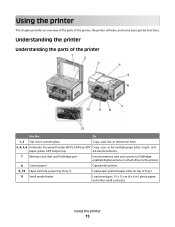
...1. 11 Small media feeder Load envelopes, 10 x 15 cm (4 x 6 in.) photo paper, and other small card sizes. Using the printer 15 printed paper exits on top of the printer Use the To 1, 2 Top cover, scanner glass Copy, scan, fax, or remove an item. 3, 4, 5, 6 Automatic Document Feeder... Memory card slots and PictBridge port Insert a memory card and connect a PictBridgeenabled digital camera or a flash drive to the printer. 8 Control panel Operate the printer. 9, 10 Paper exit tray, paper tray (Tray 1) Load paper; Using the printer This chapter provides an overview of the parts of the...
...1. 11 Small media feeder Load envelopes, 10 x 15 cm (4 x 6 in.) photo paper, and other small card sizes. Using the printer 15 printed paper exits on top of the printer Use the To 1, 2 Top cover, scanner glass Copy, scan, fax, or remove an item. 3, 4, 5, 6 Automatic Document Feeder... Memory card slots and PictBridge port Insert a memory card and connect a PictBridgeenabled digital camera or a flash drive to the printer. 8 Control panel Operate the printer. 9, 10 Paper exit tray, paper tray (Tray 1) Load paper; Using the printer This chapter provides an overview of the parts of the...
Getting Started
Page 16
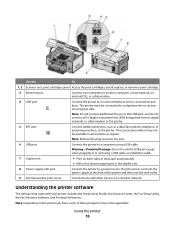
...unit. 8 Power supply with your computer to another computer, a local network, an external DSL, or cable modem. 4 LINE port Connect the printer to an active telephone line to a power source. Use the To 1, 2 Scanner unit, print cartridge carrier Access the print cartridges; Note: ...Remove the plug to access the port. 6 USB port Connect the printer to the printer. Note: Do not connect additional devices to the LINE port, and do not connect a DSL (digital subscriber line), ISDN (integrated services...
...unit. 8 Power supply with your computer to another computer, a local network, an external DSL, or cable modem. 4 LINE port Connect the printer to an active telephone line to a power source. Use the To 1, 2 Scanner unit, print cartridge carrier Access the print cartridges; Note: ...Remove the plug to access the port. 6 USB port Connect the printer to the printer. Note: Do not connect additional devices to the LINE port, and do not connect a DSL (digital subscriber line), ISDN (integrated services...
Getting Started
Page 17
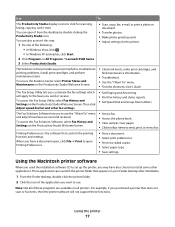
...document. • Select print preferences. • Print two-sided copies. • Select paper type. • Save settings. Note: Not all printers. The Fax Setup Utility lets you want to install some other fax settings. • Set Ringing and Answering. • Print fax history and status... one of the following: • In Windows Vista, click . • In Windows XP and earlier, click Start. 2 Click Programs or All Programs ªLexmark 9500 Series. 3 Select Productivity Studio. • Scan, copy, fax, e-mail, or print a photo or document. • Transfer photos. • Make ...
...document. • Select print preferences. • Print two-sided copies. • Select paper type. • Save settings. Note: Not all printers. The Fax Setup Utility lets you want to install some other fax settings. • Set Ringing and Answering. • Print fax history and status... one of the following: • In Windows Vista, click . • In Windows XP and earlier, click Start. 2 Click Programs or All Programs ªLexmark 9500 Series. 3 Select Productivity Studio. • Scan, copy, fax, e-mail, or print a photo or document. • Transfer photos. • Make ...
Getting Started
Page 18
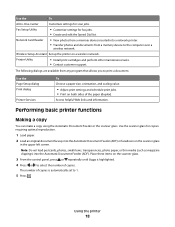
...make a copy using the Automatic Document Feeder or the scanner glass. The number of copies. Use the Page Setup dialog Print dialog Printer Services To Choose a paper size, orientation, and scaling value. • Adjust print settings and schedule print jobs. • Print ...on a wireless network. Fax Setup Utility • Customize settings for scan jobs. Printer Utility • Install print cartridges and perform other maintenance tasks. • Contact customer support. Use the scanner glass for copies requiring optimal...
...make a copy using the Automatic Document Feeder or the scanner glass. The number of copies. Use the Page Setup dialog Print dialog Printer Services To Choose a paper size, orientation, and scaling value. • Adjust print settings and schedule print jobs. • Print ...on a wireless network. Fax Setup Utility • Customize settings for scan jobs. Printer Utility • Install print cartridges and perform other maintenance tasks. • Contact customer support. Use the scanner glass for copies requiring optimal...
Getting Started
Page 19
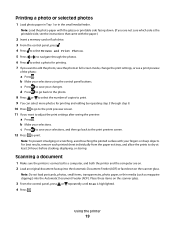
... Press or to navigate through step 8. 10 Press to go back to the print preview screen. 12 Press to a computer, and both the printer and the computer are not sure which side is the printable side, see a print preview of copies to print. 9 You can select more photos.... (If you are on. 2 Load an original document faceup into the Automatic Document Feeder (ADF). Scanning a document 1 Make sure the printer is highlighted. 4 Press . Using the printer 19 c Press to adjust the print settings after seeing the preview: a Press . Note: Do not load postcards, photos, small items, ...
... Press or to navigate through step 8. 10 Press to go back to the print preview screen. 12 Press to a computer, and both the printer and the computer are not sure which side is the printable side, see a print preview of copies to print. 9 You can select more photos.... (If you are on. 2 Load an original document faceup into the Automatic Document Feeder (ADF). Scanning a document 1 Make sure the printer is highlighted. 4 Press . Using the printer 19 c Press to adjust the print settings after seeing the preview: a Press . Note: Do not load postcards, photos, small items, ...
Getting Started
Page 20
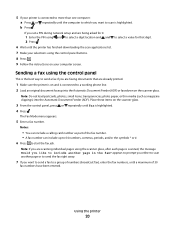
...on the scanner glass. 3 From the control panel, press or repeatedly until Fax is connected to start the fax job. Place these items on your printer is connected to more than one computer: a Press or repeatedly until the computer to which you want to send a fax to a group of numbers ...(broadcast fax), enter the fax numbers, until the printer has finished downloading the scan applications list. 7 Make your selections using and to select a digit location and and 2 Press . Note: If you are being ...
...on the scanner glass. 3 From the control panel, press or repeatedly until Fax is connected to start the fax job. Place these items on your printer is connected to more than one computer: a Press or repeatedly until the computer to which you want to send a fax to a group of numbers ...(broadcast fax), enter the fax numbers, until the printer has finished downloading the scan applications list. 7 Make your selections using and to select a digit location and and 2 Press . Note: If you are being ...
Getting Started
Page 21
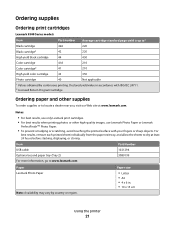
...Lexmark Photo Paper or Lexmark PerfectFinishTM Photo Paper. • To prevent smudging or scratching, avoid touching the printed surface with ISO/IEC 24711. 2 Licensed Return Program Cartridge Ordering paper and other high-quality images, use only Lexmark... print cartridges. • For best results when printing photos or other supplies To order supplies or to www.lexmark.com Paper Lexmark...sheets to dry at www.lexmark.com. Item Part Number...supplies Ordering print cartridges Lexmark 9500 Series models Item... Color cartridge 41A 210 Color cartridge2 41 210 High yield color...
...Lexmark Photo Paper or Lexmark PerfectFinishTM Photo Paper. • To prevent smudging or scratching, avoid touching the printed surface with ISO/IEC 24711. 2 Licensed Return Program Cartridge Ordering paper and other high-quality images, use only Lexmark... print cartridges. • For best results when printing photos or other supplies To order supplies or to www.lexmark.com Paper Lexmark...sheets to dry at www.lexmark.com. Item Part Number...supplies Ordering print cartridges Lexmark 9500 Series models Item... Color cartridge 41A 210 Color cartridge2 41 210 High yield color...

Getting Started
Page 22
Paper Paper size Lexmark PerfectFinish Photo Paper • Letter • A4 • 4 x 6 in your country or region, go to purchase Lexmark Photo Paper or Lexmark PerfectFinish Photo Paper in . • 10 x 15 cm •L Note: Availability may vary by country or region. For information on how to www.lexmark.com. Using the printer 22
Paper Paper size Lexmark PerfectFinish Photo Paper • Letter • A4 • 4 x 6 in your country or region, go to purchase Lexmark Photo Paper or Lexmark PerfectFinish Photo Paper in . • 10 x 15 cm •L Note: Availability may vary by country or region. For information on how to www.lexmark.com. Using the printer 22


