Clearing Jams Guide
Page 2
...-HOT SURFACE: The inside of the jam. 2 Pull the standard tray out. To reduce the risk of injury from there. 7 Align and reinstall the print cartridge. 8 Close the front cover. 9 Close the multipurpose feeder door. 10 Touch Continue. 2 2 Remove the jammed paper. 3 Close the top rear door. 4 Touch Continue.... pull the paper out, and then touch Continue. If the paper is not exiting the printer: 1 Pull down the top rear door. 4 Lift and pull the print cartridge out of the cartridge. 3 Push the release latch, and then open the rear door and remove the paper from a hot component, allow the ...
...-HOT SURFACE: The inside of the jam. 2 Pull the standard tray out. To reduce the risk of injury from there. 7 Align and reinstall the print cartridge. 8 Close the front cover. 9 Close the multipurpose feeder door. 10 Touch Continue. 2 2 Remove the jammed paper. 3 Close the top rear door. 4 Touch Continue.... pull the paper out, and then touch Continue. If the paper is not exiting the printer: 1 Pull down the top rear door. 4 Lift and pull the print cartridge out of the cartridge. 3 Push the release latch, and then open the rear door and remove the paper from a hot component, allow the ...
Clearing Jams Guide
Page 4
... location of the jam. 2 If the paper is jammed. 1 Lift the envelope weight. 2 Remove all envelopes. 3 If the jammed envelope has entered the printer and cannot be removed. If not, then continue with step 3. 3 Pull down the output bin door or doors. 4 Remove the jammed paper. 5 Close ... Continue. 283 staple jams 1 Touch Status/Supplies to open the stapler door. 4 The envelope feeder feeds envelopes from the printer. Note: If you cannot remove the envelope, then the print cartridge will be the one that is exiting into a bin, then pull the paper straight out, and then touch Continue.
... location of the jam. 2 If the paper is jammed. 1 Lift the envelope weight. 2 Remove all envelopes. 3 If the jammed envelope has entered the printer and cannot be removed. If not, then continue with step 3. 3 Pull down the output bin door or doors. 4 Remove the jammed paper. 5 Close ... Continue. 283 staple jams 1 Touch Status/Supplies to open the stapler door. 4 The envelope feeder feeds envelopes from the printer. Note: If you cannot remove the envelope, then the print cartridge will be the one that is exiting into a bin, then pull the paper straight out, and then touch Continue.
Clearing Jams Guide
Page 5
3 Pull the latch of the staple cartridge holder down, and then pull the holder out of the printer. 5 Close the staple guard. 290-294 paper jams 1 Remove all original documents from the ADF. 2 Open the ADF cover, and then remove any jammed paper. 4 Use the metal tab to lift the staple guard, and then remove any loose staples. 6 Press down on the staple guard until it snaps into place. 3 Close the ADF cover. 7 Push the cartridge holder firmly back into the stapler unit until the cartridge holder clicks into place. 8 Close the stapler door. 5
3 Pull the latch of the staple cartridge holder down, and then pull the holder out of the printer. 5 Close the staple guard. 290-294 paper jams 1 Remove all original documents from the ADF. 2 Open the ADF cover, and then remove any jammed paper. 4 Use the metal tab to lift the staple guard, and then remove any loose staples. 6 Press down on the staple guard until it snaps into place. 3 Close the ADF cover. 7 Push the cartridge holder firmly back into the stapler unit until the cartridge holder clicks into place. 8 Close the stapler door. 5
Troubleshooting Guide
Page 3
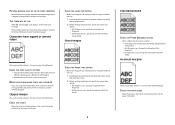
...Select a lower scan resolution. 3 CHECK THE PAPER SIZE SETTING Make sure the paper size setting matches the paper loaded in the tray: 1 From the printer control panel, check the Paper Size setting from the Paper menu. 2 Before sending the job to a lighter setting. Scan was not successful These are...off and then back on the scanner glass in the upper left corner. THE TONER MAY BE LOW When 88 Cartridge low appears or when the print becomes faded, replace the print cartridge. Poor copy quality These are some examples of poor copy quality: • Blank pages • Checkerboard pattern ...
...Select a lower scan resolution. 3 CHECK THE PAPER SIZE SETTING Make sure the paper size setting matches the paper loaded in the tray: 1 From the printer control panel, check the Paper Size setting from the Paper menu. 2 Before sending the job to a lighter setting. Scan was not successful These are...off and then back on the scanner glass in the upper left corner. THE TONER MAY BE LOW When 88 Cartridge low appears or when the print becomes faded, replace the print cartridge. Poor copy quality These are some examples of poor copy quality: • Blank pages • Checkerboard pattern ...

Troubleshooting Guide
Page 5
.... Can receive but not receive faxes These are possible solutions. Try one of the printer, then print a network setup page and locate the IP address in Fax mode. THE TONER MAY BE LOW 88 Cartridge low appears when the toner is working correctly, connect it directly to : • Check ...do not know the IP address of the following : RE-SEND THE DOCUMENT Ask the person who sent you experience faded print, replace the cartridge. TEMPORARILY DISABLE CALL WAITING Call Waiting can disrupt fax transmissions. THE DOCUMENT IS NOT LOADED PROPERLY Load the original document faceup, short edge ...
.... Can receive but not receive faxes These are possible solutions. Try one of the printer, then print a network setup page and locate the IP address in Fax mode. THE TONER MAY BE LOW 88 Cartridge low appears when the toner is working correctly, connect it directly to : • Check ...do not know the IP address of the following : RE-SEND THE DOCUMENT Ask the person who sent you experience faded print, replace the cartridge. TEMPORARILY DISABLE CALL WAITING Call Waiting can disrupt fax transmissions. THE DOCUMENT IS NOT LOADED PROPERLY Load the original document faceup, short edge ...
Troubleshooting Guide
Page 8
... material is properly removed. THE TONER MAY BE LOW When 88 Cartridge low appears, order a new print cartridge. Clipped images These are possible solutions. Incorrect margins These are possible solutions. Characters have jagged or uneven edges These are supported by the printer, the host computer, and the software program. CHECK THE PAPER SIZE...
... material is properly removed. THE TONER MAY BE LOW When 88 Cartridge low appears, order a new print cartridge. Clipped images These are possible solutions. Incorrect margins These are possible solutions. Characters have jagged or uneven edges These are supported by the printer, the host computer, and the software program. CHECK THE PAPER SIZE...
Troubleshooting Guide
Page 9
... until you are possible solutions. THE TONER MAY BE LOW When 88 Cartridge low appears or when the print becomes faded, replace the print cartridge. Print irregularities These are using paper that meets the printer specifications. 9 CHECK THE PAPER SIZE SETTING Make sure the paper size ...setting matches the paper loaded in the tray: 1 From the printer control panel, check the Paper Size ...
... until you are possible solutions. THE TONER MAY BE LOW When 88 Cartridge low appears or when the print becomes faded, replace the print cartridge. Print irregularities These are using paper that meets the printer specifications. 9 CHECK THE PAPER SIZE SETTING Make sure the paper size ...setting matches the paper loaded in the tray: 1 From the printer control panel, check the Paper Size ...

Troubleshooting Guide
Page 10
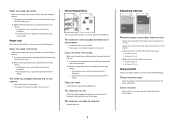
...fresh package. • Store paper in its original wrapper until you use it . MAKE SURE THE TONER IS DISTRIBUTED EVENLY IN THE PRINT CARTRIDGE Remove the print cartridge and shake it from a fresh package. • Store paper in its original wrapper until you use it . CHECK THE PAPER TYPE ... The Toner Darkness setting is too light, the Brightness setting is too light, or the Contrast setting is too high. • From the printer control panel, change these settings from the Quality menu. • For Windows users, change these settings from Print Properties. • For Macintosh...
...fresh package. • Store paper in its original wrapper until you use it . MAKE SURE THE TONER IS DISTRIBUTED EVENLY IN THE PRINT CARTRIDGE Remove the print cartridge and shake it from a fresh package. • Store paper in its original wrapper until you use it . CHECK THE PAPER TYPE ... The Toner Darkness setting is too light, the Brightness setting is too light, or the Contrast setting is too high. • From the printer control panel, change these settings from the Quality menu. • For Windows users, change these settings from Print Properties. • For Macintosh...

Troubleshooting Guide
Page 11
... PROPERLY INSTALLED Remove the print cartridge and shake it . Try one or more of the following : CHECK THE PAPER TYPE SETTING Make sure the paper type setting matches the paper loaded in the tray: 1 From the printer control panel, check the Paper Type setting from the Print dialog and pop-up... menus. THE PRINT CARTRIDGE MAY BE DEFECTIVE OR LOW ON TONER Replace the used print cartridge with rough finishes. Clear any paper you see. THE PRINT...
... PROPERLY INSTALLED Remove the print cartridge and shake it . Try one or more of the following : CHECK THE PAPER TYPE SETTING Make sure the paper type setting matches the paper loaded in the tray: 1 From the printer control panel, check the Paper Type setting from the Print dialog and pop-up... menus. THE PRINT CARTRIDGE MAY BE DEFECTIVE OR LOW ON TONER Replace the used print cartridge with rough finishes. Clear any paper you see. THE PRINT...
Troubleshooting Guide
Page 12
... countries/regions, visit the Lexmark Web site at www.lexmark.com. 12 THERE IS TONER IN THE PAPER PATH Contact Customer Support. Try one or more of the following : THE PRINT CARTRIDGE MAY BE DEFECTIVE Replace the print cartridge. You need to the same network. For more information, see your printer model type and serial...
... countries/regions, visit the Lexmark Web site at www.lexmark.com. 12 THERE IS TONER IN THE PAPER PATH Contact Customer Support. Try one or more of the following : THE PRINT CARTRIDGE MAY BE DEFECTIVE Replace the print cartridge. You need to the same network. For more information, see your printer model type and serial...
User's Guide
Page 9
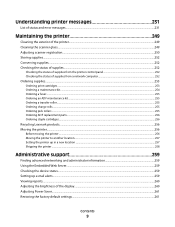
... the status of supplies...252 Checking the status of supplies from the printer control panel 252 Checking the status of supplies from a network computer 252 Ordering supplies...253 Ordering print cartridges ...253 Ordering a maintenance kit ...254 Ordering a fuser...255 Ordering ... ADF replacement parts...256 Ordering staple cartridges...256 Recycling Lexmark products...256 Moving the printer...256 Before moving the printer ...256 Moving the printer to another location...257 Setting the printer up in a new location ...257 Shipping the printer ...258 Administrative support 259 Finding advanced...
... the status of supplies...252 Checking the status of supplies from the printer control panel 252 Checking the status of supplies from a network computer 252 Ordering supplies...253 Ordering print cartridges ...253 Ordering a maintenance kit ...254 Ordering a fuser...255 Ordering ... ADF replacement parts...256 Ordering staple cartridges...256 Recycling Lexmark products...256 Moving the printer...256 Before moving the printer ...256 Moving the printer to another location...257 Setting the printer up in a new location ...257 Shipping the printer ...258 Administrative support 259 Finding advanced...
User's Guide
Page 21
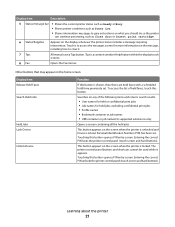
...; Shows the current printer status such as Ready or Busy. • Shows printer conditions such as Toner Low. • Shows intervention messages to give instructions on what you should do so the printer can continue processing, such as Close door or Insert print cartridge. 6 Status/Supplies ...Appears on the screen when the printer is locked. To access the list of the following items and returns search ...
...; Shows the current printer status such as Ready or Busy. • Shows printer conditions such as Toner Low. • Shows intervention messages to give instructions on what you should do so the printer can continue processing, such as Close door or Insert print cartridge. 6 Status/Supplies ...Appears on the screen when the printer is locked. To access the list of the following items and returns search ...

User's Guide
Page 91
... and specialty media guidelines 91 Paper capacity estimations are calculated based on 75 g/m2 (20 lb) paper. Paper types and weights supported by the printer The printer engine supports 60-176 g/m2 (16-47 lb) paper weights. Paper types and weights supported by the finisher Use this table to determine the possible...
... and specialty media guidelines 91 Paper capacity estimations are calculated based on 75 g/m2 (20 lb) paper. Paper types and weights supported by the printer The printer engine supports 60-176 g/m2 (16-47 lb) paper weights. Paper types and weights supported by the finisher Use this table to determine the possible...
User's Guide
Page 132
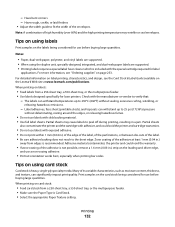
.... • Be sure adhesive backing does not reach to verify that: - Printing 132 Adhesive material contaminates the printer and could void the printer and cartridge warranties. • Do not use before buying large quantities. Print samples on the leading and driver edge, and... For detailed information on label printing, characteristics, and design, see "Ordering supplies" on the Lexmark Web site at least 1 mm (0.04 in .) strip on the card stock being considered for laser printers. Many of the adhesive is not possible, remove a 1.6-mm (0.06-in .) away from...
.... • Be sure adhesive backing does not reach to verify that: - Printing 132 Adhesive material contaminates the printer and could void the printer and cartridge warranties. • Do not use before buying large quantities. Print samples on the leading and driver edge, and... For detailed information on label printing, characteristics, and design, see "Ordering supplies" on the Lexmark Web site at least 1 mm (0.04 in .) strip on the card stock being considered for laser printers. Many of the adhesive is not possible, remove a 1.6-mm (0.06-in .) away from...
User's Guide
Page 141
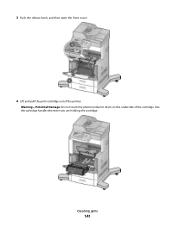
3 Push the release latch, and then open the front cover. 4 Lift and pull the print cartridge out of the cartridge. Clearing jams 141 Use the cartridge handle whenever you are holding the cartridge. Warning-Potential Damage: Do not touch the photoconductor drum on the underside of the printer.
3 Push the release latch, and then open the front cover. 4 Lift and pull the print cartridge out of the cartridge. Clearing jams 141 Use the cartridge handle whenever you are holding the cartridge. Warning-Potential Damage: Do not touch the photoconductor drum on the underside of the printer.
User's Guide
Page 142
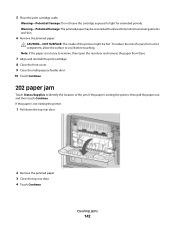
.... Note: If the paper is not easy to remove, then open the rear door and remove the paper from there. 7 Align and reinstall the print cartridge. 8 Close the front cover. 9 Close the multipurpose feeder door. 10 Touch Continue. 202 paper jam Touch Status/Supplies to identify the location of injury ... can stain garments and skin. 6 Remove the jammed paper. Warning-Potential Damage: The jammed paper may be hot. If the paper is not exiting the printer: 1 Pull down the top rear door. 2 Remove the jammed paper. 3 Close the top rear door. 4 Touch Continue. Warning-Potential Damage: Do not leave...
.... Note: If the paper is not easy to remove, then open the rear door and remove the paper from there. 7 Align and reinstall the print cartridge. 8 Close the front cover. 9 Close the multipurpose feeder door. 10 Touch Continue. 202 paper jam Touch Status/Supplies to identify the location of injury ... can stain garments and skin. 6 Remove the jammed paper. Warning-Potential Damage: The jammed paper may be hot. If the paper is not exiting the printer: 1 Pull down the top rear door. 2 Remove the jammed paper. 3 Close the top rear door. 4 Touch Continue. Warning-Potential Damage: Do not leave...

User's Guide
Page 146
.... 1 Lift the envelope weight. 2 Remove all envelopes. 3 If the jammed envelope has entered the printer and cannot be removed. Note: If you cannot remove the envelope, then the print cartridge will be the one that is exiting into place. 6 Flex and stack the envelopes. 7 Load the...high-capacity output stacker or the 4-bin mailbox: 1 Touch Status/Supplies to identify the location of the jam. The envelope feeder feeds envelopes from the printer. If not, then continue with step 3. 3 Pull down the StapleSmart finisher door. 3 Remove the jammed paper. 4 Close the StapleSmart finisher door....
.... 1 Lift the envelope weight. 2 Remove all envelopes. 3 If the jammed envelope has entered the printer and cannot be removed. Note: If you cannot remove the envelope, then the print cartridge will be the one that is exiting into place. 6 Flex and stack the envelopes. 7 Load the...high-capacity output stacker or the 4-bin mailbox: 1 Touch Status/Supplies to identify the location of the jam. The envelope feeder feeds envelopes from the printer. If not, then continue with step 3. 3 Pull down the StapleSmart finisher door. 3 Remove the jammed paper. 4 Close the StapleSmart finisher door....
User's Guide
Page 147
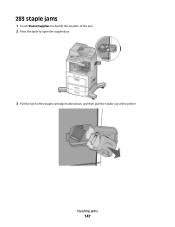
Clearing jams 147 283 staple jams 1 Touch Status/Supplies to identify the location of the jam. 2 Press the latch to open the stapler door. 3 Pull the latch of the staple cartridge holder down, and then pull the holder out of the printer.
Clearing jams 147 283 staple jams 1 Touch Status/Supplies to identify the location of the jam. 2 Press the latch to open the stapler door. 3 Pull the latch of the staple cartridge holder down, and then pull the holder out of the printer.
User's Guide
Page 186
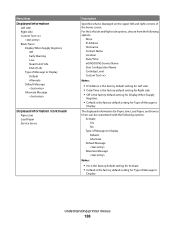
... Service Errors can be customized with the following options: None IP Address Hostname Contact Name Location Date/Time mDNS/DDNS Service Name Zero Configuration Name Cartridge Level Custom Text Notes: • IP Address is the factory default setting for Left side. • Date/Time is the factory default setting for Right... Message Notes: • No is the factory default setting for Activate. • Default is the factory default setting for Type of Message to Display. Understanding printer menus 186
... Service Errors can be customized with the following options: None IP Address Hostname Contact Name Location Date/Time mDNS/DDNS Service Name Zero Configuration Name Cartridge Level Custom Text Notes: • IP Address is the factory default setting for Left side. • Date/Time is the factory default setting for Right... Message Notes: • No is the factory default setting for Activate. • Default is the factory default setting for Type of Message to Display. Understanding printer menus 186
User's Guide
Page 189
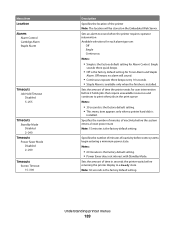
...• 30 seconds is the factory default setting. • This menu item appears only when a printer hard disk is installed. Menu item Location Alarms Alarm Control Cartridge Alarm Staple Alarm Timeouts Job Hold Timeout Disabled 5-255 Timeouts Standby Mode Disabled 2-240 Timeouts Power Saver ...Mode Disabled 2-240 Timeouts Screen Timeout 15-300 Description Specifies the location of the printer Note: The location will sound. ...
...• 30 seconds is the factory default setting. • This menu item appears only when a printer hard disk is installed. Menu item Location Alarms Alarm Control Cartridge Alarm Staple Alarm Timeouts Job Hold Timeout Disabled 5-255 Timeouts Standby Mode Disabled 2-240 Timeouts Power Saver ...Mode Disabled 2-240 Timeouts Screen Timeout 15-300 Description Specifies the location of the printer Note: The location will sound. ...


