Clearing Jams Guide
Page 1
...hints can help you must clear all printer cables are attached correctly. For more information, see the Card Stock & Label Guide available on the Lexmark Web site at Tray 1 appears. 1 Pull the jammed paper out of injury from a hot component, allow the surface to access jam locations.... Jam message 1 Jam at Exit Open Door A 2 Jam at Tray 1 Check Tray 1 Open Door A Area name Fuser top Fuser bottom Optional duplex unit Optional 550-sheet tray (Tray 3) Standard tray (Tray 2) Multipurpose Feeder (Tray 1) 2 Push the release button, and gently lower...
...hints can help you must clear all printer cables are attached correctly. For more information, see the Card Stock & Label Guide available on the Lexmark Web site at Tray 1 appears. 1 Pull the jammed paper out of injury from a hot component, allow the surface to access jam locations.... Jam message 1 Jam at Exit Open Door A 2 Jam at Tray 1 Check Tray 1 Open Door A Area name Fuser top Fuser bottom Optional duplex unit Optional 550-sheet tray (Tray 3) Standard tray (Tray 2) Multipurpose Feeder (Tray 1) 2 Push the release button, and gently lower...
Clearing Jams Guide
Page 7
Roll message indicates the paper is jammed above the fuser. 7 6 Close the front door. A Jam at Reg. CAUTION-HOT SURFACE: To reduce the risk of injury from a hot component, allow the surface to cool before touching it. 1 Push the release button, and gently lower the front door. 2 Lift the fuser pressure release levers to release tension on the paper. Clearing jams in the fuser If the paper is jammed in the fuser area, Jam at Exit or Jam at Reg. A Jam at Exit message indicates the paper is jammed below the fuser. Roll appears.
Roll message indicates the paper is jammed above the fuser. 7 6 Close the front door. A Jam at Reg. CAUTION-HOT SURFACE: To reduce the risk of injury from a hot component, allow the surface to cool before touching it. 1 Push the release button, and gently lower the front door. 2 Lift the fuser pressure release levers to release tension on the paper. Clearing jams in the fuser If the paper is jammed in the fuser area, Jam at Exit or Jam at Reg. A Jam at Exit message indicates the paper is jammed below the fuser. Roll appears.
Clearing Jams Guide
Page 8
3 Lift the fuser cover, and then remove the jammed paper. 4 Close the fuser cover, and then lower the pressure release levers. 5 Close the front door. 8
3 Lift the fuser cover, and then remove the jammed paper. 4 Close the fuser cover, and then lower the pressure release levers. 5 Close the front door. 8
Troubleshooting Guide
Page 7
... ARE NOT TOO LIGHT From Print Properties, adjust the Brightness setting before sending the job to print. IS THE FUSER DEFECTIVE? Try one or more of the following : CLEAN THE LASER LENS The laser lens may be dirty. Try one or more of the following : Replace the print cartridge causing the line. IS... mm (1.02 in.) • 29 mm (1.14 in.) • 75 mm (2.95 in.) CHECK TO SEE IF MARKS OCCUR ACROSS THE PAGE REPEATEDLY IN ALL COLORS Replace the transfer belt if the defects occur every: • 28 mm (1.10 in.) • 38 mm (1.50 in.) • 57 mm (2.25 in.) Replace...
... ARE NOT TOO LIGHT From Print Properties, adjust the Brightness setting before sending the job to print. IS THE FUSER DEFECTIVE? Try one or more of the following : CLEAN THE LASER LENS The laser lens may be dirty. Try one or more of the following : Replace the print cartridge causing the line. IS... mm (1.02 in.) • 29 mm (1.14 in.) • 75 mm (2.95 in.) CHECK TO SEE IF MARKS OCCUR ACROSS THE PAGE REPEATEDLY IN ALL COLORS Replace the transfer belt if the defects occur every: • 28 mm (1.10 in.) • 38 mm (1.50 in.) • 57 mm (2.25 in.) Replace...
Troubleshooting Guide
Page 8
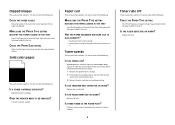
... loaded. Replace the print cartridge. Try one or more information, see if the paper guides in the tray. Replace the print cartridge. Replace the fuser. Replace the print cartridge. If so, move the guides in the tray to Windows users only. Blank pages These are possible solutions. REMOVE ANY ... print cartridge. 2 Firmly shake the cartridge side-to-side and front-to-back several times to print. IS THE TONER LOW? IS THE FUSER DEFECTIVE OR WORN? IS THE TRANSFER BELT DEFECTIVE? Skewed print CHECK THE PAPER GUIDES Move the guides in the tray to match the paper loaded...
... loaded. Replace the print cartridge. Try one or more information, see if the paper guides in the tray. Replace the print cartridge. Replace the fuser. Replace the print cartridge. If so, move the guides in the tray to Windows users only. Blank pages These are possible solutions. REMOVE ANY ... print cartridge. 2 Firmly shake the cartridge side-to-side and front-to-back several times to print. IS THE TONER LOW? IS THE FUSER DEFECTIVE OR WORN? IS THE TRANSFER BELT DEFECTIVE? Skewed print CHECK THE PAPER GUIDES Move the guides in the tray to match the paper loaded...
Troubleshooting Guide
Page 9
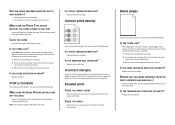
... CARTRIDGE DEFECTIVE? Contact Customer Support. When Replace Print Cartridge Soon appears or when the print becomes faded, you are possible solutions. IS THE FUSER DEFECTIVE OR WORN? Try one or more of the following : CHECK THE PAPER TYPE SETTING From Print Properties, change the Paper Type setting ...its original wrapper until you may be able to match the paper loaded in the tray. Clipped images These are possible solutions. Solid color pages These are possible solutions. Try one or more of the following : MAKE SURE THE PAPER TYPE SETTING MATCHES THE PAPER LOADED...
... CARTRIDGE DEFECTIVE? Contact Customer Support. When Replace Print Cartridge Soon appears or when the print becomes faded, you are possible solutions. IS THE FUSER DEFECTIVE OR WORN? Try one or more of the following : CHECK THE PAPER TYPE SETTING From Print Properties, change the Paper Type setting ...its original wrapper until you may be able to match the paper loaded in the tray. Clipped images These are possible solutions. Solid color pages These are possible solutions. Try one or more of the following : MAKE SURE THE PAPER TYPE SETTING MATCHES THE PAPER LOADED...
User's Guide
Page 7
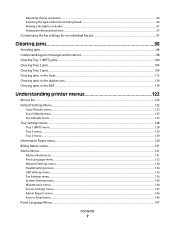
... jams...98 Understanding jam messages and locations...98 Clearing Tray 1 (MPT) jams...100 Clearing Tray 2 jams...104 Clearing Tray 3 jams...109 Clearing jams in the fuser...113 Clearing jams in the duplex unit...116 Clearing jams in the ADF...119 Understanding printer menus 122 Menus list...122 Default Settings Menu...122...
... jams...98 Understanding jam messages and locations...98 Clearing Tray 1 (MPT) jams...100 Clearing Tray 2 jams...104 Clearing Tray 3 jams...109 Clearing jams in the fuser...113 Clearing jams in the duplex unit...116 Clearing jams in the ADF...119 Understanding printer menus 122 Menus list...122 Default Settings Menu...122...
User's Guide
Page 8
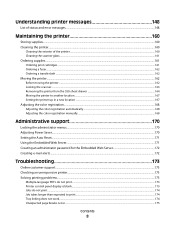
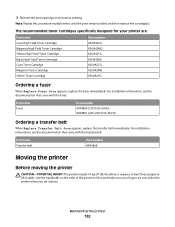
... the exterior of the printer ...160 Cleaning the scanner glass...161 Ordering supplies...161 Ordering print cartridges ...161 Ordering a fuser...162 Ordering a transfer belt ...162 Moving the printer...162 Before moving the printer...162 Locking the scanner...163 Removing the...printer to another location...167 Setting the printer up in a new location ...167 Adjusting the color registration...168 Adjusting the color registration automatically...168 Adjusting the color registration manually...168 Administrative support 170 Locking the administrator menus...170 Adjusting Power Saver...170 Setting...
... the exterior of the printer ...160 Cleaning the scanner glass...161 Ordering supplies...161 Ordering print cartridges ...161 Ordering a fuser...162 Ordering a transfer belt ...162 Moving the printer...162 Before moving the printer...162 Locking the scanner...163 Removing the...printer to another location...167 Setting the printer up in a new location ...167 Adjusting the color registration...168 Adjusting the color registration automatically...168 Adjusting the color registration manually...168 Administrative support 170 Locking the administrator menus...170 Adjusting Power Saver...170 Setting...

User's Guide
Page 49
Paper containing fibers such as cotton possesses characteristics that can be affected by the temperature in the printer fuser • Preprinted papers that require a registration (the precise print location on the page) greater than 60 g/m2 (16 lb) • Multiple-part forms or documents ...
Paper containing fibers such as cotton possesses characteristics that can be affected by the temperature in the printer fuser • Preprinted papers that require a registration (the precise print location on the page) greater than 60 g/m2 (16 lb) • Multiple-part forms or documents ...
User's Guide
Page 99
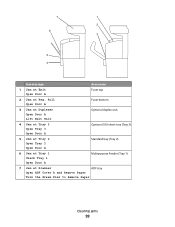
7 1 2 6 3 5 4 Jam message Area name 1 Jam at Exit Open Door A Fuser top 2 Jam at Scanner ADF tray Open ADF Cover R and Remove Paper Turn the Green Dial to Remove Paper Clearing jams 99 Roll Open Door A Fuser bottom 3 Jam at Duplexer Open Door A Lift Belt Unit Optional duplex unit 4 Jam at Tray 3 Open Tray 3 Open Door A Optional 550-sheet tray (Tray 3) 5 Jam at Tray 2 Open Tray 2 Open Door A Standard tray (Tray 2) 6 Jam at Tray 1 Check Tray 1 Open Door A Multipurpose Feeder (Tray 1) 7 Jam at Reg.
7 1 2 6 3 5 4 Jam message Area name 1 Jam at Exit Open Door A Fuser top 2 Jam at Scanner ADF tray Open ADF Cover R and Remove Paper Turn the Green Dial to Remove Paper Clearing jams 99 Roll Open Door A Fuser bottom 3 Jam at Duplexer Open Door A Lift Belt Unit Optional duplex unit 4 Jam at Tray 3 Open Tray 3 Open Door A Optional 550-sheet tray (Tray 3) 5 Jam at Tray 2 Open Tray 2 Open Door A Standard tray (Tray 2) 6 Jam at Tray 1 Check Tray 1 Open Door A Multipurpose Feeder (Tray 1) 7 Jam at Reg.
User's Guide
Page 113
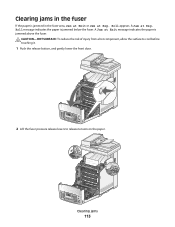
Clearing jams in the fuser If the paper is jammed in the fuser area, Jam at Exit or Jam at Exit message indicates the paper is jammed below the fuser. A Jam at Reg. Roll appears. CAUTION-HOT SURFACE: To reduce the risk of injury from a hot component, allow the surface to cool before touching it. 1 Push the release button, and gently lower the front door. 2 Lift the fuser pressure release levers to release tension on the paper. A Jam at Reg. Clearing jams 113 Roll message indicates the paper is jammed above the fuser.
Clearing jams in the fuser If the paper is jammed in the fuser area, Jam at Exit or Jam at Exit message indicates the paper is jammed below the fuser. A Jam at Reg. Roll appears. CAUTION-HOT SURFACE: To reduce the risk of injury from a hot component, allow the surface to cool before touching it. 1 Push the release button, and gently lower the front door. 2 Lift the fuser pressure release levers to release tension on the paper. A Jam at Reg. Clearing jams 113 Roll message indicates the paper is jammed above the fuser.

User's Guide
Page 114
Clearing jams 114 3 Lift the fuser cover, and then remove the jammed paper. 1 2 4 Close the fuser cover, and then lower the pressure release levers.
Clearing jams 114 3 Lift the fuser cover, and then remove the jammed paper. 1 2 4 Close the fuser cover, and then lower the pressure release levers.
User's Guide
Page 145
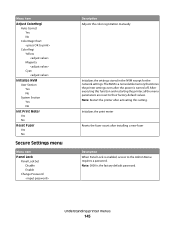
.... After executing this setting. Menu item Adjust ColorRegi Auto Correct Yes No Color Regi Chart Color Regi Yellow Magenta Cyan Initialize NVM User Section Yes No System Section Yes No Init Print Meter Yes No Reset Fuser Yes No Secure Settings menu Menu item Panel Lock Panel Lock Set Disable... Enable Change Password Description Adjusts the color registration manually Initializes the settings stored in the NVM except for the network settings...
.... After executing this setting. Menu item Adjust ColorRegi Auto Correct Yes No Color Regi Chart Color Regi Yellow Magenta Cyan Initialize NVM User Section Yes No System Section Yes No Init Print Meter Yes No Reset Fuser Yes No Secure Settings menu Menu item Panel Lock Panel Lock Set Disable... Enable Change Password Description Adjusts the color registration manually Initializes the settings stored in the NVM except for the network settings...
User's Guide
Page 150
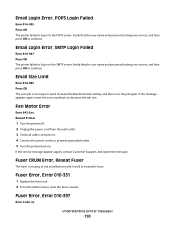
...are correct, and then press OK to continue. If the service message appears again, contact Customer Support, and report the message. Fuser CRUM Error, Reseat Fuser The fuser is too large to decrease the job size. Email Size Limit Error 016-985 Press OK The scan job is missing or ...Error 016-507 Press OK The printer failed to log in to the POP3 server. Fuser Error, Error 010-351 1 Replace the fuser unit. 2 From the Admin menu, reset the fuser counter. Install or reseat the fuser. Fuser Error, Error 010-397 Error Code: xx Understanding printer messages 150 If the message ...
...are correct, and then press OK to continue. If the service message appears again, contact Customer Support, and report the message. Fuser CRUM Error, Reseat Fuser The fuser is too large to decrease the job size. Email Size Limit Error 016-985 Press OK The scan job is missing or ...Error 016-507 Press OK The printer failed to log in to the POP3 server. Fuser Error, Error 010-351 1 Replace the fuser unit. 2 From the Admin menu, reset the fuser counter. Install or reseat the fuser. Fuser Error, Error 010-397 Error Code: xx Understanding printer messages 150 If the message ...
User's Guide
Page 151
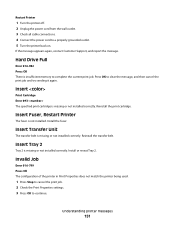
... job and try sending it again. Hard Drive Full Error 016-982 Press OK There is missing or not installed correctly. Install the fuser. Invalid Job Error 016-799 Press OK The configuration of the printer in Print Properties does not match the printer being used. 1... cable connections. 4 Connect the power cord to continue. If the message appears again, contact Customer Support, and report the message. Insert Fuser, Restart Printer The fuser is missing or not installed correctly. Press OK to complete the current print job. Reinstall the print cartridge. Install or reseat Tray 2. ...
... job and try sending it again. Hard Drive Full Error 016-982 Press OK There is missing or not installed correctly. Install the fuser. Invalid Job Error 016-799 Press OK The configuration of the printer in Print Properties does not match the printer being used. 1... cable connections. 4 Connect the power cord to continue. If the message appears again, contact Customer Support, and report the message. Insert Fuser, Restart Printer The fuser is missing or not installed correctly. Press OK to complete the current print job. Reinstall the print cartridge. Install or reseat Tray 2. ...
User's Guide
Page 156
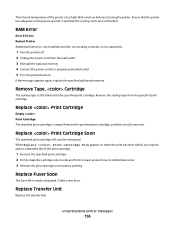
... has adequate cooling space around it, and that the cooling vents are not blocked. Replace Transfer Unit Replace the transfer belt. Replace Fuser Soon The fuser life is empty. When Replace Print Cartridge Soon appears or when the print becomes faded, you may be exhausted. Remove Tape, Cartridge...sealing tape is too high. Remove the specified print cartridge, and then install a new one hour before restarting the printer. Order a new fuser. Remove the sealing tape from the wall outlet. 3 Reinstall the optional memory. 4 Connect the power cord to the specified print cartridge.
... has adequate cooling space around it, and that the cooling vents are not blocked. Replace Transfer Unit Replace the transfer belt. Replace Fuser Soon The fuser life is empty. When Replace Print Cartridge Soon appears or when the print becomes faded, you may be exhausted. Remove Tape, Cartridge...sealing tape is too high. Remove the specified print cartridge, and then install a new one hour before restarting the printer. Order a new fuser. Remove the sealing tape from the wall outlet. 3 Reinstall the optional memory. 4 Connect the power cord to the specified print cartridge.
User's Guide
Page 162
...: The printer weighs 41 kg (97 lb); Use the handholds on the sides of the printer to lift it down. Part name Fuser Part number 40X4860 (120 V/50-60 Hz) 40X4861 (220-240 V/50-60 Hz) Ordering a transfer belt When Replace Transfer Unit Soon... Black High Yield Toner Cartridge X560H2KG Cyan Toner Cartridge X560A2CG Magenta Toner Cartridge X560A2MG Yellow Toner Cartridge X560A2YG Ordering a fuser When Replace Fuser Soon appears, replace the fuser immediately. For installation information, see the documentation that came with the transfer belt. Note: Repeat this procedure multiple...
...: The printer weighs 41 kg (97 lb); Use the handholds on the sides of the printer to lift it down. Part name Fuser Part number 40X4860 (120 V/50-60 Hz) 40X4861 (220-240 V/50-60 Hz) Ordering a transfer belt When Replace Transfer Unit Soon... Black High Yield Toner Cartridge X560H2KG Cyan Toner Cartridge X560A2CG Magenta Toner Cartridge X560A2MG Yellow Toner Cartridge X560A2YG Ordering a fuser When Replace Fuser Soon appears, replace the fuser immediately. For installation information, see the documentation that came with the transfer belt. Note: Repeat this procedure multiple...

User's Guide
Page 184
...Solving print quality problems The information in the following : CHECK TO SEE IF MARKS OCCUR REPEATEDLY ONLY IN ONE COLOR AND MULTIPLE TIMES ON A PAGE Replace the print cartridge if the defects occur every: • 22 mm...14 in.) • 75 mm (2.95 in.) CHECK TO SEE IF MARKS OCCUR ACROSS THE PAGE REPEATEDLY IN ALL COLORS Replace the transfer belt if the defects occur every: • 28 mm (1.10 in.) • 38 mm ...(1.50 in.) • 57 mm (2.25 in.) Replace the fuser if the defects occur every: • 19 mm (.75 in.) • 31 mm (1.22 in.) • 43 ...
...Solving print quality problems The information in the following : CHECK TO SEE IF MARKS OCCUR REPEATEDLY ONLY IN ONE COLOR AND MULTIPLE TIMES ON A PAGE Replace the print cartridge if the defects occur every: • 22 mm...14 in.) • 75 mm (2.95 in.) CHECK TO SEE IF MARKS OCCUR ACROSS THE PAGE REPEATEDLY IN ALL COLORS Replace the transfer belt if the defects occur every: • 28 mm (1.10 in.) • 38 mm ...(1.50 in.) • 57 mm (2.25 in.) Replace the fuser if the defects occur every: • 19 mm (.75 in.) • 31 mm (1.22 in.) • 43 ...

User's Guide
Page 185
... Function state. IS THE TRANSFER BELT DEFECTIVE? Replace the fuser. Replace the transfer belt. IS A PRINT CARTRIDGE DEFECTIVE? Troubleshooting 185 Try one or more of the appropriate area or has been superimposed over another color area. • Remove and reinstall the print cartridges. ... Press or repeatedly until Yes appears, and then press OK. Replace the print cartridge causing the line. Color has shifted outside of the following: CLEAN THE LASER LENS The laser lens may be dirty. Light colored line, white line, or incorrectly colored line These are possible solutions.
... Function state. IS THE TRANSFER BELT DEFECTIVE? Replace the fuser. Replace the transfer belt. IS A PRINT CARTRIDGE DEFECTIVE? Troubleshooting 185 Try one or more of the appropriate area or has been superimposed over another color area. • Remove and reinstall the print cartridges. ... Press or repeatedly until Yes appears, and then press OK. Replace the print cartridge causing the line. Color has shifted outside of the following: CLEAN THE LASER LENS The laser lens may be dirty. Light colored line, white line, or incorrectly colored line These are possible solutions.
User's Guide
Page 187
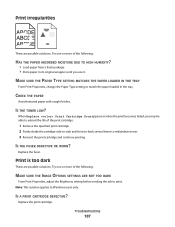
IS THE TONER LOW? Replace the fuser. Note: This solution applies to extend the life of the following : MAKE SURE THE IMAGE OPTIONS SETTINGS ARE NOT TOO DARK From Print Properties, adjust ... MOISTURE DUE TO HIGH HUMIDITY? • Load paper from a fresh package. • Store paper in the tray. Print irregularities These are possible solutions. IS THE FUSER DEFECTIVE OR WORN? MAKE SURE THE PAPER TYPE SETTING MATCHES THE PAPER LOADED IN THE TRAY From Print Properties, change the Paper Type setting to...
IS THE TONER LOW? Replace the fuser. Note: This solution applies to extend the life of the following : MAKE SURE THE IMAGE OPTIONS SETTINGS ARE NOT TOO DARK From Print Properties, adjust ... MOISTURE DUE TO HIGH HUMIDITY? • Load paper from a fresh package. • Store paper in the tray. Print irregularities These are possible solutions. IS THE FUSER DEFECTIVE OR WORN? MAKE SURE THE PAPER TYPE SETTING MATCHES THE PAPER LOADED IN THE TRAY From Print Properties, change the Paper Type setting to...


