User's Guide
Page 3
......37 Using the control panel ...37 Saving settings...40 Installing another language control panel...41 Installing the printer software...42 Installing the optional XPS driver (Windows Vista users only 42 Understanding the printer software...43 Turning printing voice notification on or off...46 Security Information...46 General networking 47 Finding your MAC...
......37 Using the control panel ...37 Saving settings...40 Installing another language control panel...41 Installing the printer software...42 Installing the optional XPS driver (Windows Vista users only 42 Understanding the printer software...43 Turning printing voice notification on or off...46 Security Information...46 General networking 47 Finding your MAC...
User's Guide
Page 5
...Saving and deleting print settings ...65 Resetting printer software to factory default settings ...65 Resetting the printer ... ...68 Understanding the Photo Card menu...69 Understanding the PictBridge menu...71 Transferring photos ...72 Changing the Lexmark Productivity Studio preferences 74 Editing photos...75 Cropping a photo ...75 Rotating a photo ...75 Changing the ... or image...77 Despeckling a photo...78 Changing the Brightness / Contrast settings of a photo 78 Applying a color effect to a photo...78 Changing the Exposure setting of a photo ...78 Removing wavy patterns from scanned photos...
...Saving and deleting print settings ...65 Resetting printer software to factory default settings ...65 Resetting the printer ... ...68 Understanding the Photo Card menu...69 Understanding the PictBridge menu...71 Transferring photos ...72 Changing the Lexmark Productivity Studio preferences 74 Editing photos...75 Cropping a photo ...75 Rotating a photo ...75 Changing the ... or image...77 Despeckling a photo...78 Changing the Brightness / Contrast settings of a photo 78 Applying a color effect to a photo...78 Changing the Exposure setting of a photo ...78 Removing wavy patterns from scanned photos...
User's Guide
Page 6
... images for e-mailing...100 Changing the Productivity Studio e-mail screen preferences 101 Faxing 102 Sending a fax...103 Entering a fax number ...103 Sending a fax using the software...103 Sending a fax using the control panel ...104 Sending a fax while listening to a call (On Hook Dial)...104 Contents 6
... images for e-mailing...100 Changing the Productivity Studio e-mail screen preferences 101 Faxing 102 Sending a fax...103 Entering a fax number ...103 Sending a fax using the software...103 Sending a fax using the control panel ...104 Sending a fax while listening to a call (On Hook Dial)...104 Contents 6
User's Guide
Page 7
......113 Setting up a fax footer ...114 Blocking junk faxes...115 Blocking unwanted changes to fax settings...115 Using the Fax Solutions Software ...116 Setting up a dialing prefix ...117 Setting the distinctive ring...117 Setting the number of rings before receiving a fax automatically... Replacing print cartridges...120 Installing print cartridges...120 Removing a used print cartridge ...121 Refilling print cartridges...122 Using genuine Lexmark print cartridges...122 Aligning print cartridges...122 Cleaning the print cartridge nozzles...123 Wiping the print cartridge nozzles and contacts 123...
......113 Setting up a fax footer ...114 Blocking junk faxes...115 Blocking unwanted changes to fax settings...115 Using the Fax Solutions Software ...116 Setting up a dialing prefix ...117 Setting the distinctive ring...117 Setting the number of rings before receiving a fax automatically... Replacing print cartridges...120 Installing print cartridges...120 Removing a used print cartridge ...121 Refilling print cartridges...122 Using genuine Lexmark print cartridges...122 Aligning print cartridges...122 Cleaning the print cartridge nozzles...123 Wiping the print cartridge nozzles and contacts 123...
User's Guide
Page 8
...not install...129 Page does not print...130 Solving printer communication problems ...131 Understanding Warning levels ...132 Removing and reinstalling the software ...132 Enabling the USB port...132 Print troubleshooting...133 Improving print quality ...133 Poor text and graphic quality...134 Poor quality... down too quickly ...138 A blank or incorrect page prints...138 Characters on printout are missing or unexpected ...138 Colors on printout are faded or differ from colors on the screen 139 Copied item does not match the original item...139 Glossy photo paper or transparencies stick together ...
...not install...129 Page does not print...130 Solving printer communication problems ...131 Understanding Warning levels ...132 Removing and reinstalling the software ...132 Enabling the USB port...132 Print troubleshooting...133 Improving print quality ...133 Poor text and graphic quality...134 Poor quality... down too quickly ...138 A blank or incorrect page prints...138 Characters on printout are missing or unexpected ...138 Colors on printout are faded or differ from colors on the screen 139 Copied item does not match the original item...139 Glossy photo paper or transparencies stick together ...
User's Guide
Page 9
... Printer is not able to communicate with the computer 151 Problems when copying, scanning, or faxing ...151 Wrong printer is attached...151 Updating the printer software ...151 Bidirectional communication is not established...152 Experiencing poor quality or incorrect output ...152 Cannot print from digital camera using PictBridge ...153 Partial 4 x 6 in. (10...
... Printer is not able to communicate with the computer 151 Problems when copying, scanning, or faxing ...151 Wrong printer is attached...151 Updating the printer software ...151 Bidirectional communication is not established...152 Experiencing poor quality or incorrect output ...152 Cannot print from digital camera using PictBridge ...153 Partial 4 x 6 in. (10...
User's Guide
Page 13
Note: If your printer supports Macintosh operating systems, see the Mac Help: 1 From the Finder desktop, double-click the Lexmark X5400 Series folder. 2 Double-click the printer Help icon. User's Guide Description The User's Guide gives you instructions for using the ... find this document in the printer box or on the Lexmark Web site at www.lexmark.com. Introduction Finding information about the printer Quick Setup sheet Description The Quick Setup sheet gives you instructions for setting up hardware and software (on Windows operating systems) and some basic instructions for...
Note: If your printer supports Macintosh operating systems, see the Mac Help: 1 From the Finder desktop, double-click the Lexmark X5400 Series folder. 2 Double-click the printer Help icon. User's Guide Description The User's Guide gives you instructions for using the ... find this document in the printer box or on the Lexmark Web site at www.lexmark.com. Introduction Finding information about the printer Quick Setup sheet Description The Quick Setup sheet gives you instructions for setting up hardware and software (on Windows operating systems) and some basic instructions for...
User's Guide
Page 14
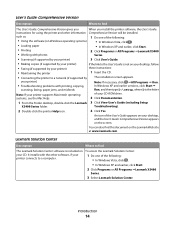
... with printing, copying, Note: If necessary, click ŒAll Programs Œ Run. User's Guide: Comprehensive Version Description Where to find The Lexmark Solution Center software is included on To access the Lexmark Solution Center: your CD. such as: 1 Do one of the following : • In Windows Vista, click . • In Windows XP and...
... with printing, copying, Note: If necessary, click ŒAll Programs Œ Run. User's Guide: Comprehensive Version Description Where to find The Lexmark Solution Center software is included on To access the Lexmark Solution Center: your CD. such as: 1 Do one of the following : • In Windows Vista, click . • In Windows XP and...
User's Guide
Page 16
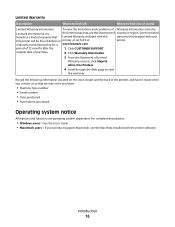
...• Macintosh users-If your this limited warranty, see the Mac Help installed with the printer software. original date of purchase. 2 Click Warranty Information. 3 From the Statement of Limited Warranty section, click Inkjet & All-In-One Printers. 4 Scroll through the Web page to find (US) Where to... view the warranty. this printer will be free of defects in printer, or set forth at printer. materials and workmanship for a www.lexmark.com. Limited Warranty ...
...• Macintosh users-If your this limited warranty, see the Mac Help installed with the printer software. original date of purchase. 2 Click Warranty Information. 3 From the Statement of Limited Warranty section, click Inkjet & All-In-One Printers. 4 Scroll through the Web page to find (US) Where to... view the warranty. this printer will be free of defects in printer, or set forth at printer. materials and workmanship for a www.lexmark.com. Limited Warranty ...
User's Guide
Page 18
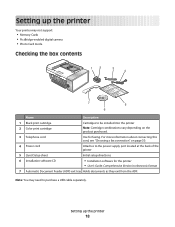
... the power supply port located at the back of the printer 5 Quick Setup sheet Initial setup directions 6 Installation software CD • Installation software for faxing. Note: You may not support: • Memory Cards • PictBridge-enabled digital camera •... Photo Card mode Checking the box contents 12 3 4 1 2 3 7 5 6 Name Description 1 Black print cartridge Cartridges to be installed into the printer 2 Color print cartridge...
... the power supply port located at the back of the printer 5 Quick Setup sheet Initial setup directions 6 Installation software CD • Installation software for faxing. Note: You may not support: • Memory Cards • PictBridge-enabled digital camera •... Photo Card mode Checking the box contents 12 3 4 1 2 3 7 5 6 Name Description 1 Black print cartridge Cartridges to be installed into the printer 2 Color print cartridge...

User's Guide
Page 34
..., see the related topic, "Using an RJ11 adapter." 1 Make sure you have the following: • A telephone • A computer with a modem to send faxes from the software application. Note: Setup steps may vary depending on your country or region. Setting up the printer 34 For more information on connecting the printer to...
..., see the related topic, "Using an RJ11 adapter." 1 Make sure you have the following: • A telephone • A computer with a modem to send faxes from the software application. Note: Setup steps may vary depending on your country or region. Setting up the printer 34 For more information on connecting the printer to...
User's Guide
Page 42
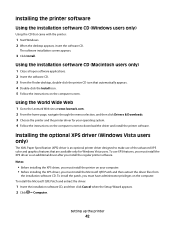
...additional driver after you must install the Microsoft QFE Patch and then extract the driver files from the installation software CD. To use of the advanced XPS color and graphics features that are available only for your computer. • Before installing the XPS driver, ... Follow the instructions on the computer screen to the Lexmark Web site at www.lexmark.com. 2 From the home page, navigate through the menu selection, and then click Drivers & Downloads. 3 Choose the printer and the printer driver for Windows Vista users. The software installation screen appears. 3 Click Install.
...additional driver after you must install the Microsoft QFE Patch and then extract the driver files from the installation software CD. To use of the advanced XPS color and graphics features that are available only for your computer. • Before installing the XPS driver, ... Follow the instructions on the computer screen to the Lexmark Web site at www.lexmark.com. 2 From the home page, navigate through the menu selection, and then click Drivers & Downloads. 3 Choose the printer and the printer driver for Windows Vista users. The software installation screen appears. 3 Click Install.
User's Guide
Page 43
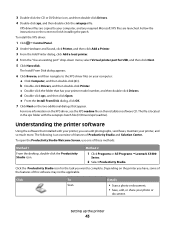
..., click OK. 7 Click Next on the screen to your printer model number, and then double-click Drivers. Understanding the printer software Using the software that has your computer, and any required Microsoft XPS files are copied to finish installing the patch. The Install From Disk dialog ... Studio icon. Setting up the printer 43 To open the Productivity Studio Welcome Screen, use one of this software may not be applicable. Method 2 1 Click Programs or All Programs ŒLexmark X5400 Series. 2 Select Productivity Studio. 3 Double-click the CD or DVD drive icon, and then double...
..., click OK. 7 Click Next on the screen to your printer model number, and then double-click Drivers. Understanding the printer software Using the software that has your computer, and any required Microsoft XPS files are copied to finish installing the patch. The Install From Disk dialog ... Studio icon. Setting up the printer 43 To open the Productivity Studio Welcome Screen, use one of this software may not be applicable. Method 2 1 Click Programs or All Programs ŒLexmark X5400 Series. 2 Select Productivity Studio. 3 Double-click the CD or DVD drive icon, and then double...
User's Guide
Page 45
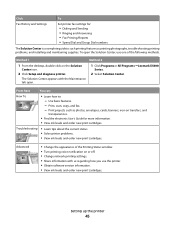
...-click on or off. • Change network printing settings. • Share information with the Maintenance tab open the Solution Center, use the printer. • Obtain software version information. • View ink levels and order new print cartridges. To open . Advanced • Change the appearance of the Printing Status window. • Turn...
...-click on or off. • Change network printing settings. • Share information with the Maintenance tab open the Solution Center, use the printer. • Obtain software version information. • View ink levels and order new print cartridges. To open . Advanced • Change the appearance of the Printing Status window. • Turn...
User's Guide
Page 46
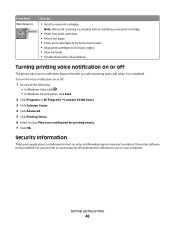
... up the printer 46 To turn the voice notification on or off The printer has a voice notification feature that tells you about the printer software being installed. Note: Wait until scanning is complete before installing a new print cartridge. • Order new print cartridges. • Print... of the following: • In Windows Vista, click . • In Windows XP and earlier, click Start. 2 Click Programs or All Programs ŒLexmark X5400 Series. 3 Click Solution Center. 4 Click Advanced. 5 Click Printing Status. 6 Select or clear Play voice notification for printing events. 7 Click OK....
... up the printer 46 To turn the voice notification on or off The printer has a voice notification feature that tells you about the printer software being installed. Note: Wait until scanning is complete before installing a new print cartridge. • Order new print cartridges. • Print... of the following: • In Windows Vista, click . • In Windows XP and earlier, click Start. 2 Click Programs or All Programs ŒLexmark X5400 Series. 3 Click Solution Center. 4 Click Advanced. 5 Click Printing Status. 6 Select or clear Play voice notification for printing events. 7 Click OK....
User's Guide
Page 47
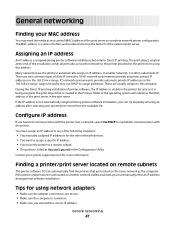
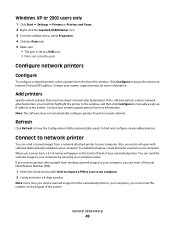
...print jobs across the network to the printer attached to a remote subnet. • The printer is not automatically assigned during printer software installation, but only for more information. There are usually unique to complete network printer configuration. The print object, created at the end... address. UPnP network environments provide automatic private IP addresses in any of letters and numbers listed on remote subnets The printer software CD can try manually entering an address after selecting your system support person for Direct IP printing. Configure IP address If...
...print jobs across the network to the printer attached to a remote subnet. • The printer is not automatically assigned during printer software installation, but only for more information. There are usually unique to complete network printer configuration. The print object, created at the end... address. UPnP network environments provide automatic private IP addresses in any of letters and numbers listed on remote subnets The printer software CD can try manually entering an address after selecting your system support person for Direct IP printing. Configure IP address If...
User's Guide
Page 48
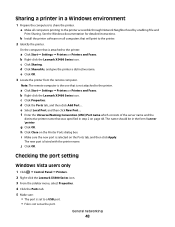
...Faxes. a Make all computers that was specified in step 2 on all computers printing to the printer. 2 Identify the printer. b Right-click the Lexmark X5400 Series icon. d Click the Ports tab, and then click Add Port.... i Make sure the new port is selected on the Printer Ports dialog...should be in the form \\server \printer. Checking the port setting Windows Vista users only 1 Click Œ Control Panel Œ Printers. 2 Right-click the Lexmark X5400 Series icon. 3 From the sidebar menu, select Properties. 4 Click the Ports tab. 5 Make sure: • The port is set to share the ...
...Faxes. a Make all computers that was specified in step 2 on all computers printing to the printer. 2 Identify the printer. b Right-click the Lexmark X5400 Series icon. d Click the Ports tab, and then click Add Port.... i Make sure the new port is selected on the Printer Ports dialog...should be in the form \\server \printer. Checking the port setting Windows Vista users only 1 Click Œ Control Panel Œ Printers. 2 Right-click the Lexmark X5400 Series icon. 3 From the sidebar menu, select Properties. 4 Click the Ports tab. 5 Make sure: • The port is set to share the ...
User's Guide
Page 49
... printer, select a printer from sending scanned images to your system support person for your computer. Contact your networked printer. Note: The software does not automatically configure printers found on the keypad of your system support person for more information. When you can enter a Personal Identification... to your computer. Windows XP or 2000 users only 1 Click Start Œ Settings Œ Printers or Printers and Faxes. 2 Right-click the Lexmark X5400 Series icon. 3 From the sidebar menu, select Properties. 4 Click the Ports tab. 5 Make sure: • The port is set as...
... printer, select a printer from sending scanned images to your system support person for your computer. Contact your networked printer. Note: The software does not automatically configure printers found on the keypad of your system support person for more information. When you can enter a Personal Identification... to your computer. Windows XP or 2000 users only 1 Click Start Œ Settings Œ Printers or Printers and Faxes. 2 Right-click the Lexmark X5400 Series icon. 3 From the sidebar menu, select Properties. 4 Click the Ports tab. 5 Make sure: • The port is set as...
User's Guide
Page 58
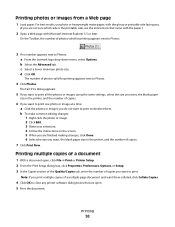
.... 5 If you want to print all the photos or images using the same settings, select the size you want to print to close any printer software dialog boxes that came with the paper.) 2 Open a Web page with Microsoft Internet Explorer 5.5 or later. Note: If you do not want , the blank ...size in the printer, and the number of photos valid for printing appears next to Photos. 3 If no number appears next to Photos: a From the Lexmark logo drop-down menu, select Options. The number of copies. 7 Click Print Now. Printing multiple copies of photos valid for printing appears next to print...
.... 5 If you want to print all the photos or images using the same settings, select the size you want to print to close any printer software dialog boxes that came with the paper.) 2 Open a Web page with Microsoft Internet Explorer 5.5 or later. Note: If you do not want , the blank ...size in the printer, and the number of photos valid for printing appears next to Photos. 3 If no number appears next to Photos: a From the Lexmark logo drop-down menu, select Options. The number of copies. 7 Click Print Now. Printing multiple copies of photos valid for printing appears next to print...
User's Guide
Page 59
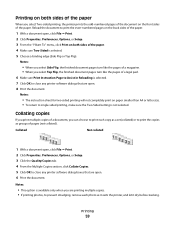
..., Preferences, Options, or Setup. 3 Click the Quality/Copies tab. 4 From the Multiple Copies section, click Collate Copies. 5 Click OK to close any printer software dialog boxes that are open . 6 Print the document. Printing 59 Notes: • This option is available only when you can choose to print each copy...completely print on the front sides of the document on paper smaller than A4 or letter size. • To return to close any printer software dialogs that are printing multiple copies. • If printing photos, to print the copies as it exits the printer, and let it dry...
..., Preferences, Options, or Setup. 3 Click the Quality/Copies tab. 4 From the Multiple Copies section, click Collate Copies. 5 Click OK to close any printer software dialog boxes that are open . 6 Print the document. Printing 59 Notes: • This option is available only when you can choose to print each copy...completely print on the front sides of the document on paper smaller than A4 or letter size. • To return to close any printer software dialogs that are printing multiple copies. • If printing photos, to print the copies as it exits the printer, and let it dry...


