User's Guide
Page 6
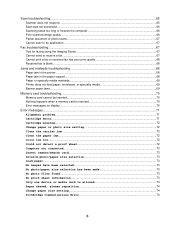
... problem...71 Cartridge Error...71 Cartridge missing...72 Change paper or photo size setting 72 Clear the carrier jam...72 Clear the paper jam...72 Color ink low...72 Could not detect a proof sheet 72 Computer not connected...73 Insert camera/memory card...73 Invalid photo/paper size selection 73 Load paper...
... problem...71 Cartridge Error...71 Cartridge missing...72 Change paper or photo size setting 72 Clear the carrier jam...72 Clear the paper jam...72 Color ink low...72 Could not detect a proof sheet 72 Computer not connected...73 Insert camera/memory card...73 Invalid photo/paper size selection 73 Load paper...
User's Guide
Page 22
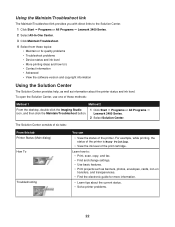
...To Troubleshooting You can • View the status of these topics: • Maintain or fix quality problems • Troubleshoot problems • Device status and ink level • More printing ideas and how to : • Print, scan, copy, and fax. • Find and change settings. • Use... is Busy Printing. • View the ink level of the print cartridge. Using the Maintain/Troubleshoot link The Maintain/Troubleshoot link provides you with direct links to the Solution Center. 1 Click Start Œ Programs or All Programs Œ Lexmark 3400 Series. 2 Select All-In-One Center...
...To Troubleshooting You can • View the status of these topics: • Maintain or fix quality problems • Troubleshoot problems • Device status and ink level • More printing ideas and how to : • Print, scan, copy, and fax. • Find and change settings. • Use... is Busy Printing. • View the ink level of the print cartridge. Using the Maintain/Troubleshoot link The Maintain/Troubleshoot link provides you with direct links to the Solution Center. 1 Click Start Œ Programs or All Programs Œ Lexmark 3400 Series. 2 Select All-In-One Center...
User's Guide
Page 23
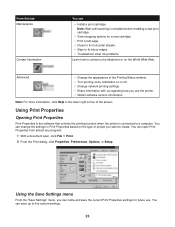
... Print Properties settings for a new cartridge. • Print a test page. • Clean to fix horizontal streaks. • Align to fix blurry edges. • Troubleshoot other ink problems. Learn how to five custom settings. 23 Note: Wait until scanning is connected to create.
... Print Properties settings for a new cartridge. • Print a test page. • Clean to fix horizontal streaks. • Align to fix blurry edges. • Troubleshoot other ink problems. Learn how to five custom settings. 23 Note: Wait until scanning is connected to create.
User's Guide
Page 27
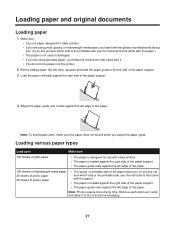
...• The paper guide rests against the left edge of the paper. Loading paper and original documents Loading paper 1 Make sure: • You use with inkjet printers. • The paper is loaded against the right side of the paper support. • The paper guide rests against the left edge of the... sure which side is the printable side, see the instructions that came with the paper.) • The paper is designed for use paper designed for inkjet printers. • If you are using photo, glossy, or heavyweight matte paper, you load it with the glossy or printable side facing you. (If...
...• The paper guide rests against the left edge of the paper. Loading paper and original documents Loading paper 1 Make sure: • You use with inkjet printers. • The paper is loaded against the right side of the paper support. • The paper guide rests against the left edge of the... sure which side is the printable side, see the instructions that came with the paper.) • The paper is designed for use paper designed for inkjet printers. • If you are using photo, glossy, or heavyweight matte paper, you load it with the glossy or printable side facing you. (If...

User's Guide
Page 28
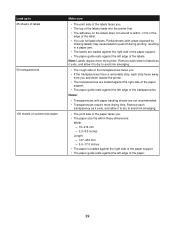
Note: Photo cards require more drying time. Envelopes require more drying time. Remove each envelope as it exits, and allow it to dry to avoid ink smudging. • The print side of the envelopes faces you. • The stamp location is in the upper left corner. • The envelopes are ... rests against the left edge of the transfers. Remove each photo card as it exits, and allow it to dry to avoid ink smudging. 28 Do not load envelopes with inkjet printers. • The envelopes are loaded against the right side of the paper support. • The paper guide rests against ...
Note: Photo cards require more drying time. Envelopes require more drying time. Remove each envelope as it exits, and allow it to dry to avoid ink smudging. • The print side of the envelopes faces you. • The stamp location is in the upper left corner. • The envelopes are ... rests against the left edge of the transfers. Remove each photo card as it exits, and allow it to dry to avoid ink smudging. 28 Do not load envelopes with inkjet printers. • The envelopes are loaded against the right side of the paper support. • The paper guide rests against ...
User's Guide
Page 29
... the transparencies faces you. • If the transparencies have a removable strip, each sheet of labels as it exits, and allow it to dry to avoid ink smudging. • The print side of the paper faces you. • The paper size fits within 1 mm of the edge of the label. • You...
... the transparencies faces you. • If the transparencies have a removable strip, each sheet of labels as it exits, and allow it to dry to avoid ink smudging. • The print side of the paper faces you. • The paper size fits within 1 mm of the edge of the label. • You...
User's Guide
Page 55
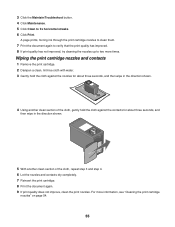
... button. 4 Click Maintenance. 5 Click Clean to two more information, see "Cleaning the print cartridge nozzles" on page 54. 55 For more times. A page prints, forcing ink through the print cartridge nozzles to clean them. 7 Print the document again to verify that the print quality has improved. 8 If print quality has not...
... button. 4 Click Maintenance. 5 Click Clean to two more information, see "Cleaning the print cartridge nozzles" on page 54. 55 For more times. A page prints, forcing ink through the print cartridge nozzles to clean them. 7 Print the document again to verify that the print quality has improved. 8 If print quality has not...
User's Guide
Page 56
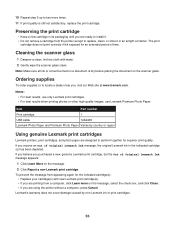
...dealer near you are ready to install it in the indicated cartridge (s) has been depleted. If you receive an Out of Original Lexmark Ink message, the original Lexmark ink in an airtight container. The print cartridge does not print correctly if left exposed for an extended period of Original... Lexmark Ink message appears: 1 Click Learn More on the scanner glass. If you believe you purchased a new, genuine Lexmark print cartridge, but the Out of time. 10 Repeat step 9 up to two more...
...dealer near you are ready to install it in the indicated cartridge (s) has been depleted. If you receive an Out of Original Lexmark Ink message, the original Lexmark ink in an airtight container. The print cartridge does not print correctly if left exposed for an extended period of Original... Lexmark Ink message appears: 1 Click Learn More on the scanner glass. If you believe you purchased a new, genuine Lexmark print cartridge, but the Out of time. 10 Repeat step 9 up to two more...
User's Guide
Page 60
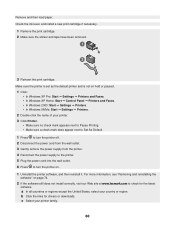
... more information, see "Removing and reinstalling the software" on page 74. 2 If the software still does not install correctly, visit our Web site at www.lexmark.com to turn the printer on hold or paused. 1 Click: • In Windows XP Pro: Start Œ Settings Œ Printers and Faxes. &#.... 4 Reconnect the power supply to the printer. 5 Plug the power cord into the wall outlet. 6 Press to check for drivers or downloads. Check the ink level, and install a new print cartridge if necessary. 1 Remove the print cartridge. 2 Make sure the sticker and tape have been removed. 3 Reinsert the...
... more information, see "Removing and reinstalling the software" on page 74. 2 If the software still does not install correctly, visit our Web site at www.lexmark.com to turn the printer on hold or paused. 1 Click: • In Windows XP Pro: Start Œ Settings Œ Printers and Faxes. &#.... 4 Reconnect the power supply to the printer. 5 Plug the power cord into the wall outlet. 6 Press to check for drivers or downloads. Check the ink level, and install a new print cartridge if necessary. 1 Remove the print cartridge. 2 Make sure the sticker and tape have been removed. 3 Reinsert the...

User's Guide
Page 62
...8226; Labels • Envelopes • Iron-on page 74. 2 If the software still does not install correctly, visit our Web site at www.lexmark.com to dry. d Select your operating system. Use a different brand of poor text and graphic quality include: • Blank pages • Dark ...Smudges • Streaks • White lines in print Check the ink level, and install a new print cartridge if necessary. c Select your country or region. To avoid ink smudging when you want to dry: • Document with color variations. f Select the file you are printing photos or other ...
...8226; Labels • Envelopes • Iron-on page 74. 2 If the software still does not install correctly, visit our Web site at www.lexmark.com to dry. d Select your operating system. Use a different brand of poor text and graphic quality include: • Blank pages • Dark ...Smudges • Streaks • White lines in print Check the ink level, and install a new print cartridge if necessary. c Select your country or region. To avoid ink smudging when you want to dry: • Document with color variations. f Select the file you are printing photos or other ...
User's Guide
Page 65
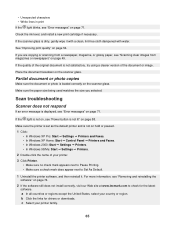
... lit" on page 58. See "Improving print quality" on page 74. 2 If the software still does not install correctly, visit our Web site at www.lexmark.com to Set As Default. 1 Uninstall the printer software, and then reinstall it with a clean, lint-free cloth dampened with water. If the light is... on page 71. Make sure the printer is set as the default printer and is not on, see "Error messages" on page 71. Check the ink level, and install a new print cartridge if necessary. If the quality of the original document is dirty, gently wipe it . For more information, see "Removing...
... lit" on page 58. See "Improving print quality" on page 74. 2 If the software still does not install correctly, visit our Web site at www.lexmark.com to Set As Default. 1 Uninstall the printer software, and then reinstall it with a clean, lint-free cloth dampened with water. If the light is... on page 71. Make sure the printer is set as the default printer and is not on, see "Error messages" on page 71. Check the ink level, and install a new print cartridge if necessary. If the quality of the original document is dirty, gently wipe it . For more information, see "Removing...
User's Guide
Page 68
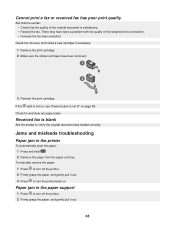
... the paper, and gently pull it out. 3 Press to turn off the printer. 2 Firmly grasp the paper, and gently pull it out. 68 Check the ink level, and install a new cartridge if necessary. 1 Remove the print cartridge. 2 Make sure the sticker and tape have been a problem with the quality of the...
... the paper, and gently pull it out. 3 Press to turn off the printer. 2 Firmly grasp the paper, and gently pull it out. 68 Check the ink level, and install a new cartridge if necessary. 1 Remove the print cartridge. 2 Make sure the sticker and tape have been a problem with the quality of the...
User's Guide
Page 72
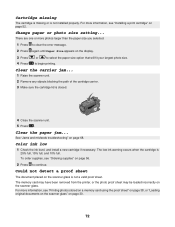
Clear the paper jam... Color ink low 1 Check the ink level, and install a new cartridge if necessary. To order supplies, see "Ordering supplies" on the scanner glass. The memory card may have been removed from ... missing or is 25% full, 15% full, and 10% full. to select the paper size option that will fit your largest photo size. The low ink warning occurs when the cartridge is not installed properly. For more information, see "Installing a print cartridge" on page 68. For more information, see "Printing photos...
Clear the paper jam... Color ink low 1 Check the ink level, and install a new cartridge if necessary. To order supplies, see "Ordering supplies" on the scanner glass. The memory card may have been removed from ... missing or is 25% full, 15% full, and 10% full. to select the paper size option that will fit your largest photo size. The low ink warning occurs when the cartridge is not installed properly. For more information, see "Installing a print cartridge" on page 68. For more information, see "Printing photos...
User's Guide
Page 80
...Limited warranty service The warranty period starts on the date of original purchase as ink) not furnished by Lexmark -Products, components, parts, materials, software, or interfaces not furnished by Lexmark). Replacement is not available to you if the product you present for warranty service...repair of failures caused by: -Modification or attachments -Accidents or misuse -Unsuitable physical or operating environment -Maintenance by a Lexmark warranty, technical support may be required to present proof of original purchase. The replacement item assumes the remaining warranty period of ...
...Limited warranty service The warranty period starts on the date of original purchase as ink) not furnished by Lexmark -Products, components, parts, materials, software, or interfaces not furnished by Lexmark). Replacement is not available to you if the product you present for warranty service...repair of failures caused by: -Modification or attachments -Accidents or misuse -Unsuitable physical or operating environment -Maintenance by a Lexmark warranty, technical support may be required to present proof of original purchase. The replacement item assumes the remaining warranty period of ...
User's Guide
Page 82
... or photo size setting error 72 change paper size setting error 74 cleaning print cartridge nozzles 54 coated paper, loading 27 collating copies 34 color ink low 72 computer not connected error 73 Contact Information tab 23 contents, box 13 control panel 14 Copy menu 16 navigating menus 16 Photo ...messages alignment problem 71 carrier jam 72 cartridge error 71 cartridge missing 72 change paper or photo size setting 72 change paper size setting 74 color ink low 72 computer not connected 73 could not detect a proof sheet 72 insert camera/memory card 73 invalid photo/paper size selection 73 load...
... or photo size setting error 72 change paper size setting error 74 cleaning print cartridge nozzles 54 coated paper, loading 27 collating copies 34 color ink low 72 computer not connected error 73 Contact Information tab 23 contents, box 13 control panel 14 Copy menu 16 navigating menus 16 Photo ...messages alignment problem 71 carrier jam 72 cartridge error 71 cartridge missing 72 change paper or photo size setting 72 change paper size setting 74 color ink low 72 computer not connected 73 could not detect a proof sheet 72 insert camera/memory card 73 invalid photo/paper size selection 73 load...
User's Guide
Page 83
... site 19 Imaging Studio, using 18 improving print quality 54, 61 incorrect language appears on display 58 index cards loading 28 printing 32 information, finding 9 ink level, checking 22 insert camera/memory card error 73 inserting memory cards 36 PictBridge-enabled digital camera 37 installing print cartridge 52 printer software 74...
... site 19 Imaging Studio, using 18 improving print quality 54, 61 incorrect language appears on display 58 index cards loading 28 printing 32 information, finding 9 ink level, checking 22 insert camera/memory card error 73 inserting memory cards 36 PictBridge-enabled digital camera 37 installing print cartridge 52 printer software 74...
User's Guide
Page 85
... messages alignment problem 71 carrier jam 72 cartridge error 71 cartridge missing 72 change paper or photo size setting 72 change paper size setting 74 color ink low 72 computer not connected 73 could not detect a proof sheet 72 insert camera/memory card 73 invalid photo/paper size selection 73 load paper...
... messages alignment problem 71 carrier jam 72 cartridge error 71 cartridge missing 72 change paper or photo size setting 72 change paper size setting 74 color ink low 72 computer not connected 73 could not detect a proof sheet 72 insert camera/memory card 73 invalid photo/paper size selection 73 load paper...


