
User's Guide
Page 3
... printer 9 Setting up the printer 13 Checking the box contents...13 Learning about the printer 14 Understanding the parts of the printer 14 Using the control panel buttons and menus 15 Using the control panel...15 Navigating the control panel menus...16 Using the Copy menu...16 Using the Photo Card menu...16 Learning about the software 18 Using the printer software...18 Using the Imaging Studio...18 Using the All-In-One Center...20 Opening the All-In-One Center...20 Using the Scanning & Copying...
... printer 9 Setting up the printer 13 Checking the box contents...13 Learning about the printer 14 Understanding the parts of the printer 14 Using the control panel buttons and menus 15 Using the control panel...15 Navigating the control panel menus...16 Using the Copy menu...16 Using the Photo Card menu...16 Learning about the software 18 Using the printer software...18 Using the Imaging Studio...18 Using the All-In-One Center...20 Opening the All-In-One Center...20 Using the Scanning & Copying...
User's Guide
Page 6
... happens when a memory card is inserted 70 Error messages on display...70 Error messages...71 Alignment problem...71 Cartridge Error...71 Cartridge missing...72 Change paper or photo size setting 72 Clear the carrier jam...72 Clear the paper jam...72 Color ink low...72 Could not detect a proof sheet 72 Computer not connected...73 Insert camera/memory card...73 Invalid photo/paper size selection 73 Load paper...73 No images have been selected...73 No photo/paper size selection has been made 73 No photo files found...73 No...
... happens when a memory card is inserted 70 Error messages on display...70 Error messages...71 Alignment problem...71 Cartridge Error...71 Cartridge missing...72 Change paper or photo size setting 72 Clear the carrier jam...72 Clear the paper jam...72 Color ink low...72 Could not detect a proof sheet 72 Computer not connected...73 Insert camera/memory card...73 Invalid photo/paper size selection 73 Load paper...73 No images have been selected...73 No photo/paper size selection has been made 73 No photo files found...73 No...
User's Guide
Page 9
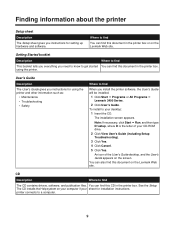
...4 Click Cancel. 5 Click Yes. using the printer and other information such as: • Maintenance • Troubleshooting • Safety Where to find You can find When you instructions for setting up hardware and software. User's Guide Description The User's Guide gives you instructions for installation instructions. Finding information about the printer Setup sheet Description The Setup sheet gives you install the printer software, the User's Guide will be installed. 1 Click Start Œ Programs or All Programs Œ Lexmark 3400 Series. 2 Click User's Guide. Getting Started...
...4 Click Cancel. 5 Click Yes. using the printer and other information such as: • Maintenance • Troubleshooting • Safety Where to find You can find When you instructions for setting up hardware and software. User's Guide Description The User's Guide gives you instructions for installation instructions. Finding information about the printer Setup sheet Description The Setup sheet gives you install the printer software, the User's Guide will be installed. 1 Click Start Œ Programs or All Programs Œ Lexmark 3400 Series. 2 Click User's Guide. Getting Started...
User's Guide
Page 10
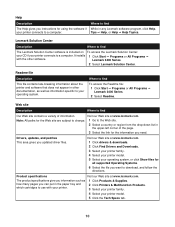
... your printer model. 5 Click the Tech Specs tab. 10 Where to find To access the Readme file: 1 Click Start ΠPrograms or All Programs ΠLexmark 3400 Series. 2 Select Readme. Lexmark Solution Center Description Where to find Our Web site contains a variety of the page. 3 Select the link for the information you updated driver files. Note: All paths for using the software if your operating system. Lexmark 3400 Series. 2 Select Lexmark Solution Center. Readme file...
... your printer model. 5 Click the Tech Specs tab. 10 Where to find To access the Readme file: 1 Click Start ΠPrograms or All Programs ΠLexmark 3400 Series. 2 Select Readme. Lexmark Solution Center Description Where to find Our Web site contains a variety of the page. 3 Select the link for the information you updated driver files. Note: All paths for using the software if your operating system. Lexmark 3400 Series. 2 Select Lexmark Solution Center. Readme file...
User's Guide
Page 13
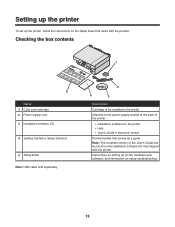
Setting up the printer To set up printer hardware and software, and information on setup troubleshooting 13 Checking the box contents 1 ?? ? 5 Name 1 Color print cartridge 2 Power supply cord 3 Installation software CD 4 Getting Started or Setup Solutions 5 Setup sheet Note: USB cable sold separately 2 4 3 Description Cartridge to be installed in the printer Attaches to the power supply located at the back of the printer • Installation software for the printer • Help • User's Guide in electronic format Printed booklet that serves as a guide Note: The...
Setting up the printer To set up printer hardware and software, and information on setup troubleshooting 13 Checking the box contents 1 ?? ? 5 Name 1 Color print cartridge 2 Power supply cord 3 Installation software CD 4 Getting Started or Setup Solutions 5 Setup sheet Note: USB cable sold separately 2 4 3 Description Cartridge to be installed in the printer Attaches to the power supply located at the back of the printer • Installation software for the printer • Help • User's Guide in electronic format Printed booklet that serves as a guide Note: The...
User's Guide
Page 15
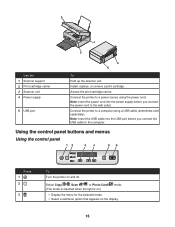
...or Photo Card (The mode is selected when the light is on.) mode. • Display the menu for the selected mode. • Select a submenu option that appears on and off. 3 1 2 Use the 1 Scanner support 2 Print cartridge carrier 3 Scanner unit 4 Power supply 5 USB port 4 5 To Hold up the scanner unit. Access the print cartridge carrier. Note: Insert the USB cable into the power supply before you connect the power cord to a computer using the power cord. Connect the printer to the computer. Install, replace, or remove a print cartridge. Using the control panel buttons...
...or Photo Card (The mode is selected when the light is on.) mode. • Display the menu for the selected mode. • Select a submenu option that appears on and off. 3 1 2 Use the 1 Scanner support 2 Print cartridge carrier 3 Scanner unit 4 Power supply 5 USB port 4 5 To Hold up the scanner unit. Access the print cartridge carrier. Note: Insert the USB cable into the power supply before you connect the power cord to a computer using the power cord. Connect the printer to the computer. Install, replace, or remove a print cartridge. Using the control panel buttons...
User's Guide
Page 18
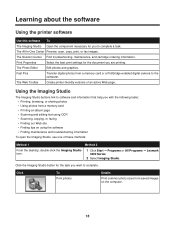
...; Programs or All Programs ΠLexmark 3400 Series. 2 Select Imaging Studio. Click To Print photos Details Print common photo sizes from a memory card or a PictBridge-enabled digital camera to the computer. The All-In-One Center Preview, scan, copy, print, or fax images. Print Properties Select the best print settings for you to complete. Using the Imaging Studio The Imaging Studio buttons link to software and information that help you want to complete a task. The Solution Center Find troubleshooting, maintenance, and cartridge...
...; Programs or All Programs ΠLexmark 3400 Series. 2 Select Imaging Studio. Click To Print photos Details Print common photo sizes from a memory card or a PictBridge-enabled digital camera to the computer. The All-In-One Center Preview, scan, copy, print, or fax images. Print Properties Select the best print settings for you to complete. Using the Imaging Studio The Imaging Studio buttons link to software and information that help you want to complete a task. The Solution Center Find troubleshooting, maintenance, and cartridge...
User's Guide
Page 23
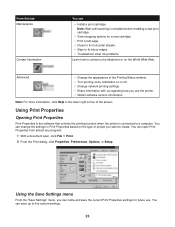
... use . Note: For more information, click Help in Print Properties based on the World Wide Web. You can save the current Print Properties settings for a new cartridge. • Print a test page. • Clean to fix horizontal streaks. • Align to fix blurry edges. • Troubleshoot other ink problems. Learn how to create. Advanced • Change the appearance of the screen. Note: Wait until scanning is connected to five custom settings. 23 From this tab Maintenance...
... use . Note: For more information, click Help in Print Properties based on the World Wide Web. You can save the current Print Properties settings for a new cartridge. • Print a test page. • Clean to fix horizontal streaks. • Align to fix blurry edges. • Troubleshoot other ink problems. Learn how to create. Advanced • Change the appearance of the screen. Note: Wait until scanning is connected to five custom settings. 23 From this tab Maintenance...

User's Guide
Page 24
... Start Œ Programs or All Programs Œ Lexmark 3400 Series. 2 Select Photo Editor. 3 Click File Œ Open to select the image you want to different parts of the Print Properties software: Quality/Copies, Paper Setup, and Print Layout. Notes: • You can reverse multiple changes. 24 You can edit only one image at a time. • Move the mouse pointer over the tool for a project. Note: For more information on these settings...
... Start Œ Programs or All Programs Œ Lexmark 3400 Series. 2 Select Photo Editor. 3 Click File Œ Open to select the image you want to different parts of the Print Properties software: Quality/Copies, Paper Setup, and Print Layout. Notes: • You can reverse multiple changes. 24 You can edit only one image at a time. • Move the mouse pointer over the tool for a project. Note: For more information on these settings...
User's Guide
Page 26
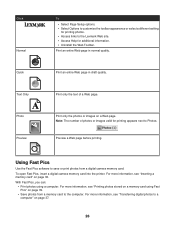
... entire Web page in normal quality. Print only the photos or images on page 39. • Save photos from a digital camera memory card. Preview a Web page before printing. With Fast Pics, you can: • Print photos using Fast Pics" on a Web page. Click Normal Quick Text Only Photo Preview To • Select Page Setup options. • Select Options to customize the toolbar appearance or select a different setting for printing photos. • Access links to the Lexmark Web site. • Access Help for printing...
... entire Web page in normal quality. Print only the photos or images on page 39. • Save photos from a digital camera memory card. Preview a Web page before printing. With Fast Pics, you can: • Print photos using Fast Pics" on a Web page. Click Normal Quick Text Only Photo Preview To • Select Page Setup options. • Select Options to customize the toolbar appearance or select a different setting for printing photos. • Access links to the Lexmark Web site. • Access Help for printing...
User's Guide
Page 56
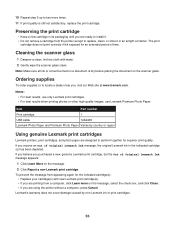
... printer except to replace, clean, or store it . • Do not remove a cartridge from a computer, click Learn more times. 11 If print quality is dry before placing the document on the scanner glass. Preserving the print cartridge • Keep a new cartridge in its packaging until you are ready to install it in the indicated cartridge (s) has been depleted. Item Part number Print cartridge 1 USB cable 12A2405 Lexmark Photo Paper and Premium Photo Paper Varies by non-Lexmark ink...
... printer except to replace, clean, or store it . • Do not remove a cartridge from a computer, click Learn more times. 11 If print quality is dry before placing the document on the scanner glass. Preserving the print cartridge • Keep a new cartridge in its packaging until you are ready to install it in the indicated cartridge (s) has been depleted. Item Part number Print cartridge 1 USB cable 12A2405 Lexmark Photo Paper and Premium Photo Paper Varies by non-Lexmark ink...
User's Guide
Page 58
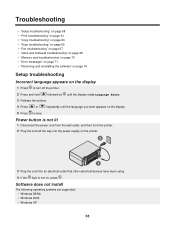
... to turn off the printer. 2 Press and hold followed by 3 Release the buttons. Troubleshooting • "Setup troubleshooting" on page 58 • "Print troubleshooting" on page 61 • "Copy troubleshooting" on page 64 • "Scan troubleshooting" on page 65 • "Fax troubleshooting" on page 67 • "Jams and misfeeds troubleshooting" on page 68 • "Memory card troubleshooting" on page 70 • "Error messages" on page 71 • "Removing and reinstalling the software" on page 74 Setup troubleshooting Incorrect language appears on the display 1 Press to save. Power...
... to turn off the printer. 2 Press and hold followed by 3 Release the buttons. Troubleshooting • "Setup troubleshooting" on page 58 • "Print troubleshooting" on page 61 • "Copy troubleshooting" on page 64 • "Scan troubleshooting" on page 65 • "Fax troubleshooting" on page 67 • "Jams and misfeeds troubleshooting" on page 68 • "Memory card troubleshooting" on page 70 • "Error messages" on page 71 • "Removing and reinstalling the software" on page 74 Setup troubleshooting Incorrect language appears on the display 1 Press to save. Power...
User's Guide
Page 65
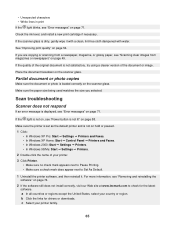
... . Scan troubleshooting Scanner does not respond If an error message is not lit" on the scanner glass. Place the document facedown on page 58. Make sure the paper size being used matches the size you are copying or scanning from a newspaper, magazine, or glossy paper, see "Scanning clear images from magazines or newspapers" on page 74. 2 If the software still does not install correctly, visit our Web site at www.lexmark.com to Set As Default...
... . Scan troubleshooting Scanner does not respond If an error message is not lit" on the scanner glass. Place the document facedown on page 58. Make sure the paper size being used matches the size you are copying or scanning from a newspaper, magazine, or glossy paper, see "Scanning clear images from magazines or newspapers" on page 74. 2 If the software still does not install correctly, visit our Web site at www.lexmark.com to Set As Default...
User's Guide
Page 67
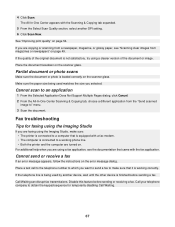
... before sending or receiving a fax. Fax troubleshooting Tips for temporarily disabling Call Waiting. 67 Cannot send or receive a fax If an error message appears, follow the instructions on page 54. Disable this feature before sending a fax. Place a test call to the telephone number to which you are faxing using the Imaging Studio If you want to send a fax to make sure: • The printer is connected to a working correctly. For additional help when you are turned on page 49. 4 Click Scan...
... before sending or receiving a fax. Fax troubleshooting Tips for temporarily disabling Call Waiting. 67 Cannot send or receive a fax If an error message appears, follow the instructions on page 54. Disable this feature before sending a fax. Place a test call to the telephone number to which you are faxing using the Imaging Studio If you want to send a fax to make sure: • The printer is connected to a working correctly. For additional help when you are turned on page 49. 4 Click Scan...
User's Guide
Page 72
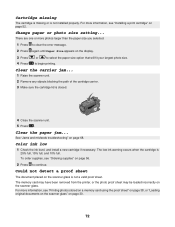
... paper size option that will fit your largest photo size. Clear the carrier jam... 1 Raise the scanner unit. 2 Remove any objects blocking the path of the cartridge carrier. 3 Make sure the cartridge lid is 25% full, 15% full, and 10% full. Color ink low 1 Check the ink level, and install a new cartridge if necessary. For more information, see "Ordering supplies" on the scanner glass. For more information, see "Printing photos stored on a memory card using the proof sheet...
... paper size option that will fit your largest photo size. Clear the carrier jam... 1 Raise the scanner unit. 2 Remove any objects blocking the path of the cartridge carrier. 3 Make sure the cartridge lid is 25% full, 15% full, and 10% full. Color ink low 1 Check the ink level, and install a new cartridge if necessary. For more information, see "Ordering supplies" on the scanner glass. For more information, see "Printing photos stored on a memory card using the proof sheet...
User's Guide
Page 73
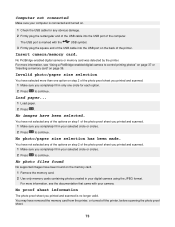
... of the USB cable into the USB port on . 1 Check the USB cable for each option. 2 Press to control printing photos" on page 37 or "Inserting a memory card" on the memory card. 1 Remove the memory card. 2 Use only memory cards containing photos created in your selected circle or circles. 2 Press to continue. No photo files found on page 36. For more than one circle for any of the options on step 1 of the photo proof sheet you printed and scanned. 1 Make sure...
... of the USB cable into the USB port on . 1 Check the USB cable for each option. 2 Press to control printing photos" on page 37 or "Inserting a memory card" on the memory card. 1 Remove the memory card. 2 Use only memory cards containing photos created in your selected circle or circles. 2 Press to continue. No photo files found on page 36. For more than one circle for any of the options on step 1 of the photo proof sheet you printed and scanned. 1 Make sure...
User's Guide
Page 82
...send or receive fax 67 cards memory 36 printing 32 carrier jam error 72 cartridge error 71 cartridge missing error 72 cartridge, print aligning 54 cleaning 54 installing 52 preserving 56 removing 52 wiping 55 change paper or photo size setting error 72 change paper size setting error 74 cleaning print cartridge nozzles 54 coated paper, loading 27 collating copies 34 color ink low 72 computer not connected error 73 Contact Information tab 23 contents, box 13 control panel 14 Copy menu 16 navigating menus 16 Photo Card menu 16 using 15 copier does not respond 64 Copy menu 16 copy options making...
...send or receive fax 67 cards memory 36 printing 32 carrier jam error 72 cartridge error 71 cartridge missing error 72 cartridge, print aligning 54 cleaning 54 installing 52 preserving 56 removing 52 wiping 55 change paper or photo size setting error 72 change paper size setting error 74 cleaning print cartridge nozzles 54 coated paper, loading 27 collating copies 34 color ink low 72 computer not connected error 73 Contact Information tab 23 contents, box 13 control panel 14 Copy menu 16 navigating menus 16 Photo Card menu 16 using 15 copier does not respond 64 Copy menu 16 copy options making...
User's Guide
Page 83
... paper jam in printer 68 paper or specialty media misfeeds 69 Paper Setup tab changing orientation 24 changing paper size 24 paper sizes, specifying 24 paper skewed error 74 paper support 14 paper type, changing 31 paper, loading 27 partial document or photo copies 65 partial document or photo prints 64 partial document or photo scans 67 parts control panel 14 display 14 memory card slots 14 paper exit tray 14 paper guide 14 paper support 14 PictBridge port 14 power supply 15 print cartridge carrier 14 scanner glass 14 scanner support 14 scanner unit 15 top cover 14 USB port 15 Photo Card menu...
... paper jam in printer 68 paper or specialty media misfeeds 69 Paper Setup tab changing orientation 24 changing paper size 24 paper sizes, specifying 24 paper skewed error 74 paper support 14 paper type, changing 31 paper, loading 27 partial document or photo copies 65 partial document or photo prints 64 partial document or photo scans 67 parts control panel 14 display 14 memory card slots 14 paper exit tray 14 paper guide 14 paper support 14 PictBridge port 14 power supply 15 print cartridge carrier 14 scanner glass 14 scanner support 14 scanner unit 15 top cover 14 USB port 15 Photo Card menu...
User's Guide
Page 84
... problem reading memory card error 74 proof sheet, using 38 publications, finding 9 Q Quality/Copies tab 24 R received fax is blank 68 receiving a fax using the software 50 recycling Lexmark products 57 WEEE statement 78 reducing an image 43 removing print cartridge 52 repeating an image 44 reverse page order 35 S safety information 2 Saved Images tab Creative Tasks section 21 Open With section 21 Photo Prints section 21 Preview section 21 using 21 Scan button 19 Scan & edit text (OCR) button 19 scan troubleshooting cannot scan...
... problem reading memory card error 74 proof sheet, using 38 publications, finding 9 Q Quality/Copies tab 24 R received fax is blank 68 receiving a fax using the software 50 recycling Lexmark products 57 WEEE statement 78 reducing an image 43 removing print cartridge 52 repeating an image 44 reverse page order 35 S safety information 2 Saved Images tab Creative Tasks section 21 Open With section 21 Photo Prints section 21 Preview section 21 using 21 Scan button 19 Scan & edit text (OCR) button 19 scan troubleshooting cannot scan...
User's Guide
Page 85
... transparencies loading 29 printing 33 Troubleshooting tab 22 troubleshooting, copy copier does not respond 64 partial document or photo copies 65 poor copy quality 64 scanner unit does not close 64 troubleshooting, error messages alignment problem 71 carrier jam 72 cartridge error 71 cartridge missing 72 change paper or photo size setting 72 change paper size setting 74 color ink low 72 computer not connected 73 could not detect a proof sheet 72 insert camera/memory card 73 invalid photo/paper size selection 73 load paper 73 no images have been selected 73 no photo files...
... transparencies loading 29 printing 33 Troubleshooting tab 22 troubleshooting, copy copier does not respond 64 partial document or photo copies 65 poor copy quality 64 scanner unit does not close 64 troubleshooting, error messages alignment problem 71 carrier jam 72 cartridge error 71 cartridge missing 72 change paper or photo size setting 72 change paper size setting 74 color ink low 72 computer not connected 73 could not detect a proof sheet 72 insert camera/memory card 73 invalid photo/paper size selection 73 load paper 73 no images have been selected 73 no photo files...

