User's Guide for Windows
Page 1
January 2003 www.lexmark.com Z600 Series Color Jetprinter™ User's Guide for Windows • Setup troubleshooting A checklist to find solutions to common setup problems. • Printer overview Learn about the printer parts and the printer software. • Printing ideas How to print several projects on various types of paper. • Maintenance Caring for your cartridges and ordering supplies. • General troubleshooting Error messages, print quality problems, paper jams, and much more.
January 2003 www.lexmark.com Z600 Series Color Jetprinter™ User's Guide for Windows • Setup troubleshooting A checklist to find solutions to common setup problems. • Printer overview Learn about the printer parts and the printer software. • Printing ideas How to print several projects on various types of paper. • Maintenance Caring for your cartridges and ordering supplies. • General troubleshooting Error messages, print quality problems, paper jams, and much more.
User's Guide for Windows
Page 3
Contents Chapter 1: Printer overview 5 Understanding the printer parts 5 Understanding the printer software 6 Chapter 2: Printing ideas 10 Printing on plain paper 10 Printing photos 11 Printing on premium or coated paper 13 Printing on both sides of a sheet of paper 14 Printing cards 17 Printing envelopes 18 Printing color images in black and white 20 Printing...
Contents Chapter 1: Printer overview 5 Understanding the printer parts 5 Understanding the printer software 6 Chapter 2: Printing ideas 10 Printing on plain paper 10 Printing photos 11 Printing on premium or coated paper 13 Printing on both sides of a sheet of paper 14 Printing cards 17 Printing envelopes 18 Printing color images in black and white 20 Printing...
User's Guide for Windows
Page 4
Chapter 4: Setup troubleshooting 49 Troubleshooting checklist 49 Solving printer software installation problems 50 Chapter 5: General troubleshooting 53 Understanding error messages and flashing lights 53 Resolving unsuccessful or slow printing 54 Clearing paper misfeeds or jams 56 Solving print quality problems 58 Solving specialty media problems 60 Notices 61 Glossary 63 Index 66 Contents 4
Chapter 4: Setup troubleshooting 49 Troubleshooting checklist 49 Solving printer software installation problems 50 Chapter 5: General troubleshooting 53 Understanding error messages and flashing lights 53 Resolving unsuccessful or slow printing 54 Clearing paper misfeeds or jams 56 Solving print quality problems 58 Solving specialty media problems 60 Notices 61 Glossary 63 Index 66 Contents 4
User's Guide for Windows
Page 5
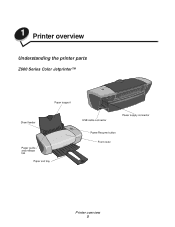
1 Printer overview Understanding the printer parts Z600 Series Color Jetprinter™ Sheet feeder Paper support Paper guide and release tab Paper exit tray USB cable connector Power supply connector Power/Resume button Front cover Printer overview 5
1 Printer overview Understanding the printer parts Z600 Series Color Jetprinter™ Sheet feeder Paper support Paper guide and release tab Paper exit tray USB cable connector Power supply connector Power/Resume button Front cover Printer overview 5

User's Guide for Windows
Page 6
... Page Setup dialog box and the Print dialog box are set to these default settings: Understanding the printer software 6 This software has two parts: the Printer driver and the Lexmark Solution Center. Connect the printer to the printer. Understanding the printer software Your printer software works with superior results. When you want to print documents with your...
... Page Setup dialog box and the Print dialog box are set to these default settings: Understanding the printer software 6 This software has two parts: the Printer driver and the Lexmark Solution Center. Connect the printer to the printer. Understanding the printer software Your printer software works with superior results. When you want to print documents with your...
User's Guide for Windows
Page 7
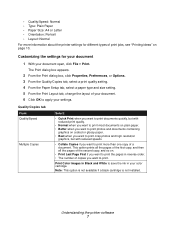
... Normal when you want to print most documents on plain paper. • Better when you want to print more information about the printer settings for your document 1 With your color cartridge. This option prints all the pages of the first copy, and then all the pages of the second copy, and so... on. • Print Last Page First if you want to print. Understanding the printer software 7 Customizing the settings for different types of print ...
... Normal when you want to print most documents on plain paper. • Better when you want to print more information about the printer settings for your document 1 With your color cartridge. This option prints all the pages of the first copy, and then all the pages of the second copy, and so... on. • Print Last Page First if you want to print. Understanding the printer software 7 Customizing the settings for different types of print ...
User's Guide for Windows
Page 8
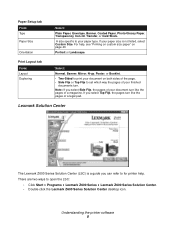
... of a legal pad. Understanding the printer software 8 If your finished documents turn. Portrait or Landscape. A size specific to open the LSC: • Click Start Programs Lexmark Z600 Series Lexmark Z600 Series Solution Center. • Double-click the Lexmark Z600 Series Solution Center desktop icon. ...Orientation Select: Plain Paper, Envelope, Banner, Coated Paper, Photo/Glossy Paper, Transparency, Iron-On Transfer, or Card Stock. Lexmark Solution Center The Lexmark Z600 Series Solution Center (LSC) is not listed, select Custom Size. If you select Side Flip, the pages of your ...
... of a legal pad. Understanding the printer software 8 If your finished documents turn. Portrait or Landscape. A size specific to open the LSC: • Click Start Programs Lexmark Z600 Series Lexmark Z600 Series Solution Center. • Double-click the Lexmark Z600 Series Solution Center desktop icon. ...Orientation Select: Plain Paper, Envelope, Banner, Coated Paper, Photo/Glossy Paper, Transparency, Iron-On Transfer, or Card Stock. Lexmark Solution Center The Lexmark Z600 Series Solution Center (LSC) is not listed, select Custom Size. If you select Side Flip, the pages of your ...
User's Guide for Windows
Page 9
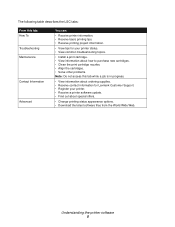
...How To Troubleshooting Maintenance Contact Information Advanced You can: • Receive printer information. • Receive basic printing tips. • Receive printing project information. • View tips for your printer status. • View common troubleshooting topics. • Install a ...job is in progress. • View information about ordering supplies. • Receive contact information for Lexmark Customer Support. • Register your printer. • Receive a printer software update. • Find out about special offers. • Change printing status appearance options....
...How To Troubleshooting Maintenance Contact Information Advanced You can: • Receive printer information. • Receive basic printing tips. • Receive printing project information. • View tips for your printer status. • View common troubleshooting topics. • Install a ...job is in progress. • View information about ordering supplies. • Receive contact information for Lexmark Customer Support. • Register your printer. • Receive a printer software update. • Find out about special offers. • Change printing status appearance options....

User's Guide for Windows
Page 10
2 Printing ideas Printing on the thickness of the paper. Printing ideas 10 Note: If you are using letter size paper, adjusting the paper guide may not be necessary. Step 1: Load the paper • Load the paper vertically against the right side of the paper support. • Do not force the paper into the printer. • Squeeze and slide the paper guide to 100 sheets of plain paper at a time, depending on plain paper You can load up to the left side of the paper.
2 Printing ideas Printing on the thickness of the paper. Printing ideas 10 Note: If you are using letter size paper, adjusting the paper guide may not be necessary. Step 1: Load the paper • Load the paper vertically against the right side of the paper support. • Do not force the paper into the printer. • Squeeze and slide the paper guide to 100 sheets of plain paper at a time, depending on plain paper You can load up to the left side of the paper.
User's Guide for Windows
Page 11
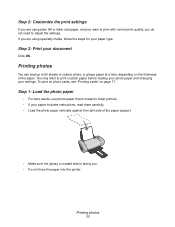
...normal print quality, you do not need to adjust the settings. Step 3: Print your settings. If you are using specialty media, follow the steps for inkjet printers. • If your paper includes instructions, read them carefully. • Load the photo paper vertically against the right side of coated, photo, or ... 1: Load the photo paper • For best results, use photo paper that is facing you. • Do not force the paper into the printer. Printing photos 11 Printing photos You can load up to 50 sheets of the paper support. • Make sure the glossy or coated side is...
...normal print quality, you do not need to adjust the settings. Step 3: Print your settings. If you are using specialty media, follow the steps for inkjet printers. • If your paper includes instructions, read them carefully. • Load the photo paper vertically against the right side of coated, photo, or ... 1: Load the photo paper • For best results, use photo paper that is facing you. • Do not force the paper into the printer. Printing photos 11 Printing photos You can load up to 50 sheets of the paper support. • Make sure the glossy or coated side is...
User's Guide for Windows
Page 13
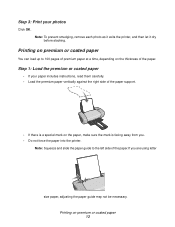
... premium or coated paper You can load up to the left side of the paper.If you . • Do not force the paper into the printer. Step 3: Print your paper includes instructions, read them carefully. • Load the premium paper vertically against the right side of the paper support. • If... paper. Step 1: Load the premium or coated paper • If your photos Click OK. Note: To prevent smudging, remove each photo as it exits the printer, and then let it dry before stacking.
... premium or coated paper You can load up to the left side of the paper.If you . • Do not force the paper into the printer. Step 3: Print your paper includes instructions, read them carefully. • Load the premium paper vertically against the right side of the paper support. • If... paper. Step 1: Load the premium or coated paper • If your photos Click OK. Note: To prevent smudging, remove each photo as it exits the printer, and then let it dry before stacking.
User's Guide for Windows
Page 15
.... Step 1: Load the paper • Load the paper vertically against the right side of the paper support. • Do not force the paper into the printer. • Make sure the print side is facing you are using letter size paper, adjusting the paper guide may not be necessary. Note: If you...
.... Step 1: Load the paper • Load the paper vertically against the right side of the paper support. • Do not force the paper into the printer. • Make sure the print side is facing you are using letter size paper, adjusting the paper guide may not be necessary. Note: If you...
User's Guide for Windows
Page 16
... Print Properties dialog box, select the Print Layout tab. If you to assist in reloading check box. When the odd-numbered pages finish printing, the printer software prompts you select Side Flip, the pages of your document Click OK. If you and the arrows pointing down into the paper support. 2 Click...
... Print Properties dialog box, select the Print Layout tab. If you to assist in reloading check box. When the odd-numbered pages finish printing, the printer software prompts you select Side Flip, the pages of your document Click OK. If you and the arrows pointing down into the paper support. 2 Click...

User's Guide for Windows
Page 17
... against the right side of the paper support. • Make sure the print side is facing you. • Do not force the cards into the printer. • Squeeze and slide the paper guide to 25 greeting cards, index cards, photo cards, or postcards at a time, depending on the thickness of the...
... against the right side of the paper support. • Make sure the print side is facing you. • Do not force the cards into the printer. • Squeeze and slide the paper guide to 25 greeting cards, index cards, photo cards, or postcards at a time, depending on the thickness of the...
User's Guide for Windows
Page 19
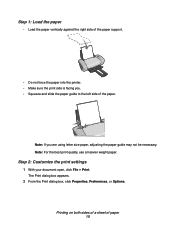
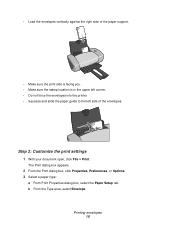
... print side is facing you. • Make sure the stamp location is in the upper left corner. • Do not force the envelopes into the printer. • Squeeze and slide the paper guide to the left side of the envelopes. Step 2: Customize the print settings 1 With your document open, click File...
... print side is facing you. • Make sure the stamp location is in the upper left corner. • Do not force the envelopes into the printer. • Squeeze and slide the paper guide to the left side of the envelopes. Step 2: Customize the print settings 1 With your document open, click File...

User's Guide for Windows
Page 21
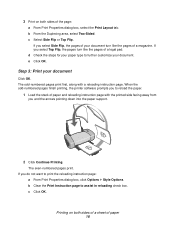
... open, click File Print. Step 2: Customize the print settings 1 With your paper type. b Select Print Color Images in black and white: a From Print Properties dialog box, select the Quality/Copies tab. The Print ... box appears. 2 From the Print dialog box, click Properties, Preferences, or Options. 3 To print color images in Black and White. If you are using letter size paper, adjusting the paper guide may not... remove the first 50 sheets from the paper exit tray before the others print. Printing color images in black and white 21 Note: If you want to 50 sheets of the paper....
... open, click File Print. Step 2: Customize the print settings 1 With your paper type. b Select Print Color Images in black and white: a From Print Properties dialog box, select the Quality/Copies tab. The Print ... box appears. 2 From the Print dialog box, click Properties, Preferences, or Options. 3 To print color images in Black and White. If you are using letter size paper, adjusting the paper guide may not... remove the first 50 sheets from the paper exit tray before the others print. Printing color images in black and white 21 Note: If you want to 50 sheets of the paper....
User's Guide for Windows
Page 22
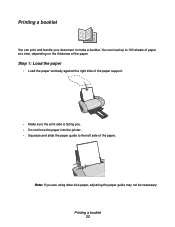
Printing a booklet You can load up to make a booklet. Step 1: Load the paper • Load the paper vertically against the right side of the paper support. • Make sure the print side is facing you are using letter size paper, adjusting the paper guide may not be necessary. Note: If you . • Do not force the paper into the printer. • Squeeze and slide the paper guide to the left side of the paper. Printing a booklet 22 You can print and bundle your document to 100 sheets of paper at a time, depending on the thickness of the paper.
Printing a booklet You can load up to make a booklet. Step 1: Load the paper • Load the paper vertically against the right side of the paper support. • Make sure the print side is facing you are using letter size paper, adjusting the paper guide may not be necessary. Note: If you . • Do not force the paper into the printer. • Squeeze and slide the paper guide to the left side of the paper. Printing a booklet 22 You can print and bundle your document to 100 sheets of paper at a time, depending on the thickness of the paper.
User's Guide for Windows
Page 24
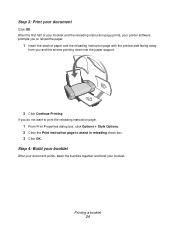
... instruction page to reload the paper. 1 Insert the stack of your booklet and the reloading instruction page prints, your document Click OK. Step 3: Print your printer software prompts you to assist in reloading check box. 3 Click OK. After the first half of paper and the reloading instruction page with the printed...
... instruction page to reload the paper. 1 Insert the stack of your booklet and the reloading instruction page prints, your document Click OK. Step 3: Print your printer software prompts you to assist in reloading check box. 3 Click OK. After the first half of paper and the reloading instruction page with the printed...
User's Guide for Windows
Page 25
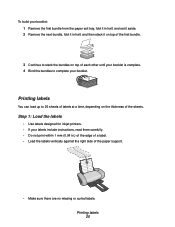
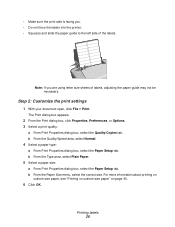
Printing labels 25 Step 1: Load the labels • Use labels designed for inkjet printers. • If your labels include instructions, read them carefully. • Do not print within 1 mm (0.04 in half, and then stack it on top of ...
Printing labels 25 Step 1: Load the labels • Use labels designed for inkjet printers. • If your labels include instructions, read them carefully. • Do not print within 1 mm (0.04 in half, and then stack it on top of ...
User's Guide for Windows
Page 26
... Paper. 5 Select a paper size: a From Print Properties dialog box, select the Paper Setup tab. Note: If you . • Do not force the labels into the printer. • Squeeze and slide the paper guide to the left side of labels, adjusting the paper guide may not be necessary. b From the Paper Size...
... Paper. 5 Select a paper size: a From Print Properties dialog box, select the Paper Setup tab. Note: If you . • Do not force the labels into the printer. • Squeeze and slide the paper guide to the left side of labels, adjusting the paper guide may not be necessary. b From the Paper Size...


