Lenovo K4 Series User Guide V1.0
Page 8
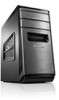
1.2 Rear view of the chassis IdeaCentre K430 Voltage selection switch (selected models only) Power connector HDMI connector (selected models only) USB connectors DisplayPort connector (selected models only) On-board VGA connector Ethernet connector Audio connectors PCI Express X 16 graphics adapter connector (some models are equipped with a graphics card) PCI Express X 1 adapter connector (some models are equipped with a WIFI card or TV tuner card) User Guide 3
1.2 Rear view of the chassis IdeaCentre K430 Voltage selection switch (selected models only) Power connector HDMI connector (selected models only) USB connectors DisplayPort connector (selected models only) On-board VGA connector Ethernet connector Audio connectors PCI Express X 16 graphics adapter connector (some models are equipped with a graphics card) PCI Express X 1 adapter connector (some models are equipped with a WIFI card or TV tuner card) User Guide 3
Lenovo K4 Series User Guide V1.0
Page 9
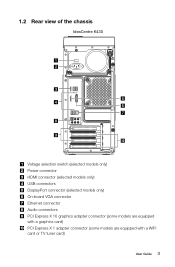
IdeaCentre K410 Voltage selection switch (selected models only) Power connector USB connectors HDMI connector (selected models only) On-board VGA connector Ethernet connector Audio connectors PCI Express X 16 graphics adapter connector (some models are equipped with a graphics card) PCI Express X 1 adapter connector (some models are equipped with a WIFI card or TV tuner card) 4 User Guide
IdeaCentre K410 Voltage selection switch (selected models only) Power connector USB connectors HDMI connector (selected models only) On-board VGA connector Ethernet connector Audio connectors PCI Express X 16 graphics adapter connector (some models are equipped with a graphics card) PCI Express X 1 adapter connector (some models are equipped with a WIFI card or TV tuner card) 4 User Guide
Lenovo K4 Series User Guide V1.0
Page 10
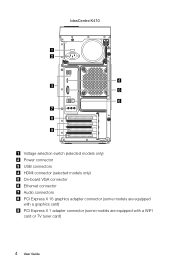
IdeaCentre K415 Voltage selection switch (selected models only) Power connector USB connectors (USB ports 4 to 6) HDMI connector (selected models only) On-board VGA connector Ethernet connector Audio connectors PCI Express X 16 graphics adapter connector (some models are equipped with a graphics card) PCI Express X 1 adapter connector (some models are equipped with a WIFI card or TV tuner card) User Guide 5
IdeaCentre K415 Voltage selection switch (selected models only) Power connector USB connectors (USB ports 4 to 6) HDMI connector (selected models only) On-board VGA connector Ethernet connector Audio connectors PCI Express X 16 graphics adapter connector (some models are equipped with a graphics card) PCI Express X 1 adapter connector (some models are equipped with a WIFI card or TV tuner card) User Guide 5
Lenovo K4 Series User Guide V1.0
Page 29
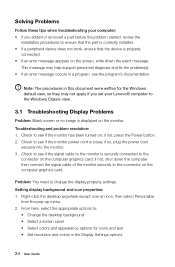
...8226; Set resolution and colors in a program, see if the monitor power cord is securely connected to the connector on the computer graphics card; Check to see the program's documentation. if not, shut down the exact message. Troubleshooting and problem resolution: 1. Right-click the ... monitor is loose; Solving Problems Follow these tips when troubleshooting your Lenovo® computer to the Windows Classic view. 3.1 Troubleshooting Display Problems Problem: Blank screen or no image is displayed on the computer graphics card. Check to see if the signal cable to change the display...
...8226; Set resolution and colors in a program, see if the monitor power cord is securely connected to the connector on the computer graphics card; Check to see the program's documentation. if not, shut down the exact message. Troubleshooting and problem resolution: 1. Right-click the ... monitor is loose; Solving Problems Follow these tips when troubleshooting your Lenovo® computer to the Windows Classic view. 3.1 Troubleshooting Display Problems Problem: Blank screen or no image is displayed on the computer graphics card. Check to see if the signal cable to change the display...
Lenovo K4 Series User Guide V1.0
Page 34
Chapter Hardware Replacement Guide This chapter contains the following topics: Identifying internal components Identifying parts on the system board Removing the computer cover Removing the front bezel Replacing a memory module Replacing a hard disk drive Replacing an optical drive Replacing a graphics card Replacing the TV-Tuner card Replacing the keyboard and mouse User Guide 29
Chapter Hardware Replacement Guide This chapter contains the following topics: Identifying internal components Identifying parts on the system board Removing the computer cover Removing the front bezel Replacing a memory module Replacing a hard disk drive Replacing an optical drive Replacing a graphics card Replacing the TV-Tuner card Replacing the keyboard and mouse User Guide 29
Lenovo K4 Series User Guide V1.0
Page 35
... of all parts. It is intended to the Hardware Maintenance Manual (HMM) for step-by Lenovo®. Overview This guide is expected that was included with a TV-Tuner card, and therefore does not apply to replace cables, switches, and certain mechanical parts without a TV...at: http://consumersupport.lenovo.com. 30 User Guide Note: Use only parts provided by -step procedures. This guide contains instructions for replacing the following parts: • Memory modules • Hard disk drive • Optical disk drive • Graphics card • TV-Tuner card Safety information for ...
... of all parts. It is intended to the Hardware Maintenance Manual (HMM) for step-by Lenovo®. Overview This guide is expected that was included with a TV-Tuner card, and therefore does not apply to replace cables, switches, and certain mechanical parts without a TV...at: http://consumersupport.lenovo.com. 30 User Guide Note: Use only parts provided by -step procedures. This guide contains instructions for replacing the following parts: • Memory modules • Hard disk drive • Optical disk drive • Graphics card • TV-Tuner card Safety information for ...
Lenovo K4 Series User Guide V1.0
Page 38
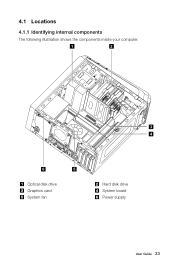
4.1 Locations 4.1.1 Identifying internal components The following illustration shows the components inside your computer. 1 2 3 4 6 5 Optical disk drive Graphics card System fan Hard disk drive System board Power supply User Guide 33
4.1 Locations 4.1.1 Identifying internal components The following illustration shows the components inside your computer. 1 2 3 4 6 5 Optical disk drive Graphics card System fan Hard disk drive System board Power supply User Guide 33
Lenovo K4 Series User Guide V1.0
Page 48
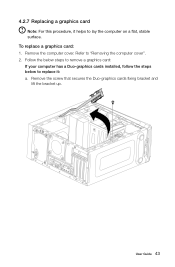
Follow the below steps to remove a graphics card: If your computer has a Duo-graphics cards installed, follow the steps below to replace it helps to "Removing the computer cover". 2. Remove the screw that secures the Duo-graphics cards fixing bracket and lift the bracket up. To replace a graphics card: 1. Remove the computer cover. 4.2.7 Replacing a graphics card Note: For this procedure, it : a. User Guide 43 Refer to lay the computer on a flat, stable surface.
Follow the below steps to remove a graphics card: If your computer has a Duo-graphics cards installed, follow the steps below to replace it helps to "Removing the computer cover". 2. Remove the screw that secures the Duo-graphics cards fixing bracket and lift the bracket up. To replace a graphics card: 1. Remove the computer cover. 4.2.7 Replacing a graphics card Note: For this procedure, it : a. User Guide 43 Refer to lay the computer on a flat, stable surface.
Lenovo K4 Series User Guide V1.0
Page 49
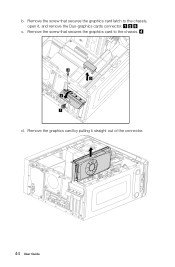
Remove the screw that secures the graphics card latch to the chassis. 4 3 2 1 d. Remove the screw that secures the graphics card to the chassis, open it straight out of the connector. 44 User Guide Remove the graphics card by pulling it , and remove the Duo-graphics cards connector. c. b.
Remove the screw that secures the graphics card latch to the chassis. 4 3 2 1 d. Remove the screw that secures the graphics card to the chassis, open it straight out of the connector. 44 User Guide Remove the graphics card by pulling it , and remove the Duo-graphics cards connector. c. b.
Lenovo K4 Series User Guide V1.0
Page 50
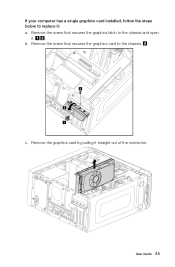
b. Remove the screw that secures the graphics card to the chassis and open it. Remove the graphics card by pulling it : a. Remove the screw that secures the graphics latch to the chassis. 3 2 1 c. If your computer has a single graphics card installed, follow the steps below to replace it straight out of the connector. User Guide 45
b. Remove the screw that secures the graphics card to the chassis and open it. Remove the graphics card by pulling it : a. Remove the screw that secures the graphics latch to the chassis. 3 2 1 c. If your computer has a single graphics card installed, follow the steps below to replace it straight out of the connector. User Guide 45
Lenovo K4 Series User Guide V1.0
Page 51
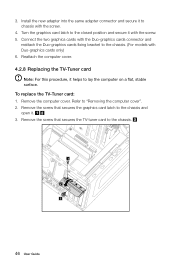
... to the chassis and open it with the screw. 5. Remove the screw that secures the TV-tuner card to "Removing the computer cover". 2. Remove the screw that secures the graphics card latch to lay the computer on a flat, stable surface. Refer to the chassis. 3 2 1 46... and secure it to the closed position and secure it . 3. Turn the graphics card latch to chassis with Duo-graphics cards only) 6. Connect the two graphics cards with the Duo-graphics cards connector and reattach the Duo-graphics cards fixing bracket to the chassis. (For models with the screw. 4. Remove the...
... to the chassis and open it with the screw. 5. Remove the screw that secures the TV-tuner card to "Removing the computer cover". 2. Remove the screw that secures the graphics card latch to lay the computer on a flat, stable surface. Refer to the chassis. 3 2 1 46... and secure it to the closed position and secure it . 3. Turn the graphics card latch to chassis with Duo-graphics cards only) 6. Connect the two graphics cards with the Duo-graphics cards connector and reattach the Duo-graphics cards fixing bracket to the chassis. (For models with the screw. 4. Remove the...
Lenovo K4 Series User Guide V1.0
Page 52
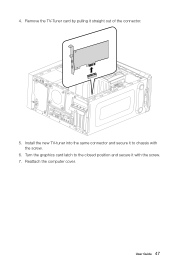
Reattach the computer cover. Turn the graphics card latch to chassis with the screw. 7. Remove the TV-Tuner card by pulling it with the screw. 6. 4. Install the new TV-tuner into the same connector and secure it to the closed position and secure it straight out of the connector. 5. User Guide 47
Reattach the computer cover. Turn the graphics card latch to chassis with the screw. 7. Remove the TV-Tuner card by pulling it with the screw. 6. 4. Install the new TV-tuner into the same connector and secure it to the closed position and secure it straight out of the connector. 5. User Guide 47


