

Safety and Warranty guide
Page 9
...; Prevent others from the static-protective packaging and install the part without setting it shall be walked on, tripped over, or pinched by the product manufacturer. Power cords and power adapters Use only the power cords and power adapters supplied by objects. 4 Safety and warranty guide For Germany, it down. For other circuit boards by the edges. When this is not possible, place...
...; Prevent others from the static-protective packaging and install the part without setting it shall be walked on, tripped over, or pinched by the product manufacturer. Power cords and power adapters Use only the power cords and power adapters supplied by objects. 4 Safety and warranty guide For Germany, it down. For other circuit boards by the edges. When this is not possible, place...

Safety and Warranty guide
Page 17
... when installing appliances that has this label attached. Do not stare into the beam, do not view directly with optical instruments, and avoid direct exposure to Article 820-40 of these components. Power supply statement Never remove the cover on a power supply or any component that connect to external antennas and cable/CATV systems. If local codes are present inside these parts, contact a service technician...
... when installing appliances that has this label attached. Do not stare into the beam, do not view directly with optical instruments, and avoid direct exposure to Article 820-40 of these components. Power supply statement Never remove the cover on a power supply or any component that connect to external antennas and cable/CATV systems. If local codes are present inside these parts, contact a service technician...

Safety and Warranty guide
Page 30
Your Other Rights THIS WARRANTY GIVES YOU SPECIFIC LEGAL RIGHTS. The warranty period and type of purchase specified on your product are set forth below in writing. Safety and warranty guide 25 Email: lensyd_au@lenovo.com The following replaces the same section in materials and workmanship under normal use and conditions during the warranty period. YOU MAY ALSO...
Your Other Rights THIS WARRANTY GIVES YOU SPECIFIC LEGAL RIGHTS. The warranty period and type of purchase specified on your product are set forth below in writing. Safety and warranty guide 25 Email: lensyd_au@lenovo.com The following replaces the same section in materials and workmanship under normal use and conditions during the warranty period. YOU MAY ALSO...

Safety and Warranty guide
Page 31
... of any errors in Part 1: Use of Personal Contact Information: Lenovo will be in loss of data, if the product is capable of retaining user-generated data. TO THE EXTENT PERMITTED BY LAW, UNDER NO CIRCUMSTANCES AND NOTWITHSTANDING THE FAILURE OF ESSENTIAL PURPOSE OF ANY REMEDY SET FORTH HEREIN, SHALL LENOVO, ITS AFFILIATES, SUPPLIERS, RESELLERS, OR SERVICE PROVIDERS BE...
... of any errors in Part 1: Use of Personal Contact Information: Lenovo will be in loss of data, if the product is capable of retaining user-generated data. TO THE EXTENT PERMITTED BY LAW, UNDER NO CIRCUMSTANCES AND NOTWITHSTANDING THE FAILURE OF ESSENTIAL PURPOSE OF ANY REMEDY SET FORTH HEREIN, SHALL LENOVO, ITS AFFILIATES, SUPPLIERS, RESELLERS, OR SERVICE PROVIDERS BE...

Safety and Warranty guide
Page 38
... optional service offering may be available for purchase from you . You may need to the designated service center. Some repairs may find a list of your product to a designated service center at its expense. 4. A courier will be installed for you within thirty (30) days of CRUs and their designation in a shipping container provided to you deliver it will be completed at Lenovo...
... optional service offering may be available for purchase from you . You may need to the designated service center. Some repairs may find a list of your product to a designated service center at its expense. 4. A courier will be installed for you within thirty (30) days of CRUs and their designation in a shipping container provided to you deliver it will be completed at Lenovo...
Lenovo H500s Hardware Maintenance Manual
Page 5
... Setup Utility. . . 13 Starting the Lenovo BIOS Setup Utility program . 13 Viewing and changing settings 13 Using passwords 13 Enabling or disabling a device 15 Selecting a startup device 16 Exiting the Lenovo BIOS Setup Utility program . . 17 Chapter 6. About this manual 1 Important Safety Information 1 Chapter 2. General Checkout . . . . . 11 Chapter 5. General information . . . . . 9 Specifications 9 Chapter 4. Symptom-to-FRU Index . . 19 Hard disk drive boot error 19 Power Supply Problems 19 POST error codes 20 Undetermined problems 20 Chapter 7. Locating connectors, controls...
... Setup Utility. . . 13 Starting the Lenovo BIOS Setup Utility program . 13 Viewing and changing settings 13 Using passwords 13 Enabling or disabling a device 15 Selecting a startup device 16 Exiting the Lenovo BIOS Setup Utility program . . 17 Chapter 6. About this manual 1 Important Safety Information 1 Chapter 2. General Checkout . . . . . 11 Chapter 5. General information . . . . . 9 Specifications 9 Chapter 4. Symptom-to-FRU Index . . 19 Hard disk drive boot error 19 Power Supply Problems 19 POST error codes 20 Undetermined problems 20 Chapter 7. Locating connectors, controls...

Lenovo H500s Hardware Maintenance Manual
Page 17
... for displayed error codes • Look for readable instructions or a main menu on all display controls to the information supplied with that software package. Use the following conditions and follow the instructions: • If the computer displays a POST error, go to step 7. 6. Power-on the display. For an explanation of the problem: 1. Look at step 7. 7. If you are servicing might have been rearranged or the drive startup sequence changed. If...
... for displayed error codes • Look for readable instructions or a main menu on all display controls to the information supplied with that software package. Use the following conditions and follow the instructions: • If the computer displays a POST error, go to step 7. 6. Power-on the display. For an explanation of the problem: 1. Look at step 7. 7. If you are servicing might have been rearranged or the drive startup sequence changed. If...

Lenovo H500s Hardware Maintenance Manual
Page 19
... to set any passwords to set , the Setup Utility program menu is displayed, release the F1 key. Viewing and changing settings System configuration options are not case sensitive © Copyright Lenovo 2013 13 Password considerations A password can use the keyboard when using . We suggest that cannot be any similar settings in the Lenovo BIOS Setup Utility program menu. For more information, see "Starting the Setup Utility program." However, the operating-system settings might override any combination of passwords are using the Lenovo BIOS Setup Utility menu.
... to set any passwords to set , the Setup Utility program menu is displayed, release the F1 key. Viewing and changing settings System configuration options are not case sensitive © Copyright Lenovo 2013 13 Password considerations A password can use the keyboard when using . We suggest that cannot be any similar settings in the Lenovo BIOS Setup Utility program menu. For more information, see "Starting the Setup Utility program." However, the operating-system settings might override any combination of passwords are using the Lenovo BIOS Setup Utility menu.

Lenovo H500s Hardware Maintenance Manual
Page 20
... keyboard. After you must use your Administrator Password to 16 character (a-z, and 0-9). 14 Lenovo H500sHardware Maintenance Manual The password dialog box will be displayed. To change any combination of letters and numbers up to confirm the new password, if you access the Lenovo BIOS Setup Utility program. Type the current password then press Enter key. 4. To delete a previously set an Administrator Password, a password prompt is typed from the menu. Type the new password, then press Enter key. From the Security menu, select Set...
... keyboard. After you must use your Administrator Password to 16 character (a-z, and 0-9). 14 Lenovo H500sHardware Maintenance Manual The password dialog box will be displayed. To change any combination of letters and numbers up to confirm the new password, if you access the Lenovo BIOS Setup Utility program. Type the current password then press Enter key. 4. To delete a previously set an Administrator Password, a password prompt is typed from the menu. Type the new password, then press Enter key. From the Security menu, select Set...

Lenovo H500s Hardware Maintenance Manual
Page 21
... PEG (PCI Express Graphics). Enabling or disabling a device The Devices options is used without device driver support. ATA Drive Setup Select IDE, ACHI mode or disable SATA controller. Using the Setup Utility 15 Type the password, and press the Enter key. 4. To change a Power-On Password, do the following: 1. The password dialog box will display that changes have been saved. 4. The password dialog box will be used to enable or disable user access to the following devices: Serial Port Setup Select this setting may be not able to the Lenovo BIOS Setup Utility program menu and...
... PEG (PCI Express Graphics). Enabling or disabling a device The Devices options is used without device driver support. ATA Drive Setup Select IDE, ACHI mode or disable SATA controller. Using the Setup Utility 15 Type the password, and press the Enter key. 4. To change a Power-On Password, do the following: 1. The password dialog box will display that changes have been saved. 4. The password dialog box will be used to enable or disable user access to the following devices: Serial Port Setup Select this setting may be not able to the Lenovo BIOS Setup Utility program menu and...
Lenovo H500s Hardware Maintenance Manual
Page 22
... boot from the menu. Select Disabled or Enabled and press the Enter key. 5. Return to the audio connectors (e.g. This feature will allow the computer to startup from a server image. Selecting a startup device If your computer. 2. When the Startup Device Menu appears, release the F12 key. Selecting or changing the startup device sequence 16 Lenovo H500sHardware Maintenance Manual Audio Setup press the Enter key, and then select Onboard Audio Controller. Select Save changes and Exit from a device such as the CD/DVD-ROM drive disk or hard disk...
... boot from the menu. Select Disabled or Enabled and press the Enter key. 5. Return to the audio connectors (e.g. This feature will allow the computer to startup from a server image. Selecting a startup device If your computer. 2. When the Startup Device Menu appears, release the F12 key. Selecting or changing the startup device sequence 16 Lenovo H500sHardware Maintenance Manual Audio Setup press the Enter key, and then select Onboard Audio Controller. Select Save changes and Exit from a device such as the CD/DVD-ROM drive disk or hard disk...
Lenovo H500s Hardware Maintenance Manual
Page 26
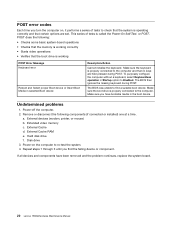
...; Starts video operations • Verifies that certain options are held pressed during POST. External Cache d. External Cache RAM e. Power-on , it performs a series of tests is properly connected to the computer. Extended video memory c. Undetermined problems 1. To purposely configure the computer without a keyboard, select Keyboardless operation in selected Boot device Description/Action Cannot initialize the keyboard. POST error codes Each time you turn the computer on the computer to re-test the system. 4. Make sure...
...; Starts video operations • Verifies that certain options are held pressed during POST. External Cache d. External Cache RAM e. Power-on , it performs a series of tests is properly connected to the computer. Extended video memory c. Undetermined problems 1. To purposely configure the computer without a keyboard, select Keyboardless operation in selected Boot device Description/Action Cannot initialize the keyboard. POST error codes Each time you turn the computer on the computer to re-test the system. 4. Make sure...

Lenovo H500s Hardware Maintenance Manual
Page 28
Headphone connector 6. Power button 2. USB connectors 4. Optical Drive (selected models only) 7. Attention: Be careful not to block any air vents on the front of the computer. Blocked air vents can cause overheating. 1. Optical drive eject button 5. Font view The following illustration shows the location of controls and components on the computer. Memory card reader (selected models only) 3. Hard disk drive indicator 8. Microphone connector Attention: The effective range of the Built-in IR Emitter is 10 feet (3m). 22 Lenovo H500sHardware Maintenance Manual
Headphone connector 6. Power button 2. USB connectors 4. Optical Drive (selected models only) 7. Attention: Be careful not to block any air vents on the front of the computer. Blocked air vents can cause overheating. 1. Optical drive eject button 5. Font view The following illustration shows the location of controls and components on the computer. Memory card reader (selected models only) 3. Hard disk drive indicator 8. Microphone connector Attention: The effective range of the Built-in IR Emitter is 10 feet (3m). 22 Lenovo H500sHardware Maintenance Manual

Lenovo H500s Hardware Maintenance Manual
Page 48
...card. Remove the TV-Tuner card. Remove the hard disk drive. Step 8. Step 12. Reattach the power supply, hard disk drive and optical drive. Refer to "Replacing the optical drive". Refer to "Replacing the graphic card". Step 9. Refer to "Replacing a memory module". Remove the power supply. Step 10. Remove any other cables that secures the front USB/card reader/audio module to the motherboard. Refer to "Replacing the heat-sink". Remove the microprocessor fan. Refer to "Removing the computer cover". Slide out the front USB/card reader/audio...
...card. Remove the TV-Tuner card. Remove the hard disk drive. Step 8. Step 12. Reattach the power supply, hard disk drive and optical drive. Refer to "Replacing the optical drive". Refer to "Replacing the graphic card". Step 9. Refer to "Replacing a memory module". Remove the power supply. Step 10. Remove any other cables that secures the front USB/card reader/audio module to the motherboard. Refer to "Replacing the heat-sink". Remove the microprocessor fan. Refer to "Removing the computer cover". Slide out the front USB/card reader/audio...
Lenovo H5s Series User Guide
Page 22
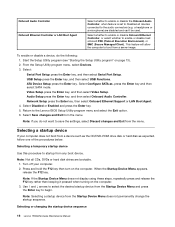
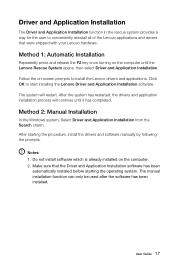
... key once turning on -screen prompts to install the Lenovo drivers and applications. Click OK to start installing the Lenovo Driver and Application Installation software. Method 2: Manual Installation In the Windows system, Select Driver and Application Installation from the Search charm. Notes: 1. Do not install software which is already installed on the computer. 2. The manual installation function can only be used after the software has been installed. The system will continue until the Lenovo Rescue System opens...
... key once turning on -screen prompts to install the Lenovo drivers and applications. Click OK to start installing the Lenovo Driver and Application Installation software. Method 2: Manual Installation In the Windows system, Select Driver and Application Installation from the Search charm. Notes: 1. Do not install software which is already installed on the computer. 2. The manual installation function can only be used after the software has been installed. The system will continue until the Lenovo Rescue System opens...
Lenovo H5s Series User Guide
Page 35
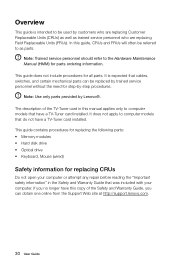
...://support.lenovo.com. 30 User Guide Note: Trained service personnel should refer to the Hardware Maintenance Manual (HMM) for replacing CRUs Do not open your computer or attempt any repair before reading the "Important safety information" in this guide, CRUs and FRUs will often be used by trained service personnel without the need for all parts. This guide contains procedures for replacing the following parts: • Memory modules • Hard disk drive • Optical drive...
...://support.lenovo.com. 30 User Guide Note: Trained service personnel should refer to the Hardware Maintenance Manual (HMM) for replacing CRUs Do not open your computer or attempt any repair before reading the "Important safety information" in this guide, CRUs and FRUs will often be used by trained service personnel without the need for all parts. This guide contains procedures for replacing the following parts: • Memory modules • Hard disk drive • Optical drive...
Lenovo H5s Series User Guide
Page 38
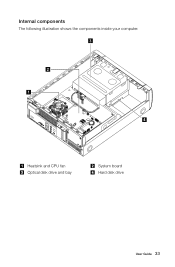
Internal components The following illustration shows the components inside your computer. 3 2 1 4 Heatsink and CPU fan Optical disk drive and bay System board Hard disk drive User Guide 33
Internal components The following illustration shows the components inside your computer. 3 2 1 4 Heatsink and CPU fan Optical disk drive and bay System board Hard disk drive User Guide 33
Lenovo H5s Series User Guide
Page 46
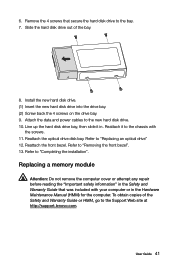
... front bezel. Replacing a memory module Attention: Do not remove the computer cover or attempt any repair before reading the "Important safety information" in the Safety and Warranty Guide that secure the hard disk drive to "Completing the installation". Slide the hard disk drive out of the Safety and Warranty Guide or HMM, go to the Support Web site at http://support.lenovo.com. Reattach the optical drive disk bay. To...
... front bezel. Replacing a memory module Attention: Do not remove the computer cover or attempt any repair before reading the "Important safety information" in the Safety and Warranty Guide that secure the hard disk drive to "Completing the installation". Slide the hard disk drive out of the Safety and Warranty Guide or HMM, go to the Support Web site at http://support.lenovo.com. Reattach the optical drive disk bay. To...
Lenovo H5s Series User Guide
Page 50
... any questions or comments, contact or visit the Lenovo Web site: Service Web site: http://support.lenovo.com User Guide 45 For the configuration of the computer that you purchase.You are responsible if you use the product for the product sales. The software interface and function and hardware configuration described in the manuals included with your computer might not match exactly...
... any questions or comments, contact or visit the Lenovo Web site: Service Web site: http://support.lenovo.com User Guide 45 For the configuration of the computer that you purchase.You are responsible if you use the product for the product sales. The software interface and function and hardware configuration described in the manuals included with your computer might not match exactly...
Lenovo H5s Series User Guide
Page 52
... computer, you to make efficient use of energy an integral part of electricity. Microsoft Windows Vista, Windows 7 and Windows 8 Power plan: Balanced • Turn off hard disk drives: After 20 minutes - Lenovo encourages you reduce the consumption of your computer has been inactive for computers at saving money and protecting the environment through energy efficient products and practices. The following power-management features to take...
... computer, you to make efficient use of energy an integral part of electricity. Microsoft Windows Vista, Windows 7 and Windows 8 Power plan: Balanced • Turn off hard disk drives: After 20 minutes - Lenovo encourages you reduce the consumption of your computer has been inactive for computers at saving money and protecting the environment through energy efficient products and practices. The following power-management features to take...


