
Lenovo H500s Hardware Maintenance Manual
Page 5
... adapter 34 Replacing the graphic card 35 Replacing the microprocessor fan 37 Replacing the heat-sink 37 Replacing the CPU 38 Replacing the Wi-Fi card 40 Replacing the front USB/card reader/audio module 41 Replacing the motherboard 42 Chapter 9. General information . . . . 45 Additional Service Information 45 © Copyright Lenovo 2013 iii Safety information...
... adapter 34 Replacing the graphic card 35 Replacing the microprocessor fan 37 Replacing the heat-sink 37 Replacing the CPU 38 Replacing the Wi-Fi card 40 Replacing the front USB/card reader/audio module 41 Replacing the motherboard 42 Chapter 9. General information . . . . 45 Additional Service Information 45 © Copyright Lenovo 2013 iii Safety information...
Lenovo H500s Hardware Maintenance Manual
Page 29
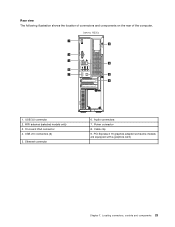
WiFi antenna (selected models only) 3. PCI Express X 16 graphics adapter slot (some models are equipped with a graphics card) Chapter 7. Audio connectors 7. Locating connectors, controls and components 23 On-board VGA connector 4. Power connector 8. USB 2.0 connectors (2) 5. Cable clip 9. Ethernet connector 6. Lenovo H500s 1. Rear view The following illustration shows the location of connectors and components on the rear of the computer. USB 3.0 connector 2.
WiFi antenna (selected models only) 3. PCI Express X 16 graphics adapter slot (some models are equipped with a graphics card) Chapter 7. Audio connectors 7. Locating connectors, controls and components 23 On-board VGA connector 4. Power connector 8. USB 2.0 connectors (2) 5. Cable clip 9. Ethernet connector 6. Lenovo H500s 1. Rear view The following illustration shows the location of connectors and components on the rear of the computer. USB 3.0 connector 2.

Lenovo H500s Hardware Maintenance Manual
Page 41
Install the new adapter: a. Step 4. Replacing the graphic card To replace the graphic card: Step 1. Step 2. Remove any other cables that are connected to the computer. Refer to the computer. Chapter 8. Remove the computer cover. Replacing ..." for help with locating the various connectors. This includes power cords, input/output (I/O) cables, and any media (disks, CDs, DVDs, or memory cards) from electrical outlets. Step 2. Connect the power cables to "Removing the computer cover". Disconnect the power cables from the connectors on the motherboard. Step 3....
Install the new adapter: a. Step 4. Replacing the graphic card To replace the graphic card: Step 1. Step 2. Remove any other cables that are connected to the computer. Refer to the computer. Chapter 8. Remove the computer cover. Replacing ..." for help with locating the various connectors. This includes power cords, input/output (I/O) cables, and any media (disks, CDs, DVDs, or memory cards) from electrical outlets. Step 2. Connect the power cables to "Removing the computer cover". Disconnect the power cables from the connectors on the motherboard. Step 3....

Lenovo H500s Hardware Maintenance Manual
Page 42
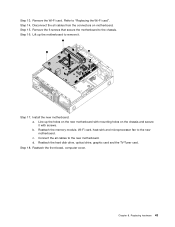
To install the new graphic card: a. Push the pin that secures the graphic card to the chassis with the screw. b. Reattach the computer cover. 36 Lenovo H500sHardware Maintenance Manual Step 6. Step 8. Step 5. Slide then insert the new graphic card to remove it. Remove the screw that lock the graphic card, and pull it up then slide it out to the same connector on the motherboard. Step 7. Reattach the metal bracket back into position and secure the graphic card to the chassis, and slide out the metal bracket.
To install the new graphic card: a. Push the pin that secures the graphic card to the chassis with the screw. b. Reattach the computer cover. 36 Lenovo H500sHardware Maintenance Manual Step 6. Step 8. Step 5. Slide then insert the new graphic card to remove it. Remove the screw that lock the graphic card, and pull it up then slide it out to the same connector on the motherboard. Step 7. Reattach the metal bracket back into position and secure the graphic card to the chassis, and slide out the metal bracket.

Lenovo H500s Hardware Maintenance Manual
Page 48
... "Left and right view" and "Rear view" for help with screw. Step 7. Remove the optical drive. Remove the graphic card. Refer to "Replacing the TV-Tuner card". 42 Lenovo H500sHardware Maintenance Manual Refer to "Replacing the graphic card". Step 8. To replace the motherboard: Step 1. Unplug all attached devices. Step 4. Step 5. Step 8. Install the new front USB...
... "Left and right view" and "Rear view" for help with screw. Step 7. Remove the optical drive. Remove the graphic card. Refer to "Replacing the TV-Tuner card". 42 Lenovo H500sHardware Maintenance Manual Refer to "Replacing the graphic card". Step 8. To replace the motherboard: Step 1. Unplug all attached devices. Step 4. Step 5. Step 8. Install the new front USB...
Lenovo H500s Hardware Maintenance Manual
Page 49
... the all cables from the connectors on the chassis and secure it . Step 13. Step 14. Step 16. Reattach the hard disk drive, optical drive, graphic card and the TV-Tuner card. Replacing hardware 43 Install the new motherboard: a. Remove the Wi-Fi...
... the all cables from the connectors on the chassis and secure it . Step 13. Step 14. Step 16. Reattach the hard disk drive, optical drive, graphic card and the TV-Tuner card. Replacing hardware 43 Install the new motherboard: a. Remove the Wi-Fi...
Lenovo H5s Series User Guide
Page 8
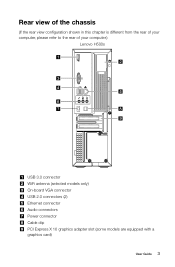
Rear view of the chassis (If the rear view configuration shown in this chapter is different from the rear of your computer, please refer to the rear of your computer.) Lenovo H500s USB 3.0 connector WiFi antenna (selected models only) On-board VGA connector USB 2.0 connectors (2) Ethernet connector Audio connectors Power connector Cable clip PCI Express X 16 graphics adapter slot (some models are equipped with a graphics card) User Guide 3
Rear view of the chassis (If the rear view configuration shown in this chapter is different from the rear of your computer, please refer to the rear of your computer.) Lenovo H500s USB 3.0 connector WiFi antenna (selected models only) On-board VGA connector USB 2.0 connectors (2) Ethernet connector Audio connectors Power connector Cable clip PCI Express X 16 graphics adapter slot (some models are equipped with a graphics card) User Guide 3

Lenovo H5s Series User Guide
Page 9
...this connector to attach a VGA monitor or other devices that requires a USB connection. Attention: Do not open the WiFi antenna cover. Memory card reader Use to receive audio signals from the computer to use a VGA monitor connector. 4 User Guide Basic connector instructions Note: Your computer...you want to music or other sounds without disturbing anyone. VGA connector Used to attach a device that use the connector on the graphics adapter. Audio line-out connector Used to send audio signals from an external audio device, such as powered stereo speakers (speakers ...
...this connector to attach a VGA monitor or other devices that requires a USB connection. Attention: Do not open the WiFi antenna cover. Memory card reader Use to receive audio signals from the computer to use a VGA monitor connector. 4 User Guide Basic connector instructions Note: Your computer...you want to music or other sounds without disturbing anyone. VGA connector Used to attach a device that use the connector on the graphics adapter. Audio line-out connector Used to send audio signals from an external audio device, such as powered stereo speakers (speakers ...

Lenovo H5s Series User Guide
Page 27
...; Check to see if the monitor power cord is securely connected to the connector on the computer graphics card; Check to see the Help document of the monitor securely to the connector on the computer graphics card. Setting display background and icon properties: 1. Right-click the desktop anywhere except over an icon, then select...
...; Check to see if the monitor power cord is securely connected to the connector on the computer graphics card; Check to see the Help document of the monitor securely to the connector on the computer graphics card. Setting display background and icon properties: 1. Right-click the desktop anywhere except over an icon, then select...


