
User Guide
Page 6
Table of Contents Your Phone 6 Phone Components 6 Rear View 7 Slide Open View 8 Getting Started 9 Installing the SIM Card and Battery 9 Installing a Memory Card 11 Touch Calibration 14 Start Up Guide 15 General Functions 16 Making a Call 16 Answering a Call 17 Adjusting the Volume 17 Setting Profiles 17 Entering ...
Table of Contents Your Phone 6 Phone Components 6 Rear View 7 Slide Open View 8 Getting Started 9 Installing the SIM Card and Battery 9 Installing a Memory Card 11 Touch Calibration 14 Start Up Guide 15 General Functions 16 Making a Call 16 Answering a Call 17 Adjusting the Volume 17 Setting Profiles 17 Entering ...

User Guide
Page 13
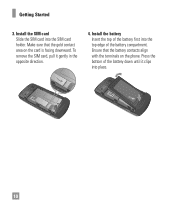
Remove the battery cover Press down on , as this may damage the phone. 9 n Warning Do not remove the battery when the phone is switched on the notch at the bottom of the battery and using your fingernail, lift the battery from the battery compartment. The battery cover should slide and lift off easily. 2. Getting Started Installing the SIM Card and Battery 1. Remove the battery Hold the top edge of the phone and slide the cover.
Remove the battery cover Press down on , as this may damage the phone. 9 n Warning Do not remove the battery when the phone is switched on the notch at the bottom of the battery and using your fingernail, lift the battery from the battery compartment. The battery cover should slide and lift off easily. 2. Getting Started Installing the SIM Card and Battery 1. Remove the battery Hold the top edge of the phone and slide the cover.
User Guide
Page 14
Make sure that the battery contacts align with the terminals on the card is facing downward. Install the battery Insert the top of the battery first into the top edge of the battery down until it gently in the opposite direction. 4. Ensure that the gold contact area on the phone. Getting Started 3. To remove the SIM card, pull it clips into the SIM card holder. Press the bottom of the battery compartment. Install the SIM card Slide the SIM card into place. 10
Make sure that the battery contacts align with the terminals on the card is facing downward. Install the battery Insert the top of the battery first into the top edge of the battery down until it gently in the opposite direction. 4. Ensure that the gold contact area on the phone. Getting Started 3. To remove the SIM card, pull it clips into the SIM card holder. Press the bottom of the battery compartment. Install the SIM card Slide the SIM card into place. 10

User Guide
Page 19
Available Guides include: 15 Touch to play the animated Guide for that subject. Or, touch to move on Home Screen Touch Start to begin the Start Up Guide feature. Start Up Guide After you install SIM card and battery, and turn on the LG Xenon, you will see Start Up Guide on the screen. ] How to Unlock Your Phone ] How to Open Menu and Select Item ] How to Scroll ] How to Navigate Between Items ] How to Rotate Screen Orientation ] How to Open Keypad and Enter Text ] How to Change Home Screen ] How to Add Shortcuts on Home Screen ] How to Add Contacts on to the next Guide.
Available Guides include: 15 Touch to play the animated Guide for that subject. Or, touch to move on Home Screen Touch Start to begin the Start Up Guide feature. Start Up Guide After you install SIM card and battery, and turn on the LG Xenon, you will see Start Up Guide on the screen. ] How to Unlock Your Phone ] How to Open Menu and Select Item ] How to Scroll ] How to Navigate Between Items ] How to Rotate Screen Orientation ] How to Open Keypad and Enter Text ] How to Change Home Screen ] How to Add Shortcuts on Home Screen ] How to Add Contacts on to the next Guide.
User Guide
Page 20
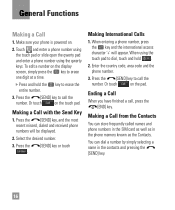
... access character '+' will be displayed. 2. Make sure your phone is powered on the pad. You can store frequently called names and phone numbers in the SIM card as well as in the contacts and pressing the [SEND] key. 16 Ending a Call When you have finished a call, press the [END] key. Or touch...
... access character '+' will be displayed. 2. Make sure your phone is powered on the pad. You can store frequently called names and phone numbers in the SIM card as well as in the contacts and pressing the [SEND] key. 16 Ending a Call When you have finished a call, press the [END] key. Or touch...
User Guide
Page 29
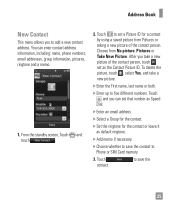
... a saved picture from No picture, Pictures or Take New Picture. Touch to set as default ringtone. ] Add memo if necessary. ] Choose whether to Phone or SIM Card memory. 3. After you take a new picture. ] Enter the First name, last name or both. ] Enter up to add a new contact address. To delete the picture...
... a saved picture from No picture, Pictures or Take New Picture. Touch to set as default ringtone. ] Add memo if necessary. ] Choose whether to Phone or SIM Card memory. 3. After you take a new picture. ] Enter the First name, last name or both. ] Enter up to add a new contact address. To delete the picture...
User Guide
Page 31
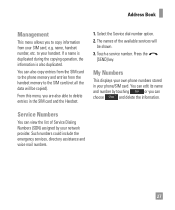
... handset number, etc. Select the Service dial number option. 2. Address Book Management This menu allows you to copy information from the handset memory to the SIM card (not all the data will be copied). The names of Service Dialing Numbers (SDN) assigned by touching or you are also able to your network... mail numbers. 27 Press the [SEND] key. You can view the list of the available services will be shown. 3. to delete entries in your SIM card, e.g. You can edit its name and number by your handset. From this menu, you can choose and delete the information.
... handset number, etc. Select the Service dial number option. 2. Address Book Management This menu allows you to copy information from the handset memory to the SIM card (not all the data will be copied). The names of Service Dialing Numbers (SDN) assigned by touching or you are also able to your network... mail numbers. 27 Press the [SEND] key. You can view the list of the available services will be shown. 3. to delete entries in your SIM card, e.g. You can edit its name and number by your handset. From this menu, you can choose and delete the information.
User Guide
Page 54
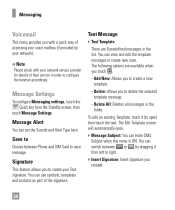
... New: Allows you touch . - To edit an existing Template, touch it from the Standby screen, then touch Message Settings. You can switch between Phone and SIM Card to open . ] Message Subject: You can use symbols, templates and contacts as part of the signature. Message Alert You can view and edit the template...
... New: Allows you touch . - To edit an existing Template, touch it from the Standby screen, then touch Message Settings. You can switch between Phone and SIM Card to open . ] Message Subject: You can use symbols, templates and contacts as part of the signature. Message Alert You can view and edit the template...

User Guide
Page 104
... the phone. Security Various codes and passwords are in an airplane or in the following sections. ] Phone lock: You can use a security code to When SIM Changed, your phone will request a security code whenever you switch the phone on the screen instead of the phone. If you set the phone lock... to confirm your wireless connections. After you to use of the wireless network when you are used to protect the features and settings of your SIM Card. They are described in places where the wireless network is closed , the screen will be displayed on .
... the phone. Security Various codes and passwords are in an airplane or in the following sections. ] Phone lock: You can use a security code to When SIM Changed, your phone will request a security code whenever you switch the phone on the screen instead of the phone. If you set the phone lock... to confirm your wireless connections. After you to use of the wireless network when you are used to protect the features and settings of your SIM Card. They are described in places where the wireless network is closed , the screen will be displayed on .
User Guide
Page 105
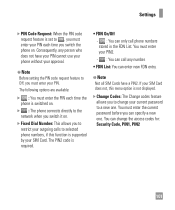
... option is required. • FDN On/Off - : You can specify a new one . You can enter new FDN entry. If your SIM Card does not, this function is supported by your SIM Card. The PIN2 code is not displayed. ] Change Codes: The Change codes feature allows you to change the access codes for: Security..., PIN1, PIN2 101 You must enter the current password before you can only call any person who does not have a PIN2. n Note Not all SIM Cards have your PIN cannot use your phone without your approval. Settings ] PIN Code Request: When the PIN code request feature is set to , you must...
... option is required. • FDN On/Off - : You can specify a new one . You can enter new FDN entry. If your SIM Card does not, this function is supported by your SIM Card. The PIN2 code is not displayed. ] Change Codes: The Change codes feature allows you to change the access codes for: Security..., PIN1, PIN2 101 You must enter the current password before you can only call any person who does not have a PIN2. n Note Not all SIM Cards have your PIN cannot use your phone without your approval. Settings ] PIN Code Request: When the PIN code request feature is set to , you must...
User Guide
Page 110
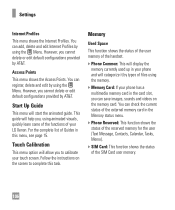
...Follow the instructions on the memory card. You can save images, sounds and videos on the screen to calibrate your LG Xenon. You can add, delete and edit Internet Profiles by using animated visuals, quickly learn some of the functions of the SIM Card user memory. 106 This guide will... categorize it by using the memory. ] Memory Card: If your phone has a multimedia memory card in the card slot, ...
...Follow the instructions on the memory card. You can save images, sounds and videos on the screen to calibrate your LG Xenon. You can add, delete and edit Internet Profiles by using animated visuals, quickly learn some of the functions of the SIM Card user memory. 106 This guide will... categorize it by using the memory. ] Memory Card: If your phone has a multimedia memory card in the card slot, ...

User Guide
Page 141
... into a small slot on . The message created or received (up to five additional parties. SDN (Service Dial Number) Telephone numbers supplied by the battery. SIM card Card containing a chip with all the information required to the correspondent. SMS (Short Message Service) Network service sending and receiving text messages to and from another ...
... into a small slot on . The message created or received (up to five additional parties. SDN (Service Dial Number) Telephone numbers supplied by the battery. SIM card Card containing a chip with all the information required to the correspondent. SMS (Short Message Service) Network service sending and receiving text messages to and from another ...


