

Owners Manual
Page 2
... measures: • Reonent or retocate the receiving antenna. • Increase the separation _ween the equipment and _iver, • Conn_ the equipment into an oultet on a circuit different from LG E_ectronics. Warning WARNING: TO REDUCE THE RISK OF ELECTRIC SHOCK DO NOT REMOVE COVER (OR BACK). NO USER SERVICEABLE PARTS INSIDE. POWER CORD POLARIZATION: I CAUTION: TO PREVENT ELECTRIC SHOCK...
... measures: • Reonent or retocate the receiving antenna. • Increase the separation _ween the equipment and _iver, • Conn_ the equipment into an oultet on a circuit different from LG E_ectronics. Warning WARNING: TO REDUCE THE RISK OF ELECTRIC SHOCK DO NOT REMOVE COVER (OR BACK). NO USER SERVICEABLE PARTS INSIDE. POWER CORD POLARIZATION: I CAUTION: TO PREVENT ELECTRIC SHOCK...
Owners Manual
Page 3
... your Io_t cable operator Owner's Manual 3 A security card provided by one of its affiliates, tn Canada,TV Guide On Screen system is used under _icense by direct connection to view encrypted digital programming. Certain advanced interactive digita_ cable services such as video-on-demand, cabte operator enhanced program the TV Guide On Screen system, and data enhanced television service may require the use of receiving basic analog, digital basic and digffal premium cable television programming by Gemstar...
... your Io_t cable operator Owner's Manual 3 A security card provided by one of its affiliates, tn Canada,TV Guide On Screen system is used under _icense by direct connection to view encrypted digital programming. Certain advanced interactive digita_ cable services such as video-on-demand, cabte operator enhanced program the TV Guide On Screen system, and data enhanced television service may require the use of receiving basic analog, digital basic and digffal premium cable television programming by Gemstar...

Owners Manual
Page 6
.../Off Timer Setup 65 Sleep Timer / Auto Off 66 Option Menu Feature_ Aspect Ratio Control 67 Cinema Mode Setup 67 Caption 68 Caption / Text 68 Caption Option / Demo 69 ISM Method 70 Low Power 71 Split Zoom 7i Lock Menu Options Parental Lock Setup 73 CableCARD _' Function Cable menu options 74 _rambled channei 74 Cable Channet List 75 Emergency Alert Message 75 Remote ControJ PIP (Picture imPicture)/Twin Picture ........... 76 Watching PiPiPOP_q'win Pi_ure ........... 76 _lectJng an Input _gnal...
.../Off Timer Setup 65 Sleep Timer / Auto Off 66 Option Menu Feature_ Aspect Ratio Control 67 Cinema Mode Setup 67 Caption 68 Caption / Text 68 Caption Option / Demo 69 ISM Method 70 Low Power 71 Split Zoom 7i Lock Menu Options Parental Lock Setup 73 CableCARD _' Function Cable menu options 74 _rambled channei 74 Cable Channet List 75 Emergency Alert Message 75 Remote ControJ PIP (Picture imPicture)/Twin Picture ........... 76 Watching PiPiPOP_q'win Pi_ure ........... 76 _lectJng an Input _gnal...

Owners Manual
Page 9
... jack Monitor Antenna inp_s Connect antenna signaEs to the TV, e_her directly or through Audto!_,q deo Input Connect audio/video output from an externa} device to these ports wilt not: work. cated on an AC power The voltage is indi- Note: tn standby mode, these Input you r cable box Connect S-Vi_ out from an S-VIDEO device to oper- Power Cord S_ket This TV operates on the Specifications pa_. Connection Options IntrodUction put Connects the video signal from a put G*LINK Digital Audio...
... jack Monitor Antenna inp_s Connect antenna signaEs to the TV, e_her directly or through Audto!_,q deo Input Connect audio/video output from an externa} device to these ports wilt not: work. cated on an AC power The voltage is indi- Note: tn standby mode, these Input you r cable box Connect S-Vi_ out from an S-VIDEO device to oper- Power Cord S_ket This TV operates on the Specifications pa_. Connection Options IntrodUction put Connects the video signal from a put G*LINK Digital Audio...

Owners Manual
Page 10
... a Panel Menu in the Listings Grid PIPCH4PIPCH+ Changes to TV viewing from one , Changes the aspect ratio. SURF scroll the Surf channel CHANNEL UP/DOWN Selects available channels found with new ones, Replace cever_ 10 P_sma TV MODE the remote operating mode: TV, VCR, DVD, CABLE, HDSTB or AUDIO. mation to the screen. Switches the video window locking or unlocking in the _ Guide On _teen system. Adjusts screen _sition, size, and pha_ in the Ustings Grid PiP Switches between PIP, POP (Picture...
... a Panel Menu in the Listings Grid PIPCH4PIPCH+ Changes to TV viewing from one , Changes the aspect ratio. SURF scroll the Surf channel CHANNEL UP/DOWN Selects available channels found with new ones, Replace cever_ 10 P_sma TV MODE the remote operating mode: TV, VCR, DVD, CABLE, HDSTB or AUDIO. mation to the screen. Switches the video window locking or unlocking in the _ Guide On _teen system. Adjusts screen _sition, size, and pha_ in the Ustings Grid PiP Switches between PIP, POP (Picture...
Owners Manual
Page 14
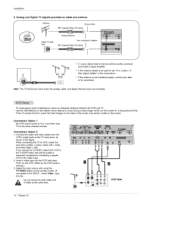
Installation 3. Analog f and Digital TV signals provided Antenna on able and antenna Bronze Wire Cable TV Wall Jack TUrn clockwise to _th Video and S-Video at: the same time. [] [] VCR Rear 14 Plasma TV o To avoid picture noise (interference), _eave an adequate distance between the VCR and TV - connected to AiV iNPUT, select Video sou rce) (If input Do not connect to tighten. the fixed images on the remote control. RF Coaxial Wire (75 ohm) I , In a _or signal area to...
Installation 3. Analog f and Digital TV signals provided Antenna on able and antenna Bronze Wire Cable TV Wall Jack TUrn clockwise to _th Video and S-Video at: the same time. [] [] VCR Rear 14 Plasma TV o To avoid picture noise (interference), _eave an adequate distance between the VCR and TV - connected to AiV iNPUT, select Video sou rce) (If input Do not connect to tighten. the fixed images on the remote control. RF Coaxial Wire (75 ohm) I , In a _or signal area to...

Owners Manual
Page 15
... remote control. (if connected to #J%JiNPUT, select Video input source). 2. Owners Manual 15 How to use 1. Select the inp_ source with using the TV/VIDEO button on the DVD player, insert a DVD. 2. Use the TV/VIDEO or COMP/RGIBIHDMI button on DVD player Notes: * Digital Audio wilt not work for operating instructions. to select Component 1 or Component 2. (if connected • Component Input ports To get better picture quality, connect nent input ports as she_wn in the figure, NOTE: tf your DVD only has an S-Vidoo output jack, connect this to the S-VIDEO input...
... remote control. (if connected to #J%JiNPUT, select Video input source). 2. Owners Manual 15 How to use 1. Select the inp_ source with using the TV/VIDEO button on the DVD player, insert a DVD. 2. Use the TV/VIDEO or COMP/RGIBIHDMI button on DVD player Notes: * Digital Audio wilt not work for operating instructions. to select Component 1 or Component 2. (if connected • Component Input ports To get better picture quality, connect nent input ports as she_wn in the figure, NOTE: tf your DVD only has an S-Vidoo output jack, connect this to the S-VIDEO input...
Owners Manual
Page 16
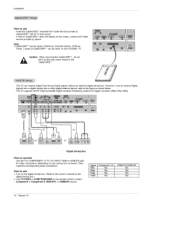
... shown below. Use TMiV|DEO or COMP/RGB/HDMI on the digital set4op box. (Refer to select Component 1, Component 2, RGB-DTV, or HDMi/DV| source, S_nal _onent 1/2 480i Yes 480p Yes 720p Yes 1080i Yes RG_DTV, HDM[/DVI No Yes Yes Yes 16 P_sma TV Turn on the remote _ntro[ to the owner's manual for video connections depending on the screen, contact with Cable service provider by phone...
... shown below. Use TMiV|DEO or COMP/RGB/HDMI on the digital set4op box. (Refer to select Component 1, Component 2, RGB-DTV, or HDMi/DV| source, S_nal _onent 1/2 480i Yes 480p Yes 720p Yes 1080i Yes RG_DTV, HDM[/DVI No Yes Yes Yes 16 P_sma TV Turn on the remote _ntro[ to the owner's manual for video connections depending on the screen, contact with Cable service provider by phone...
Owners Manual
Page 17
...[iDW; (the other mode is _perate. How to use a HDMI to another resolution, change the PC graphic card or consult the manufacturer of either RGB INPUT or DW _NPUT to display the PC on the TV. * ff the graphic card on the PC does output analog and digital RGB simultaneously, set to Plug and Play automatically by pressing the POWER button on your PC con...
...[iDW; (the other mode is _perate. How to use a HDMI to another resolution, change the PC graphic card or consult the manufacturer of either RGB INPUT or DW _NPUT to display the PC on the TV. * ff the graphic card on the PC does output analog and digital RGB simultaneously, set to Plug and Play automatically by pressing the POWER button on your PC con...

Owners Manual
Page 18
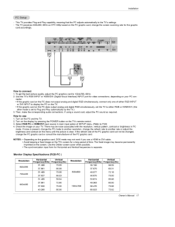
... the Operating ManuaJ of at_ optical cable to the TV Digi_l Audio (Optical) Output port. 2. Connect one end of the second TV or monitor for further detaiis regarding that device's input settings Note . How to page 64 See the external audio equipment instruction manual for MoniIor out. Connect the other end of the opticat cable to the digital audio (optS* caJ) input on the audio equipment. 3 Set the" 'r'_ Speaker option Off" in the AUDIO menu...
... the Operating ManuaJ of at_ optical cable to the TV Digi_l Audio (Optical) Output port. 2. Connect one end of the second TV or monitor for further detaiis regarding that device's input settings Note . How to page 64 See the external audio equipment instruction manual for MoniIor out. Connect the other end of the opticat cable to the digital audio (optS* caJ) input on the audio equipment. 3 Set the" 'r'_ Speaker option Off" in the AUDIO menu...

Owners Manual
Page 19
maticaily, support Plug & Play and then set the HDMItDVl Source Devices(1280 x 720p). if HDMi/DVI Source Devices not supported Auto HDMI/DW is _en, the Resolution is used. After reading in HDMIiDVI Source Devices using Display Data Channet(DDC) Protocol, EDID stored in DTV is setted, manually. ° To get the best picture quali#y, adjust the DVD Player or Set Top Box output resolution to 1280 x 720p. -To get the best picture quality adjust the PC graphics...
maticaily, support Plug & Play and then set the HDMItDVl Source Devices(1280 x 720p). if HDMi/DVI Source Devices not supported Auto HDMI/DW is _en, the Resolution is used. After reading in HDMIiDVI Source Devices using Display Data Channet(DDC) Protocol, EDID stored in DTV is setted, manually. ° To get the best picture quali#y, adjust the DVD Player or Set Top Box output resolution to 1280 x 720p. -To get the best picture quality adjust the PC graphics...
Owners Manual
Page 21
... connected Cable or poor cable connection, "NO SIGNAL" OSD display in HDMt/OVI Input, And tn case of, Video Resolution not supported TV SET output in HDMITDVI Source Device& _'INVALtD FORMAT' OSD display, Refer to the Manual of HDMI/DVI Source Devices or contact your service center. - ed on the TV SET screen for a long period of time, The fixed image may not fit to Screen, As shown the lower picture, press the Adjust button to adjust the screen...
... connected Cable or poor cable connection, "NO SIGNAL" OSD display in HDMt/OVI Input, And tn case of, Video Resolution not supported TV SET output in HDMITDVI Source Device& _'INVALtD FORMAT' OSD display, Refer to the Manual of HDMI/DVI Source Devices or contact your service center. - ed on the TV SET screen for a long period of time, The fixed image may not fit to Screen, As shown the lower picture, press the Adjust button to adjust the screen...

Owners Manual
Page 22
The TV Gui_ On _reen sy_em uses _tup information to set up TV Guide On Screen. Installation - VCR Front 22 P_sma TV VCR Rear Antenna Service VCR Front 2, C_le Service without a Cable Box VCR Rear ! Once you set up the TV according to manufacturer's instructions, you are ready to provide you with show listings and lineups in your area--which are updated several times a day, - cable box and digital cable servises as well as over-the...
The TV Gui_ On _reen sy_em uses _tup information to set up TV Guide On Screen. Installation - VCR Front 22 P_sma TV VCR Rear Antenna Service VCR Front 2, C_le Service without a Cable Box VCR Rear ! Once you set up the TV according to manufacturer's instructions, you are ready to provide you with show listings and lineups in your area--which are updated several times a day, - cable box and digital cable servises as well as over-the...

Owners Manual
Page 45
... TV Guide On Screen ® System continued < Schedu|e > = Schedule le_ you review, edit, or delete Record and Remind events that you can set previously. * With Schedume higMighted, press the Info button to display a Help screen. Tune to the Schedule Service _r. Owners Manual 4.5 opens a menu from which you set a Reminder for option& Go to _rvl_ Bar - doses the menu, changes no information, and returns to channel...
... TV Guide On Screen ® System continued < Schedu|e > = Schedule le_ you review, edit, or delete Record and Remind events that you can set previously. * With Schedume higMighted, press the Info button to display a Help screen. Tune to the Schedule Service _r. Owners Manual 4.5 opens a menu from which you set a Reminder for option& Go to _rvl_ Bar - doses the menu, changes no information, and returns to channel...
Owners Manual
Page 46
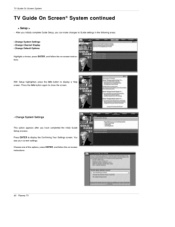
... dispiay a Help screem Press the [nfo button again to display the Confirming Your Settings screen. the initi_ Guide Press ENTER to close the screen, - Change System Settings This option appears after you can make changes to Guide settings in the following areas: , Change System Settings , Change Channel Display , Change Default Options Highlight a choice, press ENTER, and follow the on -screen instruc= tions. You see your cu trent settings. TVGuidOenScreeSnystem TV Guide On Screen ®...
... dispiay a Help screem Press the [nfo button again to display the Confirming Your Settings screen. the initi_ Guide Press ENTER to close the screen, - Change System Settings This option appears after you can make changes to Guide settings in the following areas: , Change System Settings , Change Channel Display , Change Default Options Highlight a choice, press ENTER, and follow the on -screen instruc= tions. You see your cu trent settings. TVGuidOenScreeSnystem TV Guide On Screen ®...

Owners Manual
Page 57
.../RGB!HDMI, OH (% -), Number (0 ~ 9) button on the remote control. Select the viewing source by using the TV, press the POWER button on the remote contre_ The TV reverts to standby mode, Notes: • If you turn TV on the TV, it was last set to the previous menu. This TV is programmed to remember which mode it takes time to standby mode. Press the I1_ button and then use A /V button to select Language...
.../RGB!HDMI, OH (% -), Number (0 ~ 9) button on the remote control. Select the viewing source by using the TV, press the POWER button on the remote contre_ The TV reverts to standby mode, Notes: • If you turn TV on the TV, it was last set to the previous menu. This TV is programmed to remember which mode it takes time to standby mode. Press the I1_ button and then use A /V button to select Language...

Owners Manual
Page 73
... and your password, key in '7', '7', '7_ '7' on the remote control. Then, press the i1_button * if Lock is selected, change the settings to other TV programs, Unless you ever forget your family do not w_tto view. sub menu, your children can set up b_ocking schemes to block specific channels, ratings_ and external viewing sources A password is required to gain access to this menu if the Lock System is turned on TV...
... and your password, key in '7', '7', '7_ '7' on the remote control. Then, press the i1_button * if Lock is selected, change the settings to other TV programs, Unless you ever forget your family do not w_tto view. sub menu, your children can set up b_ocking schemes to block specific channels, ratings_ and external viewing sources A password is required to gain access to this menu if the Lock System is turned on TV...

Owners Manual
Page 84
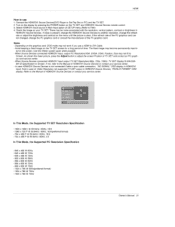
...][x] I 21. Tune Command (Command: I Data 0: White Wash off . Transmission I[k][y][][Set ID][ ][Data][Cr] I Data 0: Antenna 1 : Cable 2: Video 3: Front Video Acknowledqement I]y][][Set Ig][ ][OK][Data][x] I 84 Plasma TV 24. Orbiter Time Setting (Command2:r) • To adjust orbiter operation time term. Color Temperature (Command2:u) • To adjust color temperature. PIP Input Select (Command2:y) • To select input source for sub picture in the Video Transmission I[k][u]][S[et ID][ ][Data][Cr] I Data 0: Cool 1: Medium 2: Warm...
...][x] I 21. Tune Command (Command: I Data 0: White Wash off . Transmission I[k][y][][Set ID][ ][Data][Cr] I Data 0: Antenna 1 : Cable 2: Video 3: Front Video Acknowledqement I]y][][Set Ig][ ][OK][Data][x] I 84 Plasma TV 24. Orbiter Time Setting (Command2:r) • To adjust orbiter operation time term. Color Temperature (Command2:u) • To adjust color temperature. PIP Input Select (Command2:y) • To select input source for sub picture in the Video Transmission I[k][u]][S[et ID][ ][Data][Cr] I Data 0: Cool 1: Medium 2: Warm...

Owners Manual
Page 95
... time warranty vided. This warranty gives you specific legal rights and you . Your LG Plasma TV will be repaired or replaced in accordance with the terms of this warranty, at LGE's option, if it proves to be repaired or replaced with manufacturer's specifications, indicating that vary from state to state. ranty is pro- Your unit will be defective listed below, effective in the repair...
... time warranty vided. This warranty gives you specific legal rights and you . Your LG Plasma TV will be repaired or replaced in accordance with the terms of this warranty, at LGE's option, if it proves to be repaired or replaced with manufacturer's specifications, indicating that vary from state to state. ranty is pro- Your unit will be defective listed below, effective in the repair...
Owners Manual
Page 96
... owner's manual for power supply requirements) • installation or repair of batteries on consumer controls, or damage caused by improper adjustments • damage caused by the consumer. verters, cable company supplied equipment, or other components in a video system • set-up or adjustment on the remote control. • damage (including cosmetic damage), failure, loss or personal injury due to acts of warranted parts by independently owned and operated service...
... owner's manual for power supply requirements) • installation or repair of batteries on consumer controls, or damage caused by improper adjustments • damage caused by the consumer. verters, cable company supplied equipment, or other components in a video system • set-up or adjustment on the remote control. • damage (including cosmetic damage), failure, loss or personal injury due to acts of warranted parts by independently owned and operated service...


